with Aeroclub plastic fuselage, vac-form canopy and resin intakes and Xtradecals decals
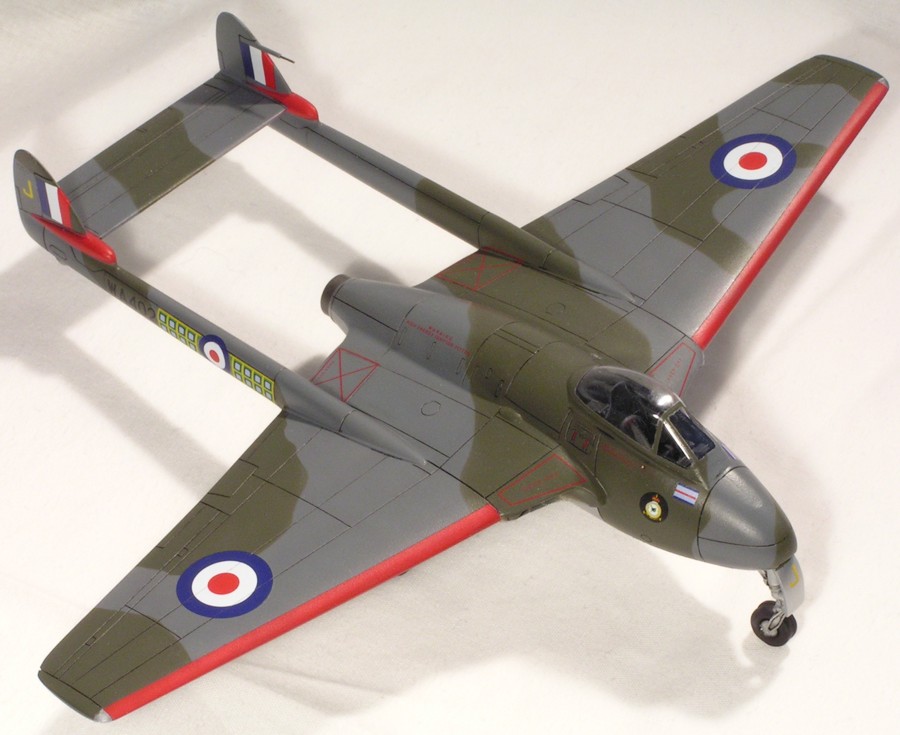
612 Squadron, Royal Air Force, United Kingdom 1954

Following hot on the heels of the Classic Airframes Attacker is this Vampire FB.5 (and T.11) from the same manufacturer. These kits were presents from my wife for Christmas 2004 and 2005 respectively, and were completed in a bit of a rush before we disappeared off to China. Hence they are not as well finished or photographed as the Attacker, but better to have them completed rather than left behind half-done.
I don’t think any models in my collection have consumed as much filler or sanding time as these little Vampires. The only exception would be the Javelin, but then that is a vac-form! That’s not to say these are bad kits, but it would take a lot of motivation for me to build another. To the single-seat fighter-bomber I made a lot of changes and additions, which didn’t help the overall build time. These included:
- Aeroclub injection moulded fuselage. This was to correct the inaccurate kit version, and worked well. The main problem was that the plastic peeled when sanded, in the same way that skin peels. This made getting a smooth plastic surface difficult. In the end I sanded it as smooth as I could and then coated in liquid cement to get the edges to blend in.
- Aeroclub vac-form canopy. This came with the fuselage and fitted well.
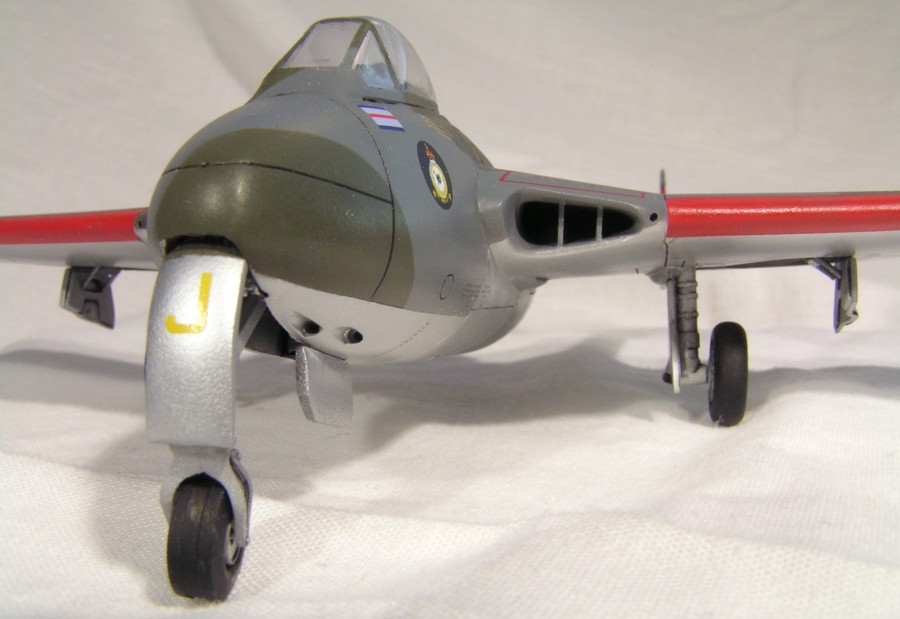
- Aeroclub resin intakes. The kit intakes are very poorly shaped and these from Aeroclub were much better. Holes needed to be drilled in the leading edge outboard of the intakes, and they protrude too far forward from the leading edge of the wing. The intakes fitted okay, but were too thick and had to be sanded down substantially to match the thickness of the wing.
- Brass tubing was used to replace the kit supplied jet exhaust.
- The wingtip navigation lights were cut out and replaced with clear plastic. Photos seem to show that these were not coloured, so I left mine clear.
- The tail mounted pitot was replaced with brass tube and wire.
- Xtradecals decals were used to replace the uninspiring kit decals.
- I rescribed the entire kit so it would hold an oil wash.
In light of all these modifications, it was unsurprising that the wings fitted very poorly to the fuselage; they were too thick. I used Milliput to build up the wing root thickness on the fuselage. I don’t know if this problem also affects the kit when the supplied fuselage is used, rather than the Aeroclub aftermarket version. Fit of most fuselage joints is poor — the gun/nosewheel well needed plenty of filler around the edges (and the gun holes drilling out); the fuselage seam had substantial gaps and the underfuselage insert was not a good fit. By contrast, the wing halves and tailbooms all fitted together very well. I constructed the entire tail assembly as a single unit and then attached it to the wings (which had already been attached to the fuselage). This ensured everything was square. I found the boom to wing fit to be very good.
In terms of detail, the really weak point of these Vampire kits is the poorly detailed landing gear. The mainwheels are nice, but nothing else is. The noseleg, in particular, is not well engineered and has in my case resulted in an asymmetric structure. One mistake of my own making is that I neglected to remember that the centre of gravity is a direction, not just a location. Therefore, whilst I had ensured that there was enough noseweight to keep the tail up if the fuselage is horizontal, I had not realised that the Vampire had a significant nose-up attitude. Fortunately, the rear bulkhead at the end of the exhaust had come adrift and I was able to drop bits of lead into the fuselage to balance things up.
I ended up having to paint, decal and finish up this kit (along with the T.11) in a week — using enamels as well (no acrylics for me!). I painted the canopy black and then primed with Halford’s primer. This was rubbed down and the Alclad II White Aluminium sprayed on the undersides. This was masked and followed by Humbrol Insignia Red, Xtracolour Dark Sea Grey and then Dark Green. Johnson’s Klear was used as a protective barrier, the masking removed and an oil wash applied to the entire airframe. Decals followed, a mixture of Xtradecals and the kit supplied stencils, all settling down wonderfully. In the rush I neglected to put an oil wash over the decals before applying a 50/50 mix of Xtracrylix Matt and Satin varnishes to the camouflaged upper surfaces. I emphasized the panel lines over the decals with a propelling pencil, but I’m annoyed that there is a mismatch with the surrounding airframe. The other really annoying aspect of the finished model is that the canopy was less than brilliantly cleaned and masked. Oh well, at least it’s done and I can add this attractive little plane to the collection.


Year bought: 2004 (Hannants)
Year built: 2006 (St Ives, Cambridgeshire)
Back to home.
