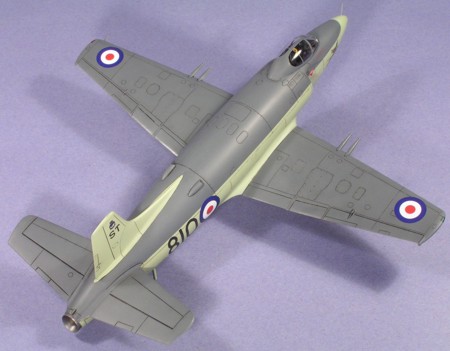
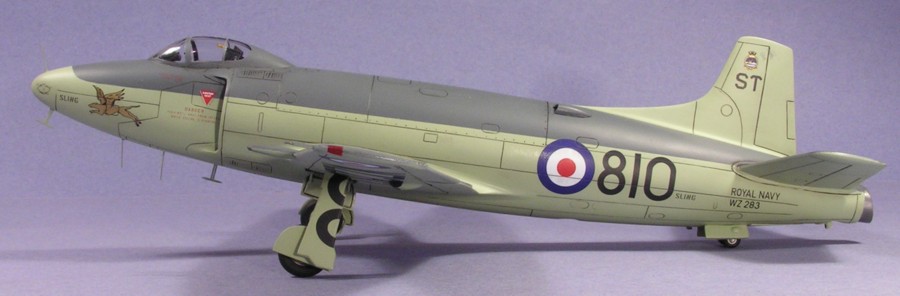
1831 Naval Air Squadron, Royal Navy Volunteer Reserve, UK 1955

The first Classic Airframes kit to appear in this list — and the second injection moulded limited-run kit. It’s a great model and I really enjoyed building it. First things first. Although it’s great, it does need some fine-tuning. I replaced the wing pitot tube with brass wire and tube, and only put one on the port side since no photos I have of an Attacker show one on the starboard wing (so ignore the instructions). The build up of this kit on Cybermodeler indicates that the fuselage panels just inside the intakes are shown backwards in the instructions — the ‘lump’ should face forwards not backwards. I could not confirm this with photos of the real thing (the intake apertures are actually very narrow and you can’t even see the kit supplied engine face) but reversed the parts anyway. One last point of accuracy is the tail wheel doors. Many photos of operational Attackers appear to show that taildoors were often not fitted. I added them anyway. Finally, do note that the undercarriage is much simplified over the real thing, no catapult hooks are supplied (and I didn’t rectify that) and the resin cylinders on the tips of the gun barrels should be removed. An F.1 cannot be built without some modification of the canopy (which should be straightforward since the frame lines are so faint) and the gun barrels (the appearance of which varies widely from aircraft to aircraft). One other small modification was the addition of a large bolt head to the centre of each tailwheel.
As I have said, this is a great model. The cockpit is quite well detailed but, with the exception of the seat, it is no better detailed than your average modern standard kit — especially the instrument panel which is quite crude. No matter — the whole lot is painted black and not terribly visible. The cockpit fits extremely well, as do the fuselage halves around it. Make sure, however, you join the front and rear parts together first, and then the complete halves together. There is a large but level gap on the starboard side of the tail, but it is easily dealt with using superglue as a filler.
The fit in other areas is less than good. The worst offender is the resin tail section which is undersized. This took me a long time to fix with plastic card, superglue and Mr Surfacer. The tailplanes and wings fit well with no steps, but with some gaps that were again easily filled with superglue. I glued the flaps up which definitely means more work as the fit is quite sloppy in these areas. The gun inserts are not a great fit, being too thin for the wing. I rescribed most of the kit as the panel lines were inconsistent in depth and didn’t look like they would hold a wash under a few coats of paint.
Once I had a complete airframe I masked the canopy (not easy given the lack of defined frames and the complex shapes involved) and used Halfords primer (having painted the outside of the canopy frames with Citadel black first). I must remember not to use the primer on the canopy next time since the thickness of the paint leaves an unsightly edge that cannot easily be removed once the masking comes off. The jet exhaust was painted with Alclad II Steel and then the Extra Dark Sea Grey (Xtracolour) was sprayed on. Once masked, Xtracolour Sky was misted on in two sessions and then masked for the main wheel bays to be painted Interior Green and the tailwheel bay Zince Chromate Yellow. All the undercarriage pieces were also painted Sky. The use of Xtracolour has fully converted me to this manufacturer following my recent disappointment with Humbrol paints. I thin them using Humbrol thinner and the coverage is amazing.
Once coated with Johnson’s Klear, an oil wash was applied and the decals added. These were wonderful and now hold the accolade of ‘Best Decals I Have Used’ — absolutely no carrier film visible and no silvering at all. Since they are printed by Microscale I used their decal solvents. The only difficult bit was trimming the underwing serials to fit the undercarrriage doors and the lumps on the wing. All the small bits were then attached. It’s worth noting all the undercarriage doors fit really well, but the outmost main gear doors splay out too much due to their thickness. The wheels are extremely frustrating — the hubs are moulded off centre. Not a lot one can do about that.
Then came the flat coat. I was trying to find a replacement for my much missed Pollyscale flat/satin finish (since it appears to be unavailable in the UK now). I tried Vallejo acrylic, again mixing the flat and satin varnishes 50/50 and thinning with water. It all went really well, spraying smoothly, drying quickly and giving a lovely sheen. However, on (very) close inspection there are quite a lot of tiny white flecks embedded in the varnish. They are only visible if you look closely. I have no idea if they are due to the varnish drying in the airbrush and being sprayed onto the plane, or if they are from the paint jars. I will try straining them next time to see if that makes any difference. So close, yet so far…
So there it is. Quite pleasing — smooth paint, perfectly applied decals, and no seams visible anywhere. Two big areas of disappointment: the buildup of paint on the canopy frames and those tiny white flecks in the clear coat. But well done to Classic Airframes for a great kit to produce a really unique looking model and I look forward to building their other kits in the stash.


Year bought: 2005 (Hannants, Lowestoft)
Year built: 2006 (St Ives, Cambridgeshire)
Back to home.
