with Eduard resin seats and wheels, Quickboost resin tail tip and LAU-7 launchers, Hypersonic resin centreline pylon and Meridia-Hobby decals
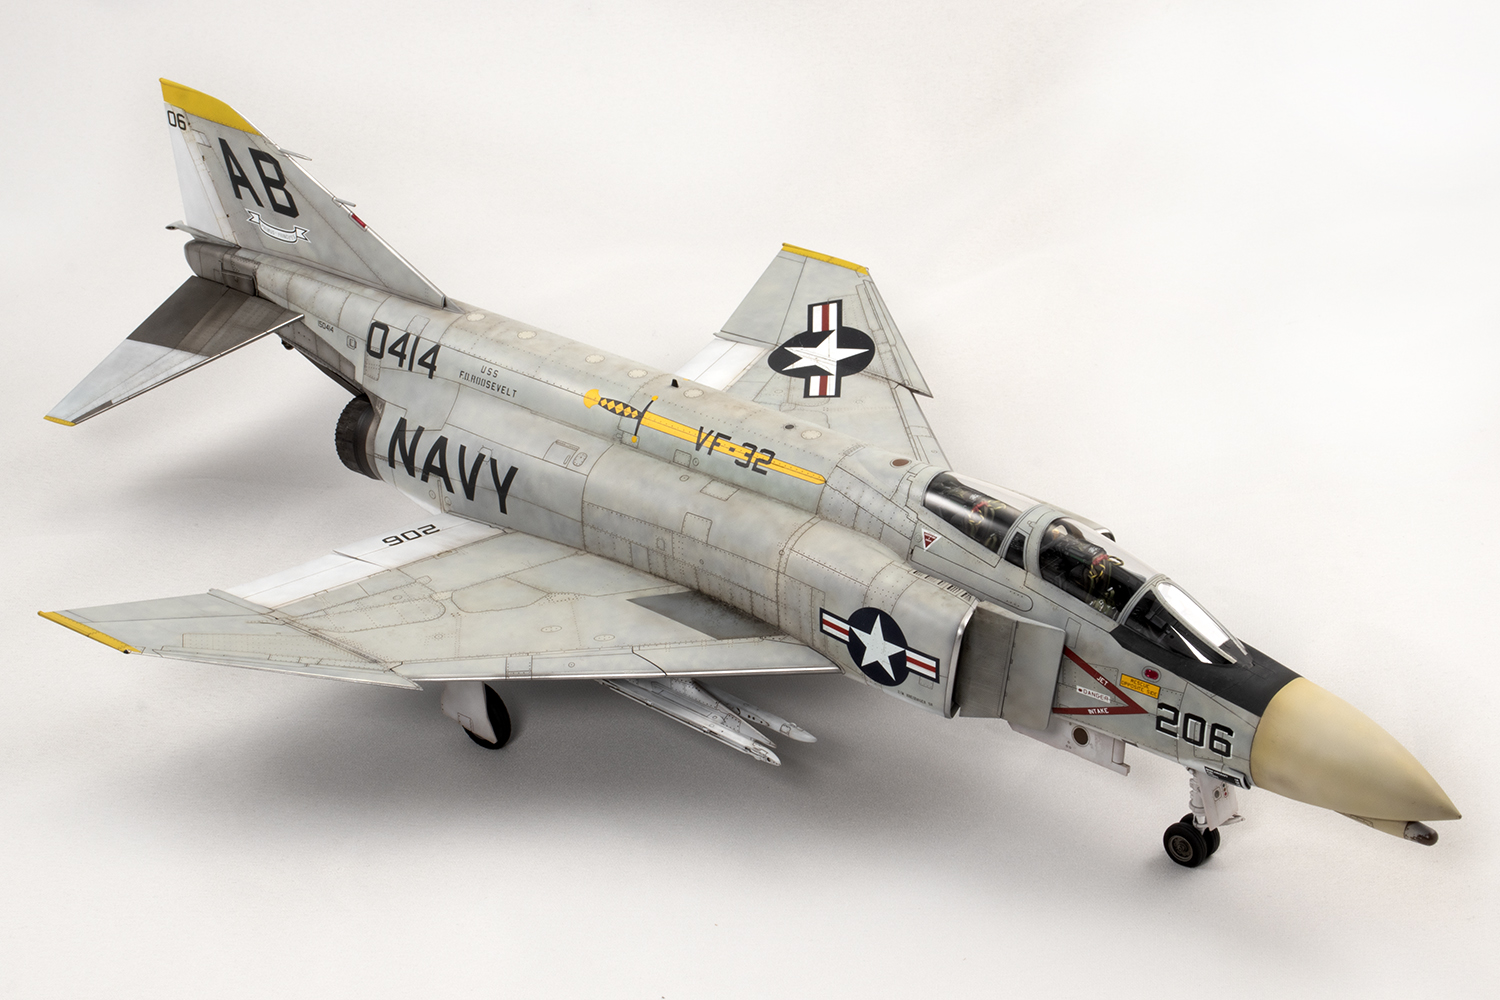
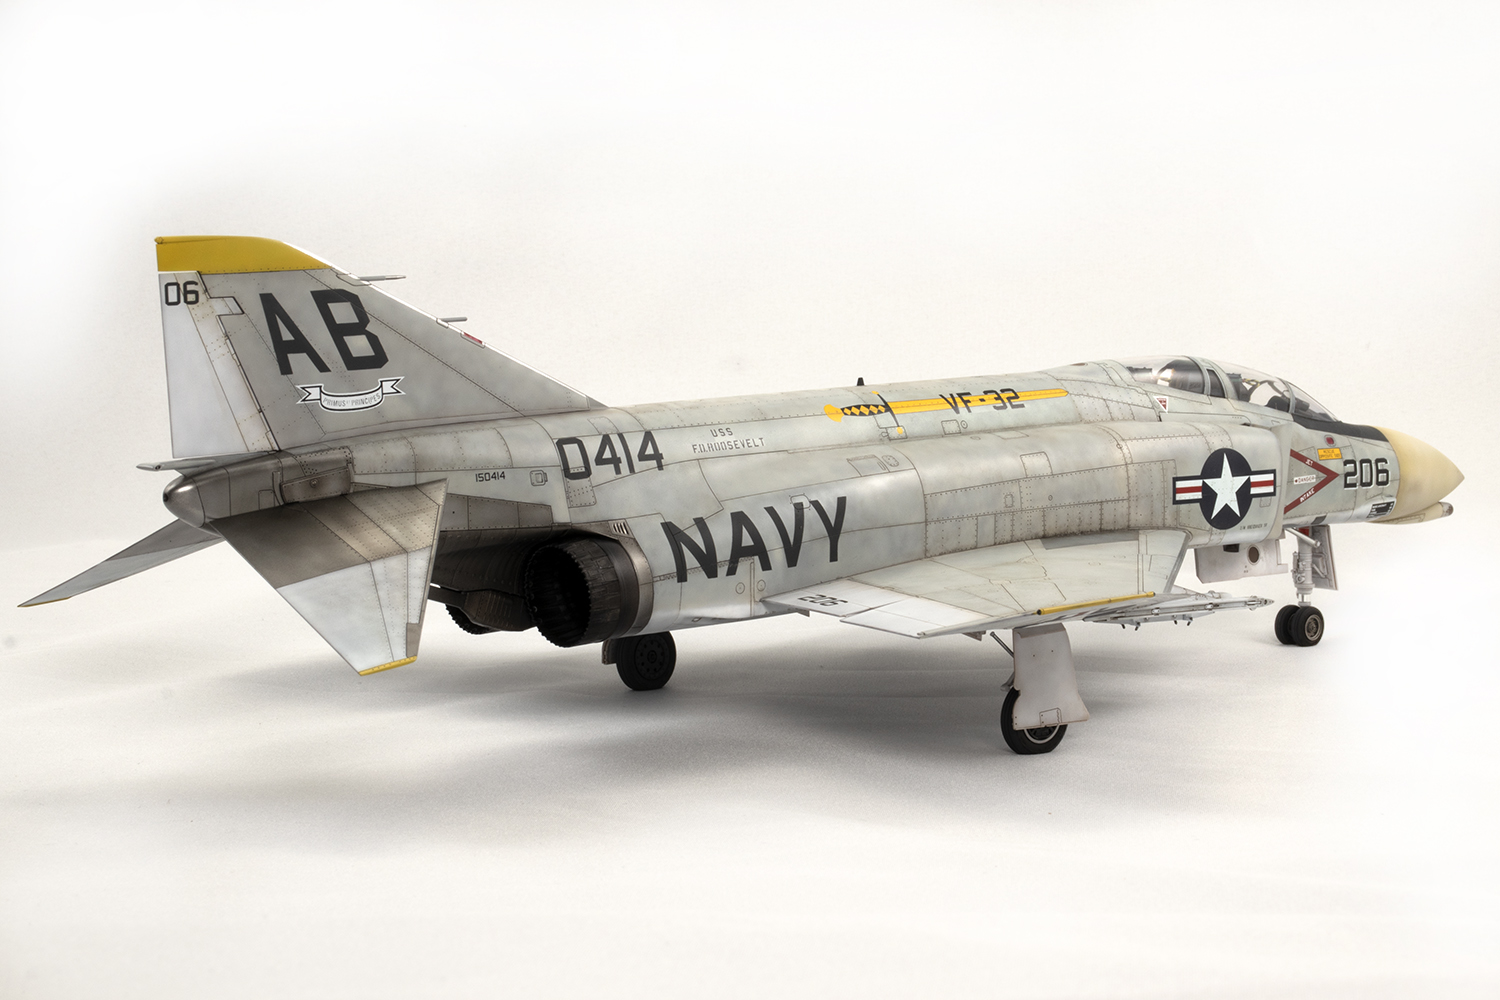
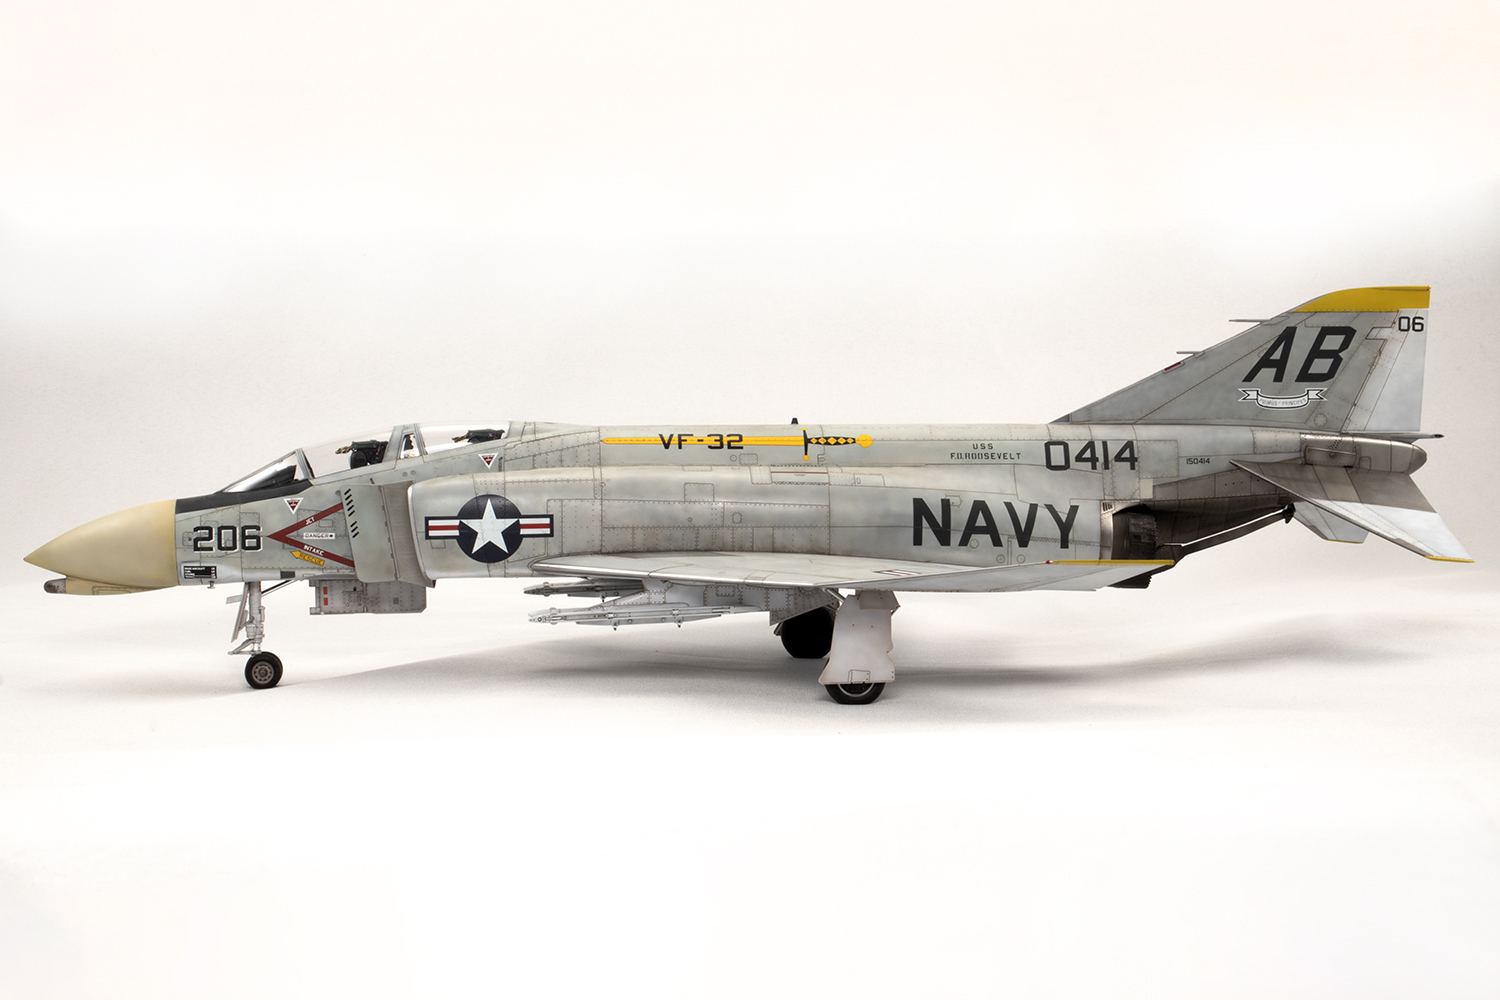
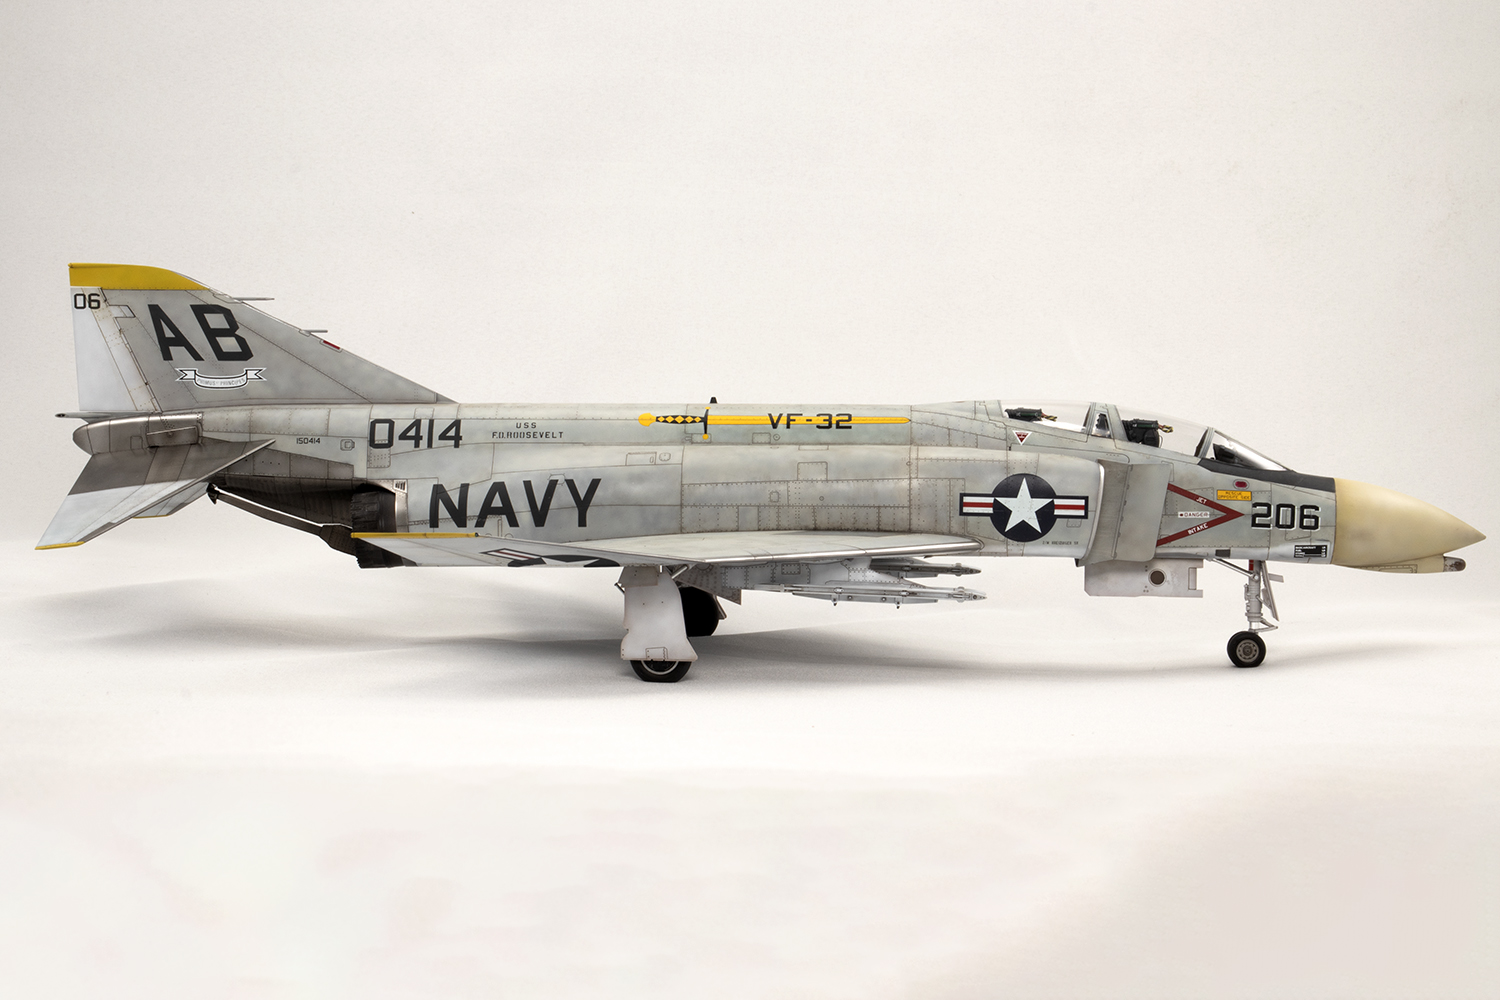
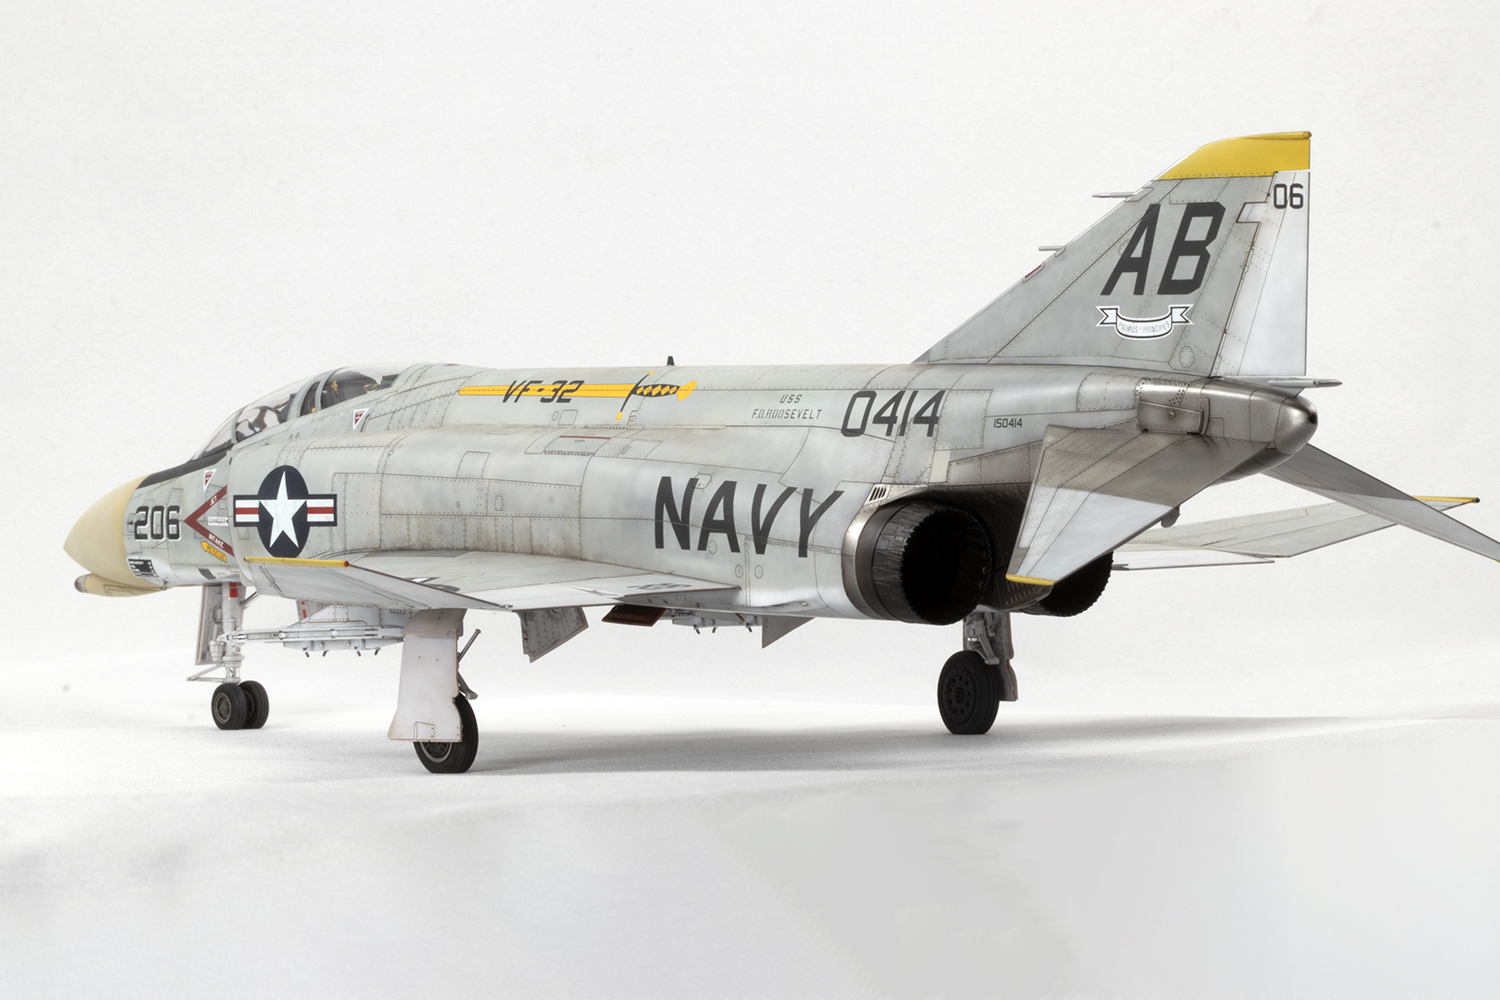
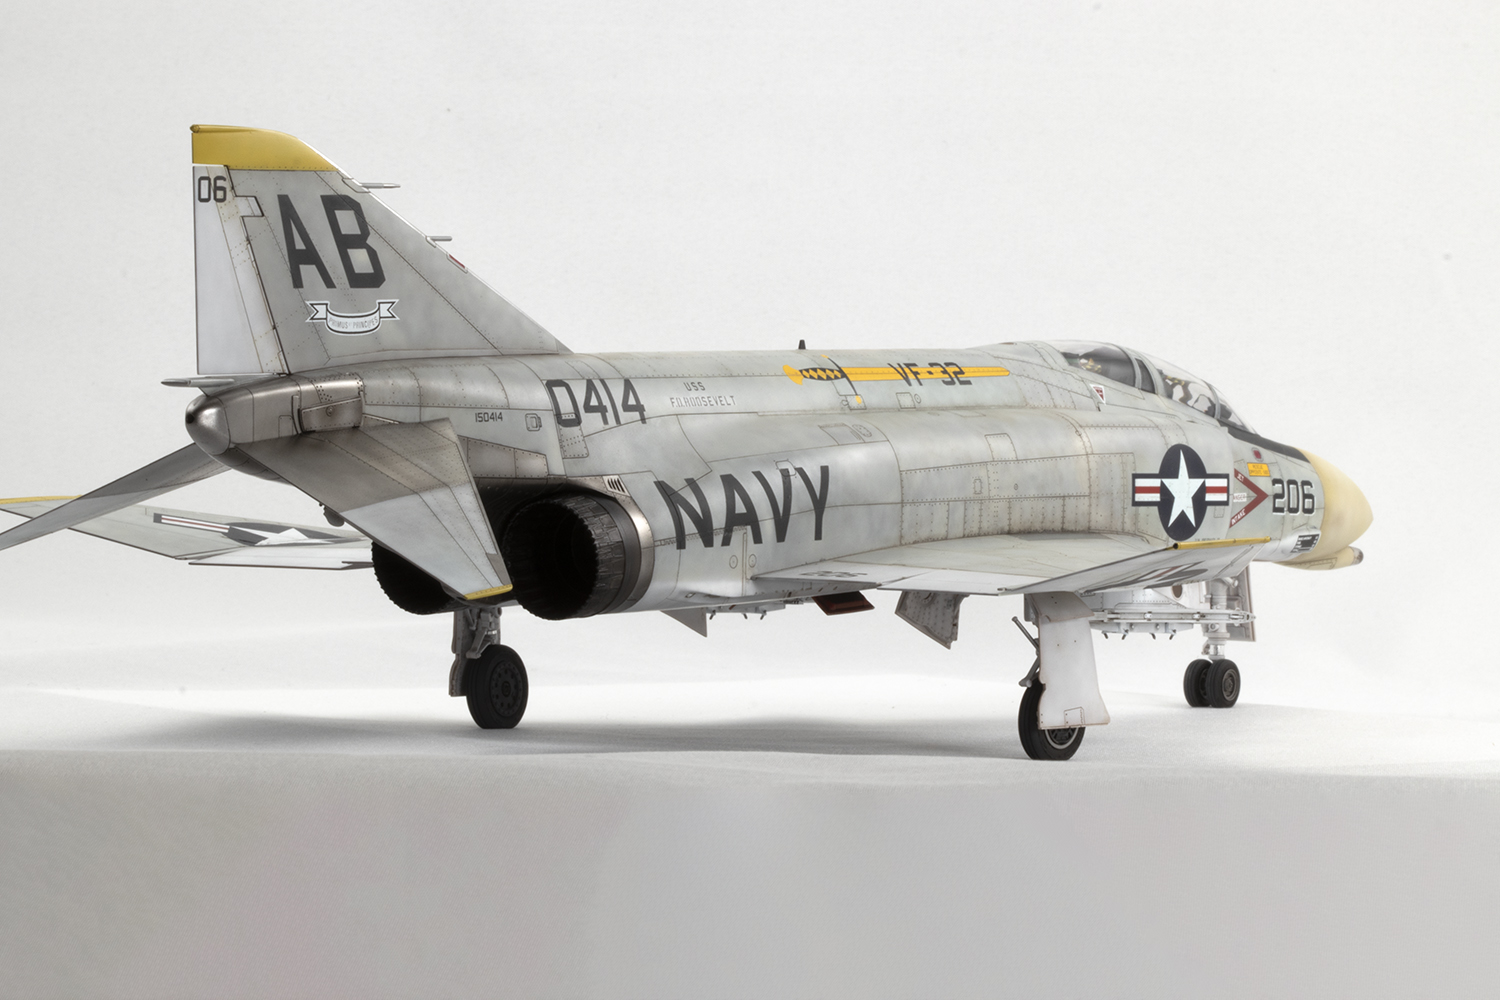
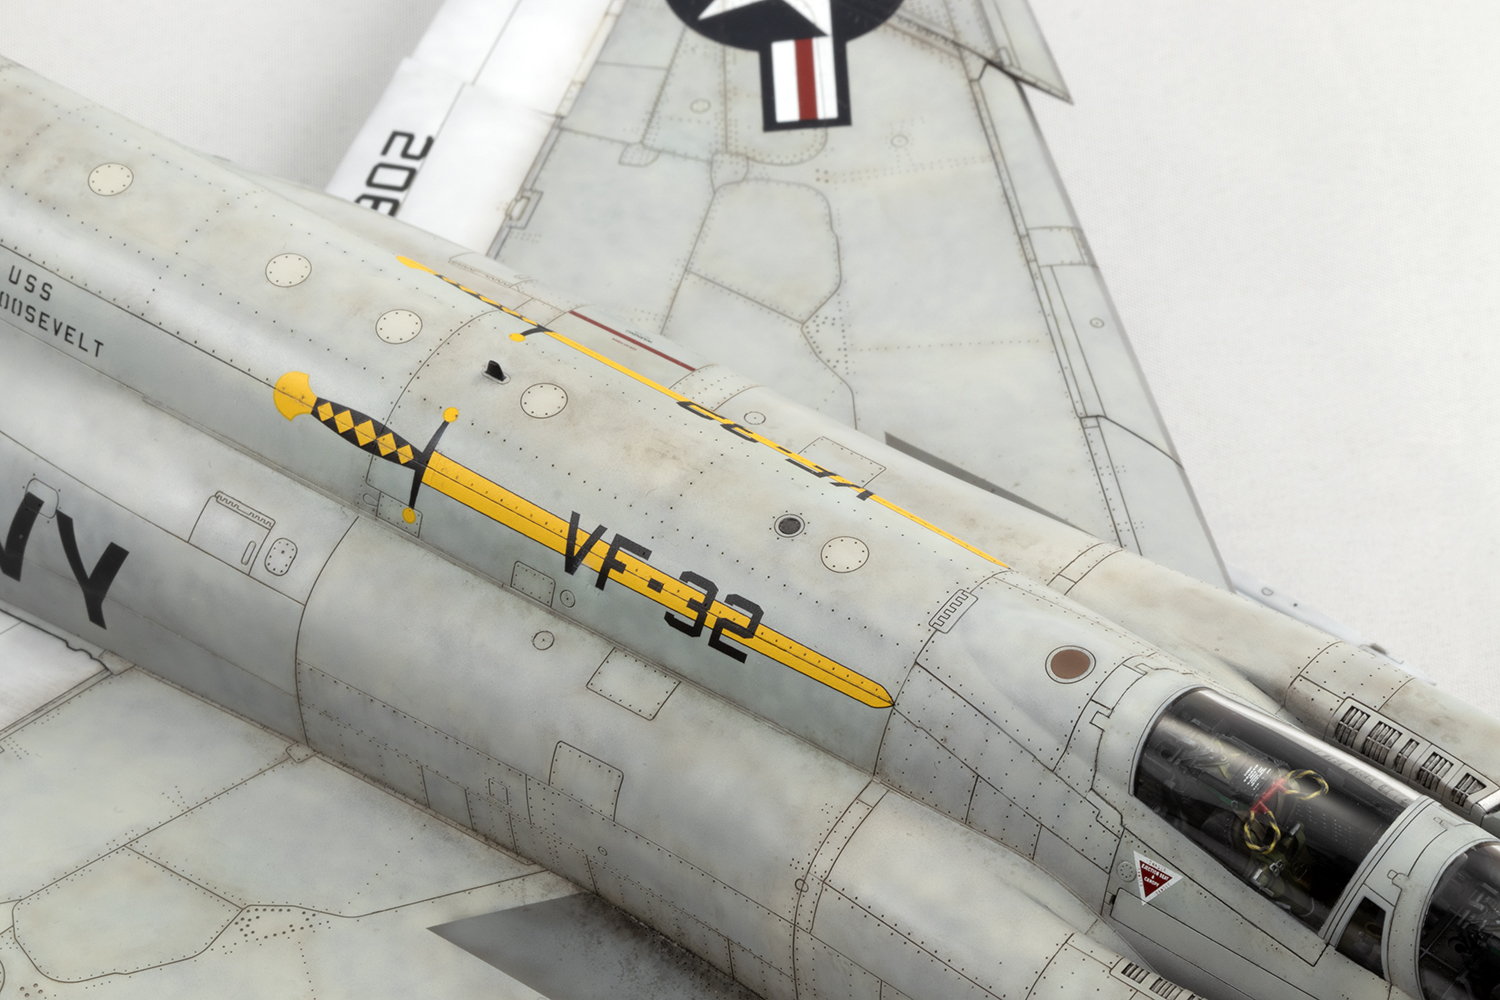
VF-32 ‘Swordsmen’, US Navy, USS Franklin D. Roosevelt 1966

For ages the F-4B was the fighter version of the Phantom II unloved by model manufacturers, at least in 1/48, and then Tamiya released this kit in 2021 and catapulted it onto many model makers’ benches. And what a kit it is. Most instructions would have you start with the cockpit, but not Tamiya. Oh no, they have a better gateway drug to suck you into this model: fuselage inserts. You know, those optional panels which usually make your heart sink when you see them: will they sit flush? Will they be too big? Too small? They always are, but not here. Here they fit so perfectly it’s magic. And once you start gluing parts into place it’s so satisfying that it’s hard to stop, and before you know it you’ve cut loads of pieces off the sprues and stuck them together because it’s just So Good. Clever Tamiya, clever.
I am not a fan of the arbitrary distinctions made popular in modelling discourse between ‘assemblers’ and ‘modellers’, nor of the moniker ‘shake and bake’ kit. In my view, it doesn’t matter how good the kit is, it still needs modelling well; anything less is often painfully obvious. Having said that, better kits do make life easier, and this is definitely a ‘better kit’, and one to be rejoiced in.
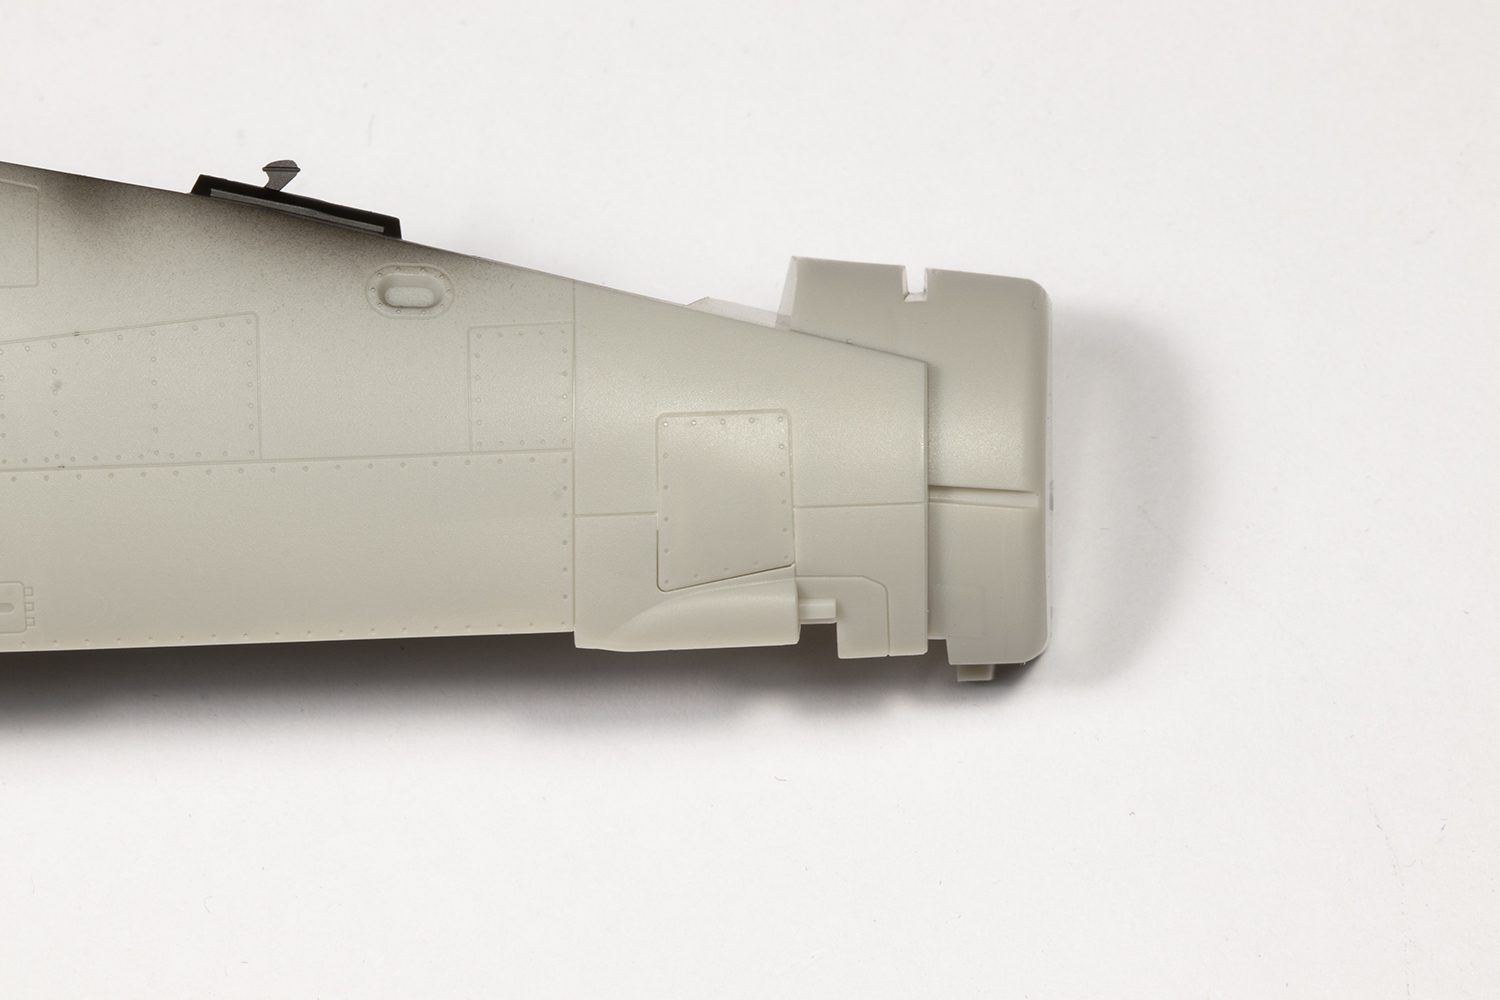
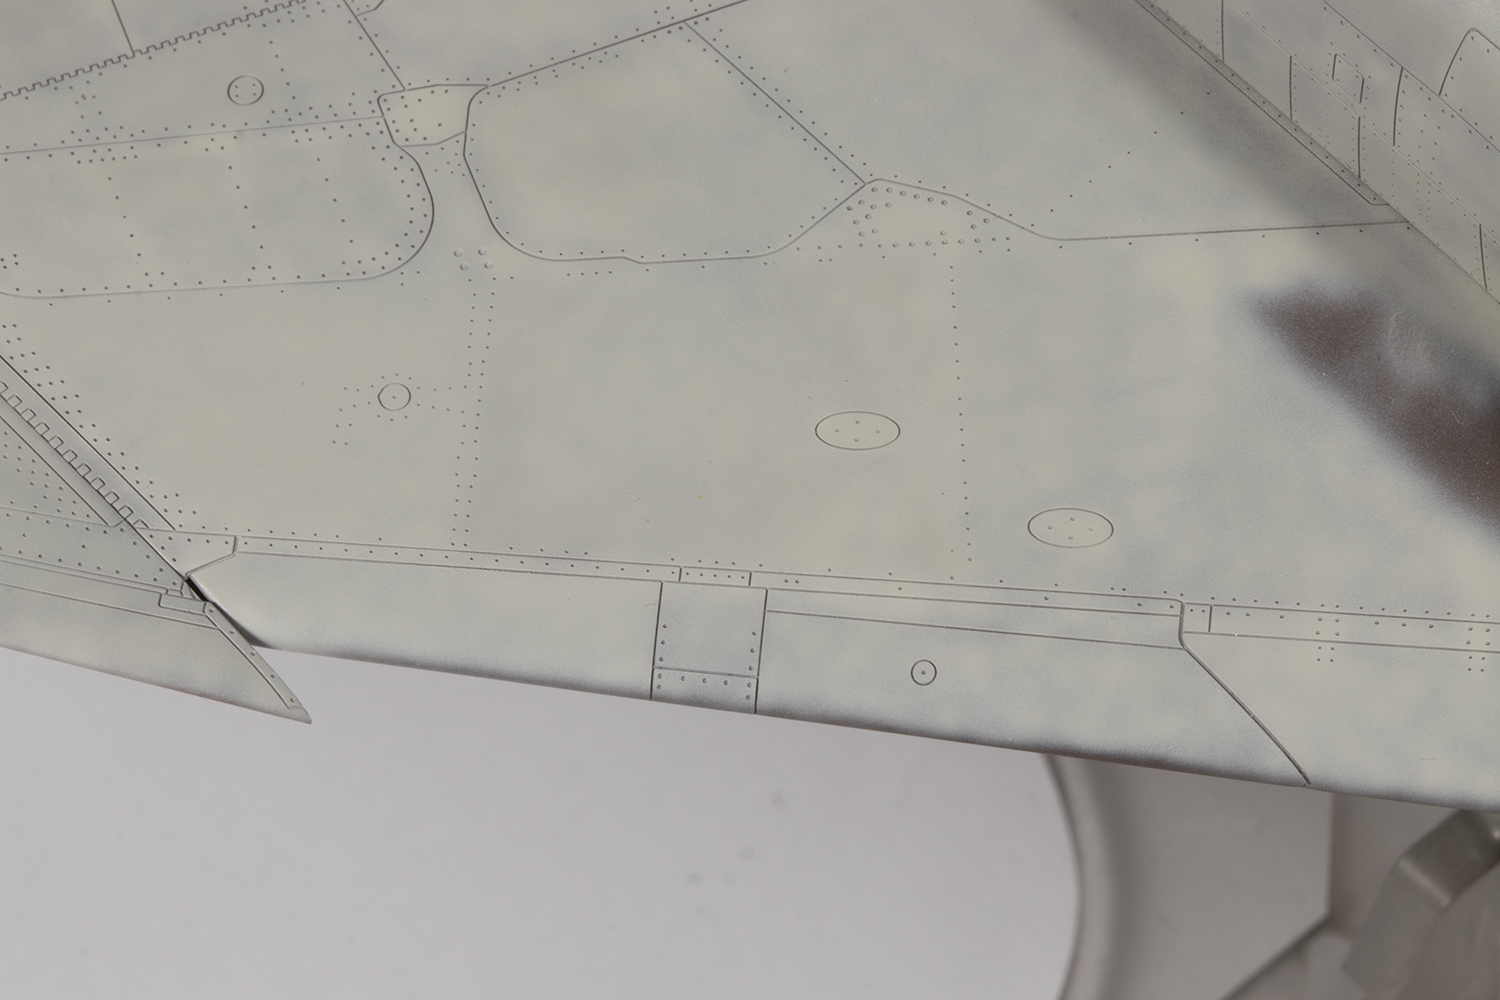
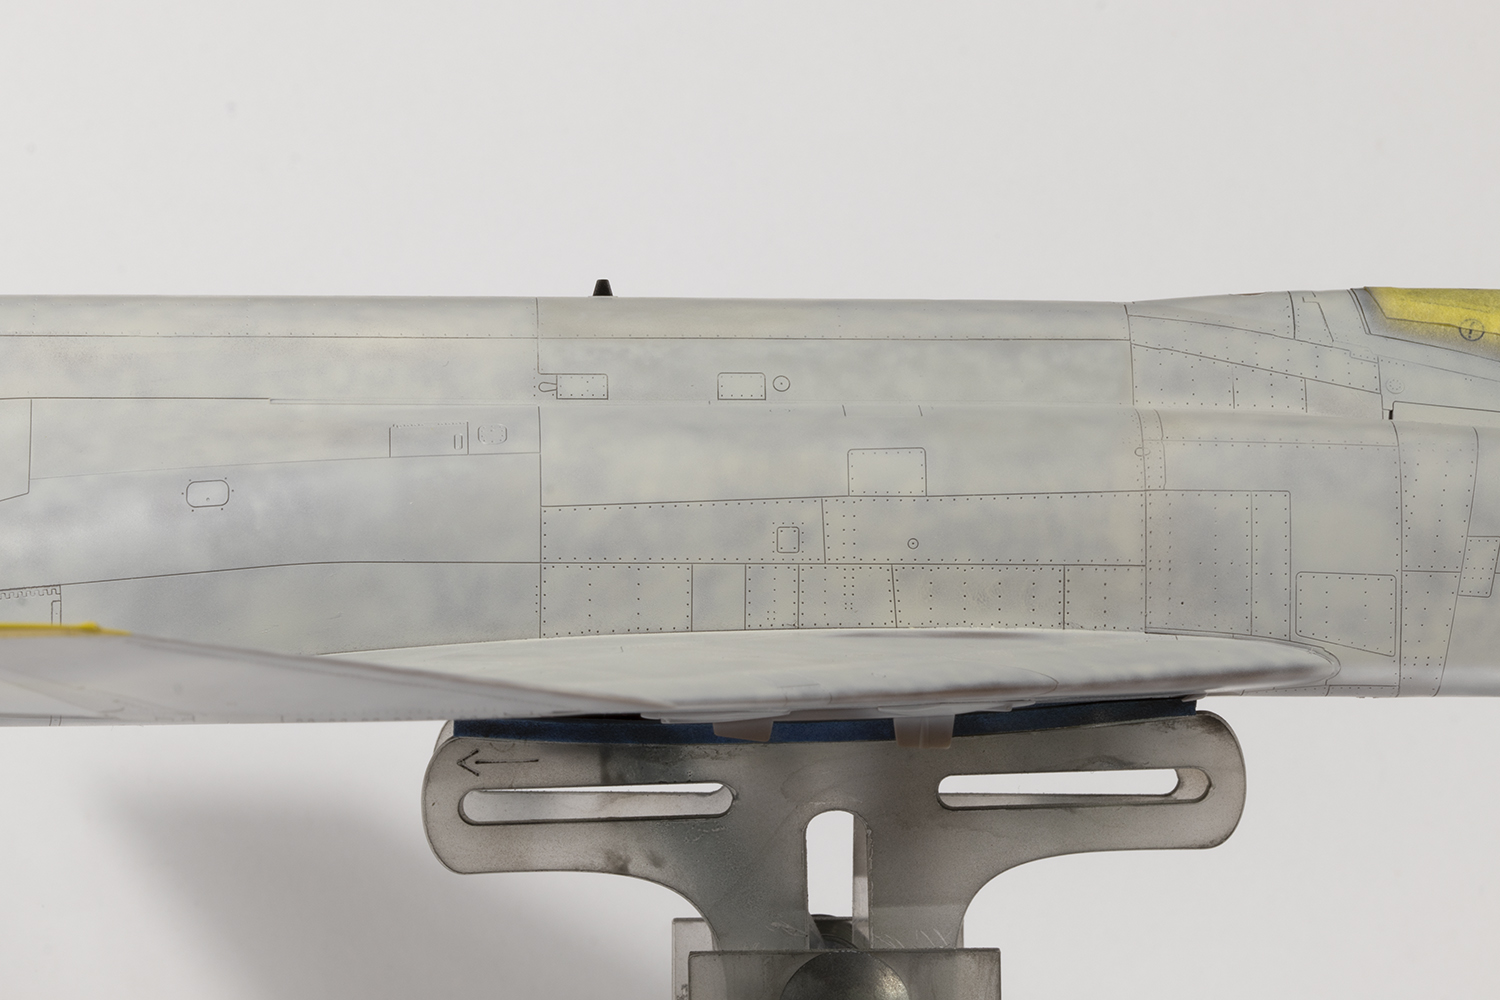
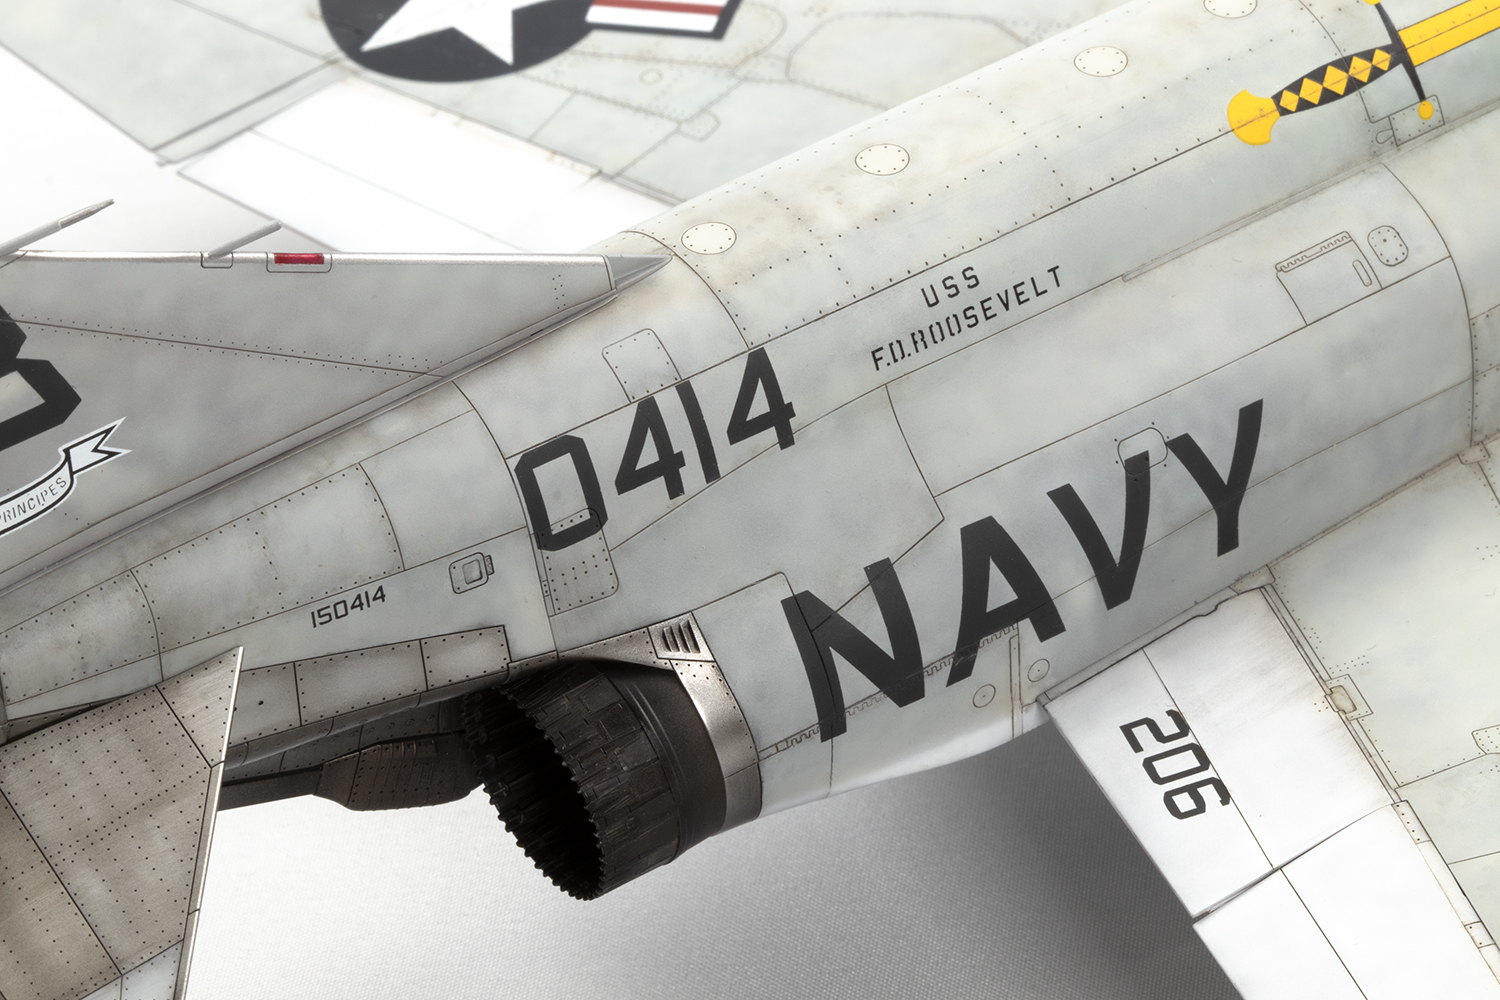
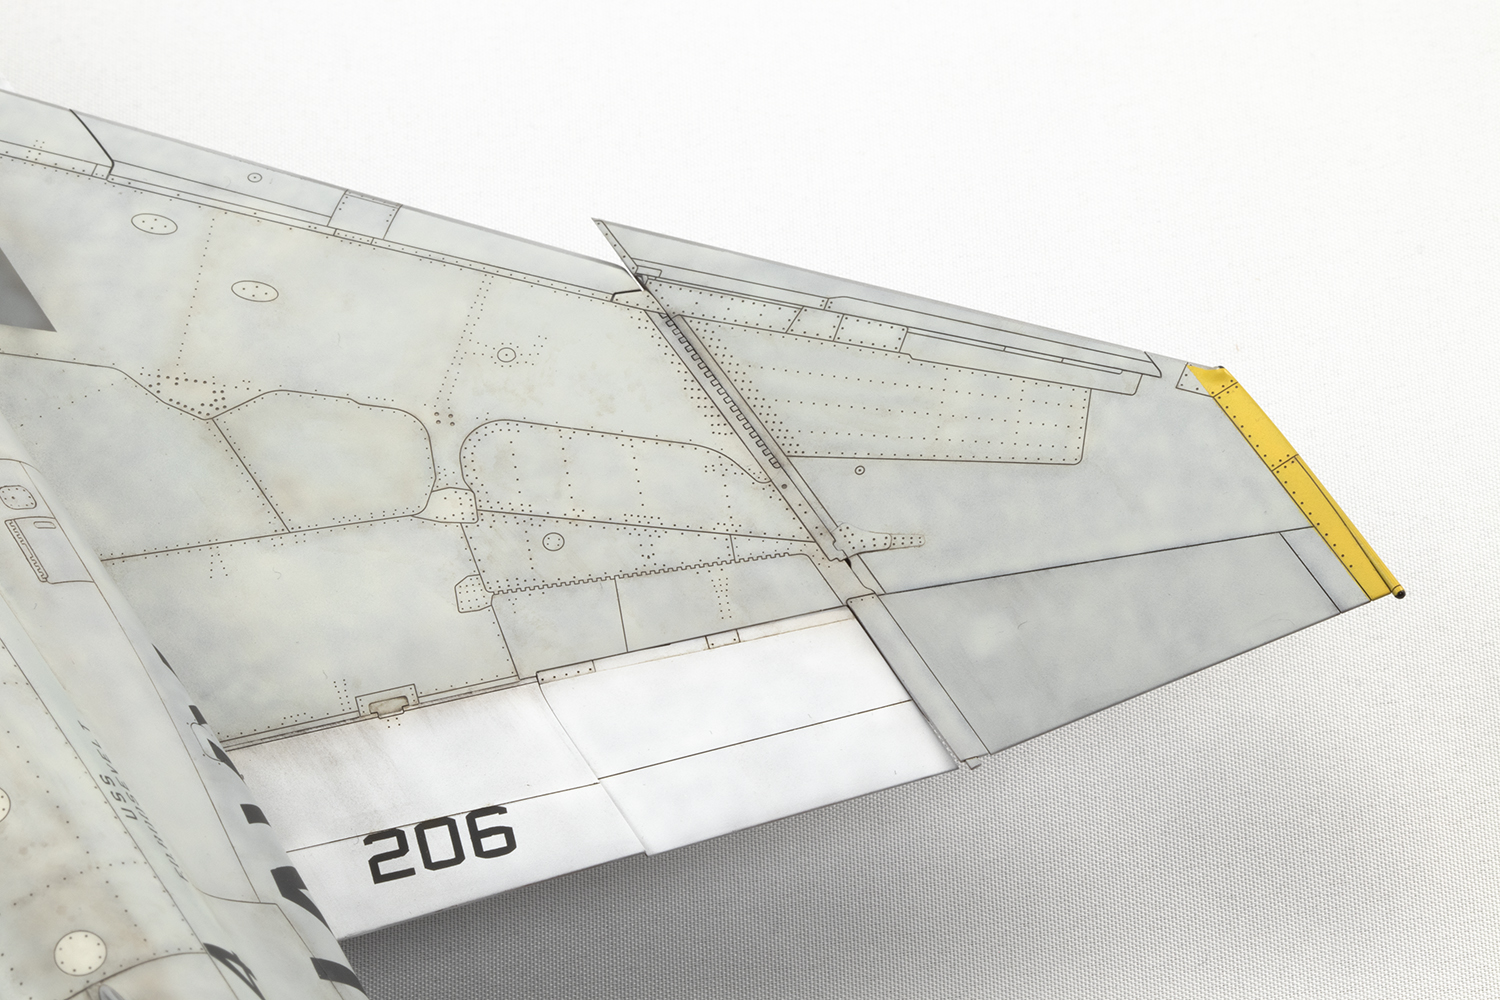
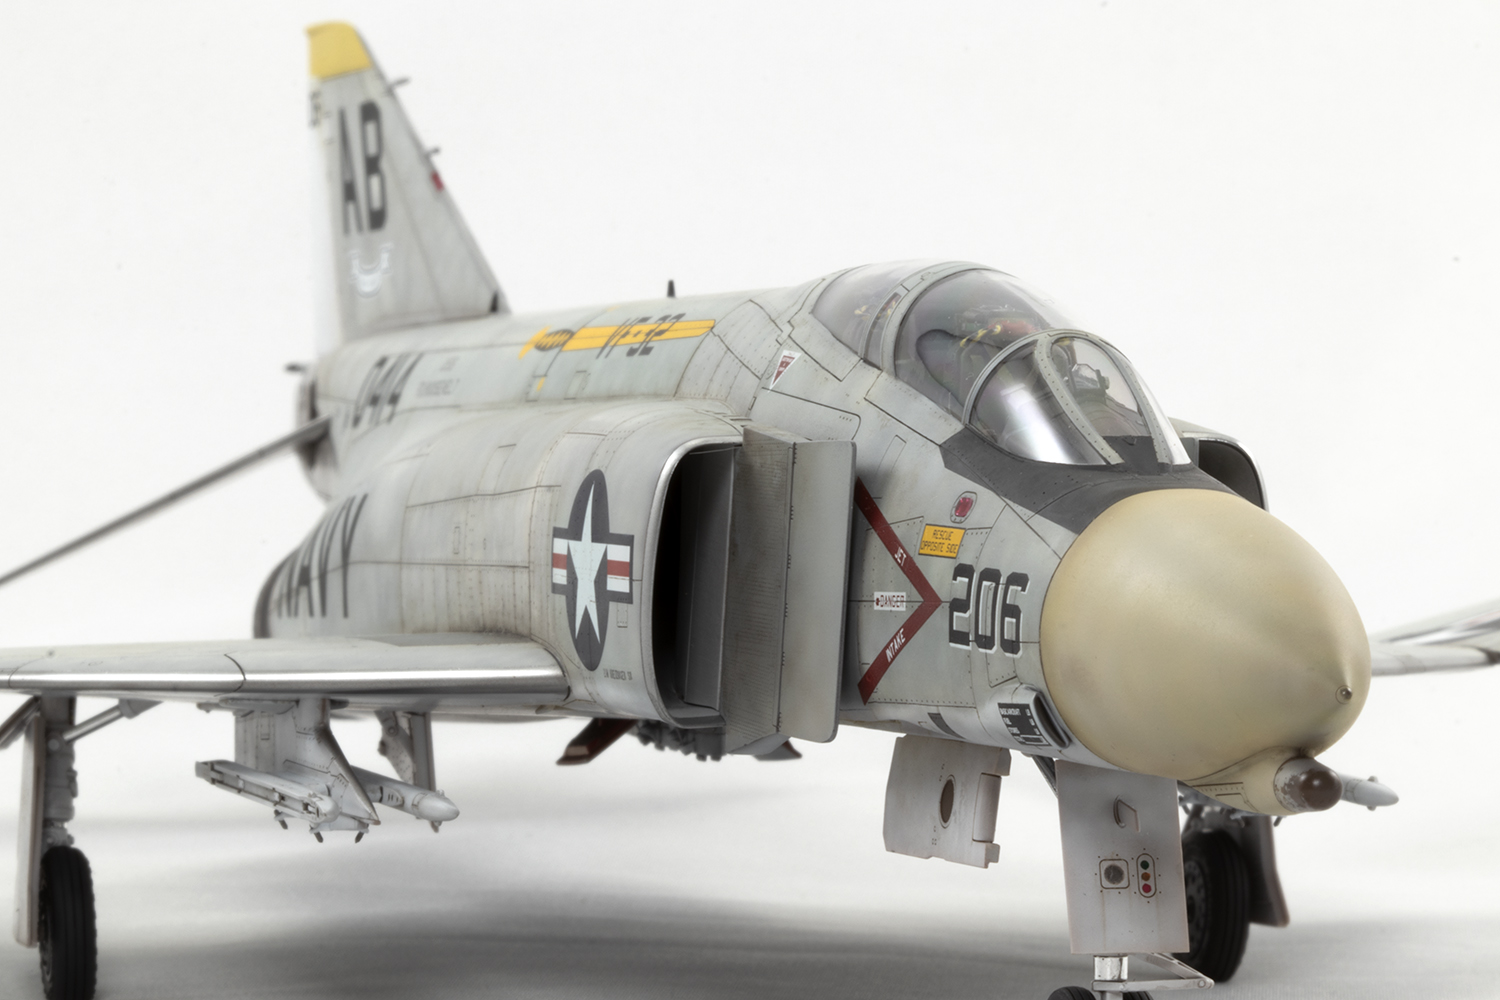
The F-4B was the first operational version of the Phantom II and saw a fair amount of development during its service with the US Navy and Marines. This manifested itself in various ECM warts it sprouted on the fuselage and wings, a change of tailplanes, landing gear leading bulges on the upper wing, three different fin caps, several kinds of undernose pod, more and more blade antennae and newer ejection seats. Remarkably, Tamiya cater for all of these except the fin tips, nose pods and ejection seats; the first is a strange oversight as they moulded the least common of the three.
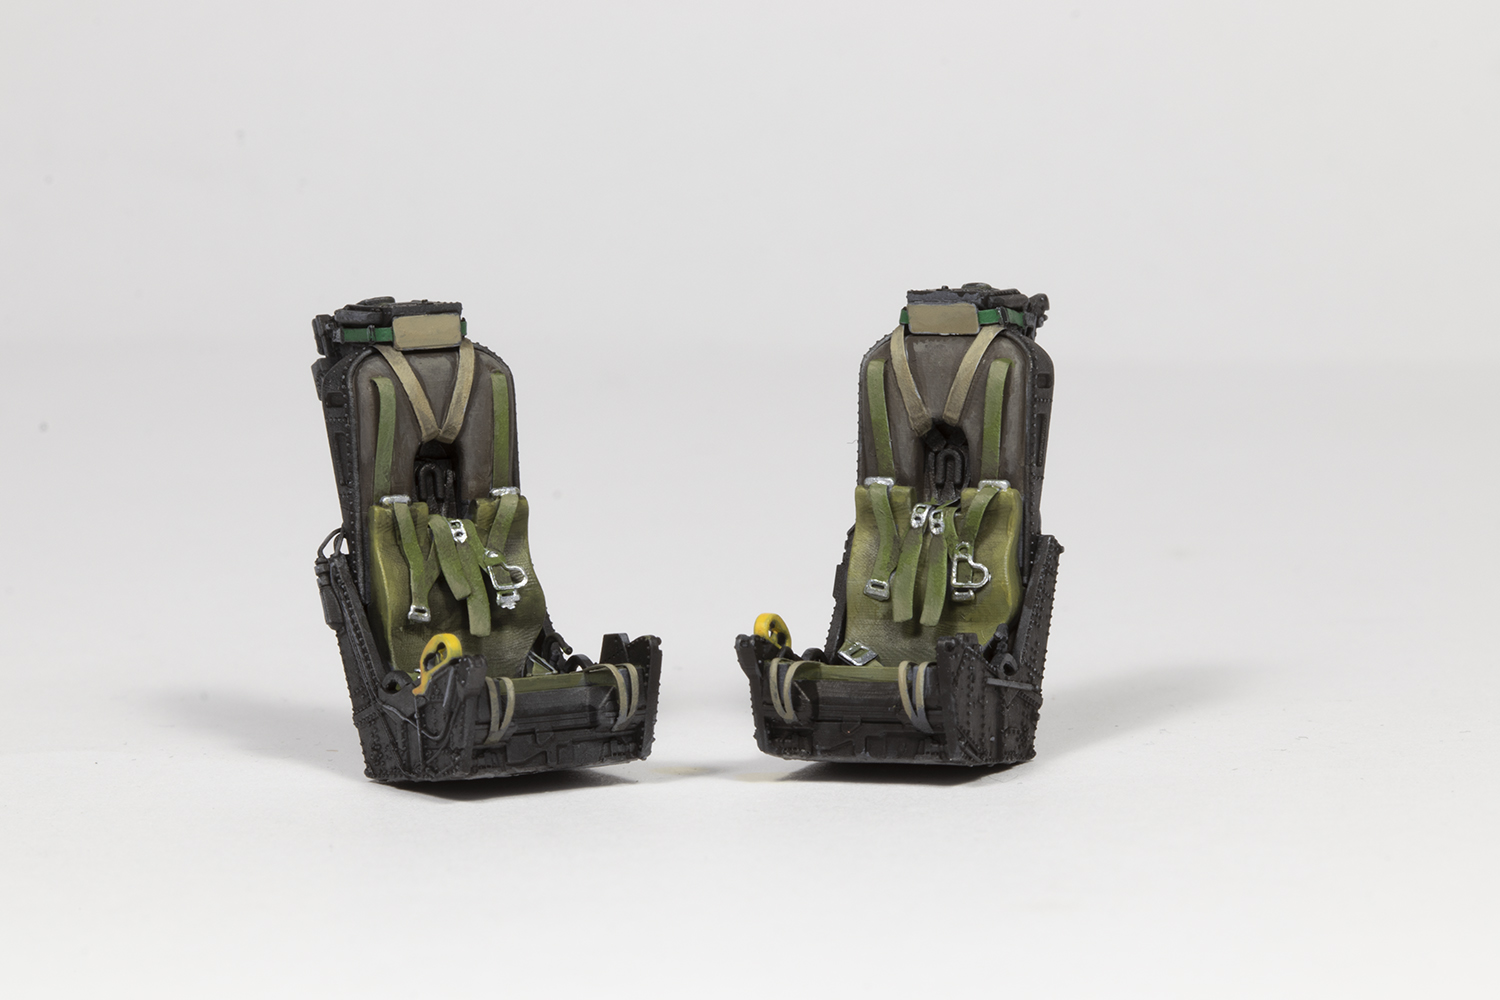
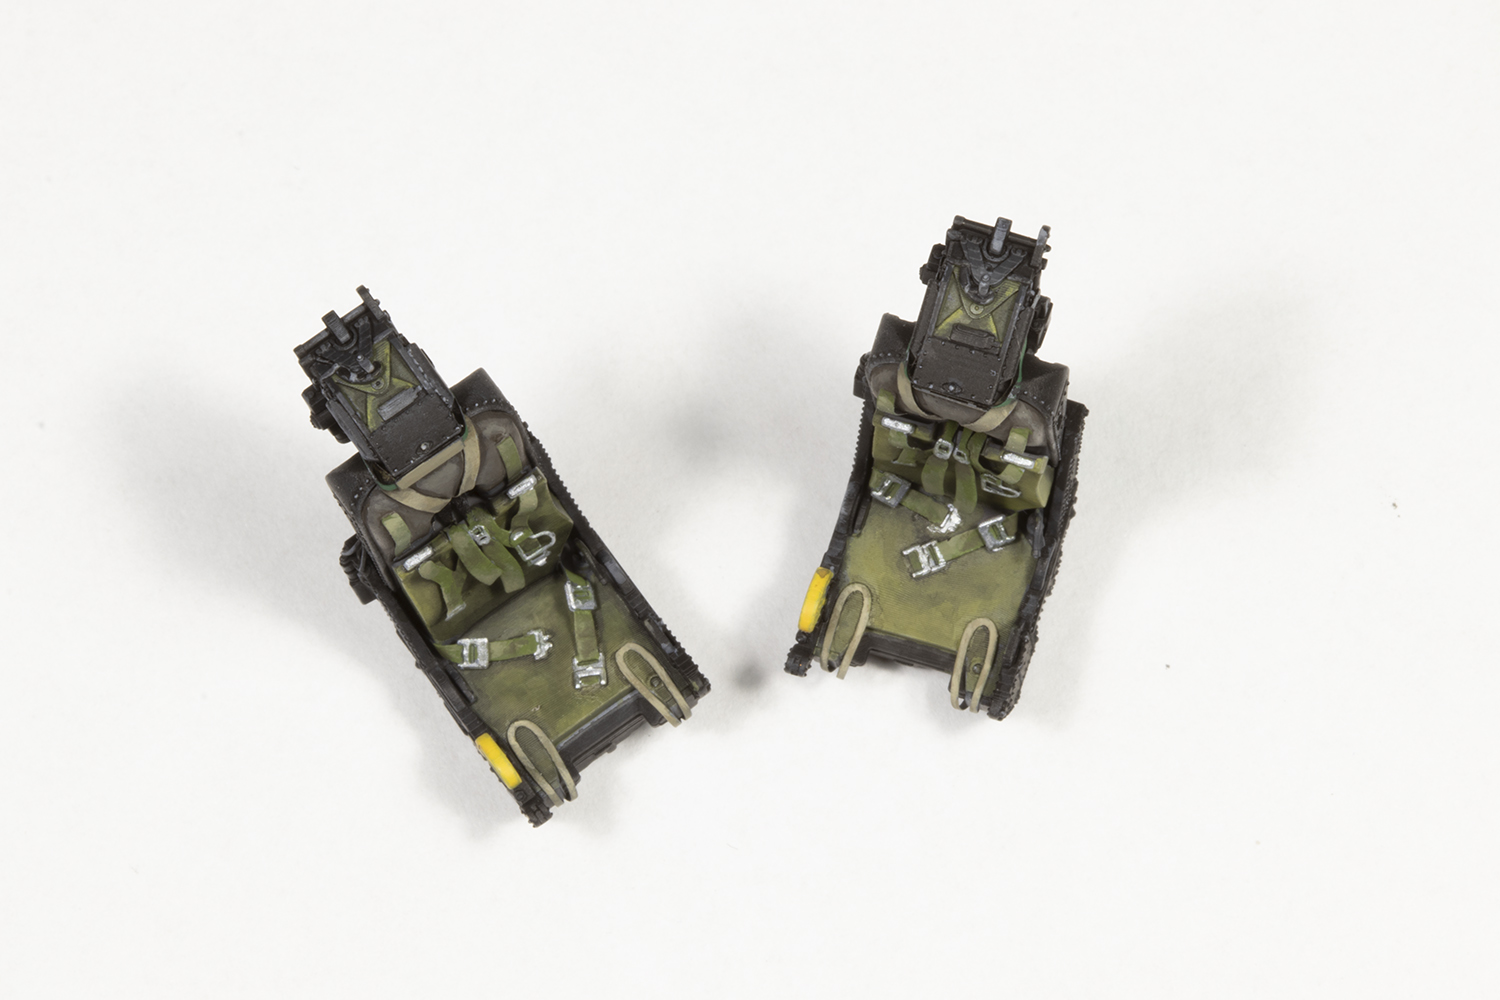
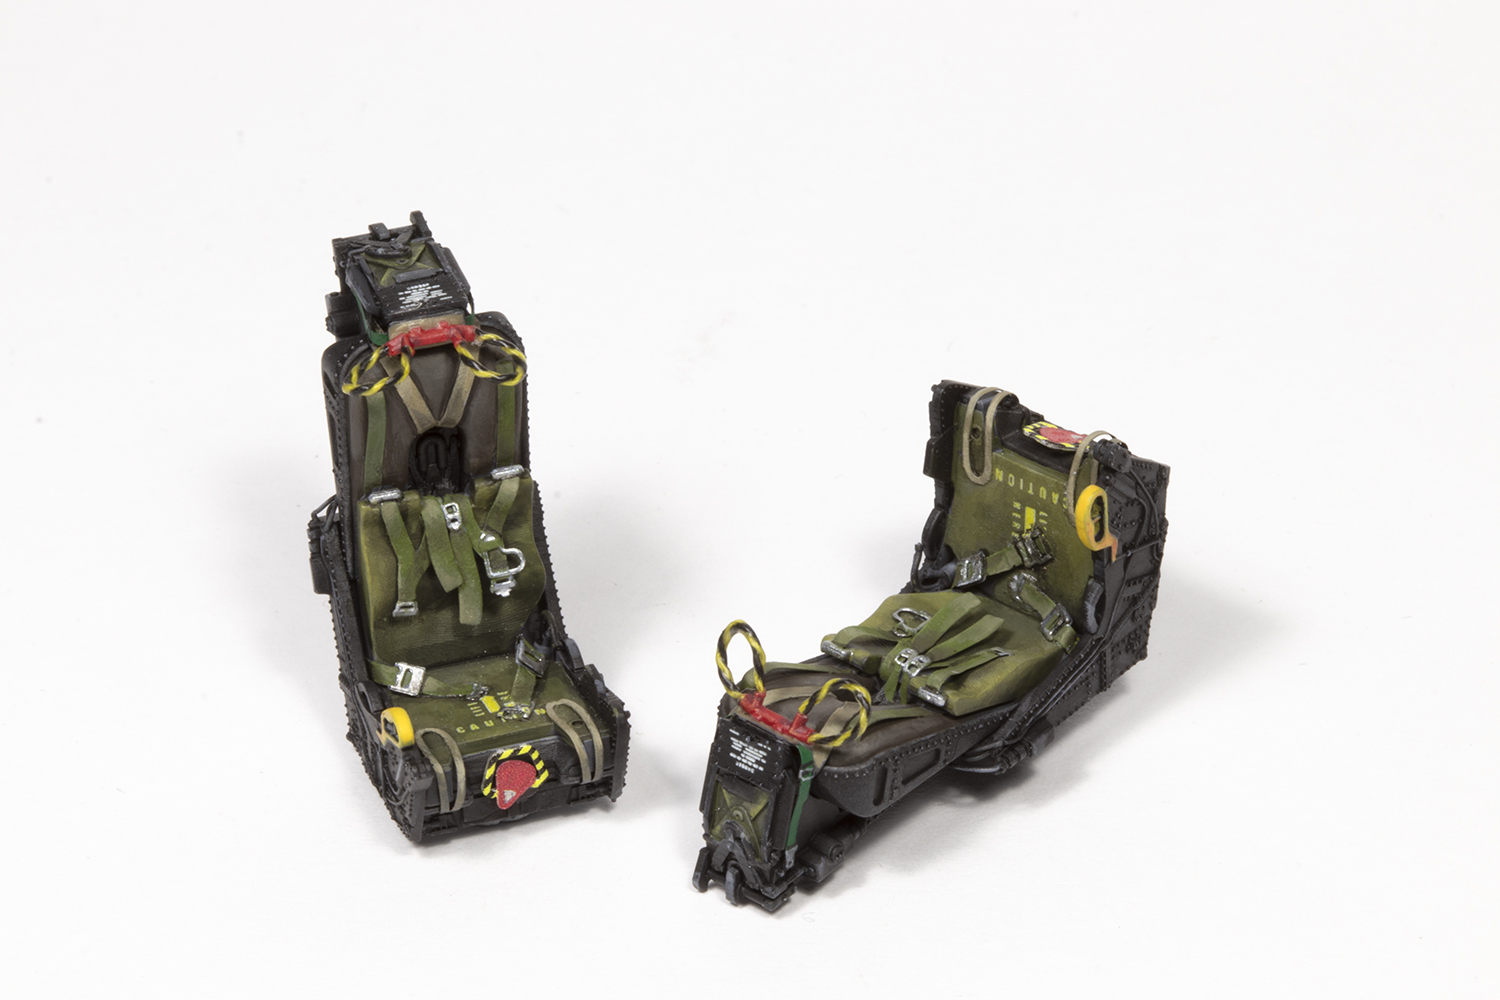
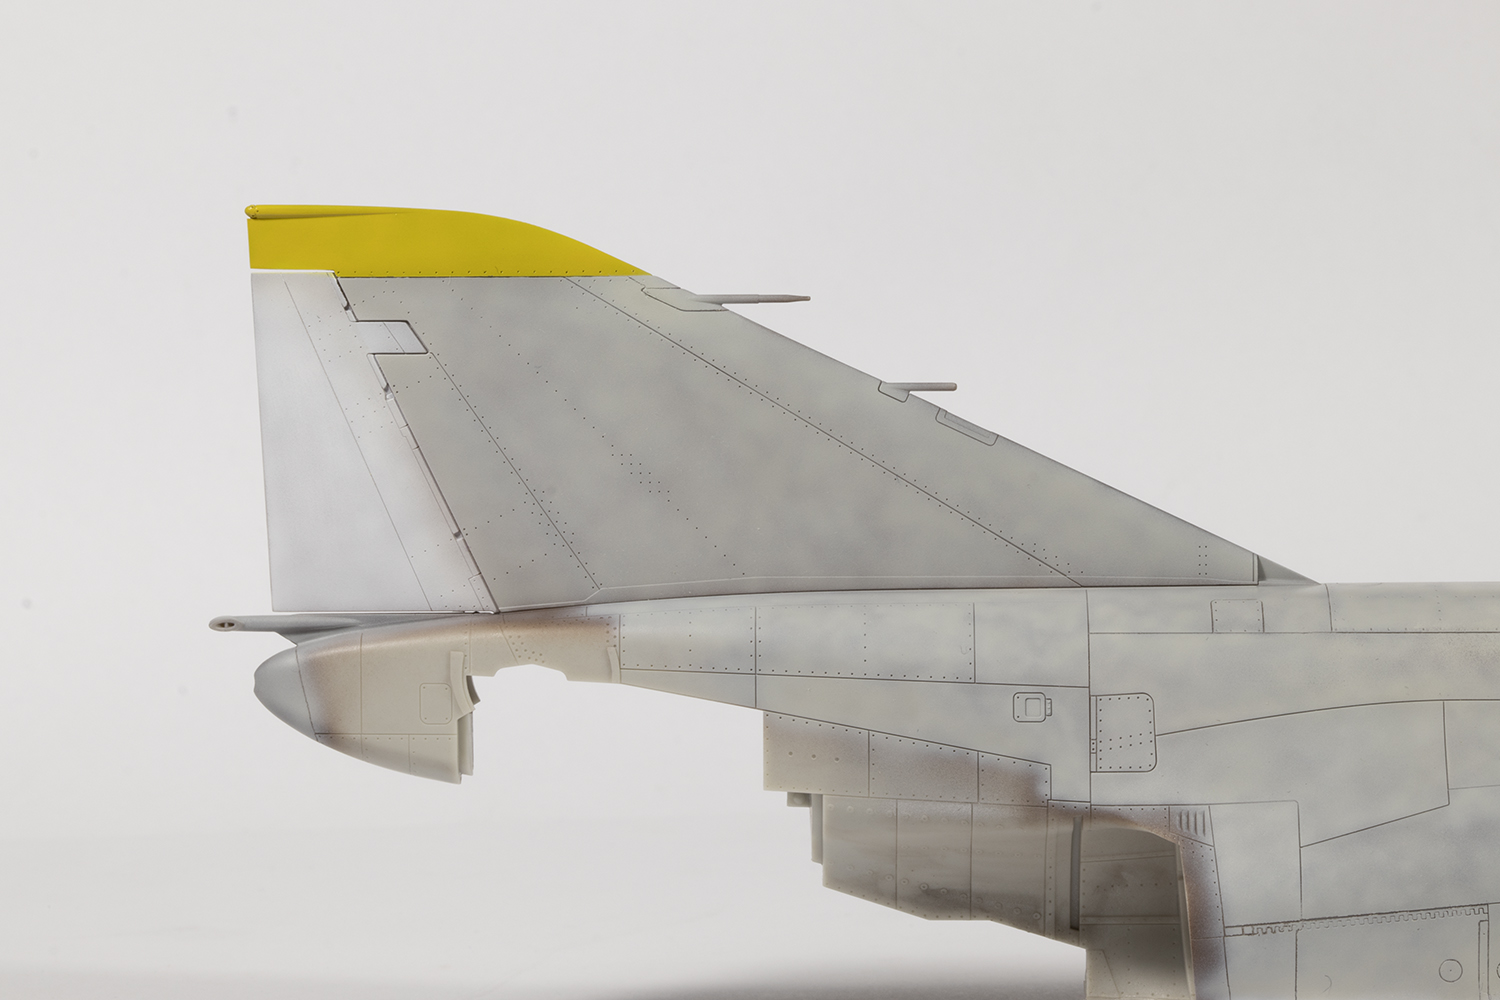
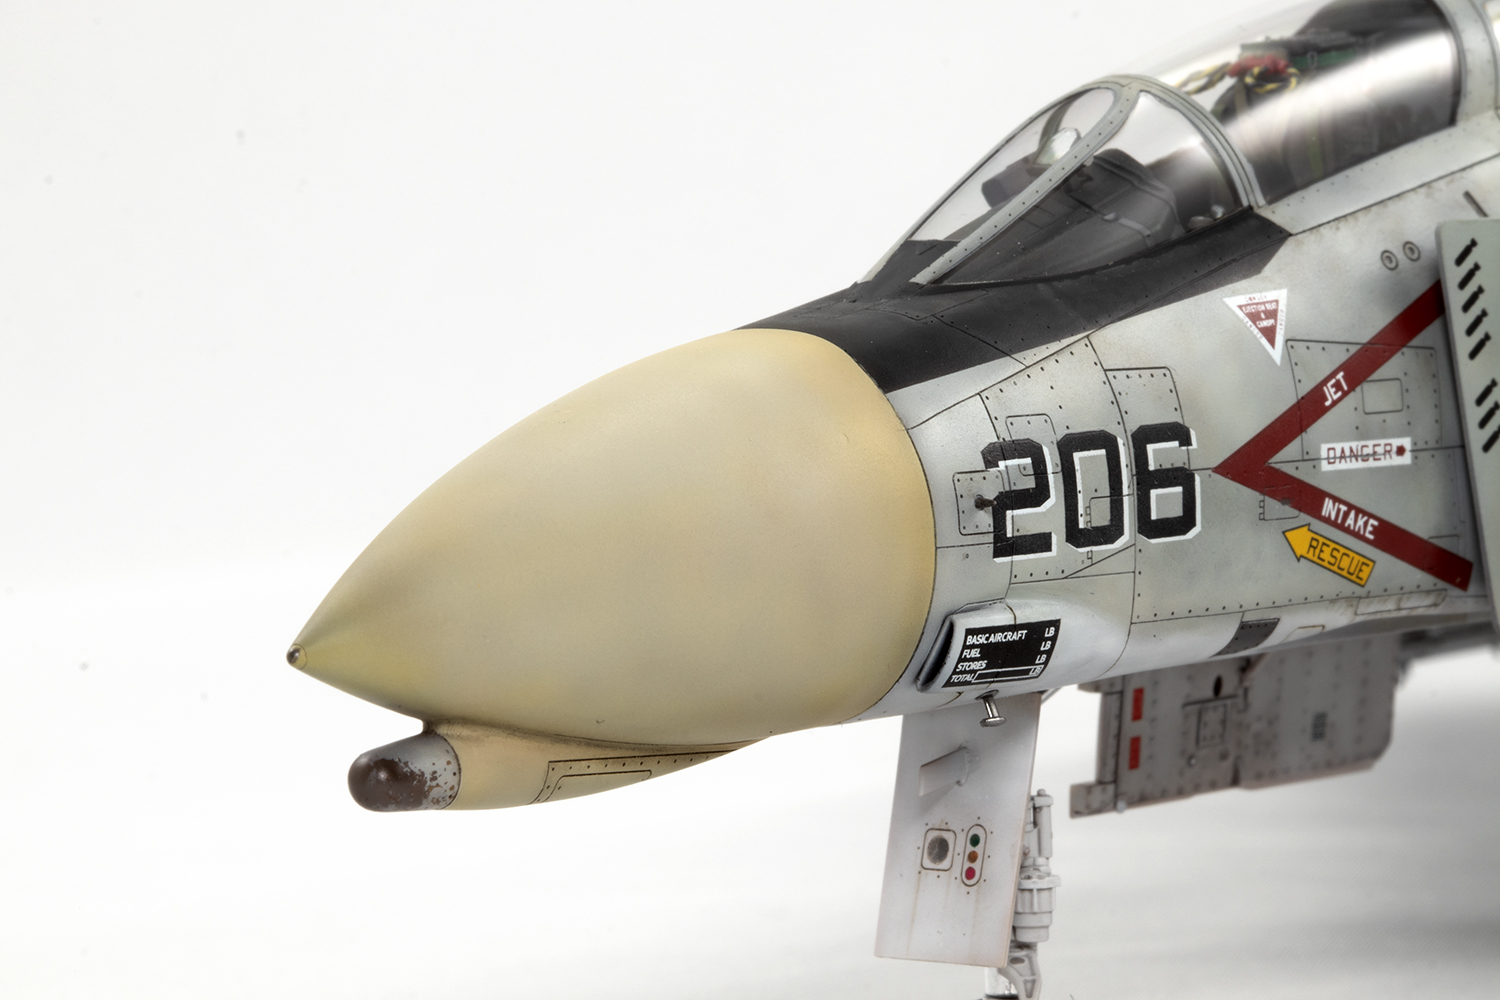
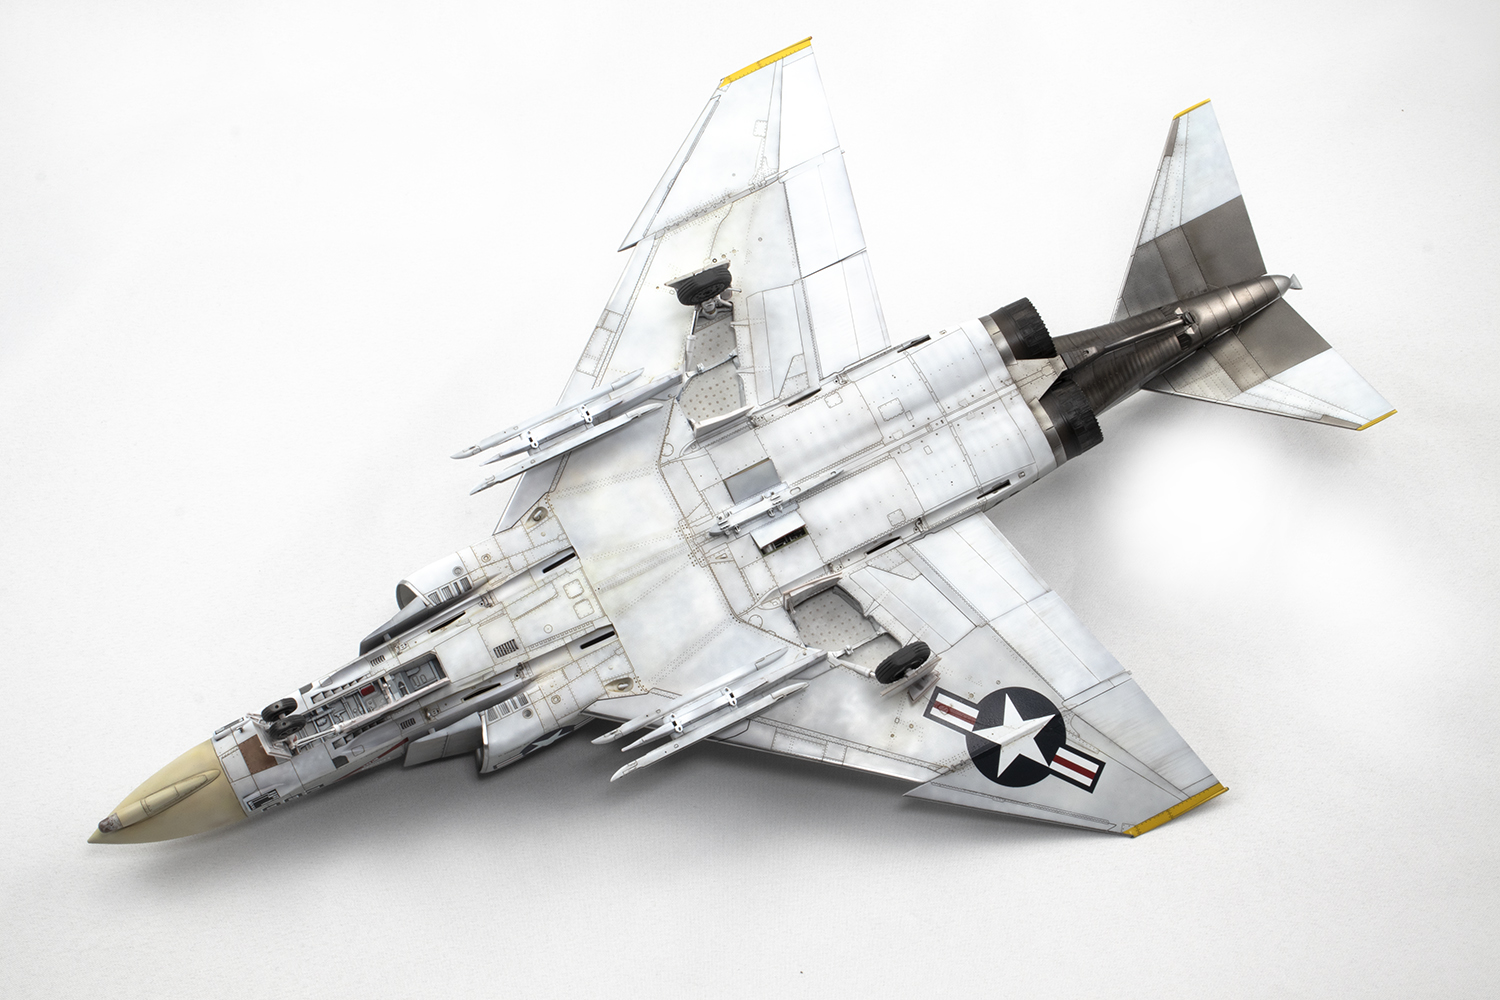
I wanted to make an airframe from 1966, and thus needed to backdate the later versions that Tamiya illustrate in their instructions. This meant leaving off all the ECM stuff and wing bulges (and being careful to not drill holes for them), bunging the slotted tailplanes in the spares box, using the simple nose pod (more on this later), disregarding several aerials, and buying a replacement fin cap (from Quickboost) and early ejection seats (from Eduard). I actually don’t know for sure about the tailplanes and wing bulges, but I was modelling 150414 from its 1966-67 cruise, and these were a standard fit from 152995 in March 1966 and slowly retrofitted to through the fleet. I think I’m on safe enough ground with my decision.

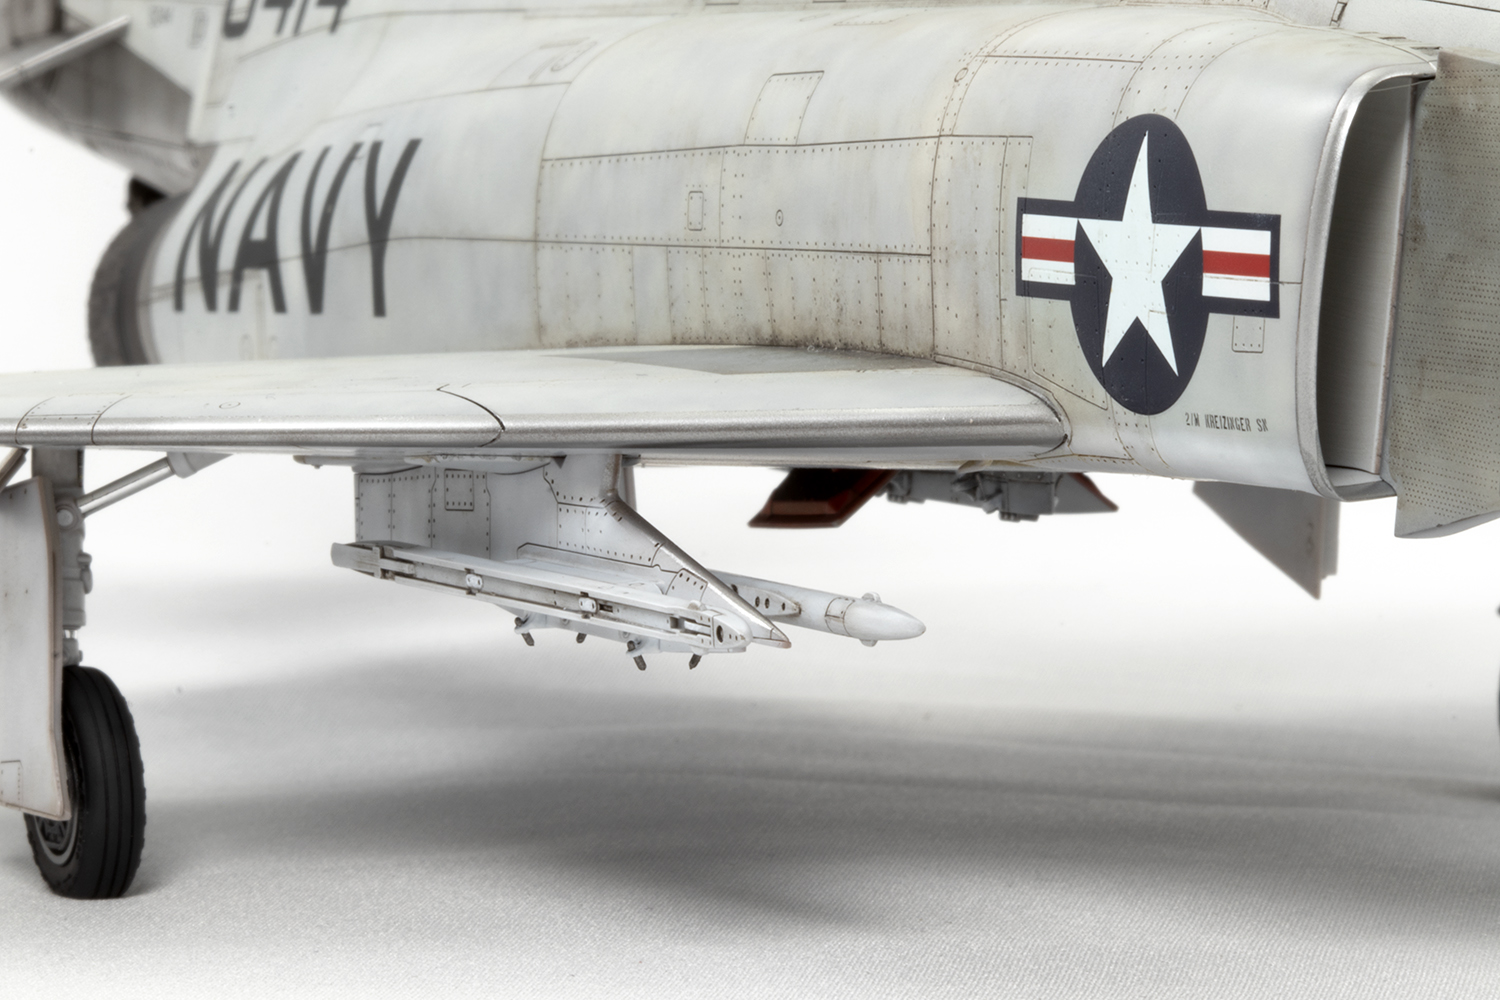
Tamiya also provide different RIO instrument panels and tail cones. I surmised I needed S8 for the former and B5 for the latter. A photo of the particular aircraft I was making showed outer pylons not fitted, so I happily missed these off: all the quicker to finish the build and all the quicker, therefore, to build my stash!
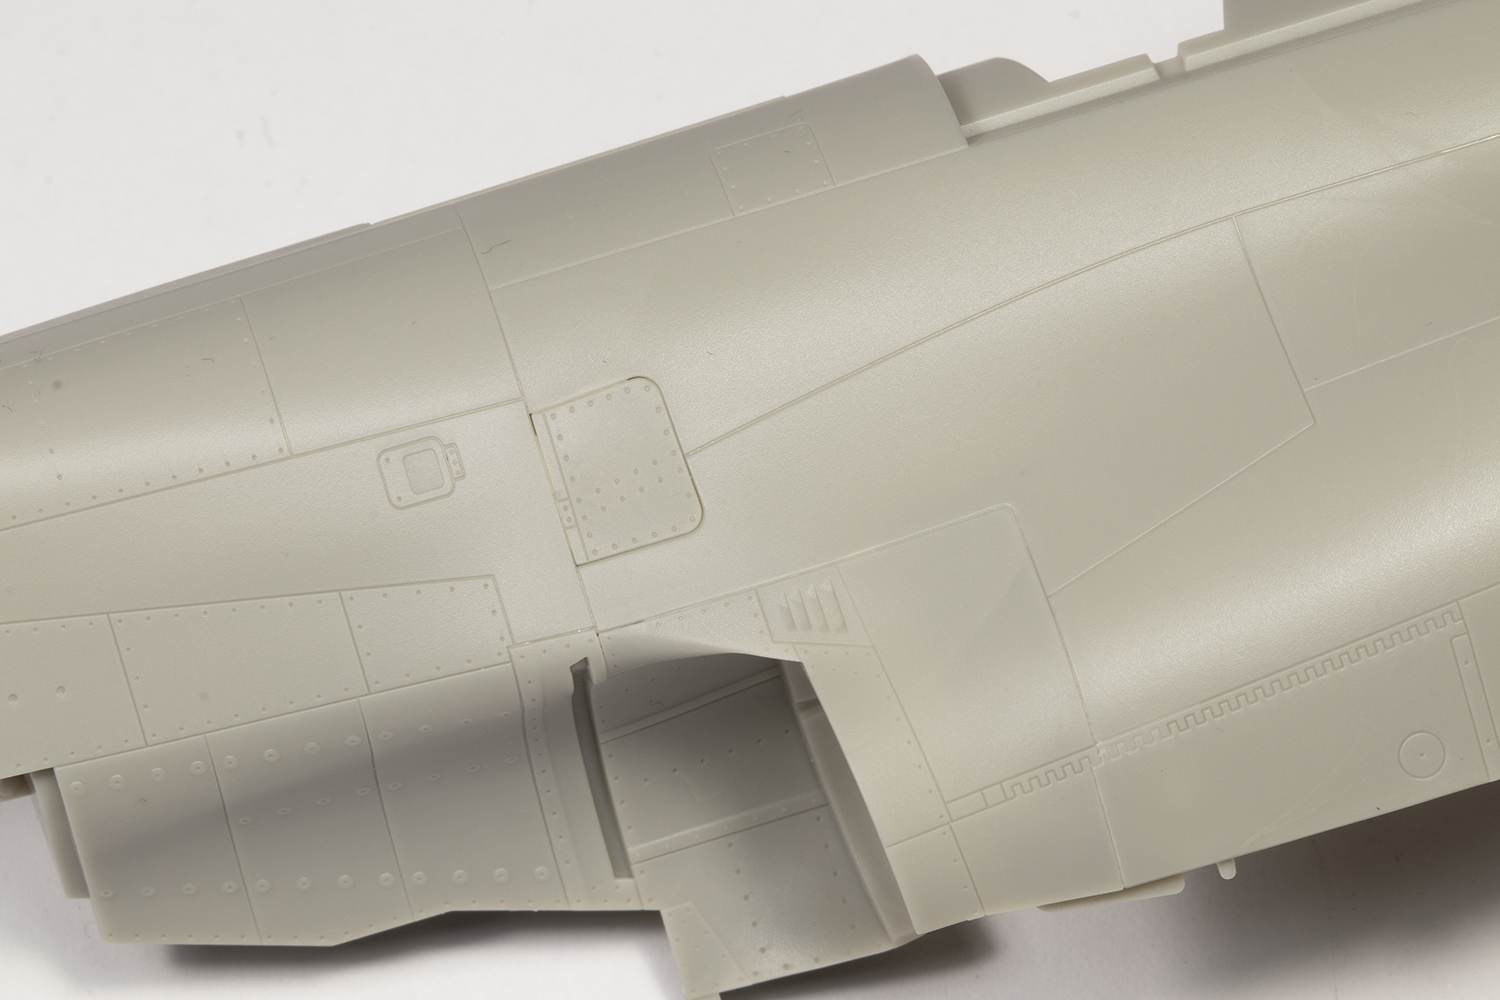
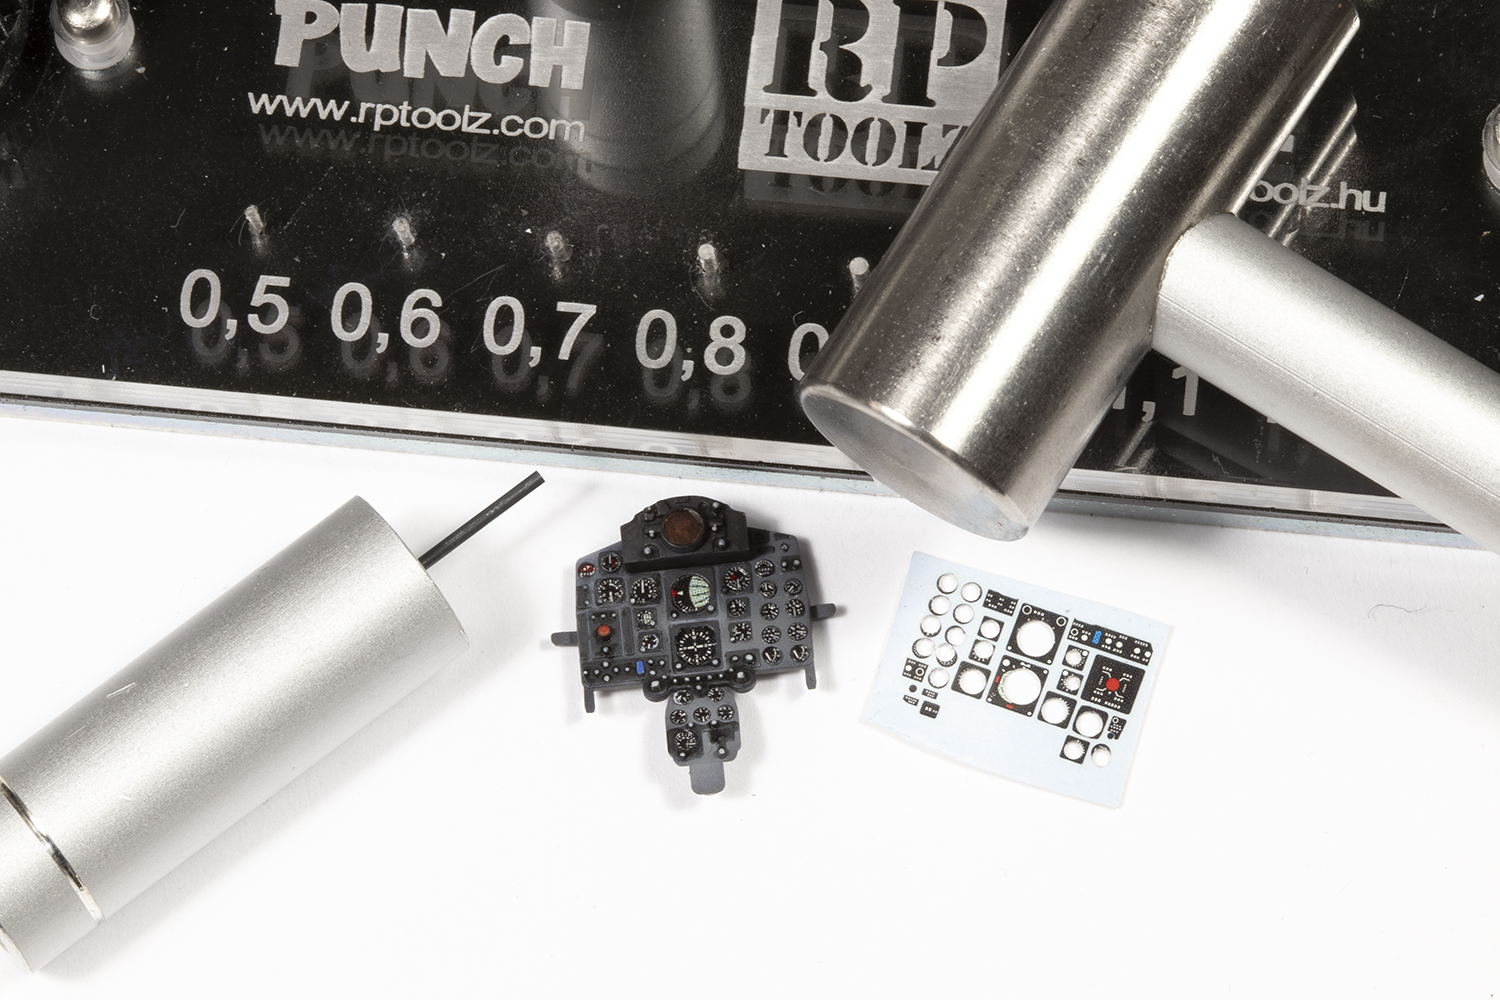
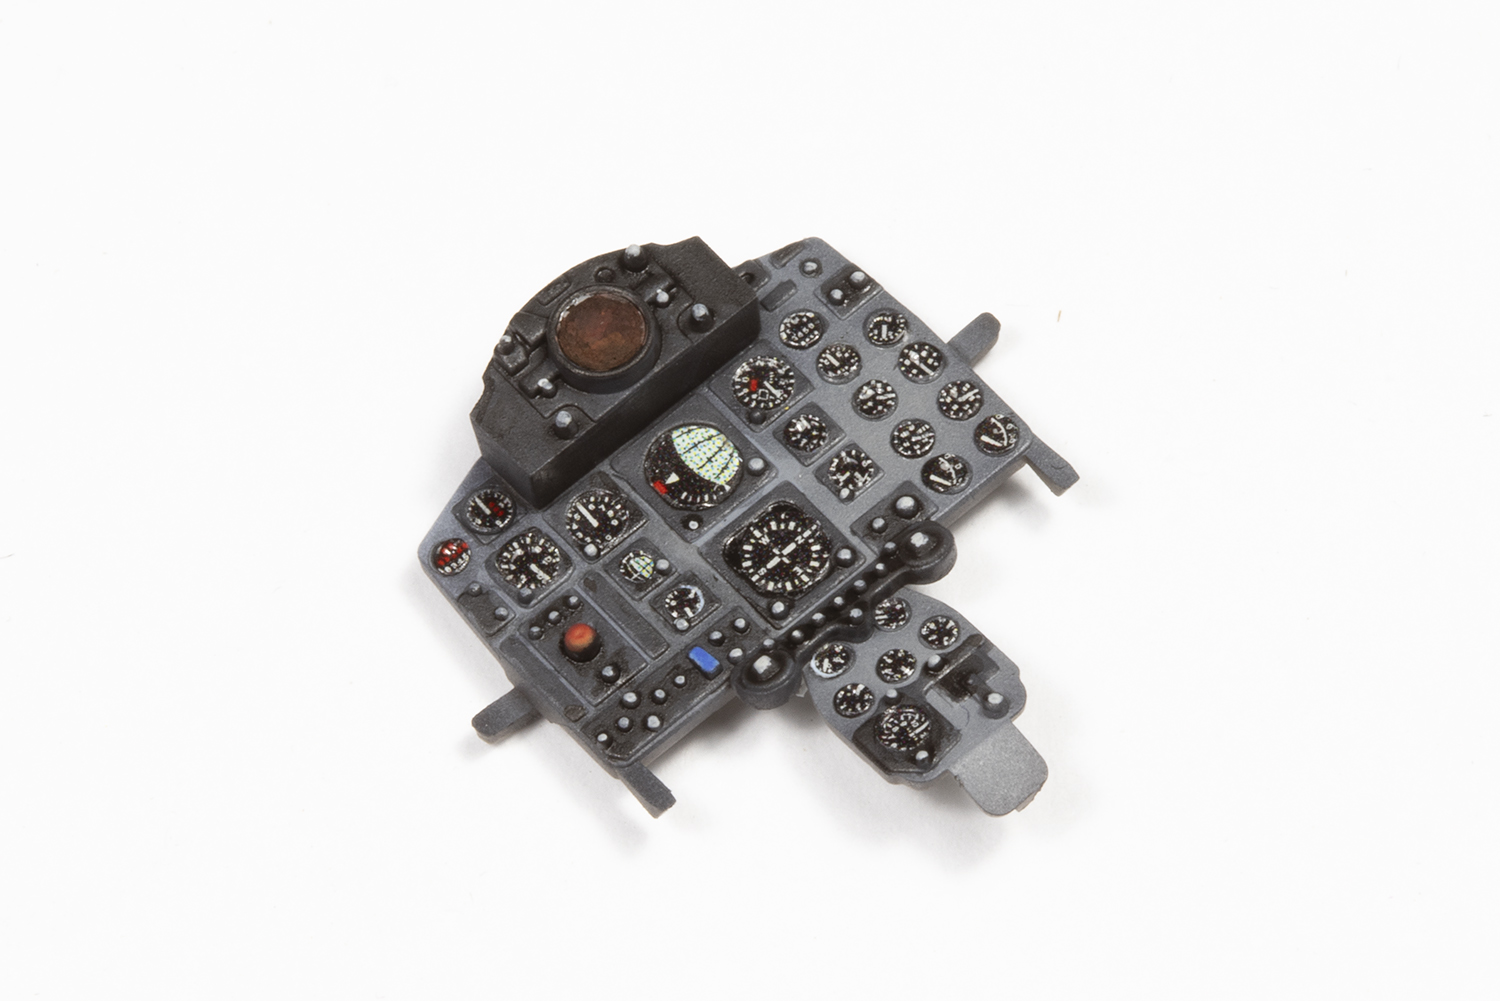
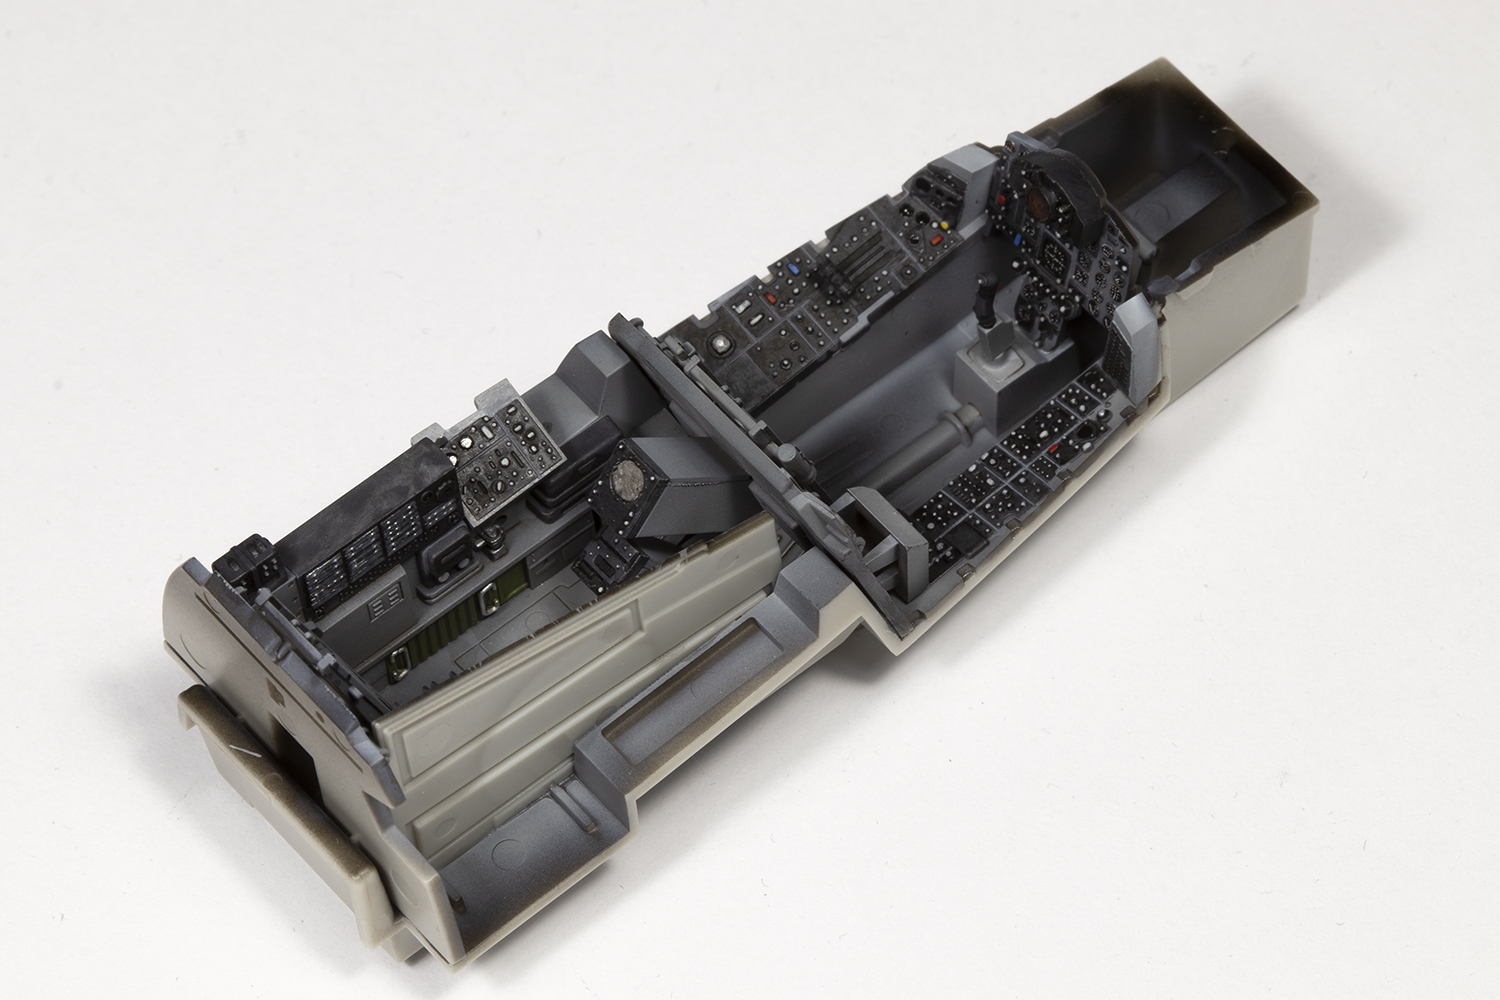
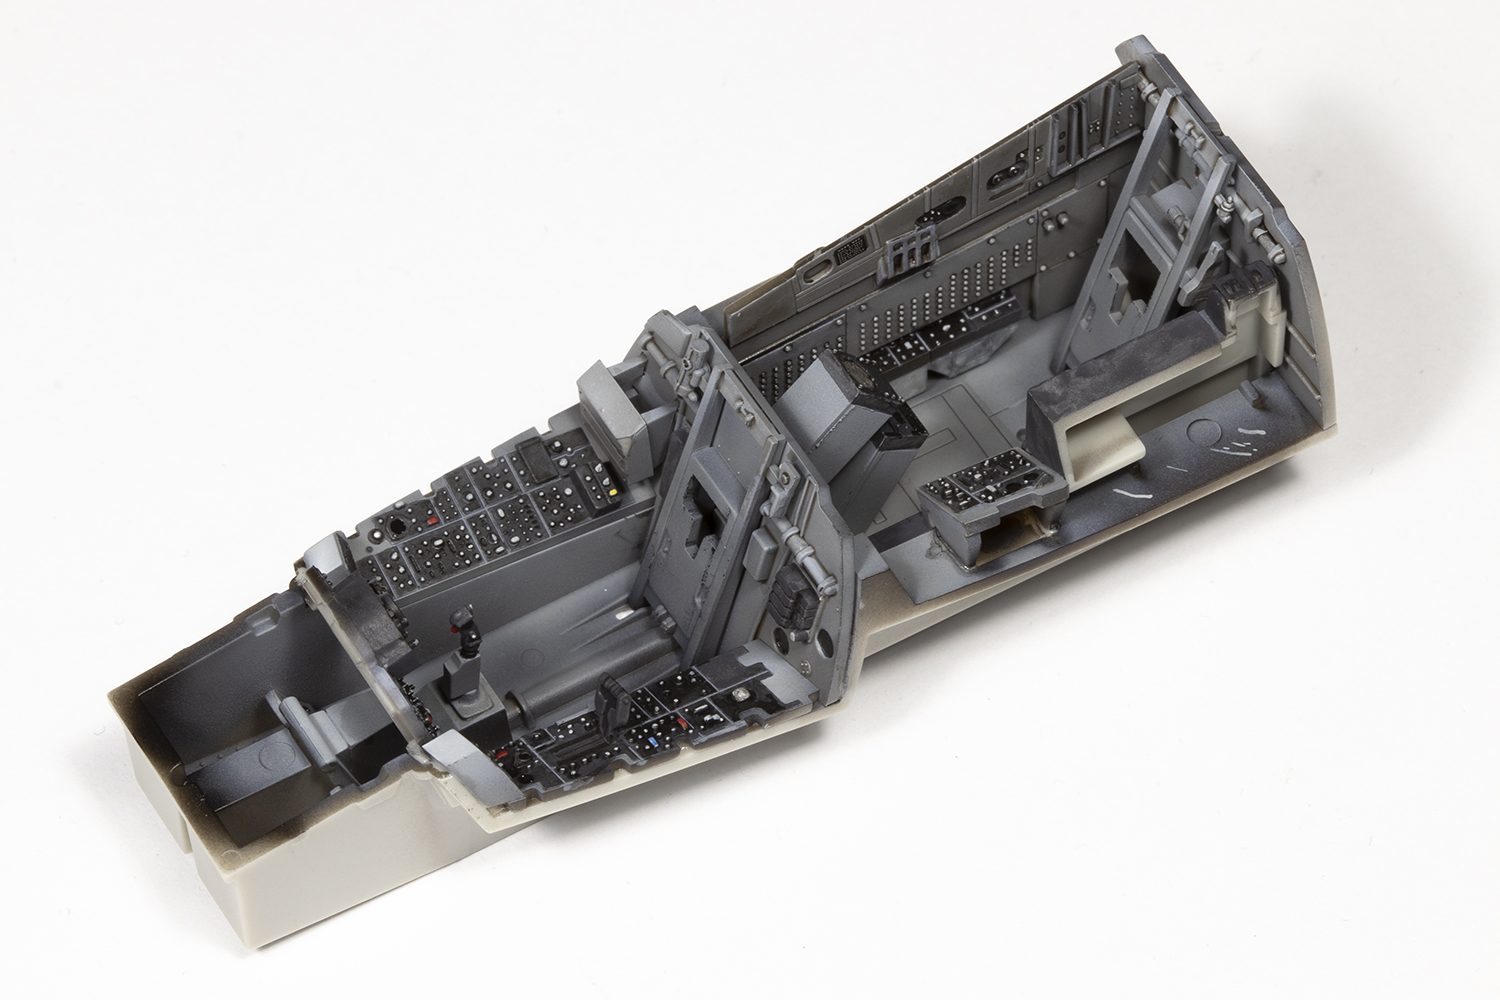
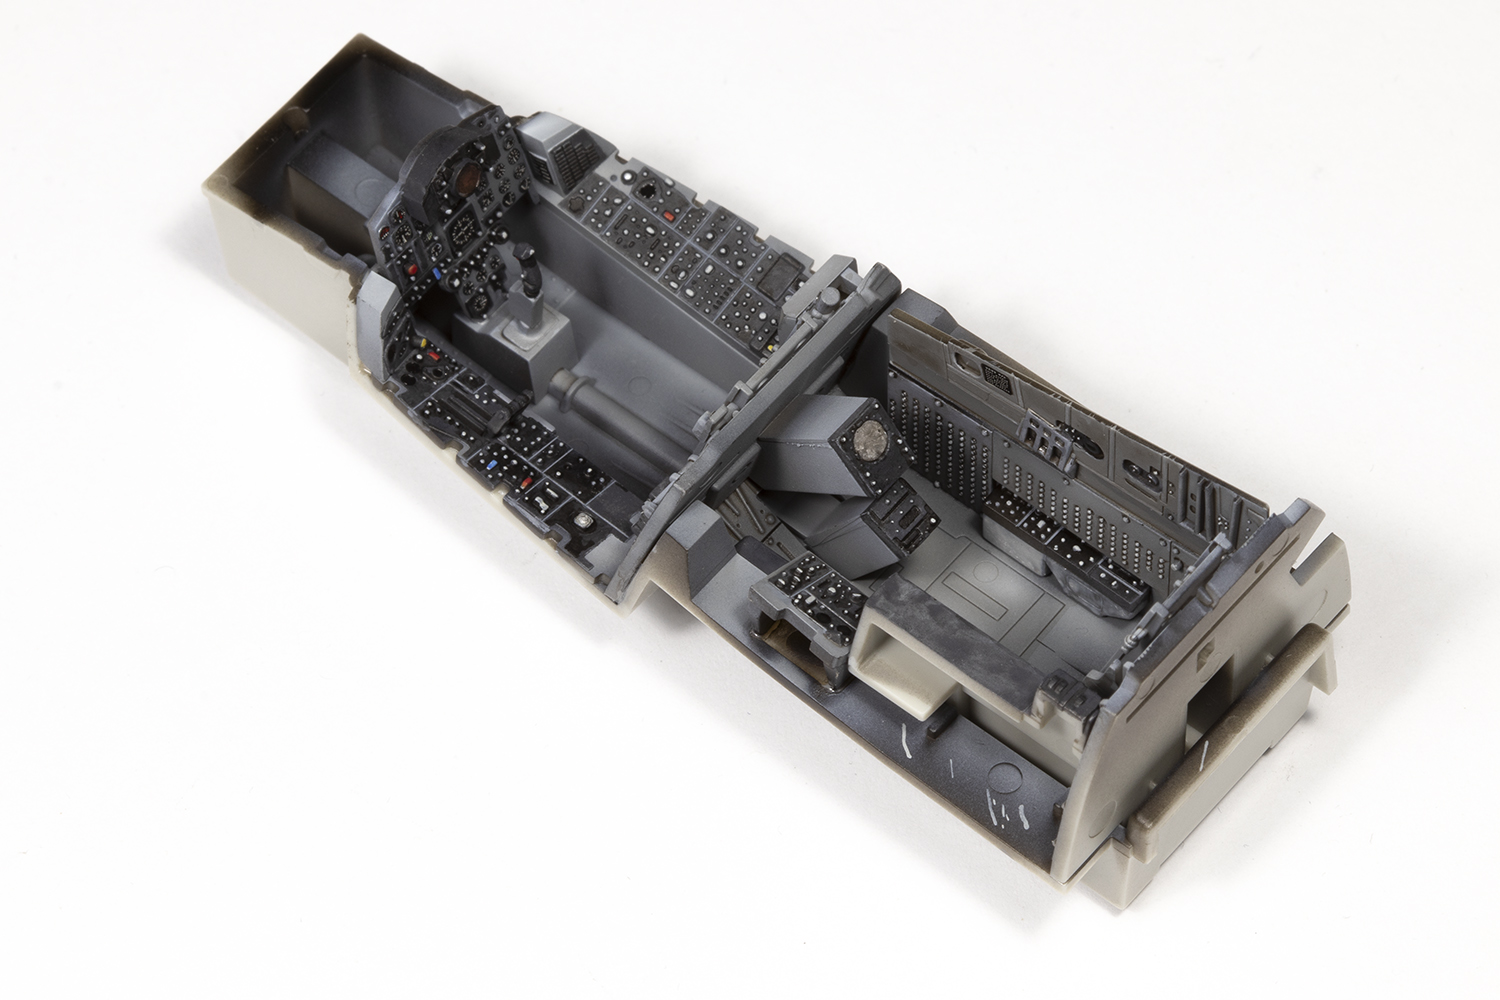
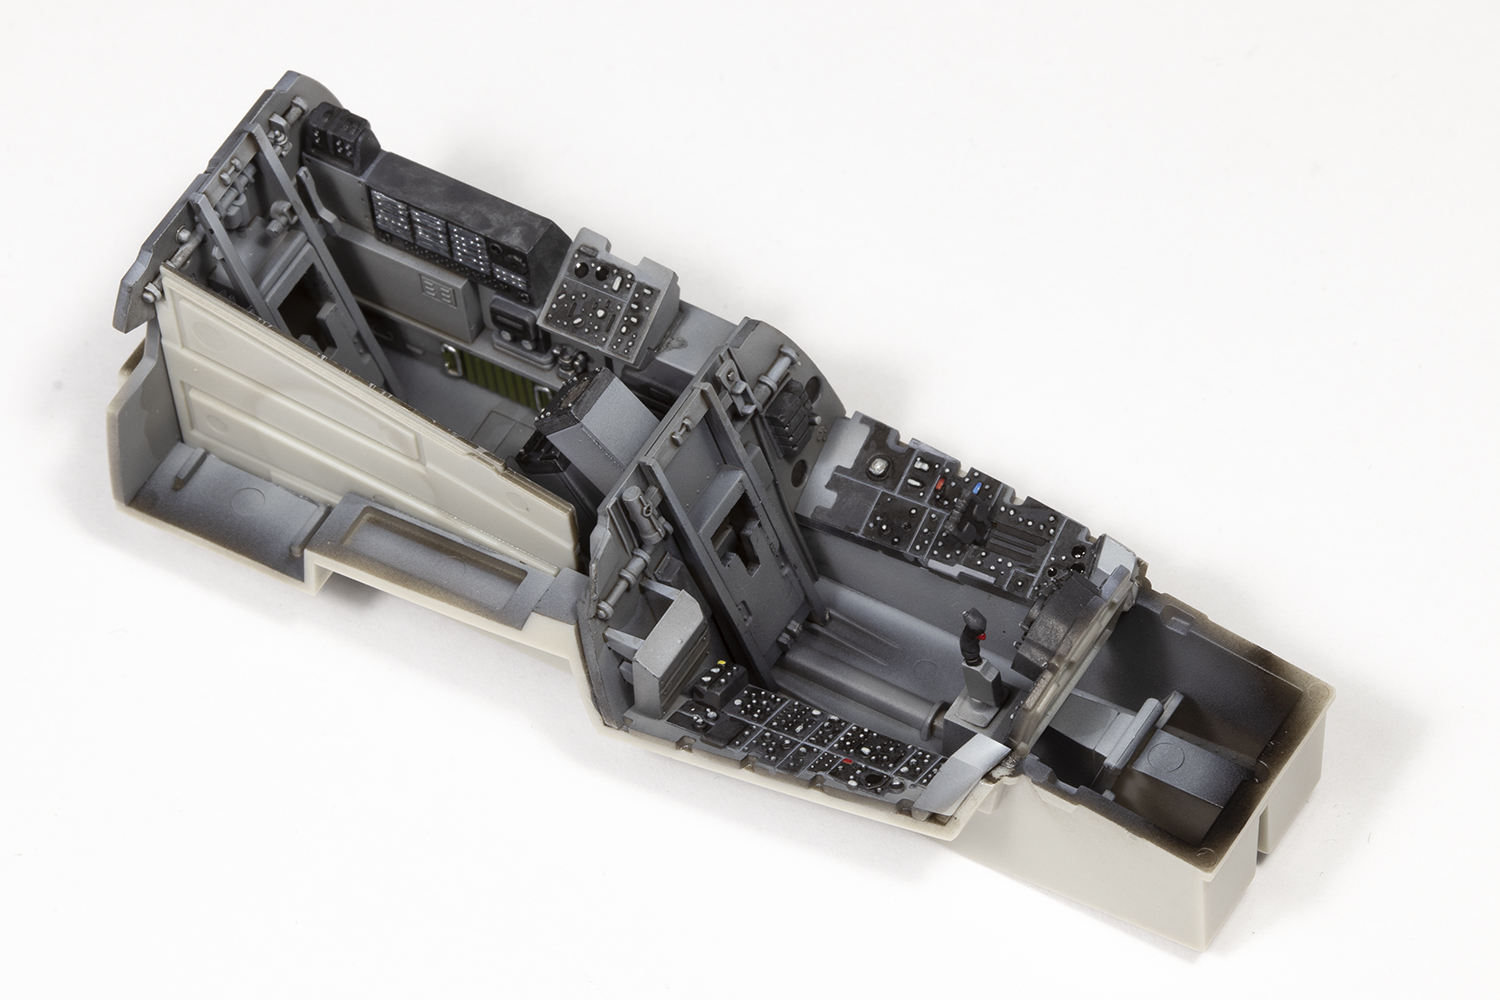
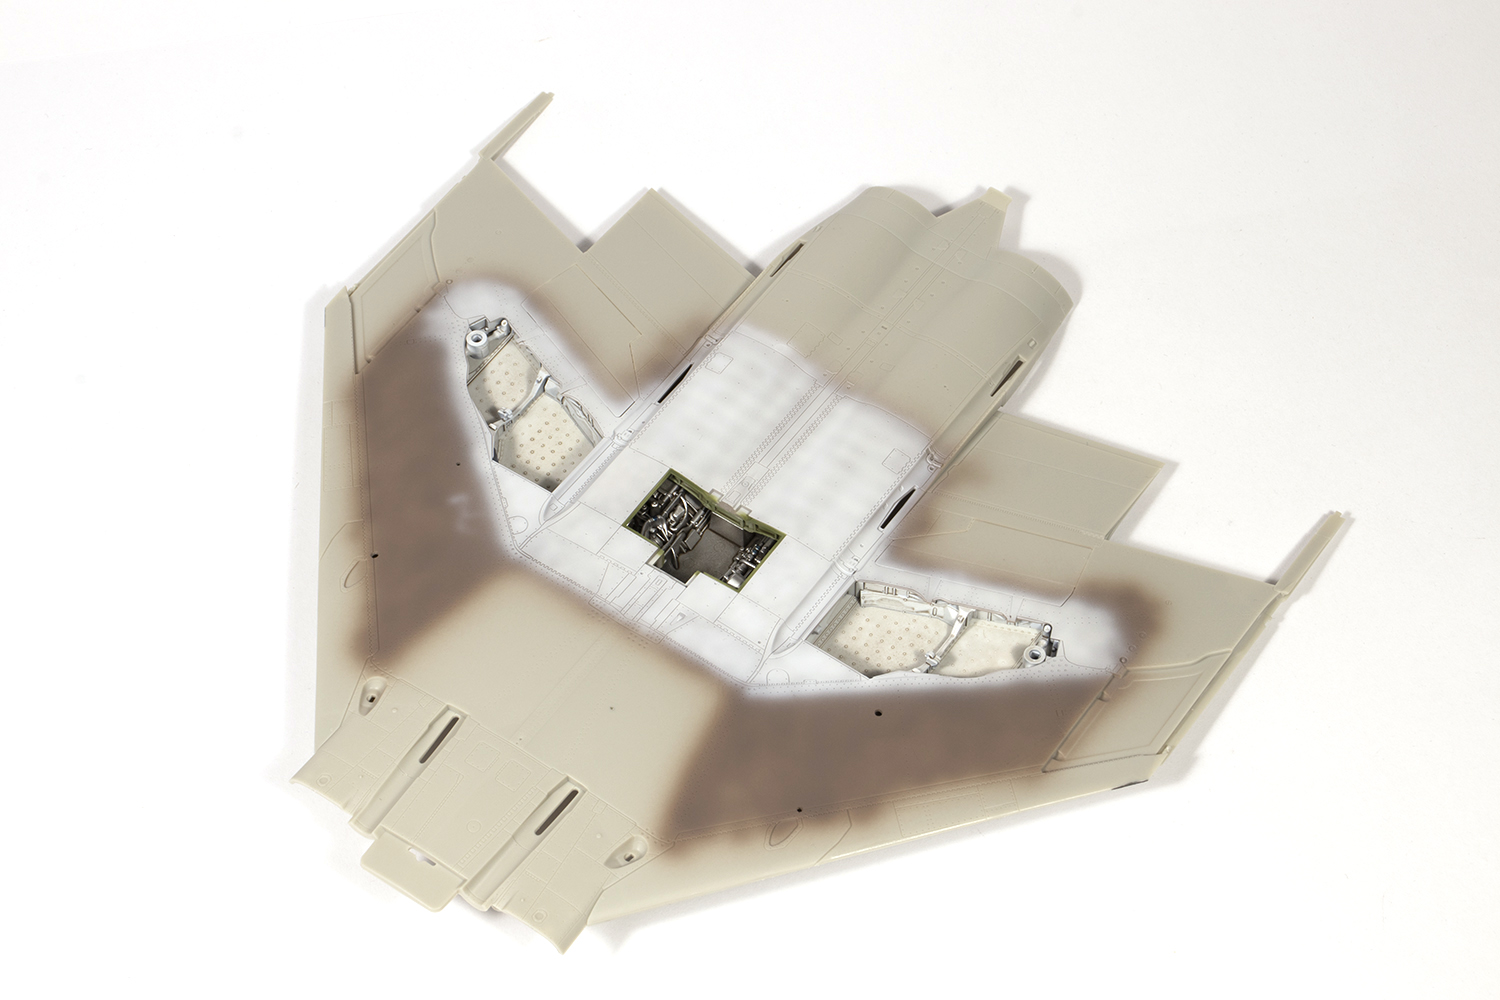
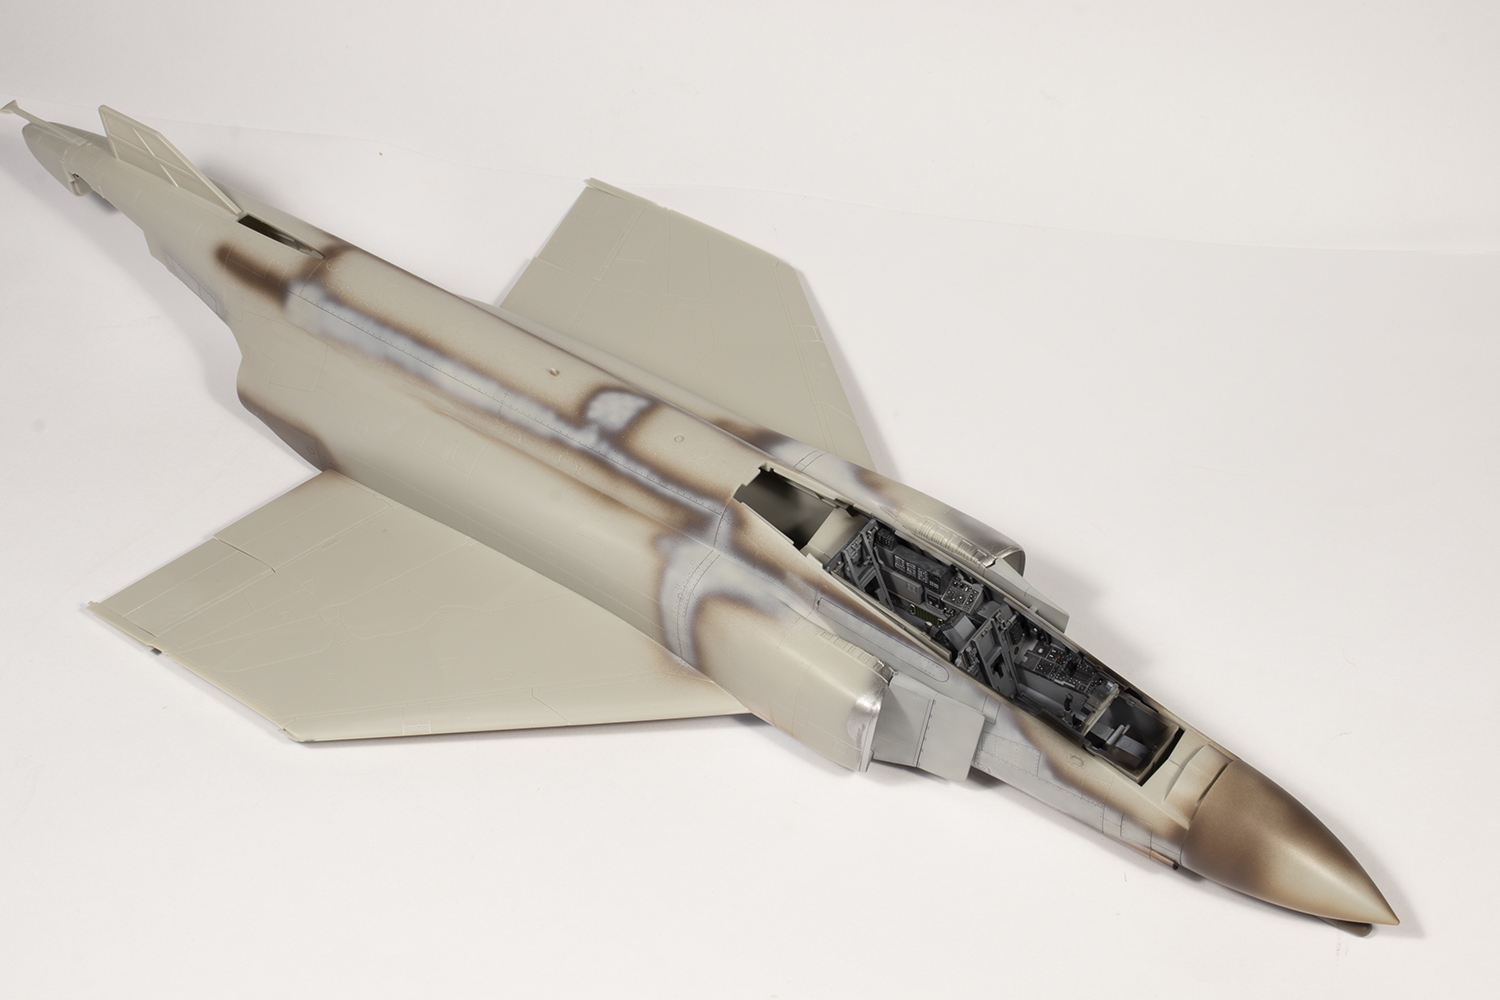
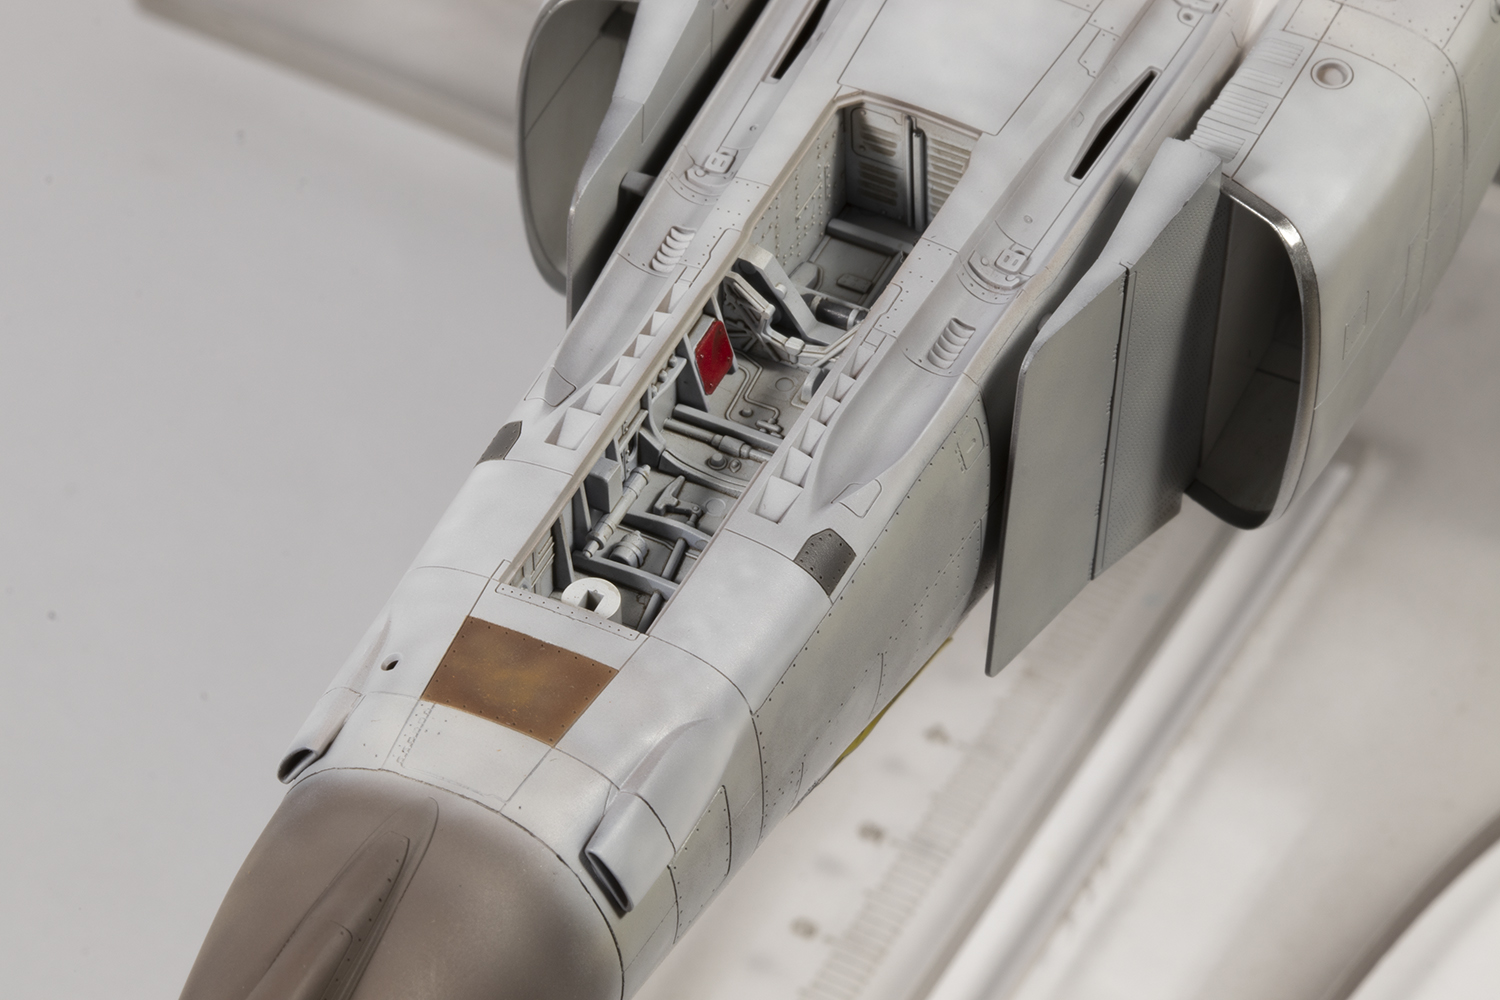
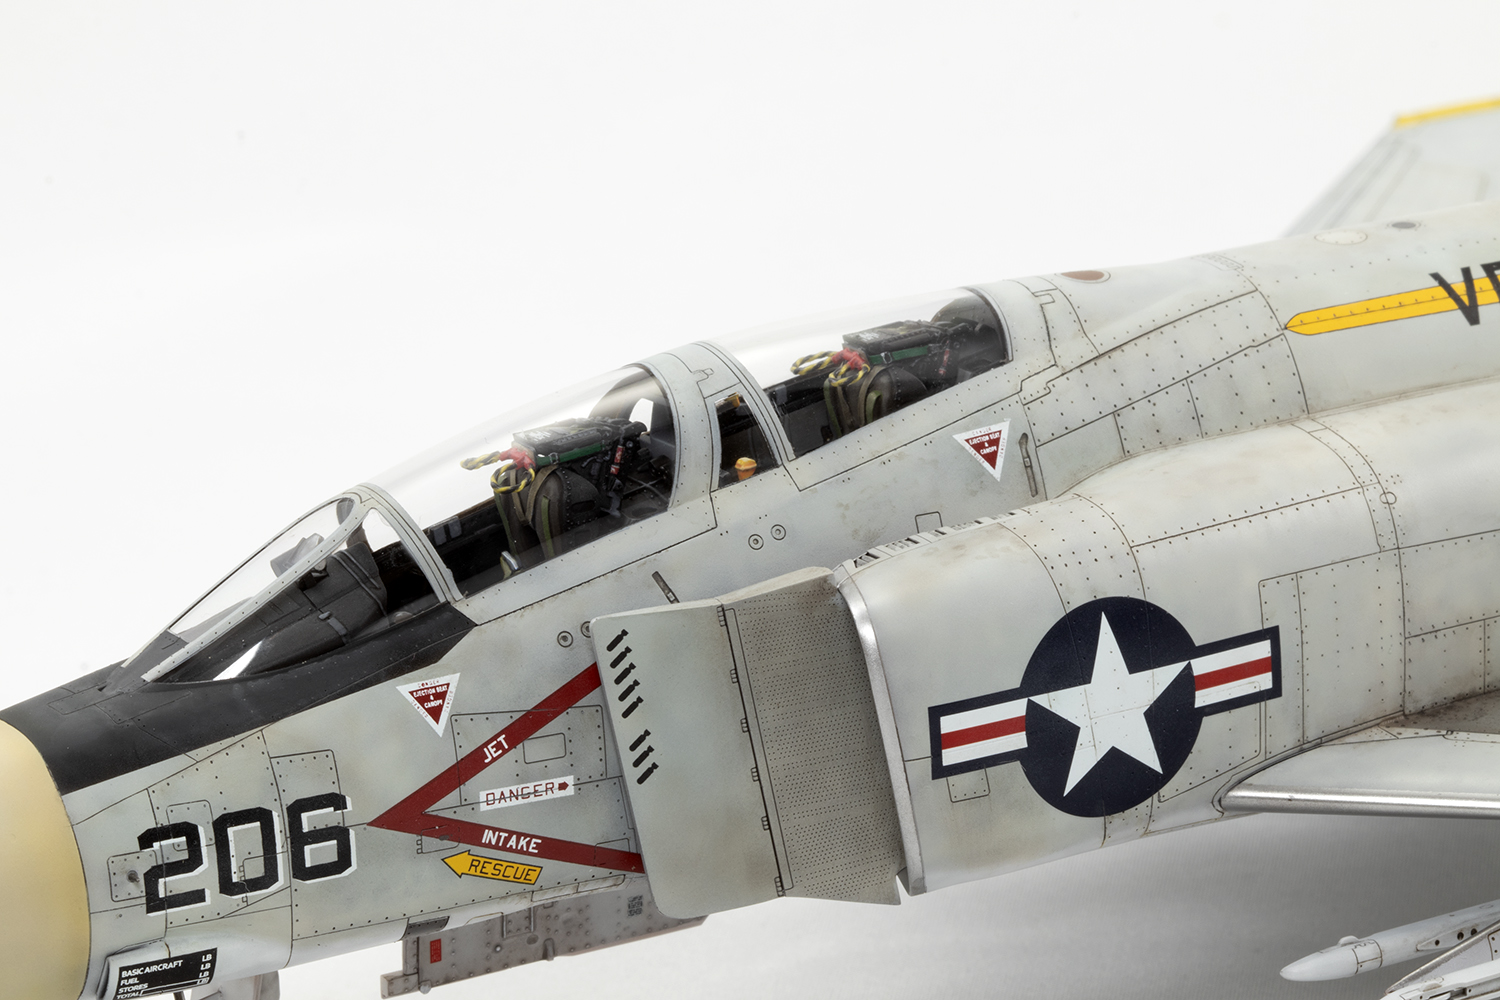
The detail on this kit is outstanding for Tamiya, who often focus on buildability over fidelity. Not here: this kit is very detailed and very buildable. Aside from the seats, I made the cockpit straight from the box and found this to be more than adequate for closed canopies. I’m always looking to improve my brush painting skills and painted everything in acrylic over an airbrushed and shaded coat of Mr Color 317 Gray FS36231. I watch quite a lot of YouTube videos of Warhammer figure painters to try and pick up their techniques for painting. I’ve found using high quality brushes, a wet palette and thinning the paints way down and applying multiple coats to be very helpful, and of course high magnification is essential. For the dials I used my punch and die set to butcher the kit decals and applied them one by one. I’ve not tried this before, but will definitely do so again.


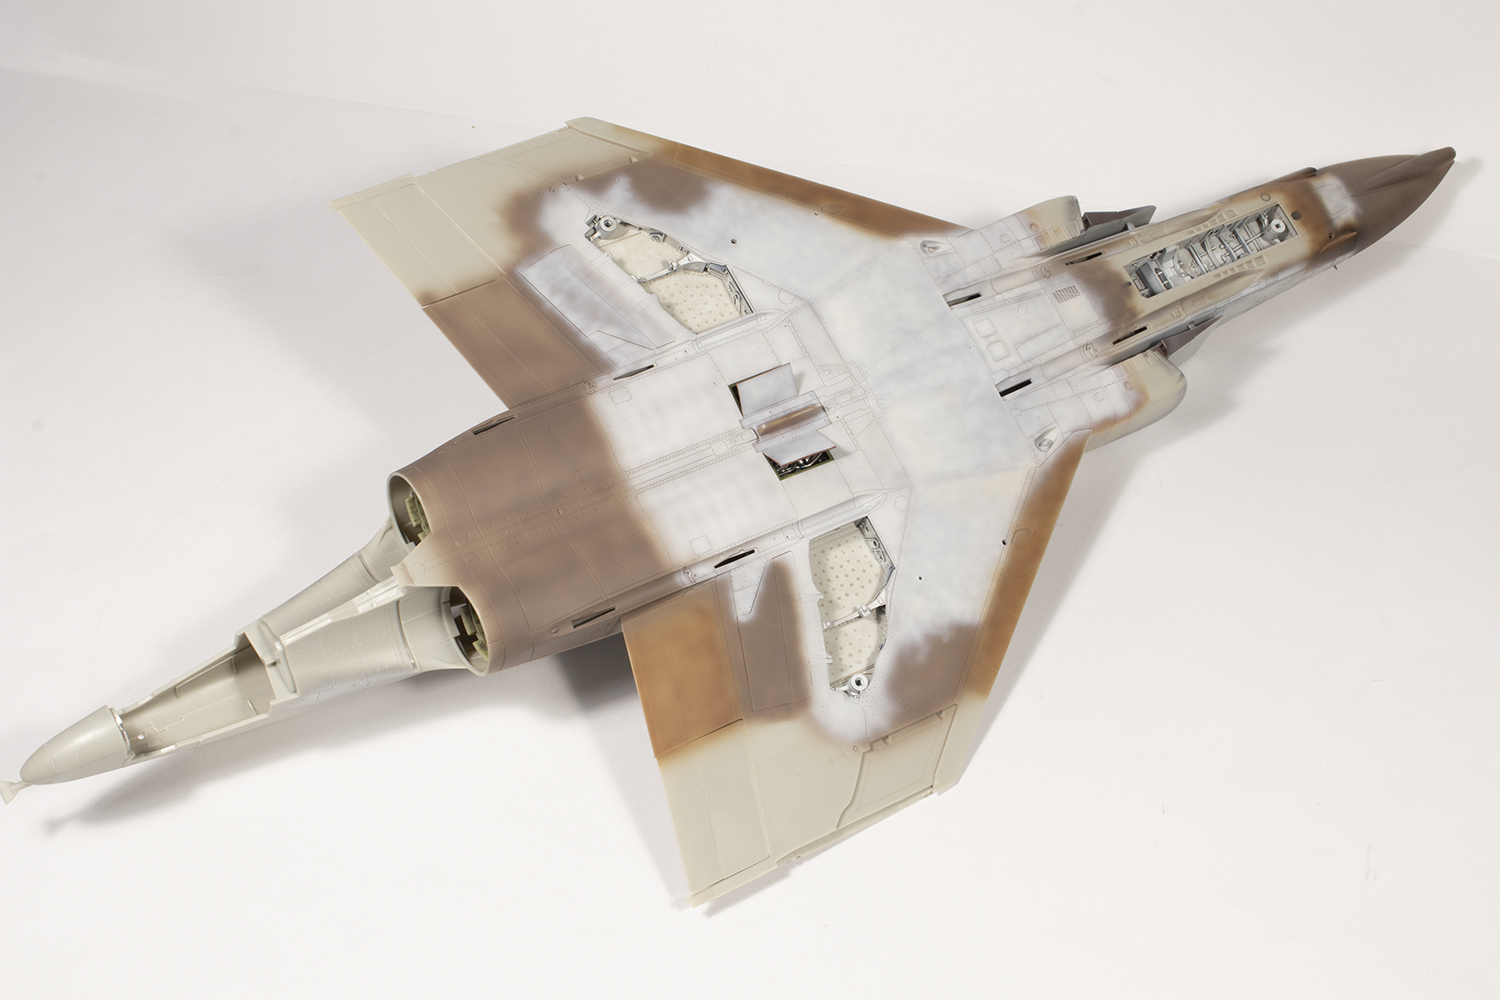
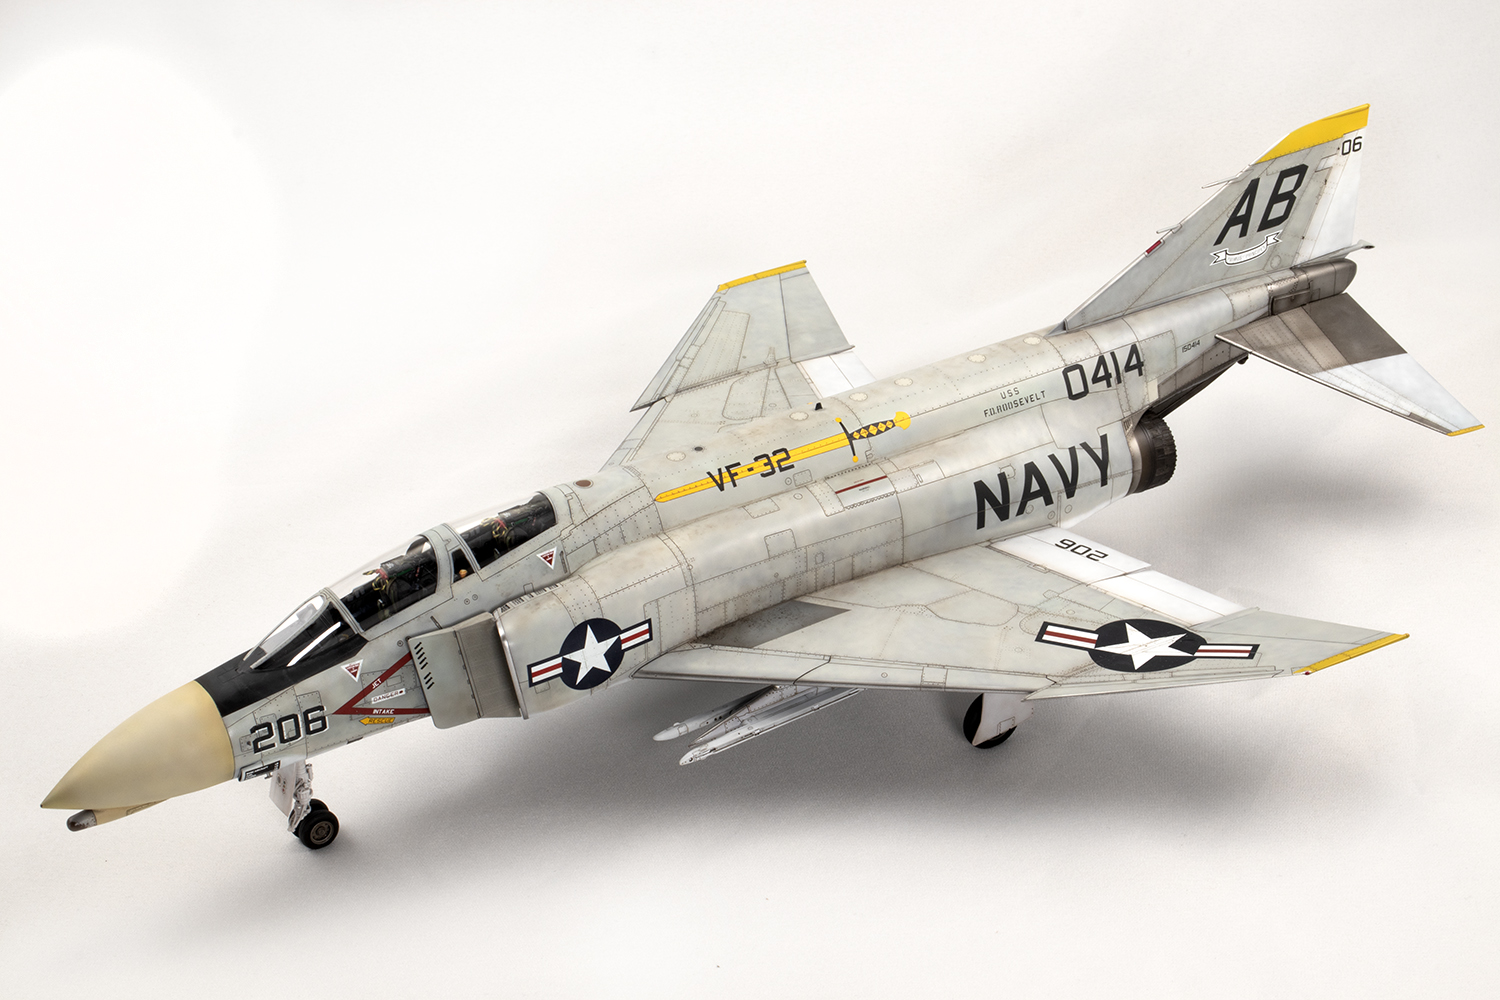
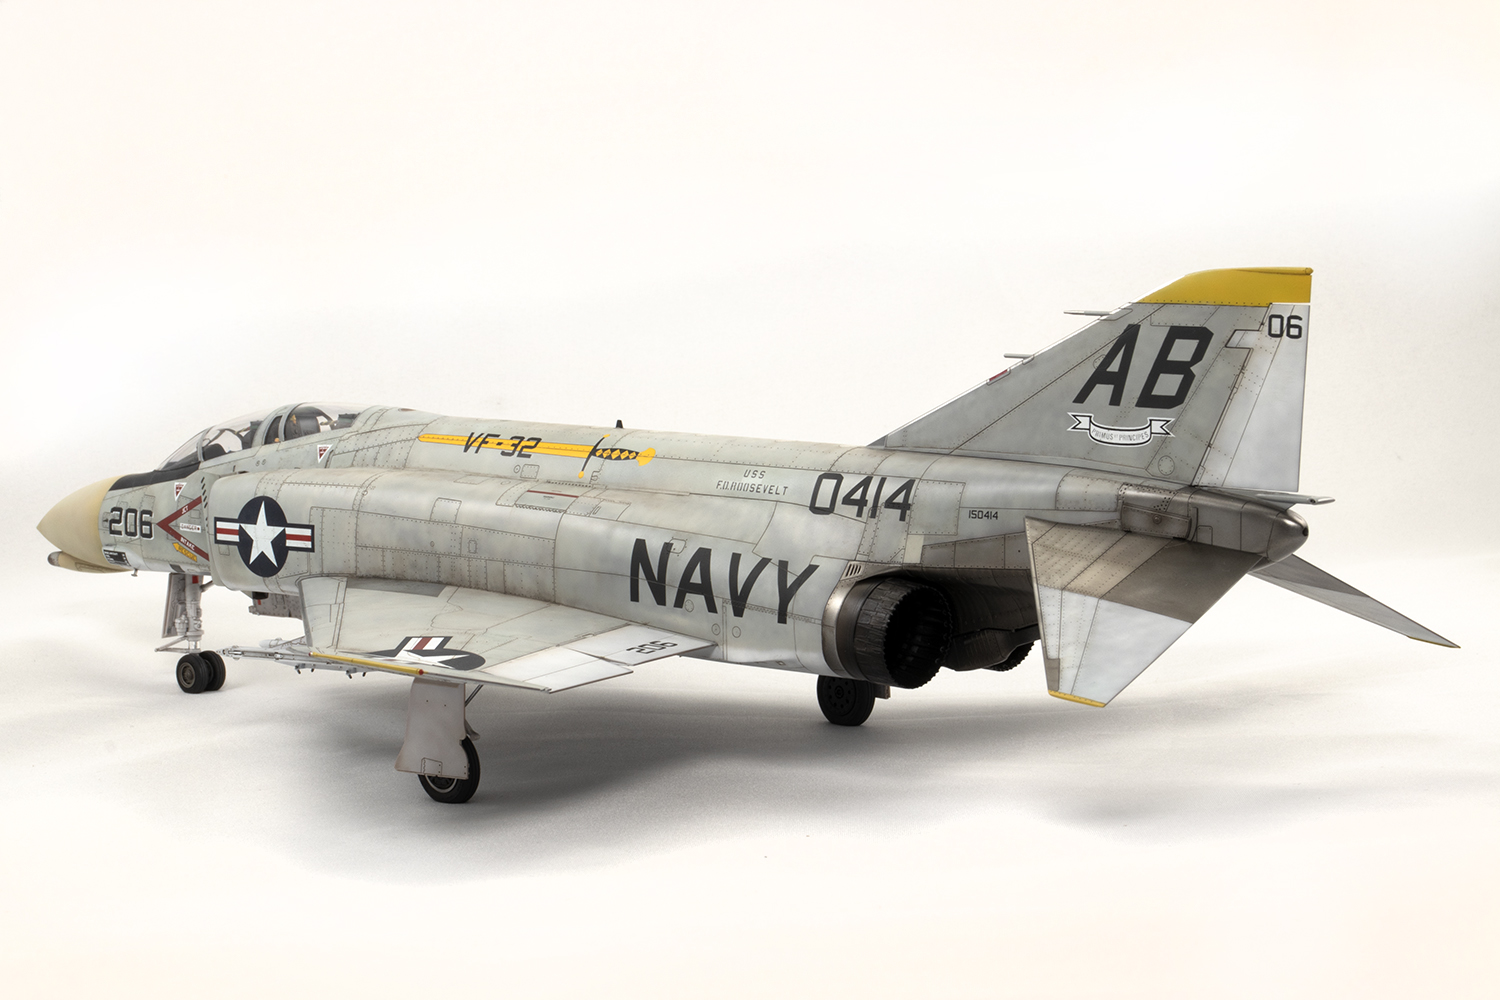
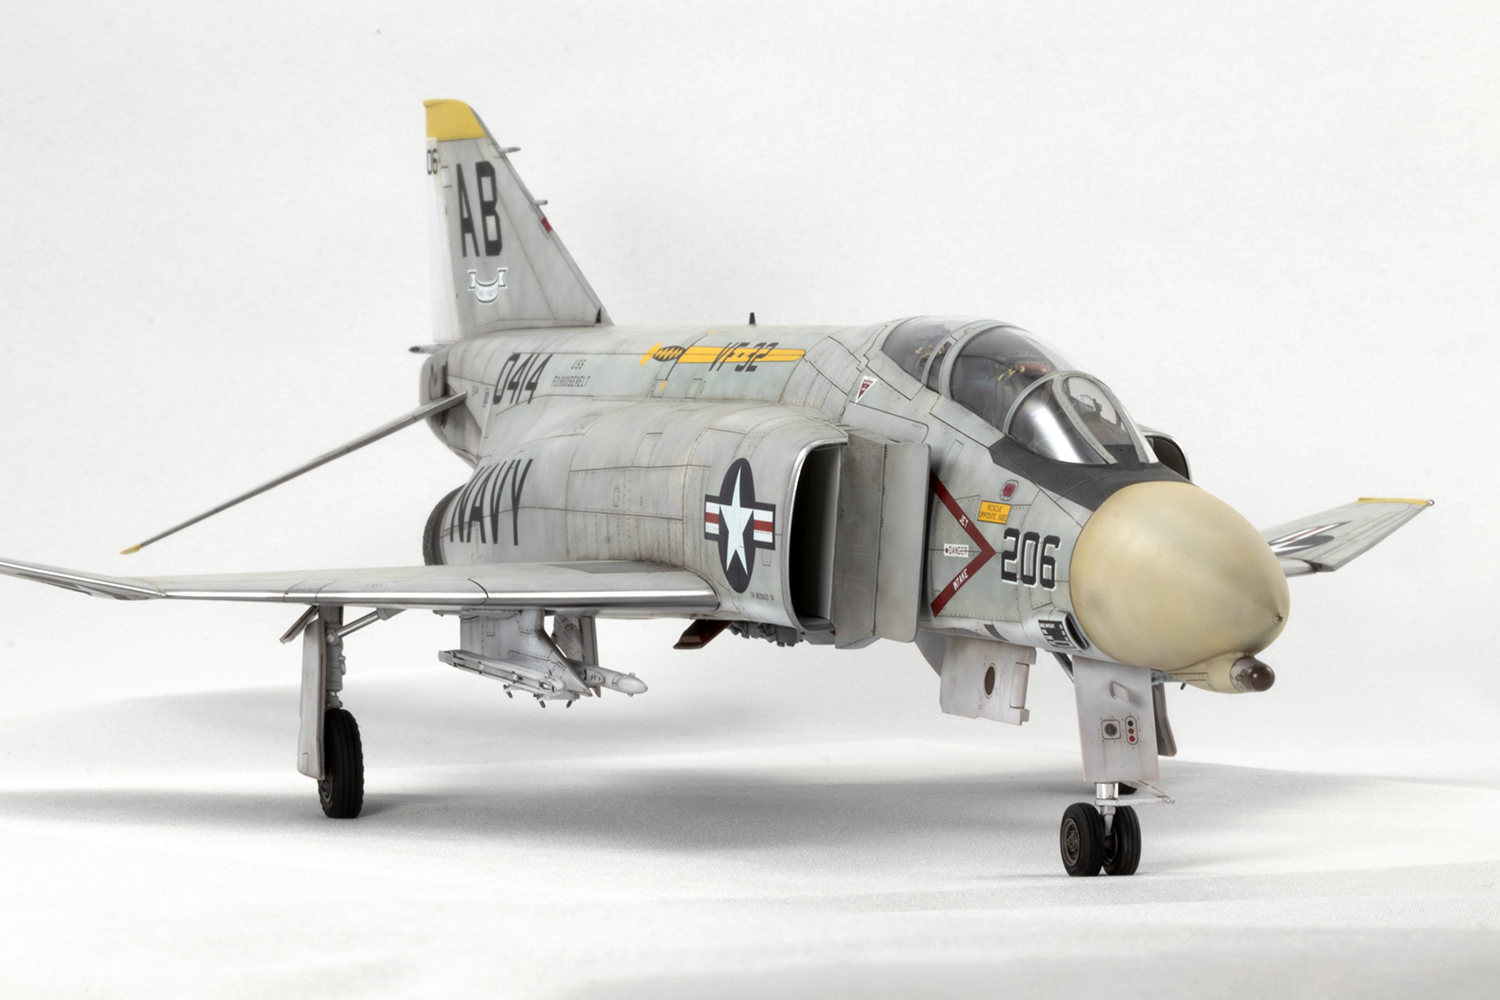
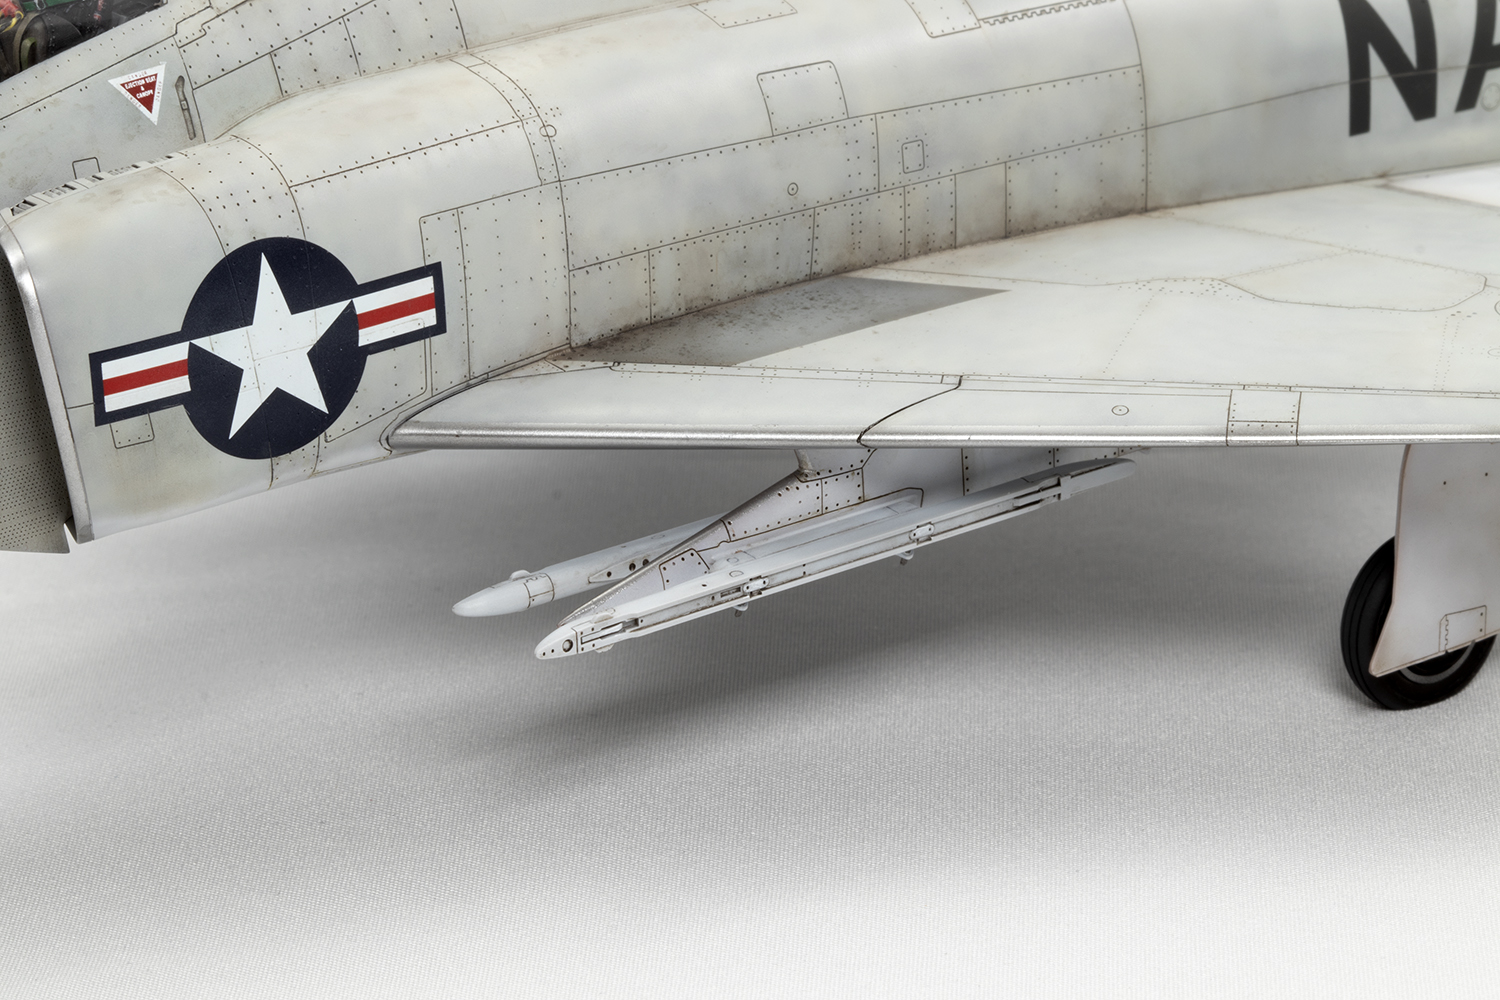
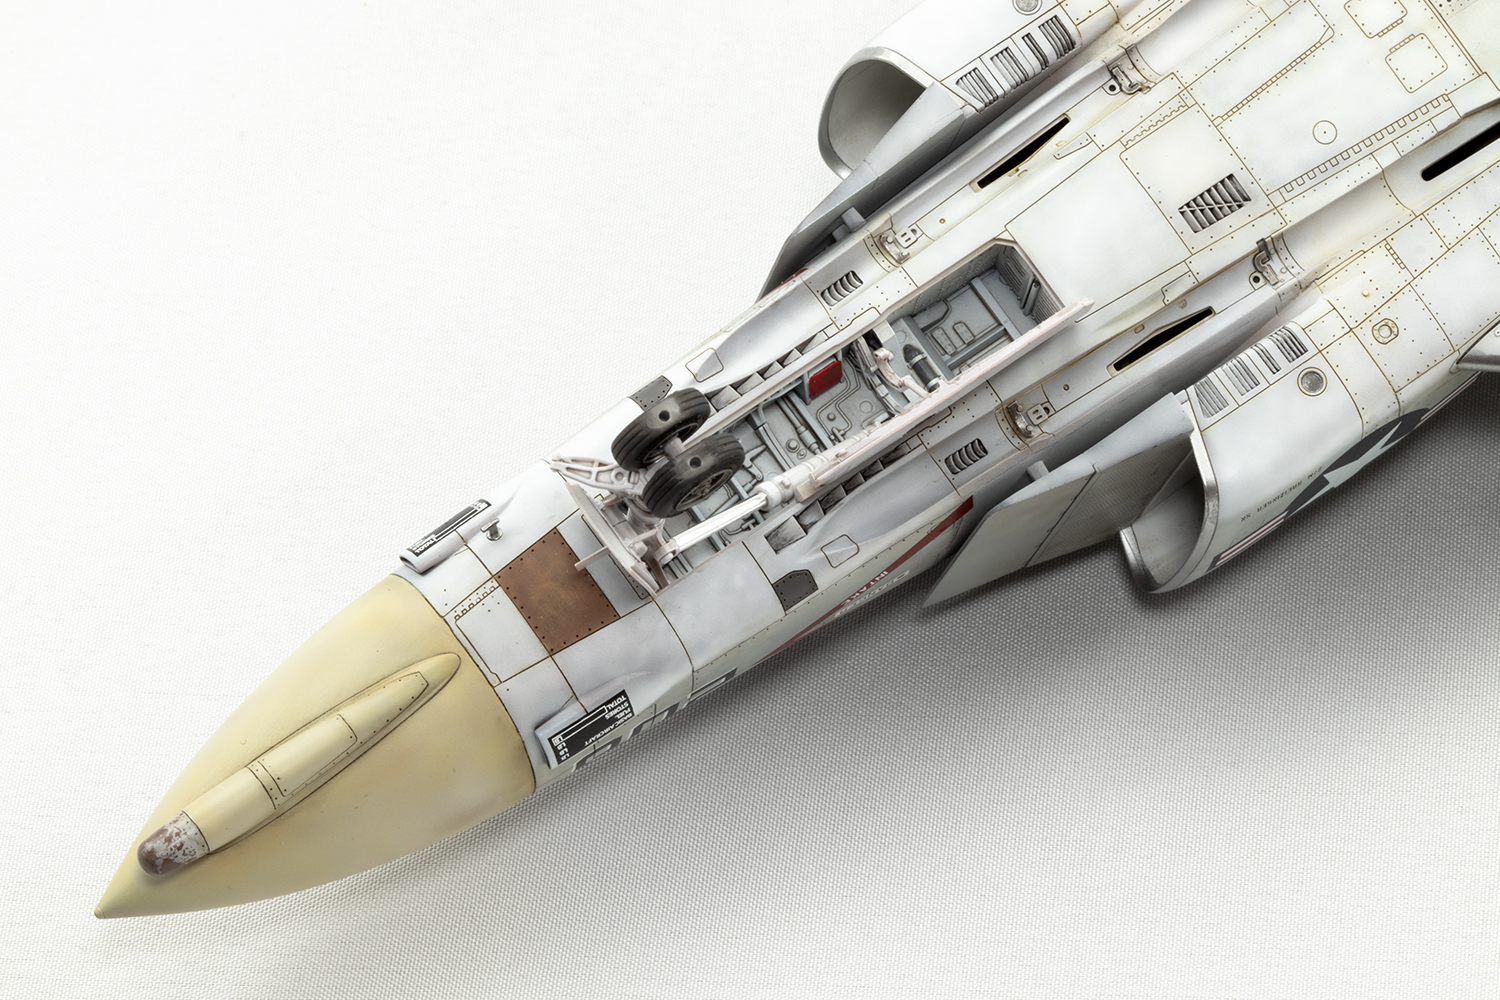
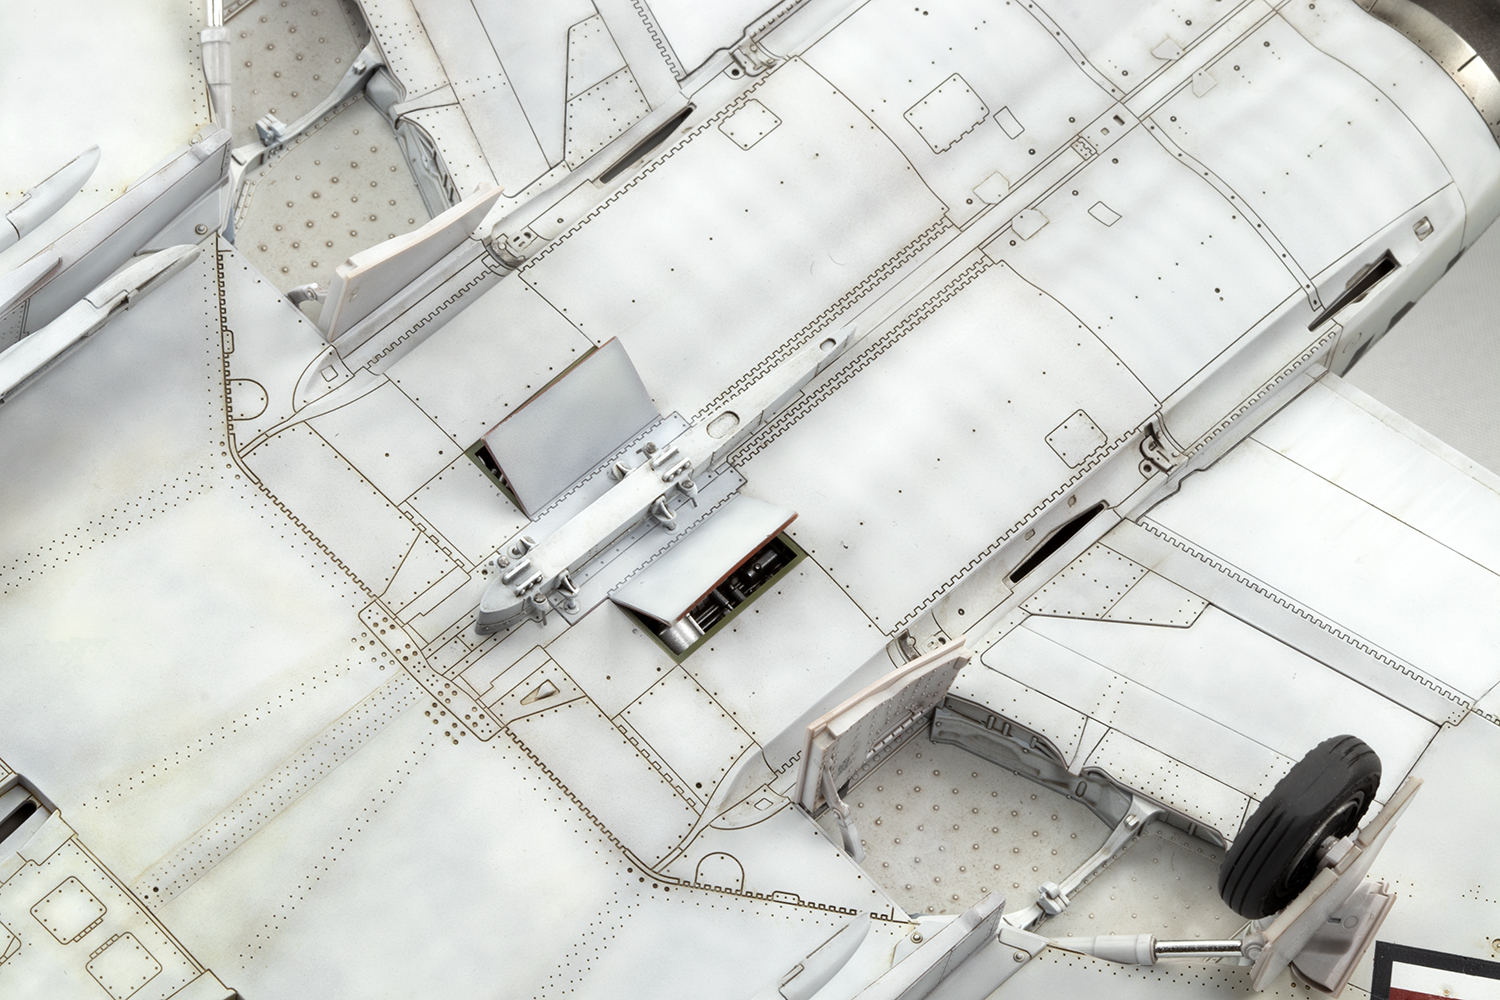
Just like the cockpit, the landing gear and undercarriage bays are beautiful from the box. There is the odd ejector pin mark (and I wasn’t as diligent in removing these as I should have been), but the detail and engineering are fantastic; everything just fits together and is almost impossible to misalign or place incorrectly. In my mind, Vietnam-era Phantoms have a brownish tone to them, and so I painted the undercarriage in various off-white shades over a brown undercoat. Over the top I utilised the ‘magic wash’ comprising a 50/50 mix of Klear and water with some drops of brown and black Tamiya acrylic paints. When brushed over the detail it gives a subtle gradient of dirty colour over the white. For the oleos I used ANYZ chrome decal. It looks cool, but it’s a bit too bright and in future I might try and source some of their aluminium decal instead. You need to soak it for a long time to get the decal to soften and conform, and avoid decal solvents.
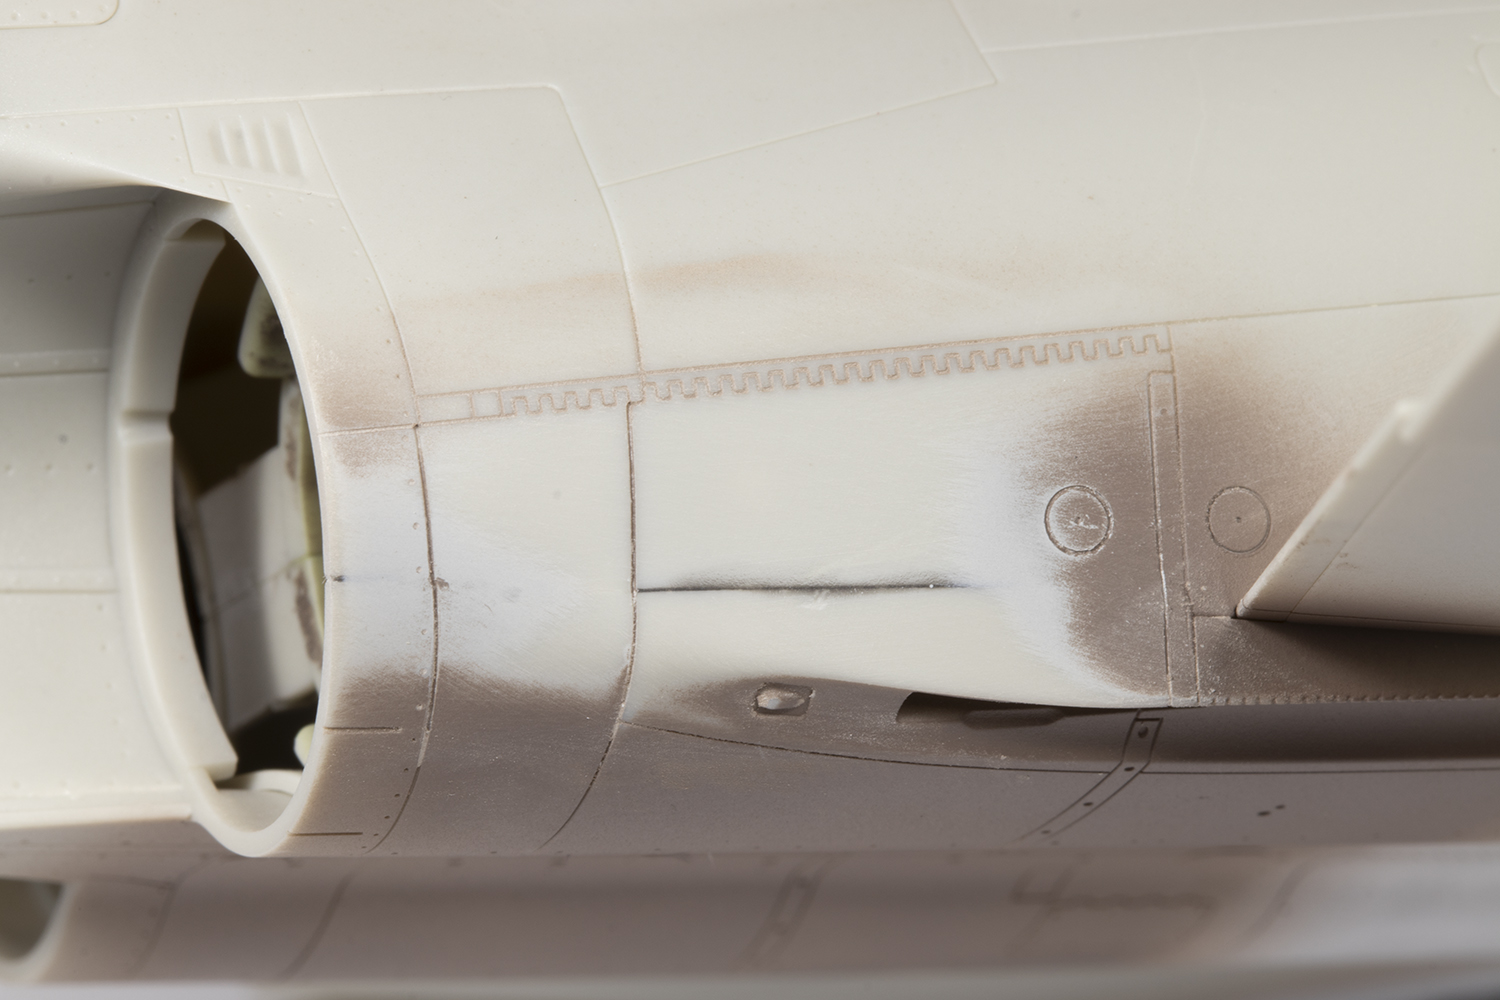
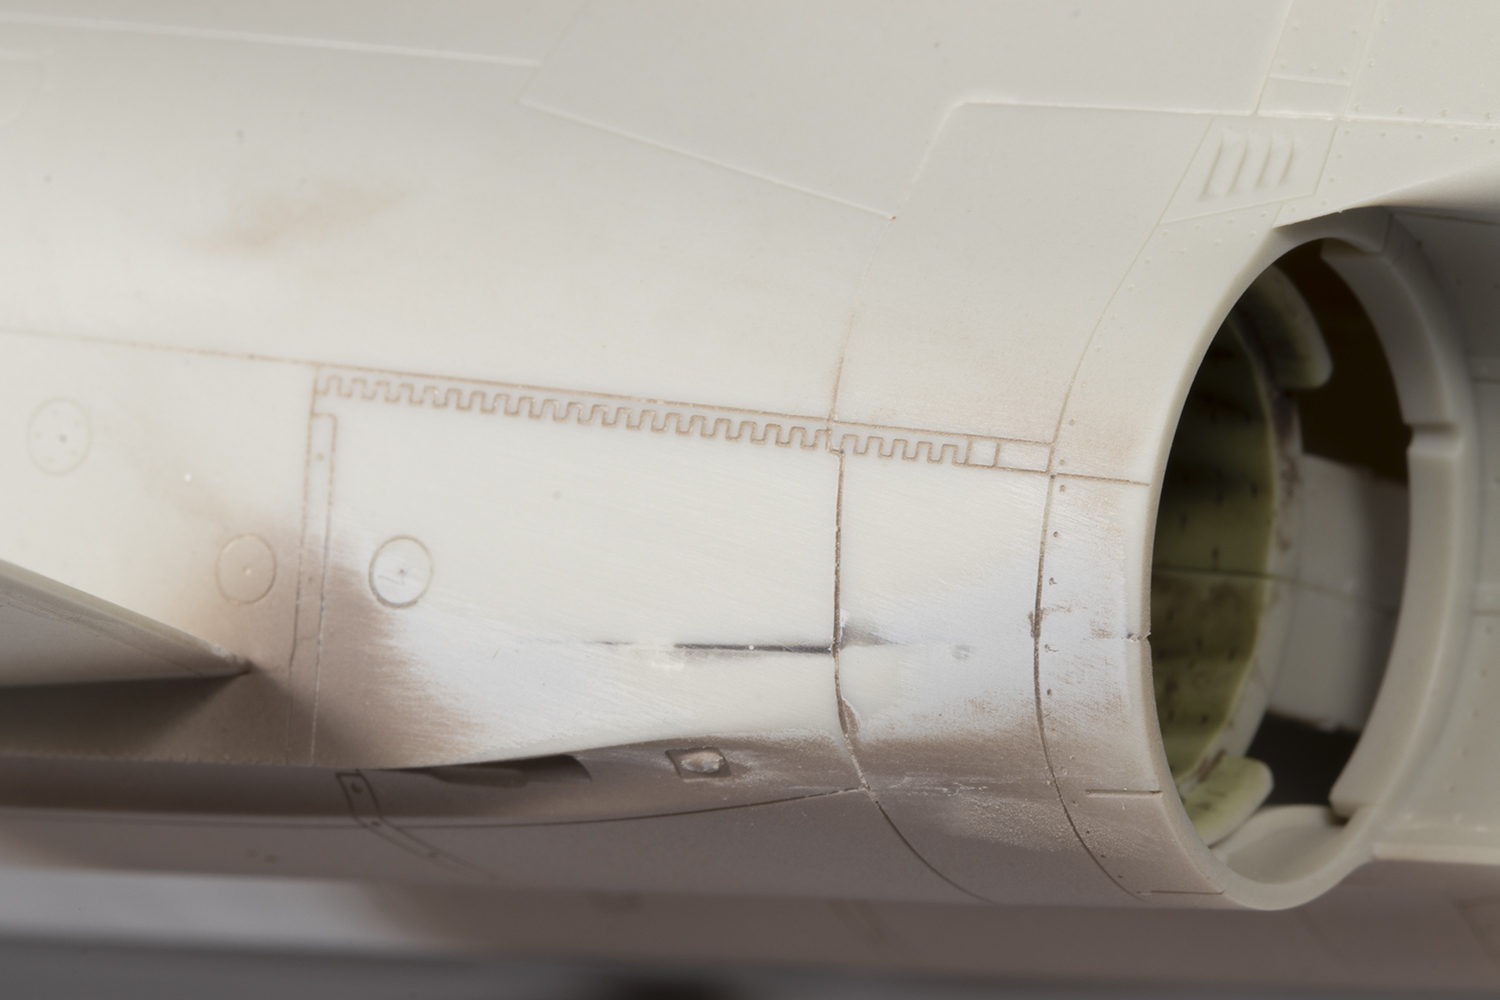
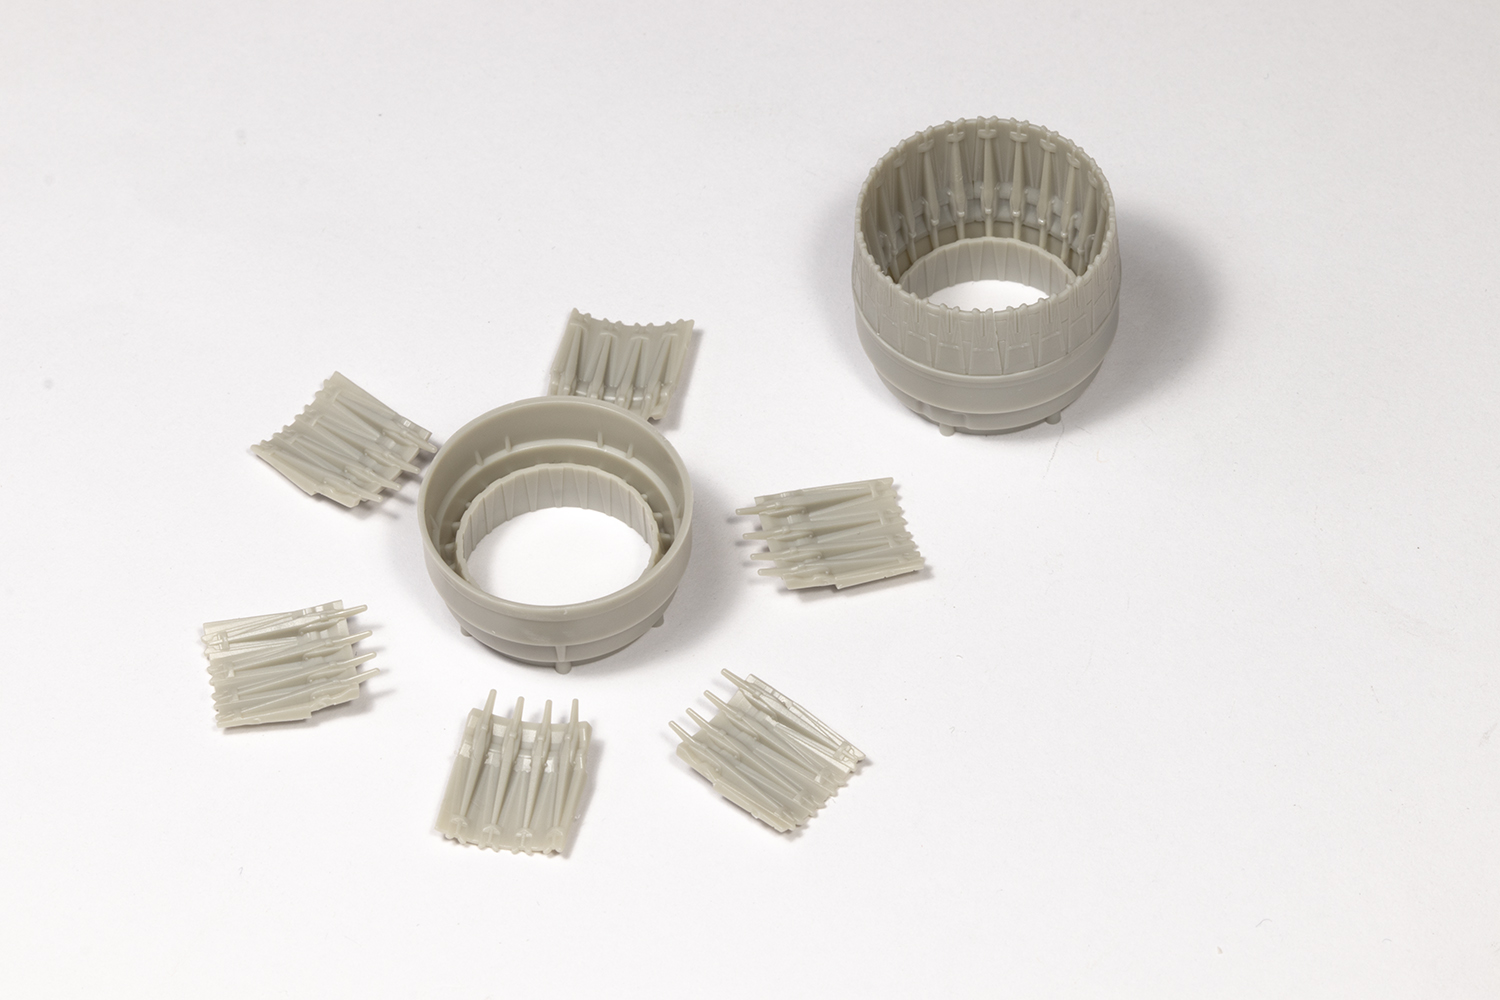
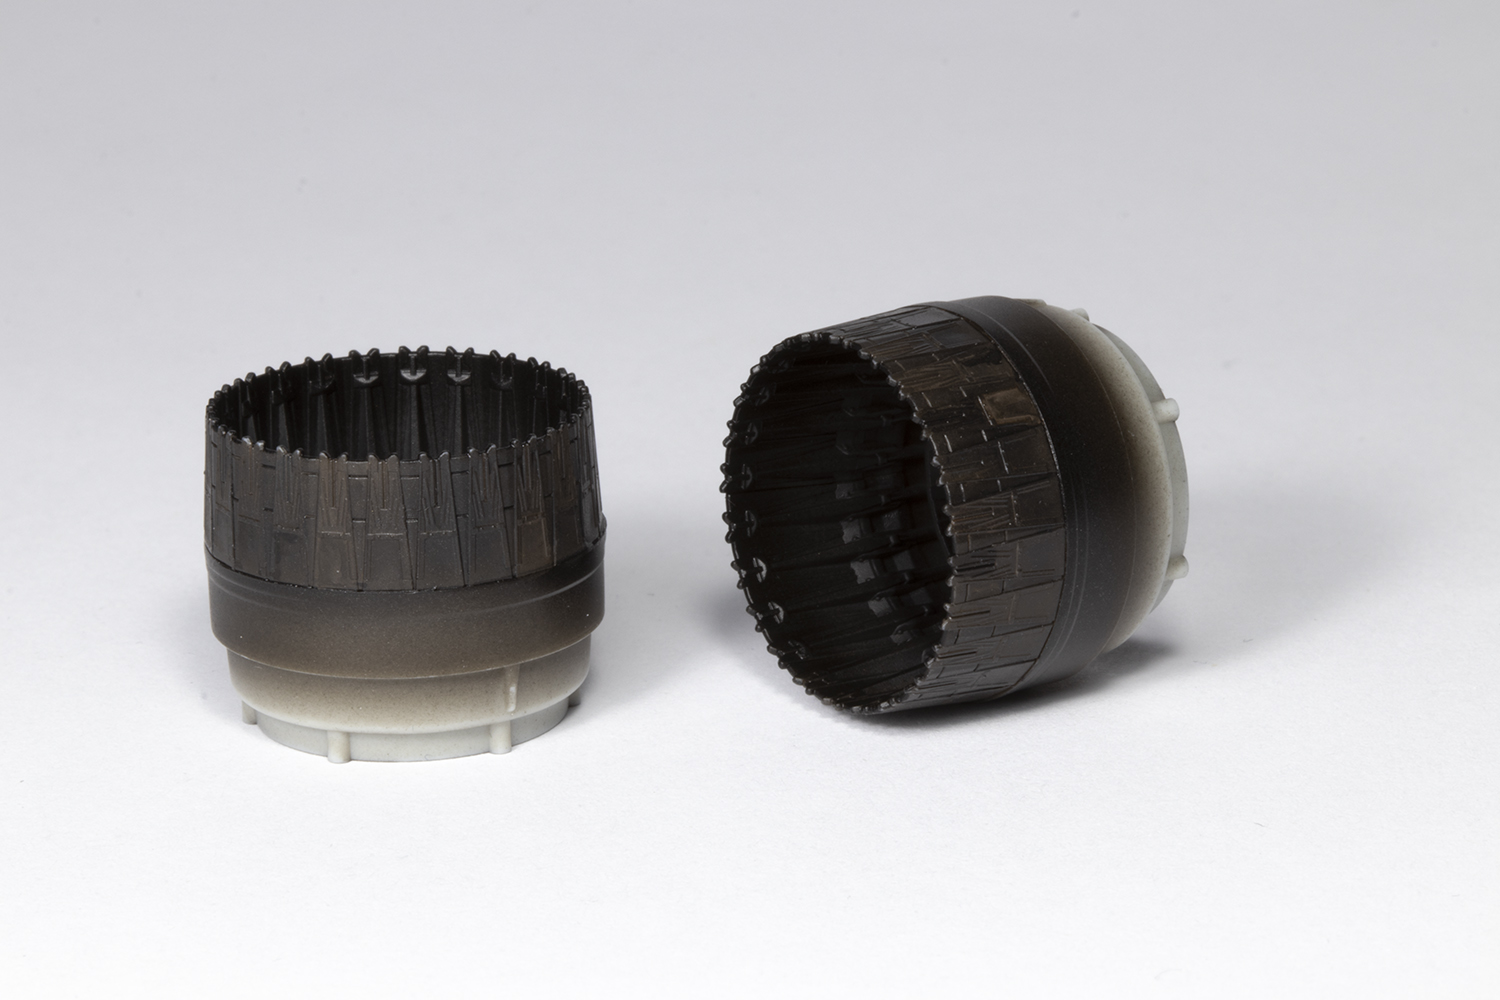
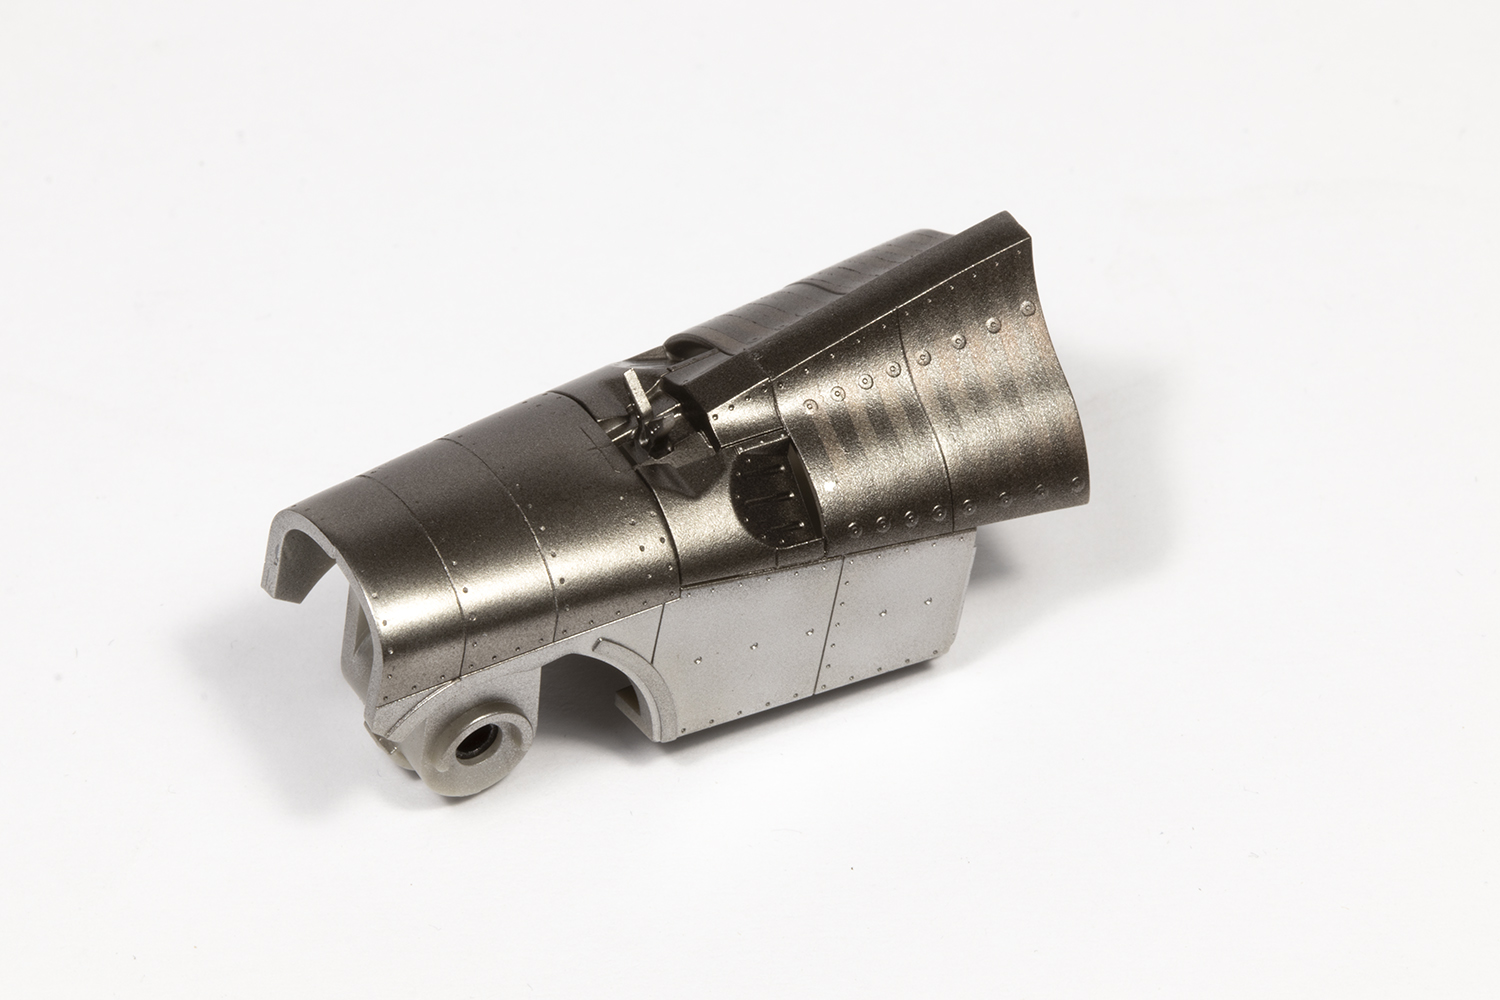
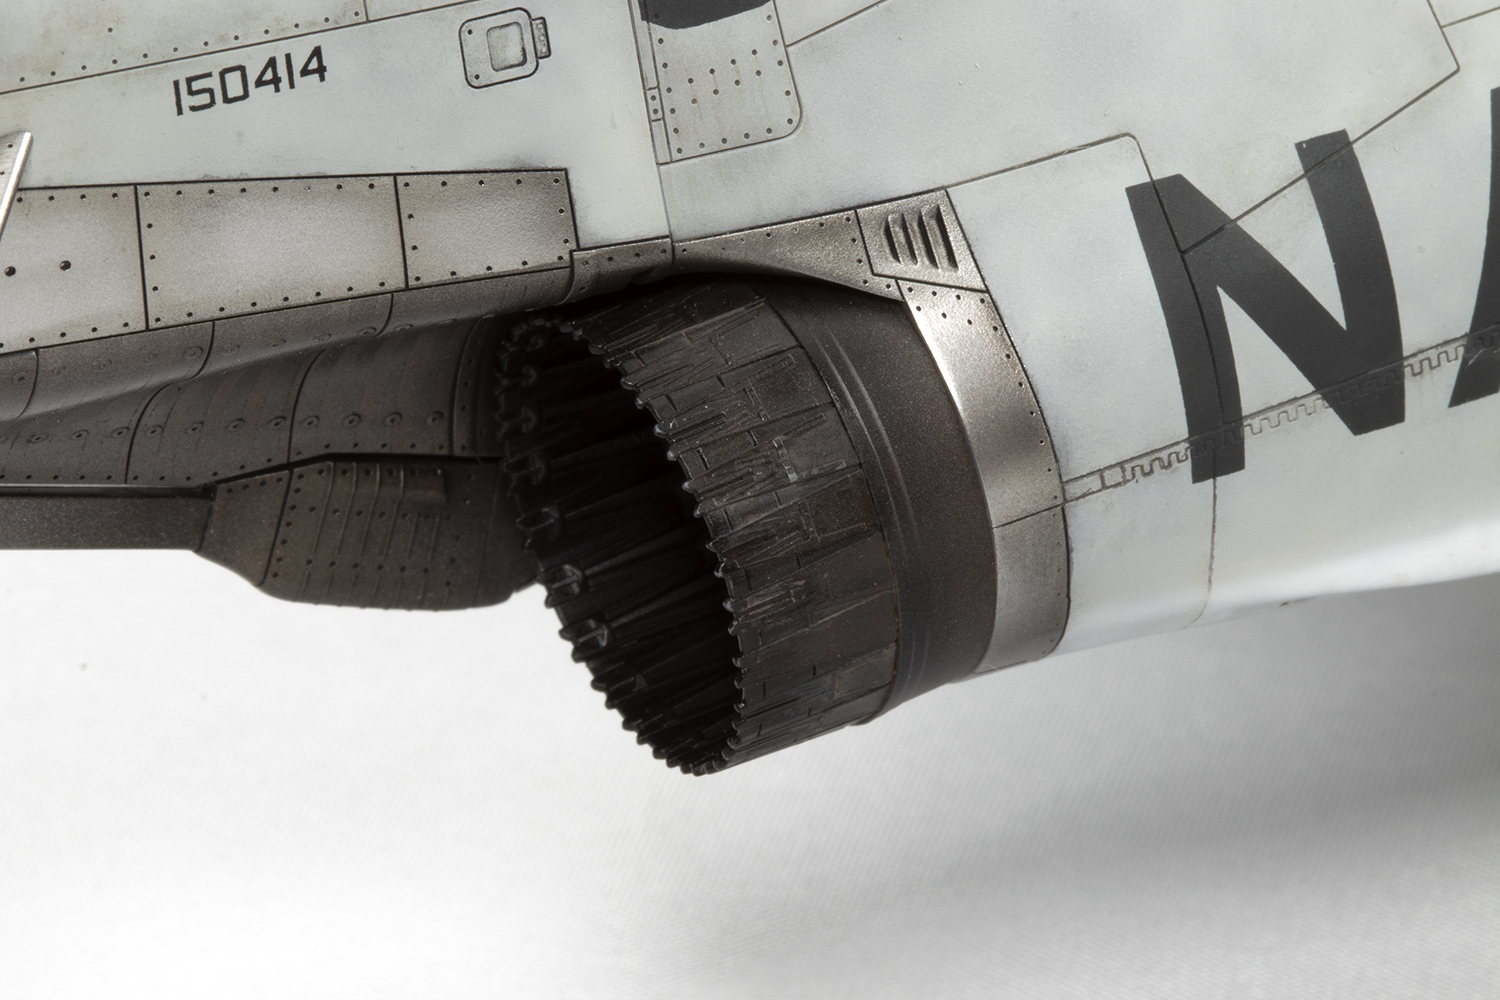
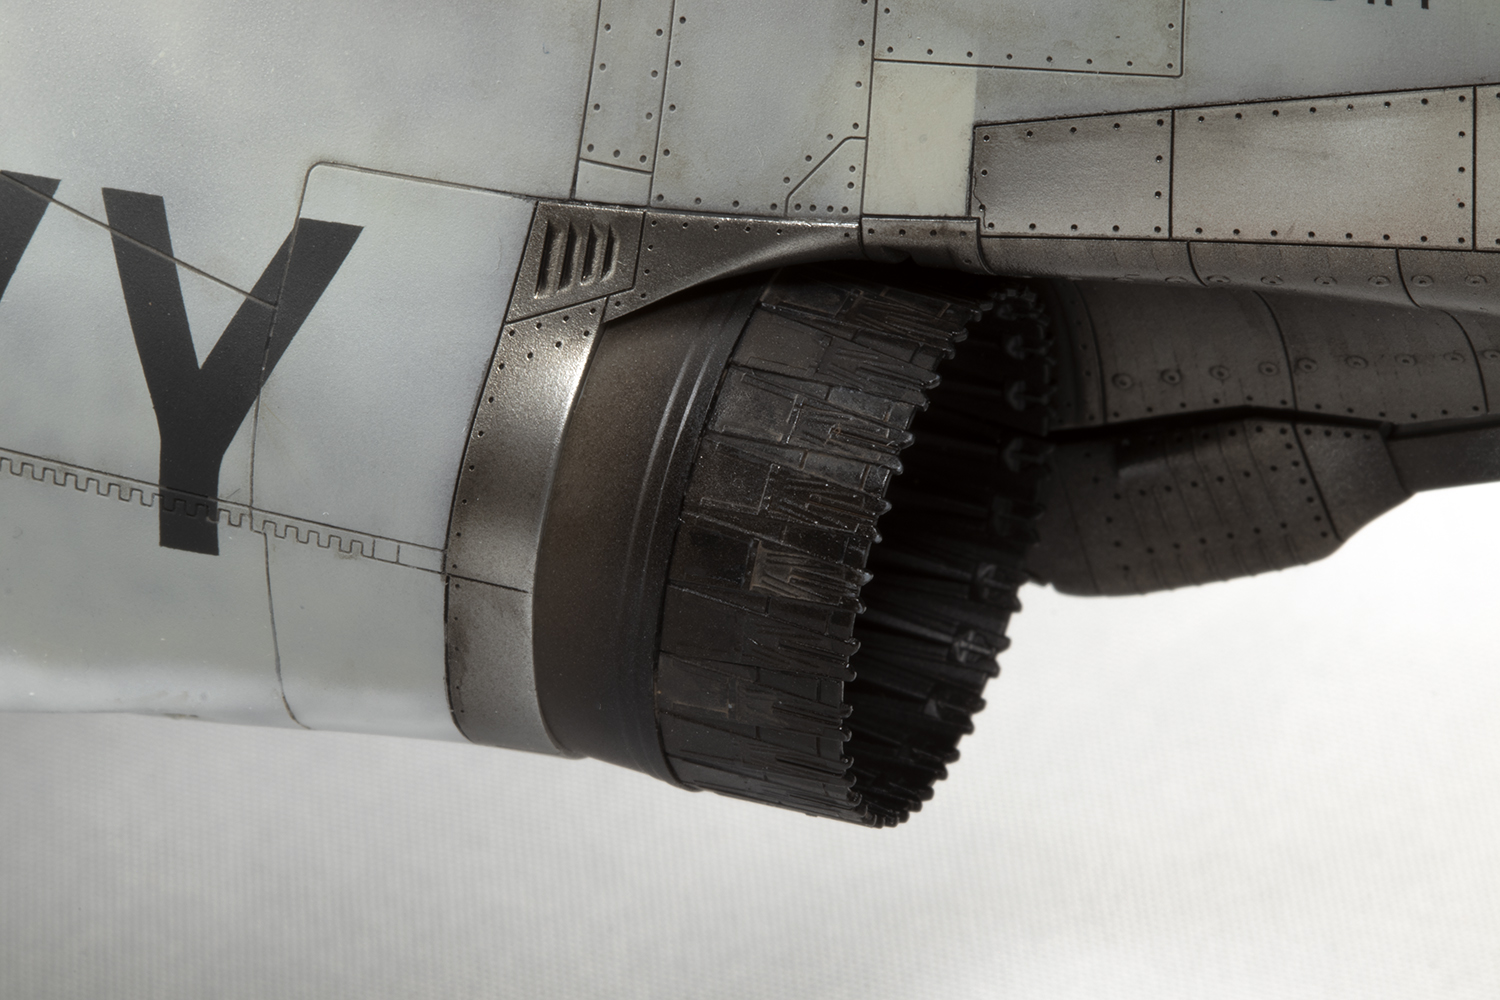
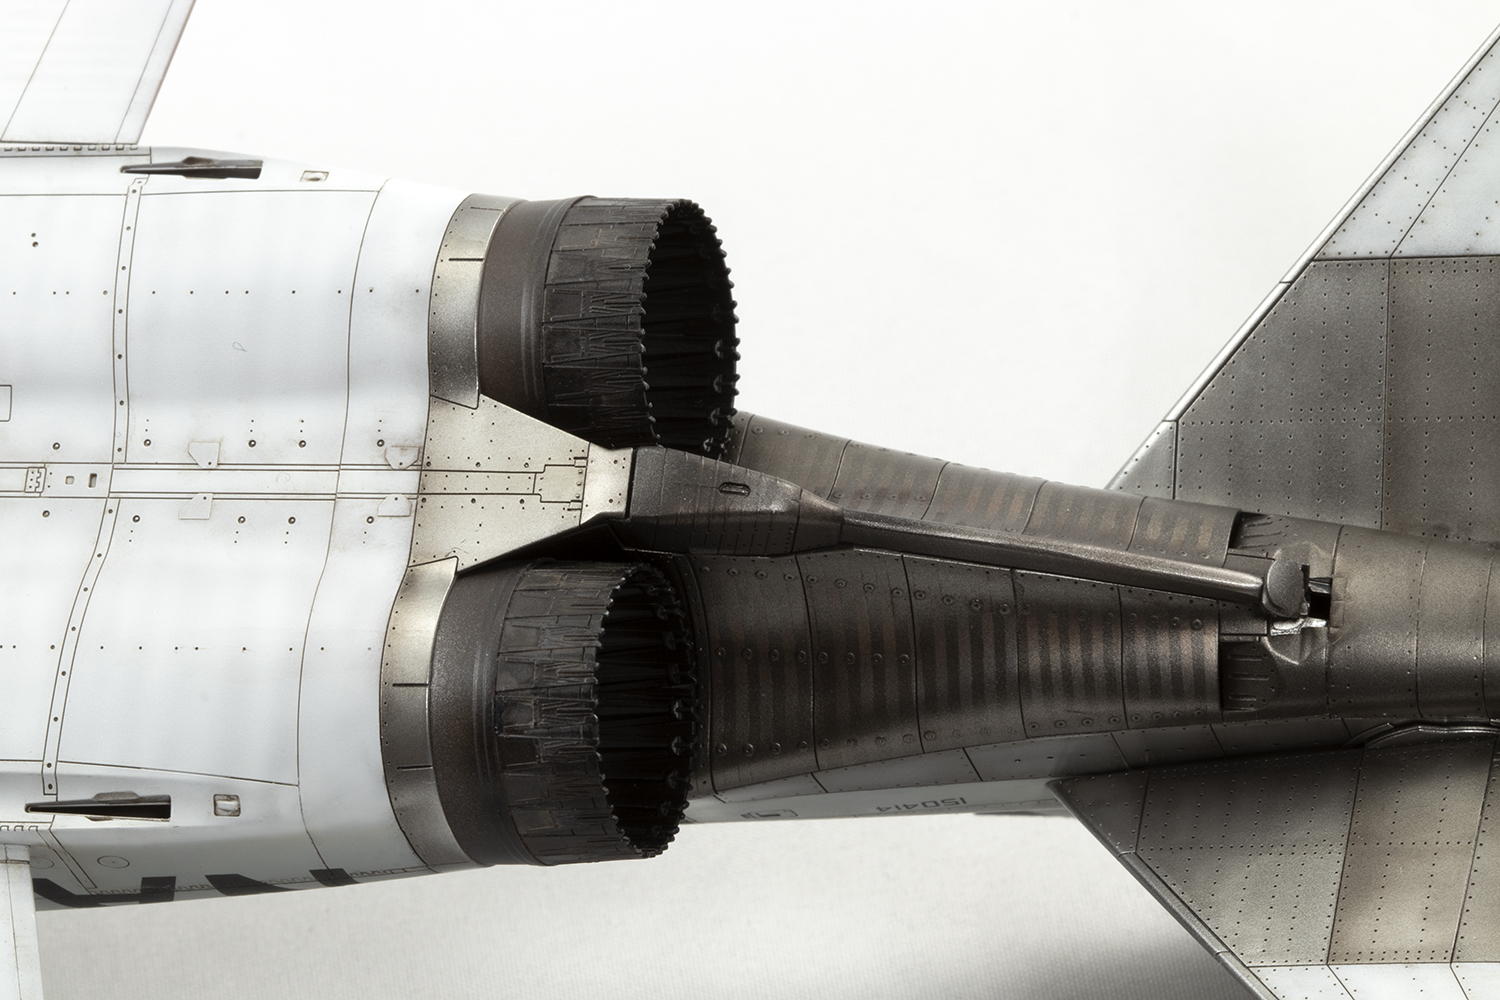
It was inevitable that a lot of the detail I was painting would be barely visible on the finished model. Usually I avoid this in order to save time, but it was so beautiful I felt compelled to paint everything. This included the excellent exhaust interiors which had some lovely surface detail.

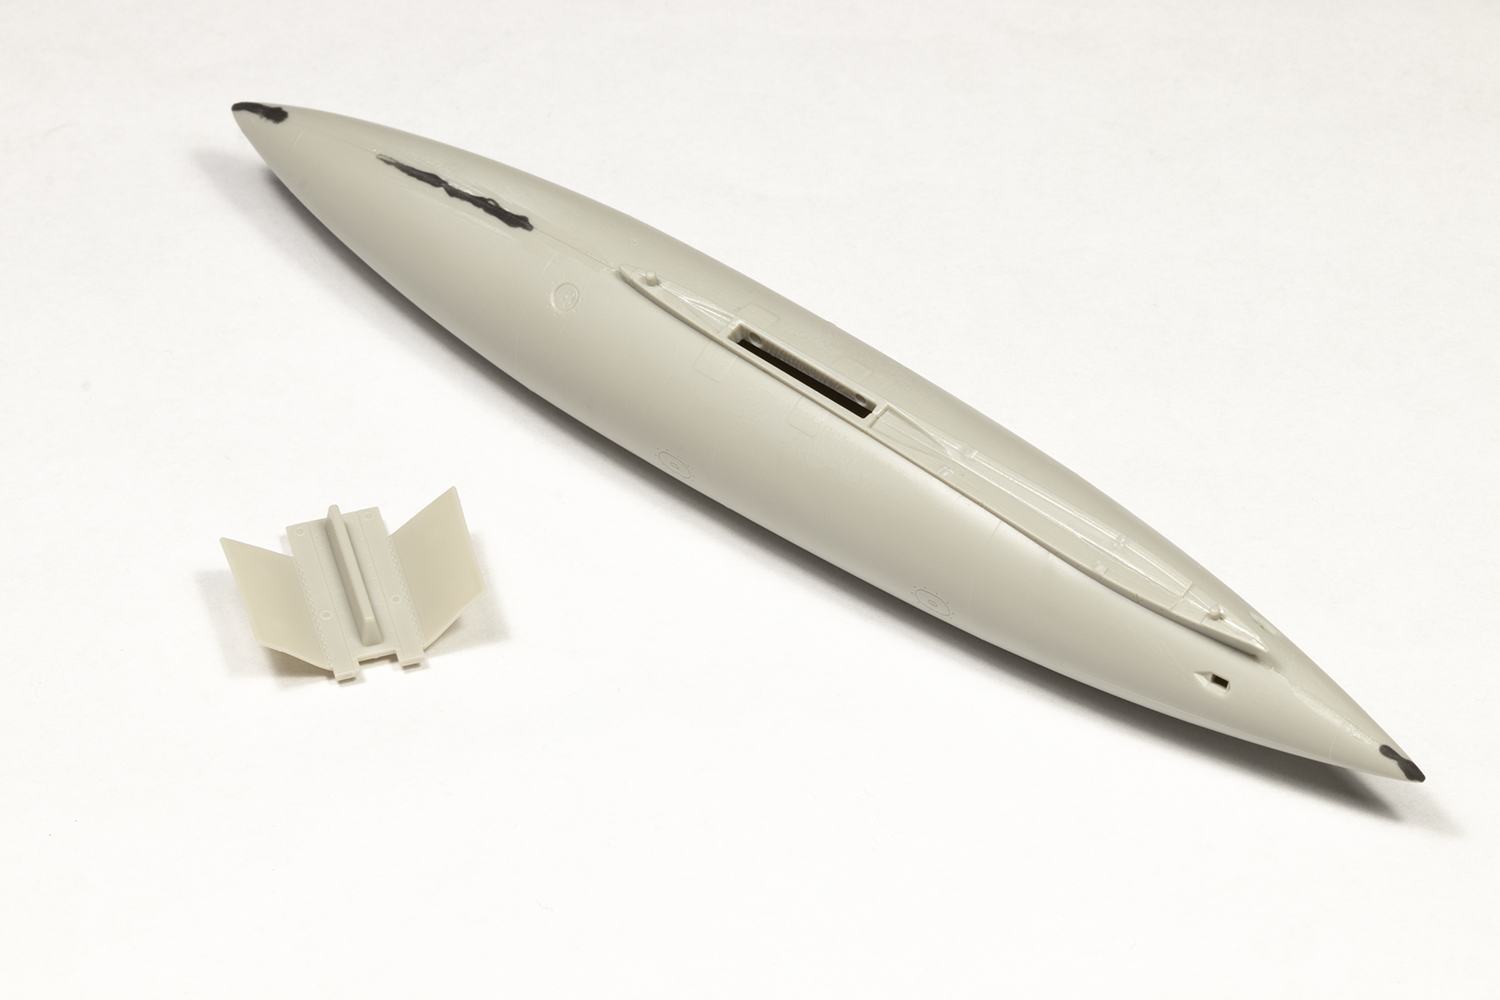
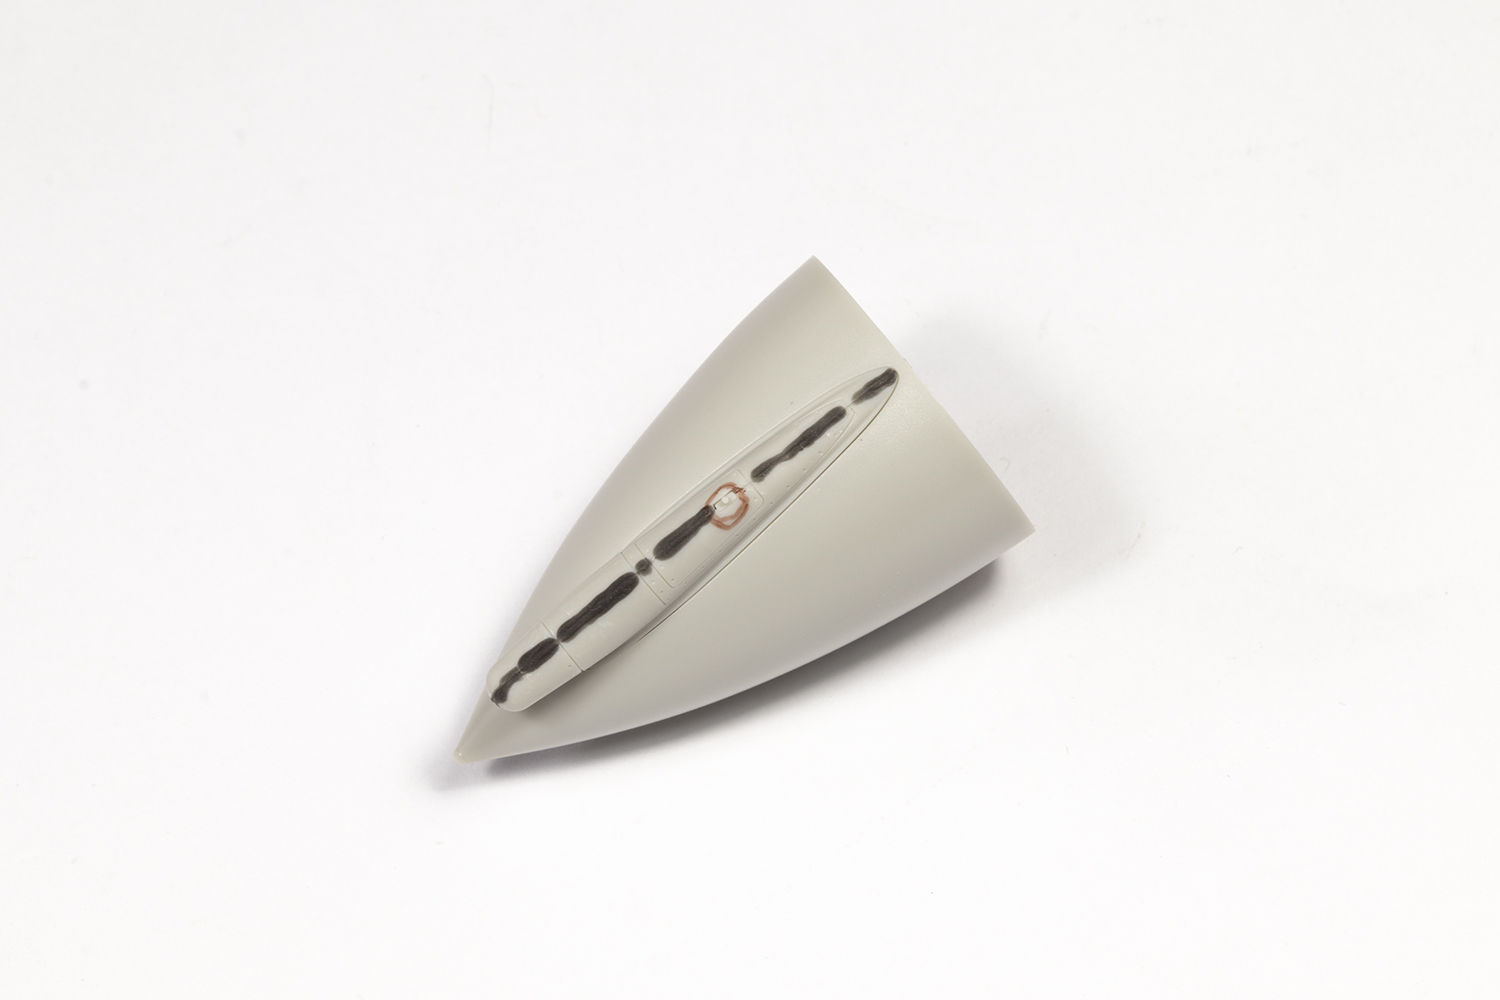
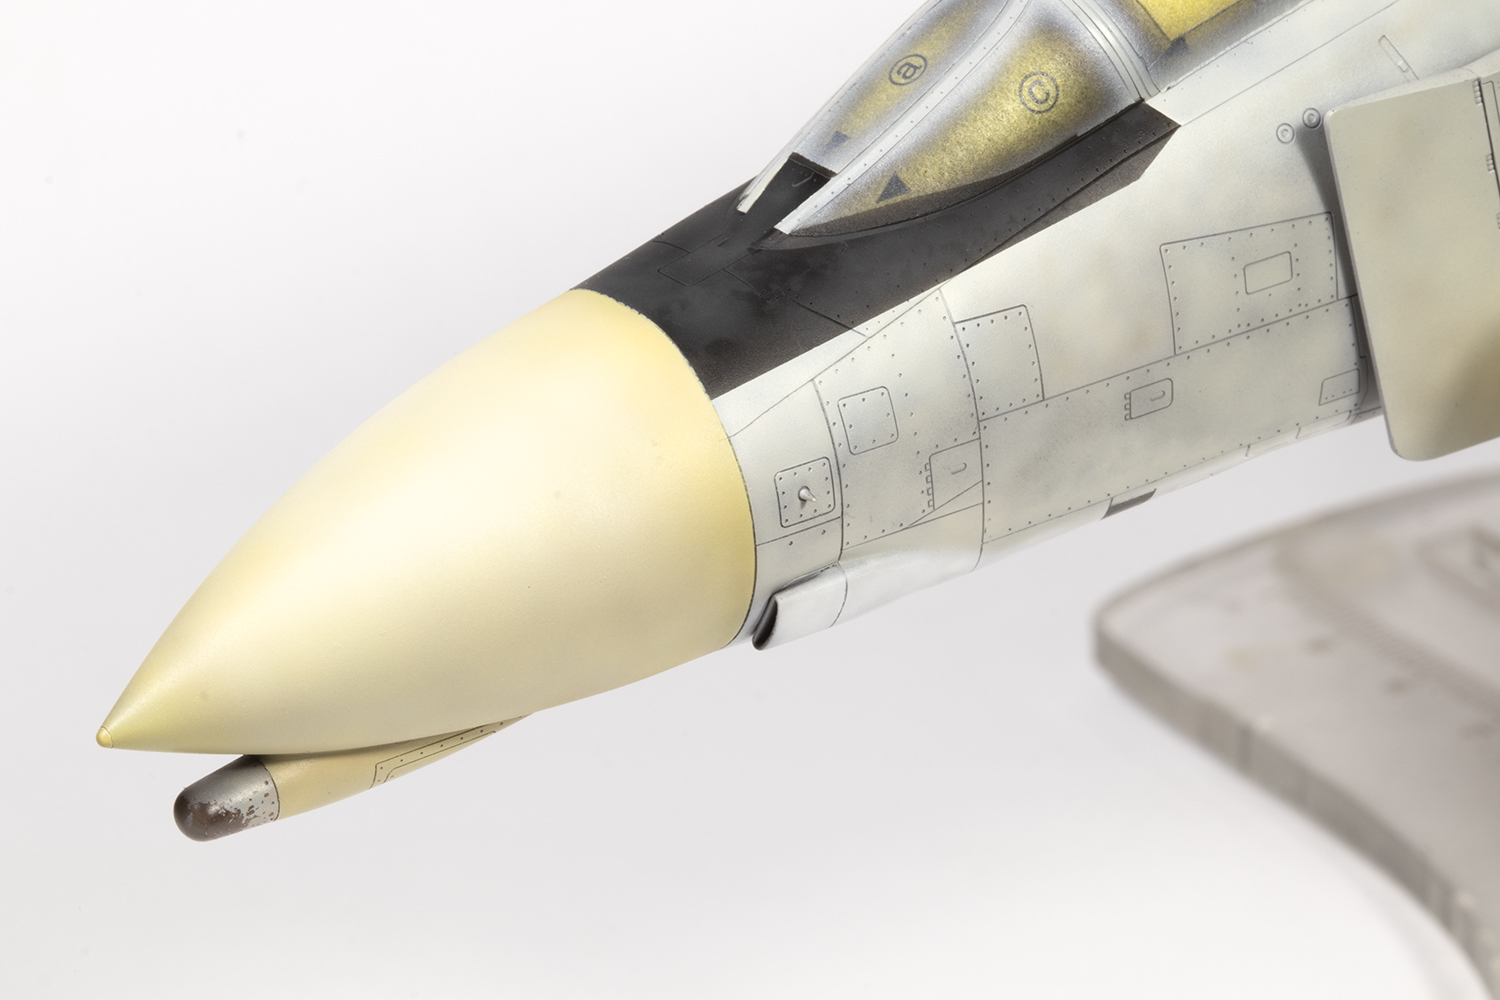
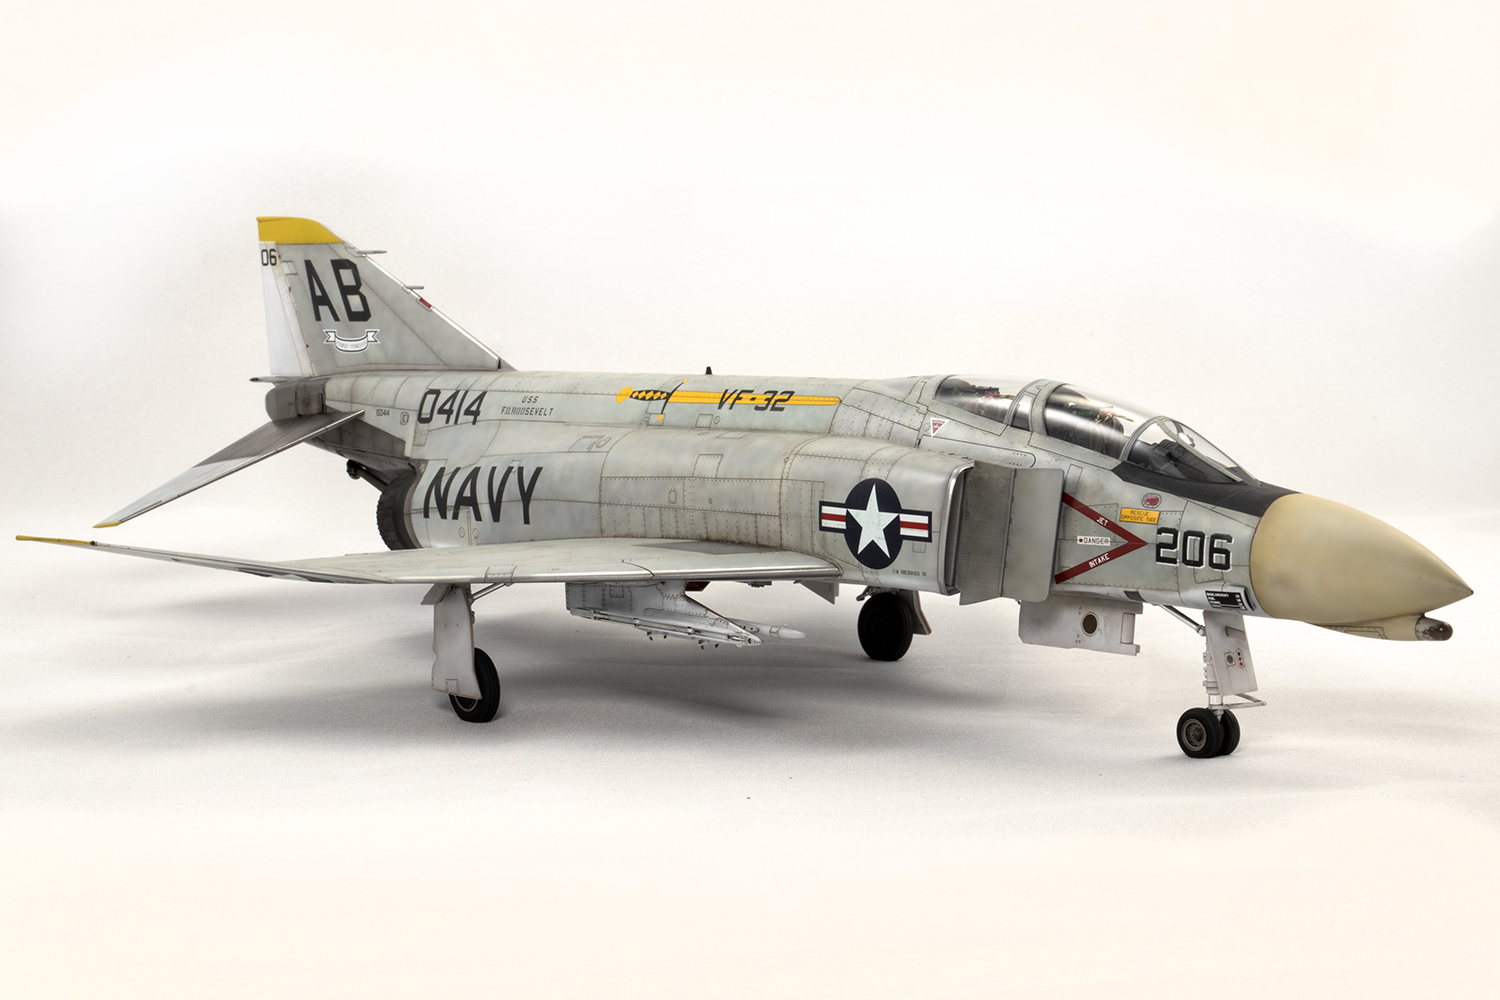
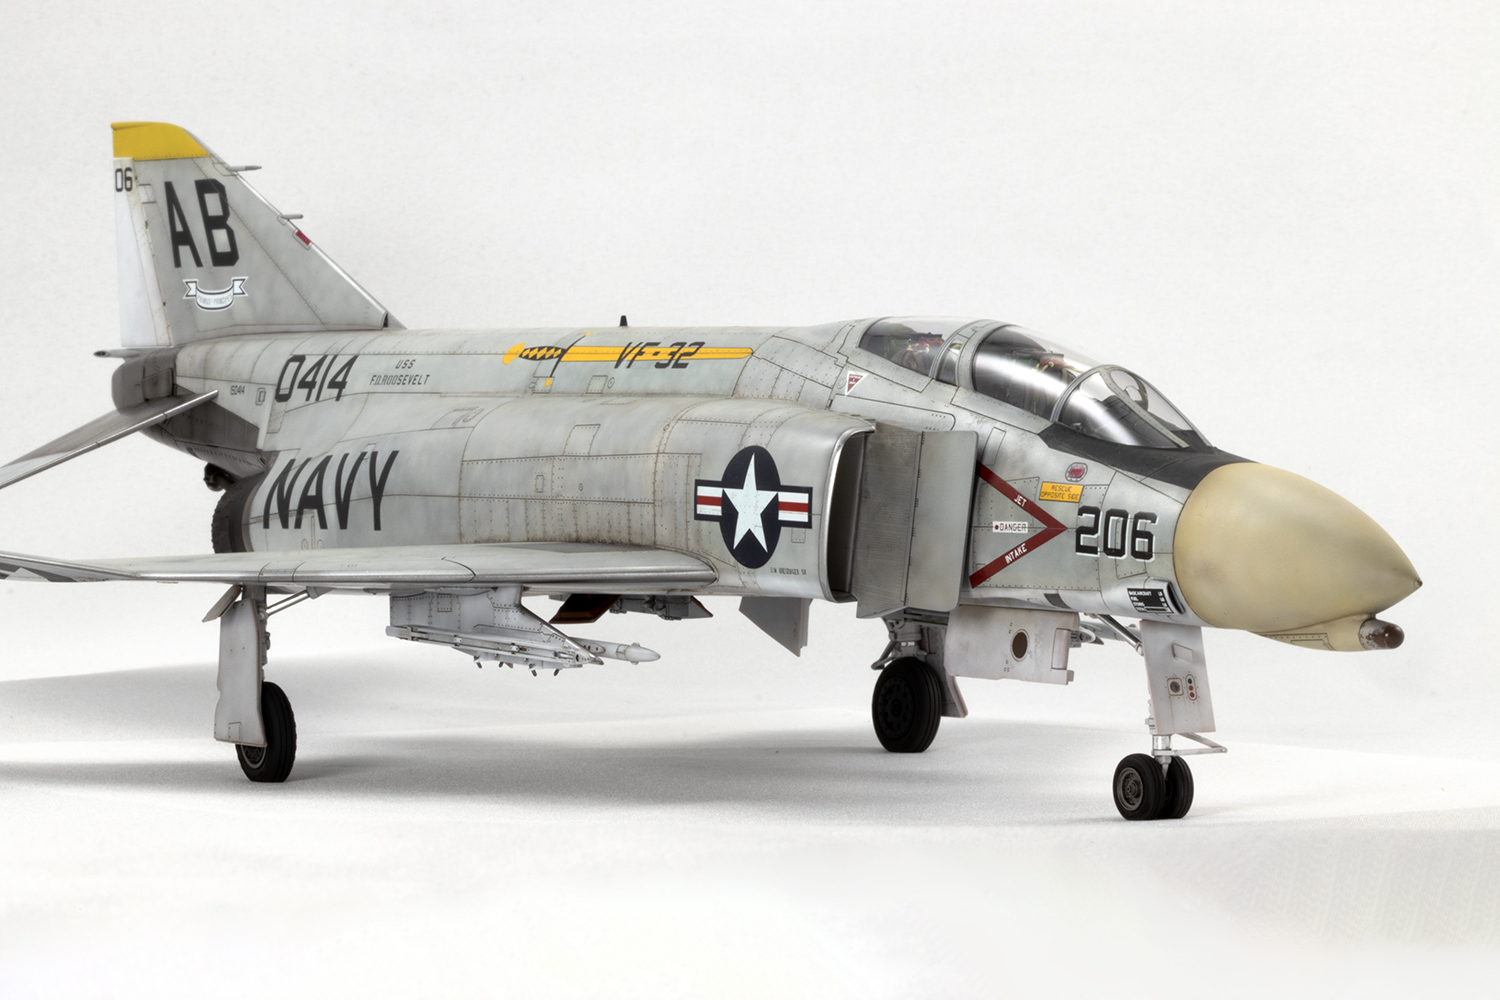
Lest I fawn too much over Tamiya, there are a couple of weak points in the kit. Tamiya provide no option to leave off the centreline drop tank – the way they have moulded the kit compels you to add it. I resigned myself to this and built the tank up. I hate drop tanks. And in addition to not providing the full range of most-used tail fin caps, Tamiya also neglected to add the empty nose pod commonly seen on early airframes. I did not realise this until too late, when I’d already glued in the IRST pod with its longer nose. Hypersonic provide the correct part, and my greatest regret with this kit is I didn’t add it.
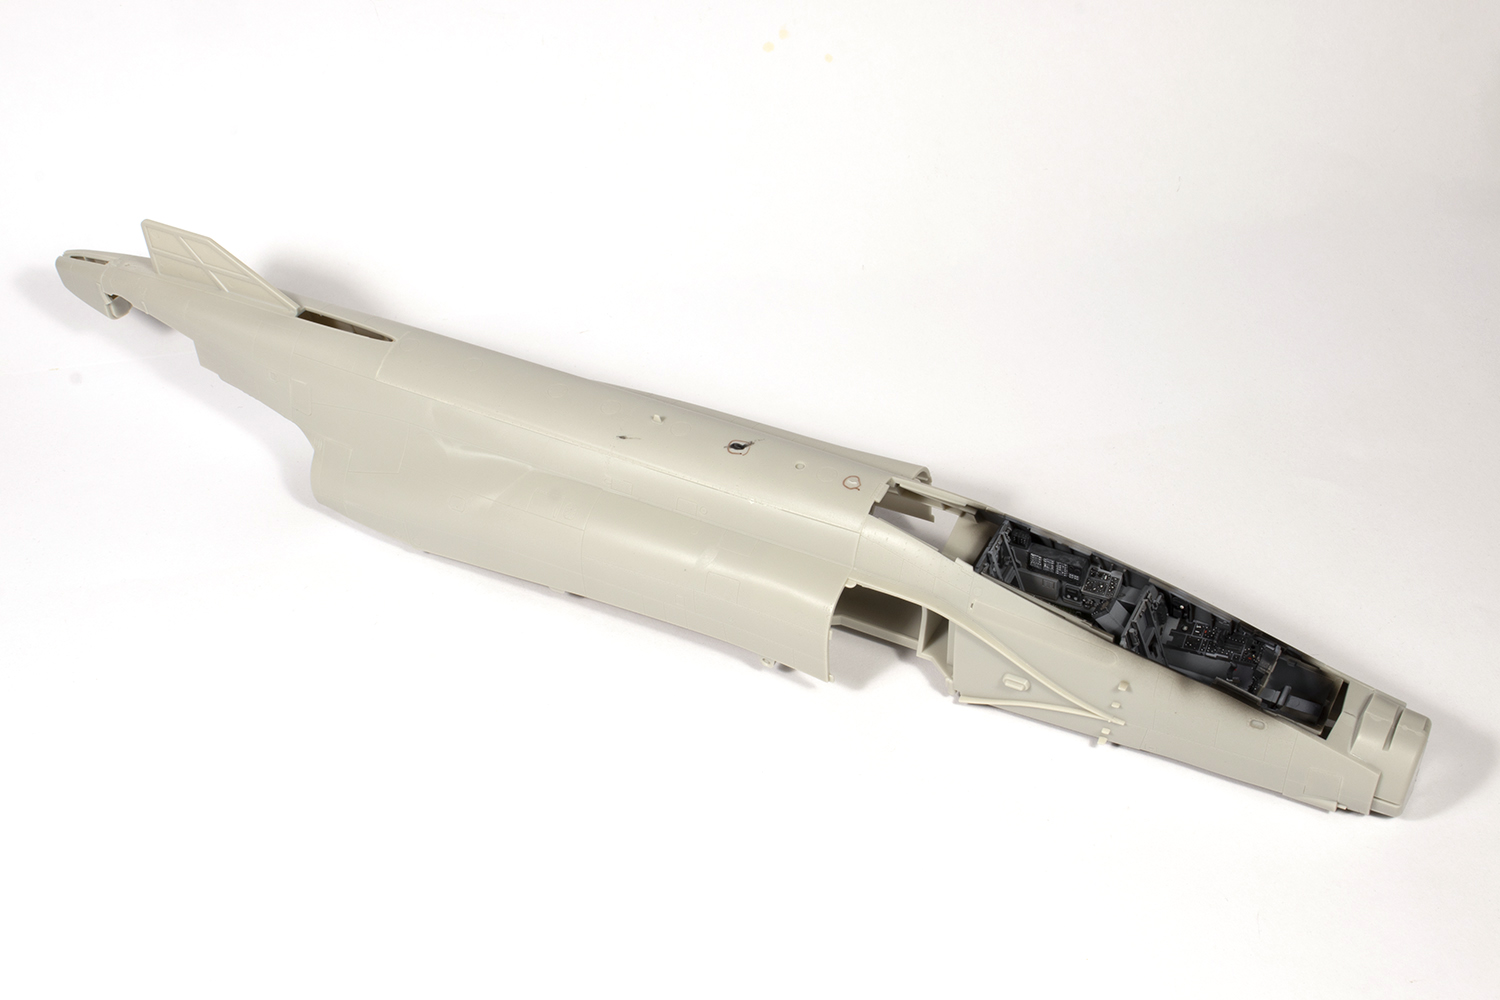
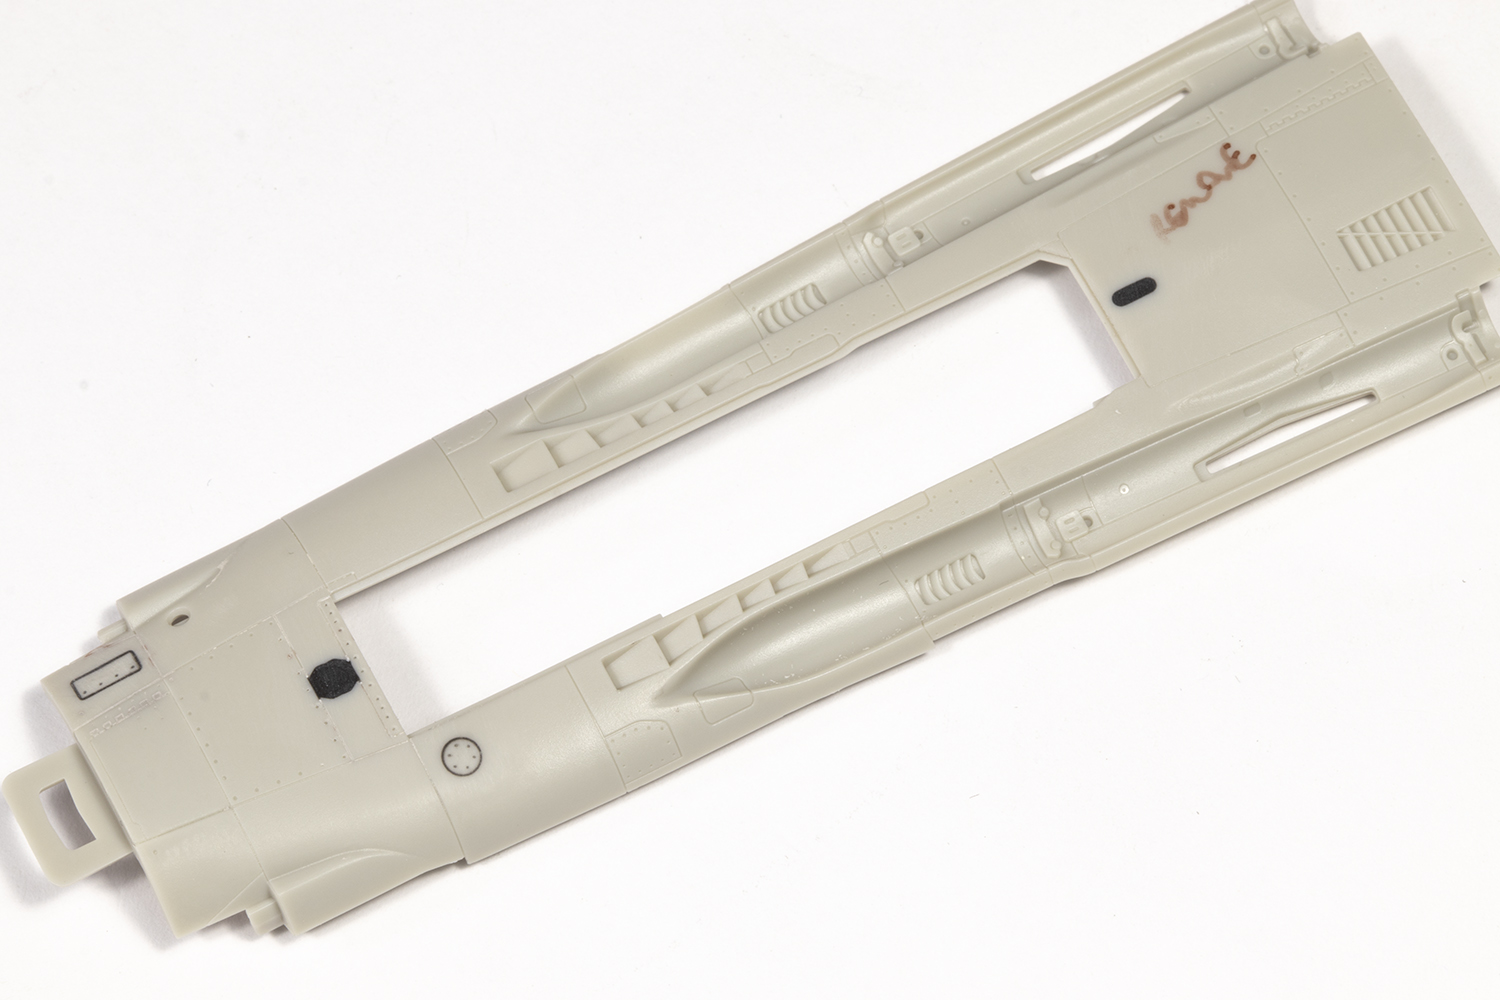

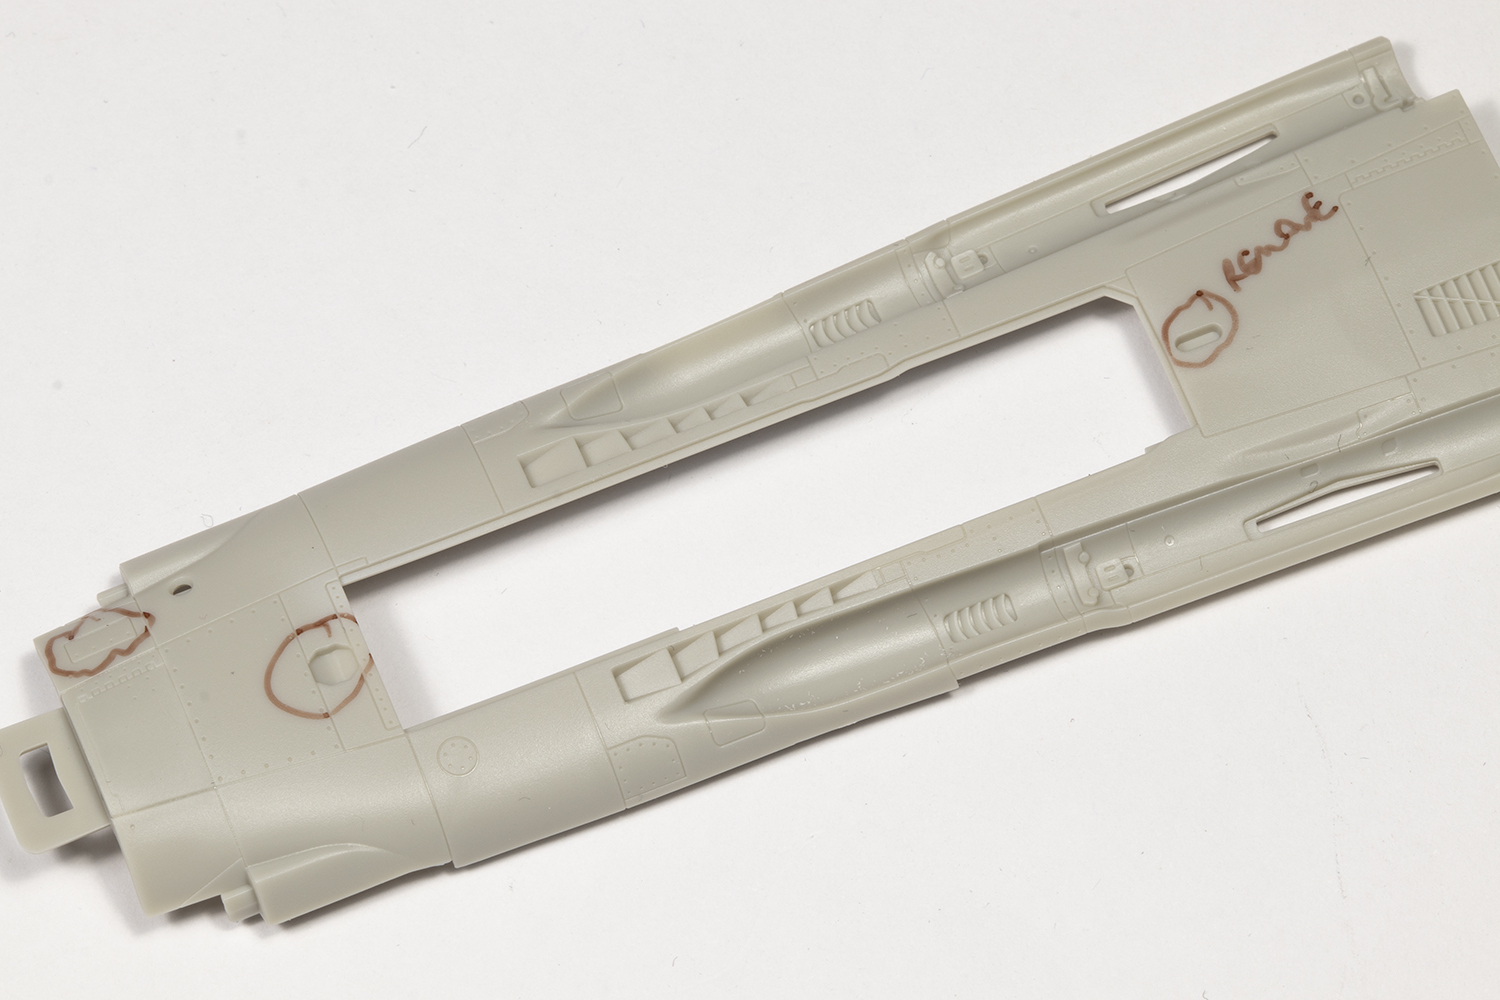
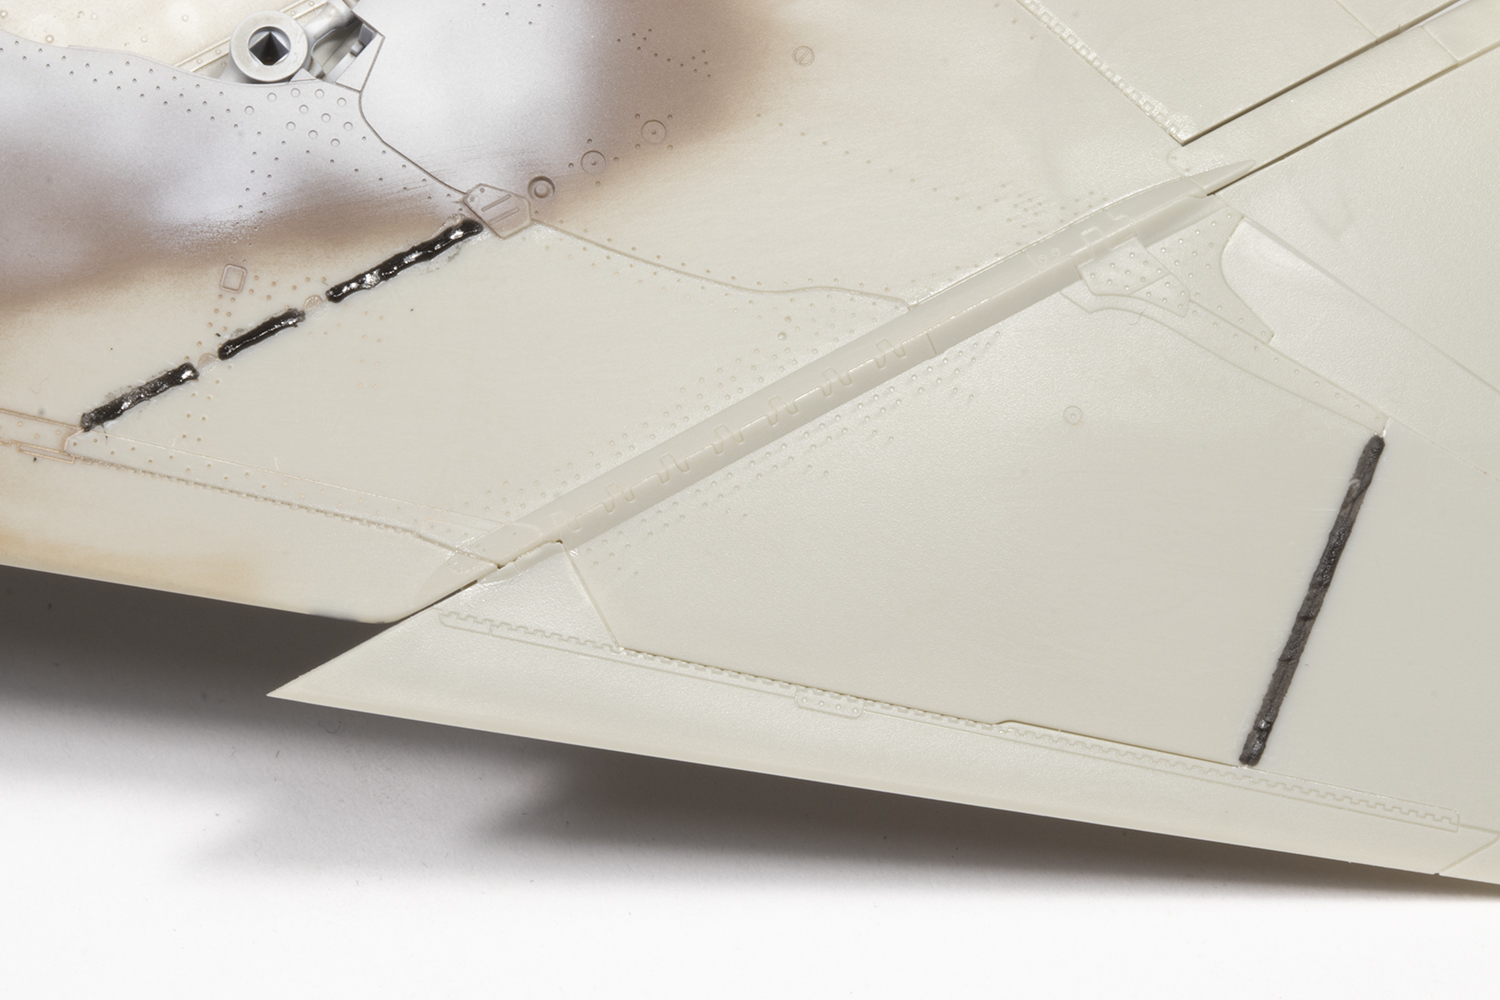
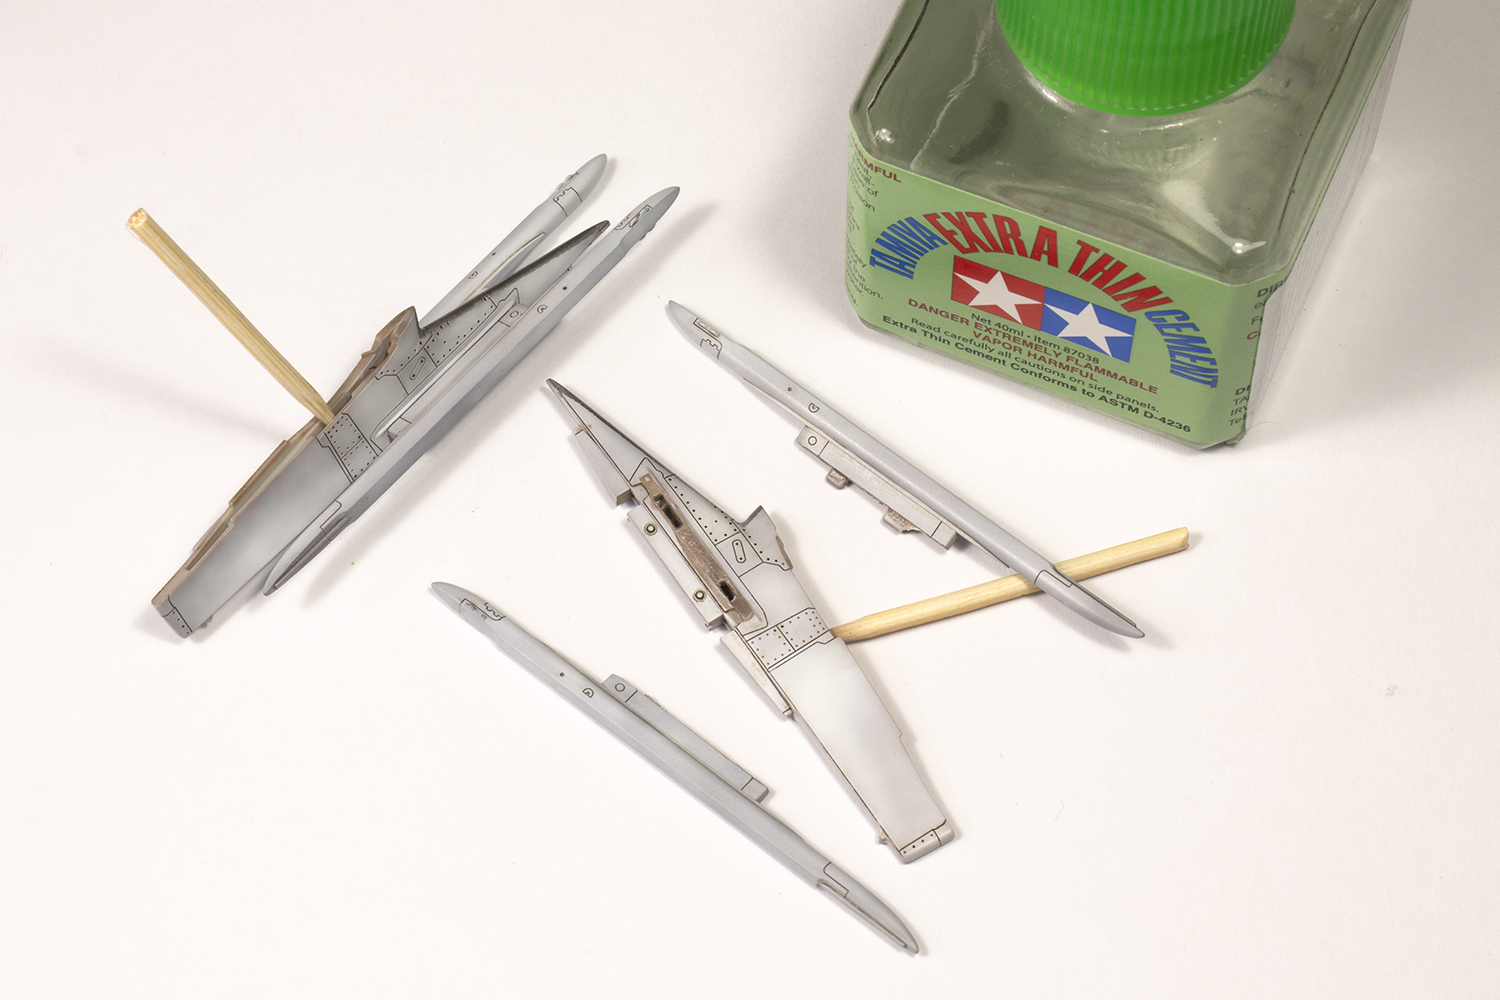
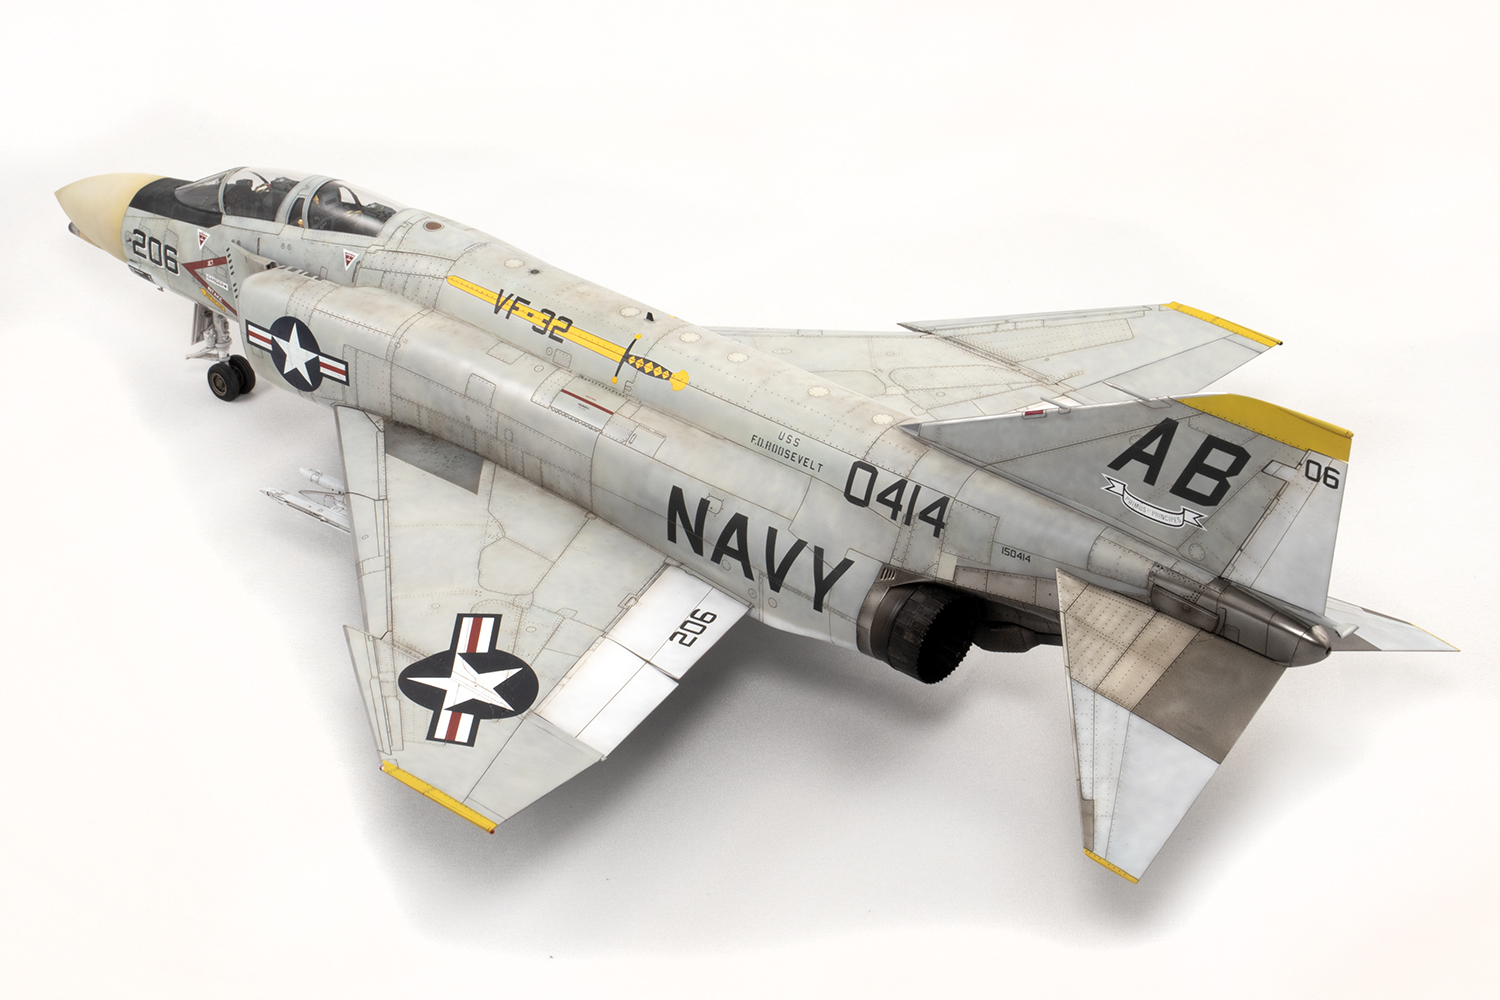
Construction is so straightforward there is little to report, but not nothing. I had seams to remove where the lower rear fuselage halves met and resorted to my favourite CA with VMS filler powder mix. Restoring the detail in this area is difficult because the trailing edge of the wing gets in the way. Some clever moulding means there is no upper centreline seam to clean up, and clever engineering continues with the windscreen moulded integrally with the front upper nose and a tail fin that can simply be push-fitted at the end. Mine is still not glued in place. Much less pleasing is the way Tamiya chose to model the horizontal stabilisers. I admire Tamiya for doing it so they can be rotated, but the cost is segmenting the metal keel between the exhausts. The fit is really good, but I would much prefer a straightforward tab-and-slot arrangement and forego the ability to move them.


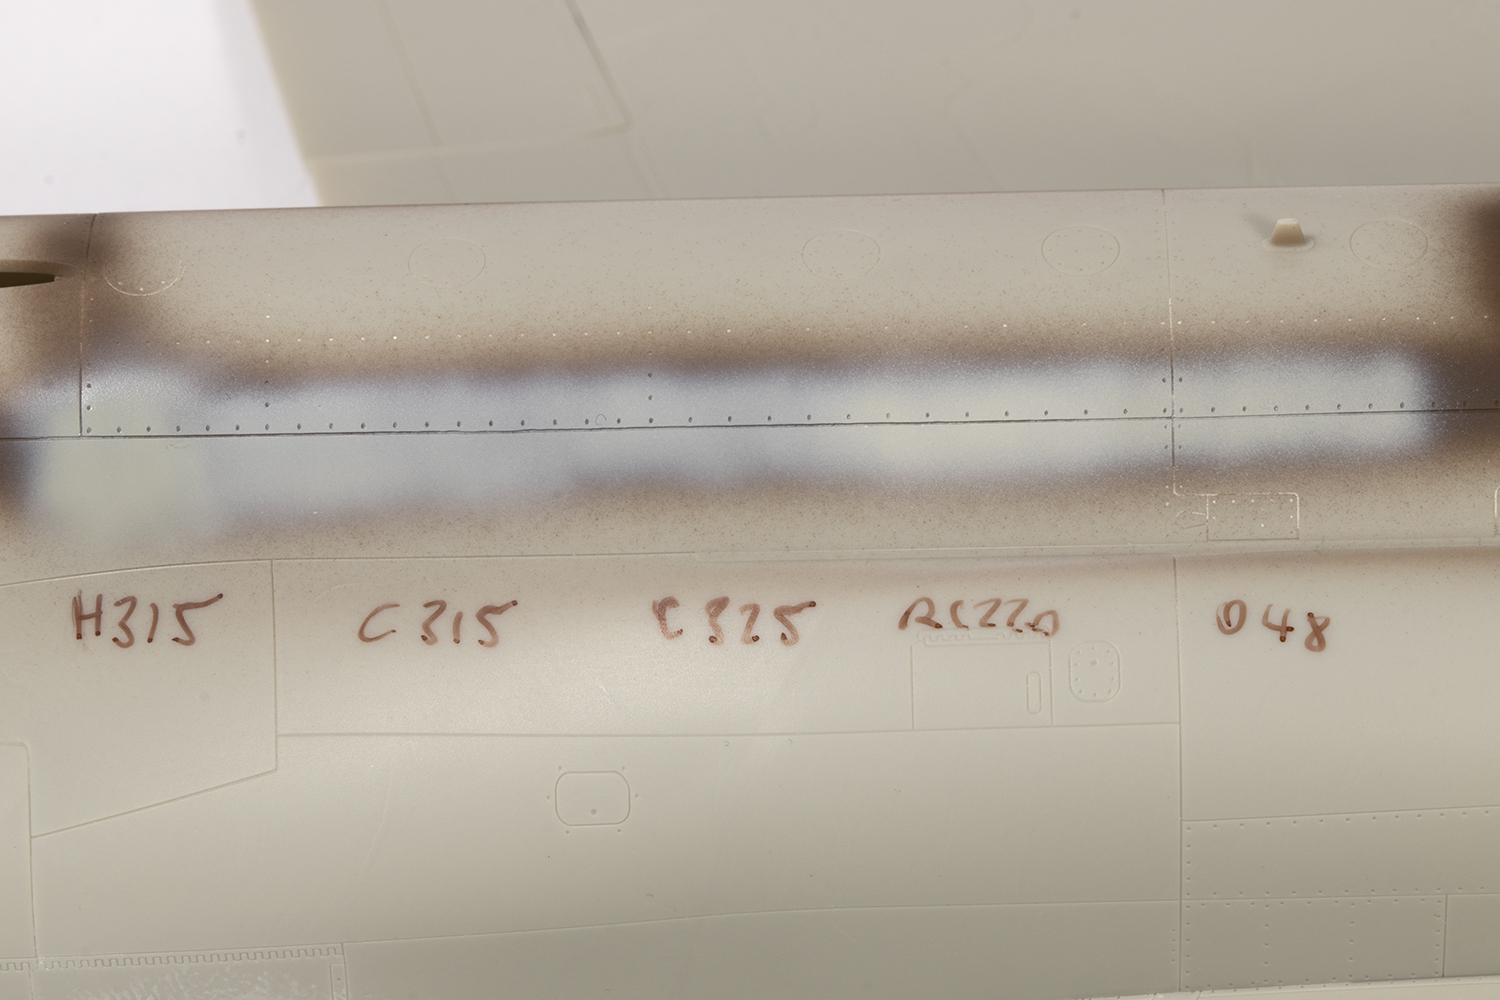
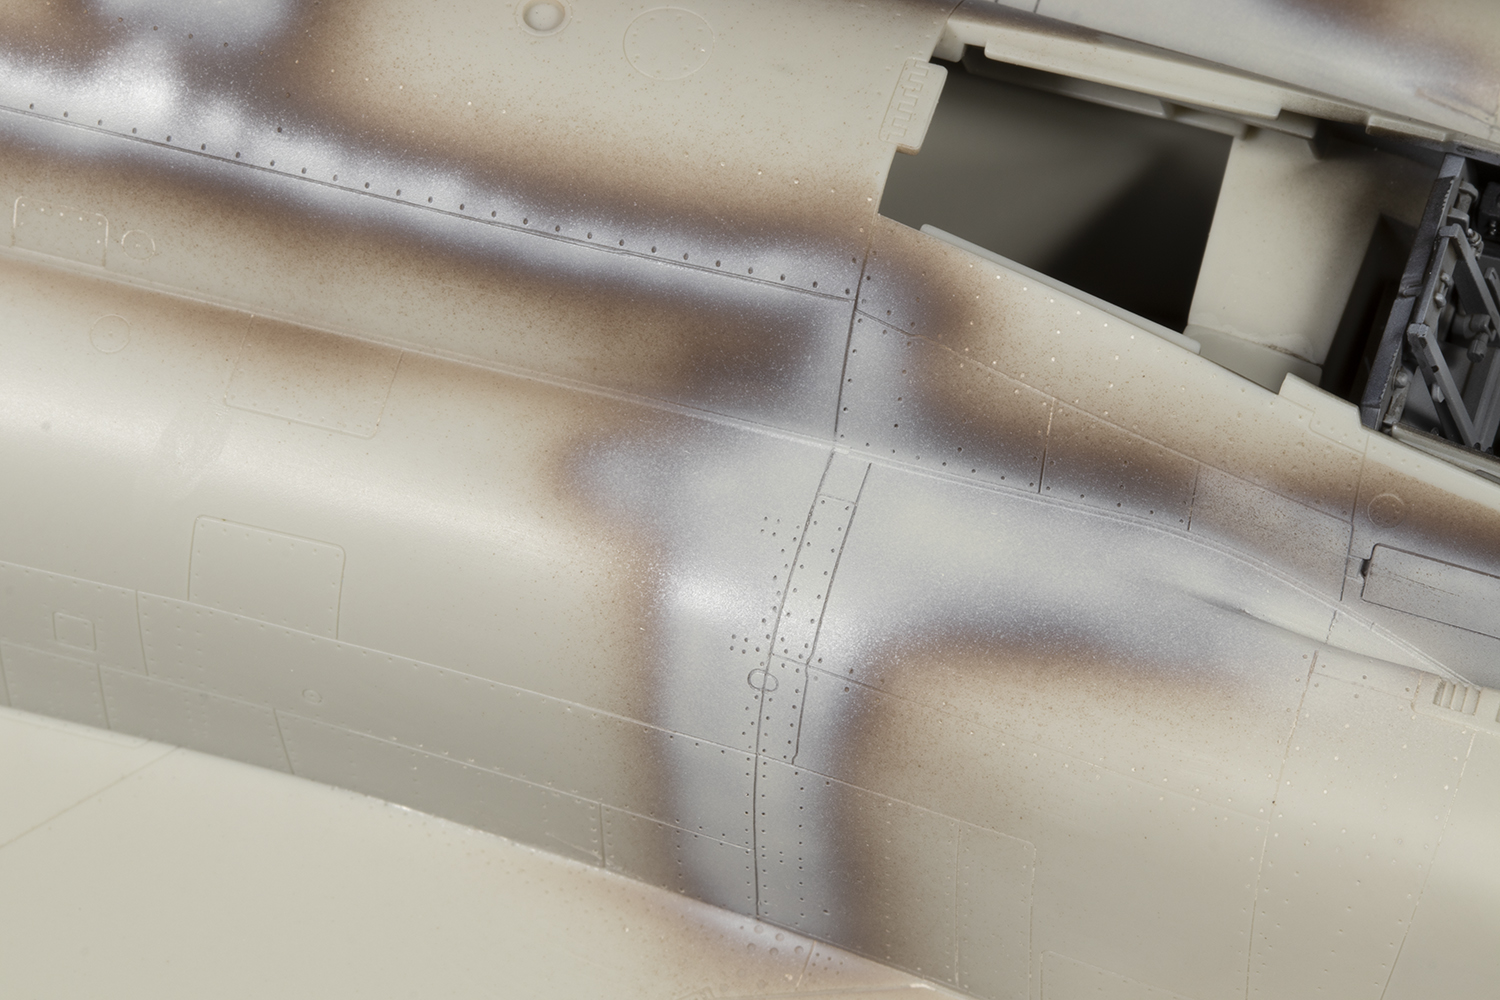
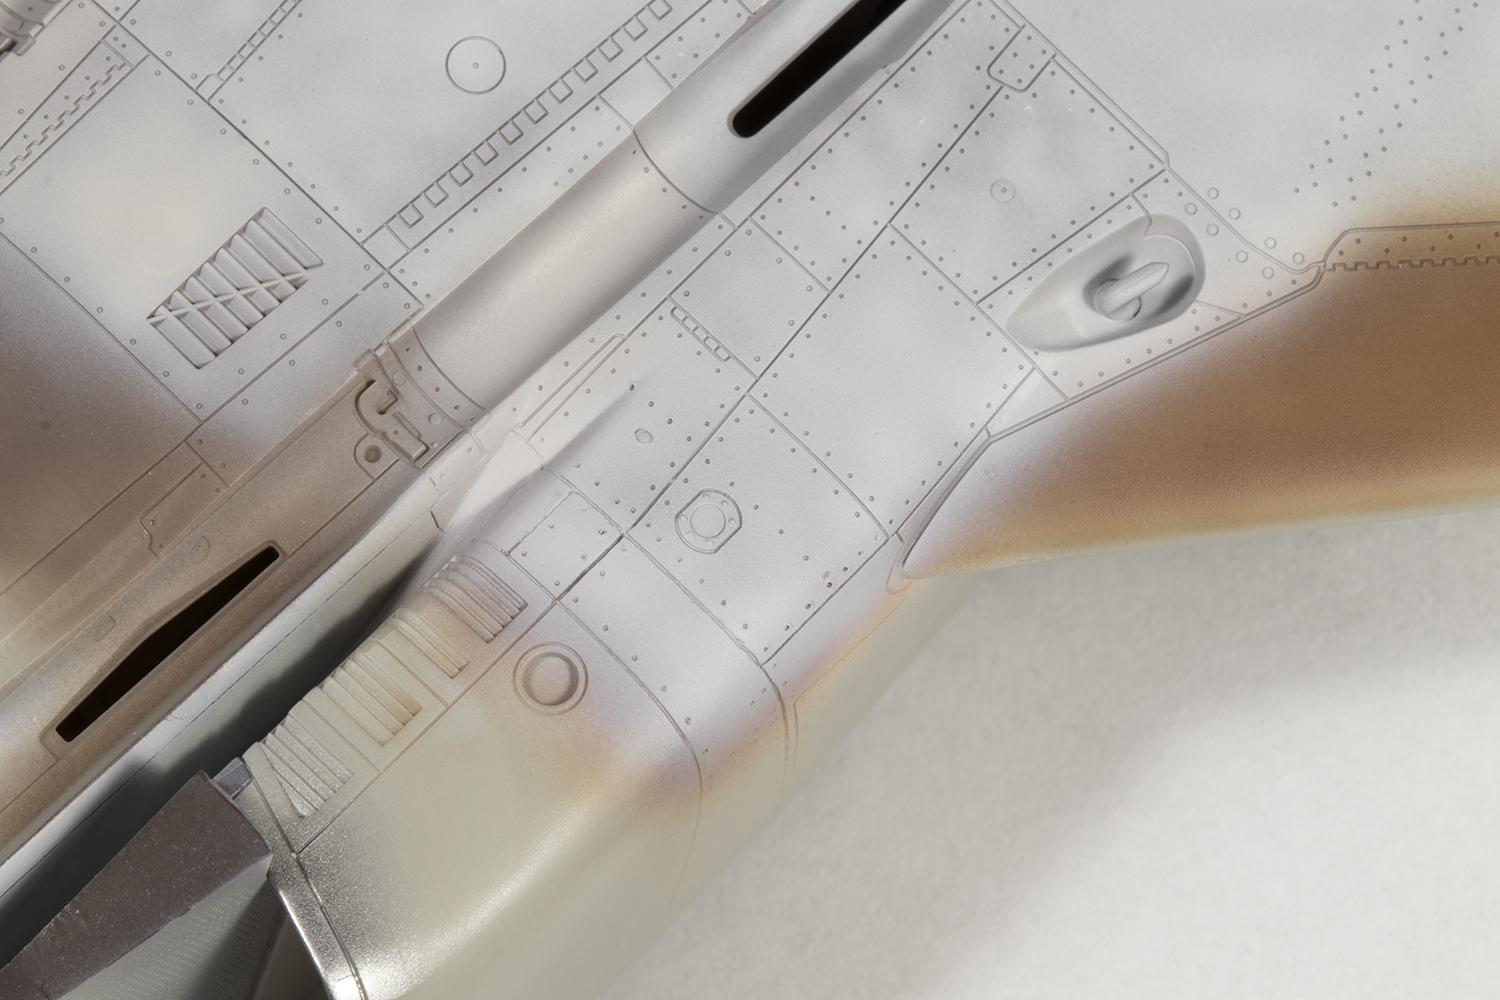
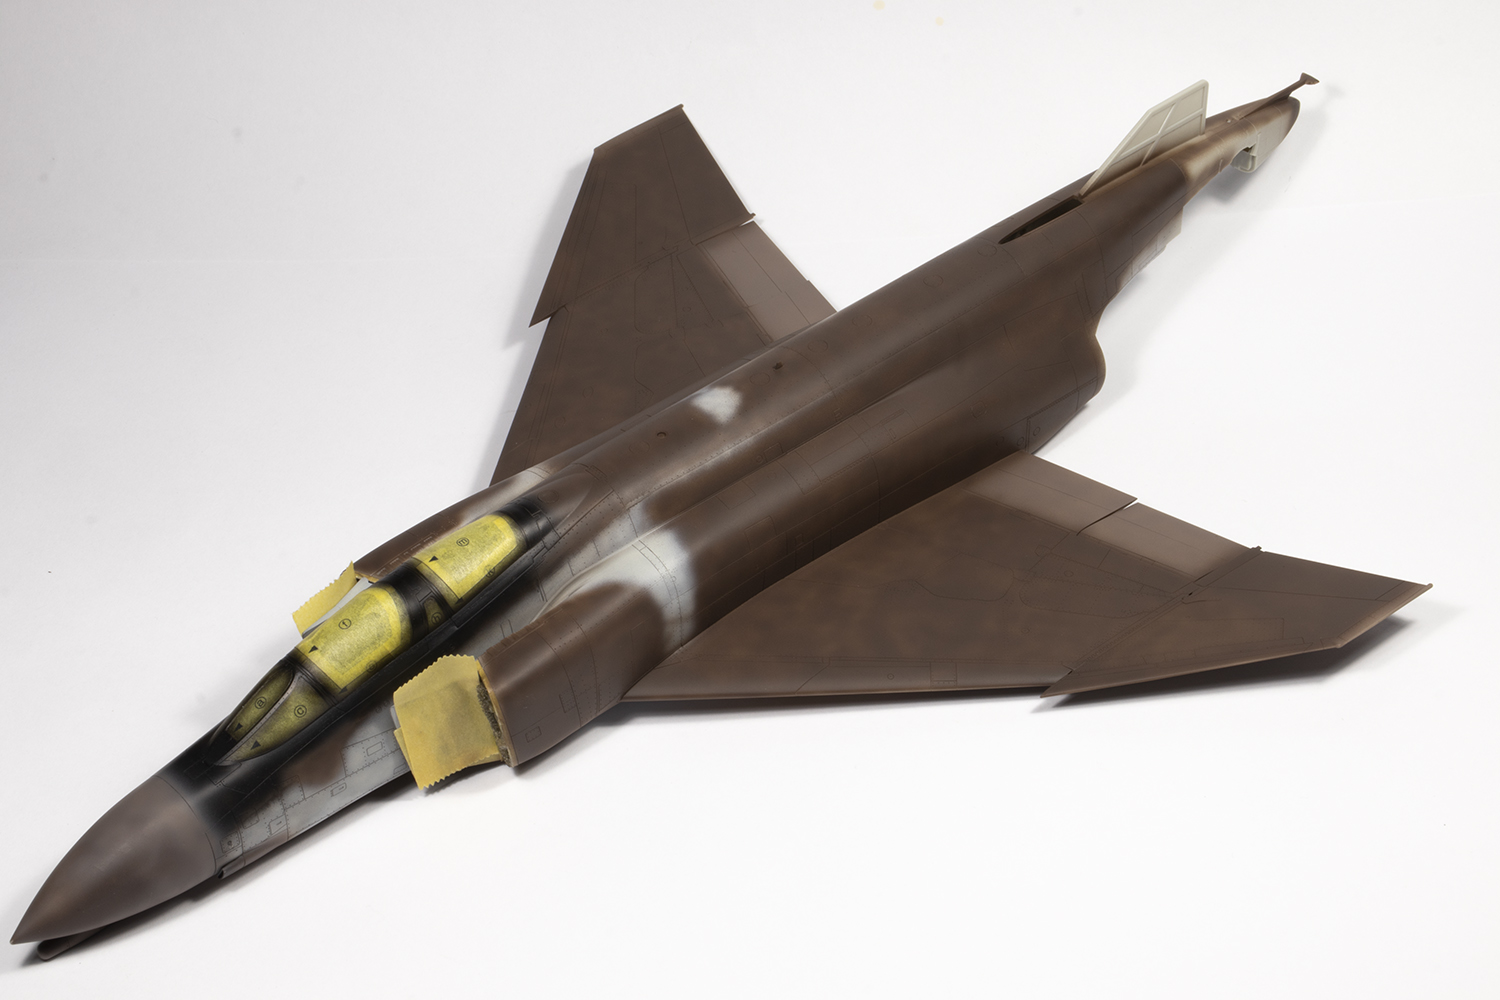
Prior to dealing with the intakes, I needed to paint the area between them and the fuselage, else the paint gets very gritty if applied later on. One way I like to add some tonal variation to the finish is using different manufacturers interpretations of the same colour. Over a base coat of Mr Mahogany Surfacer 1000 I airbrushed some patches of Mr Color 315 and 325 FS16440 (which are basically the same colour), Hataka’s lacquer version (048) and that by AK Real Color (RC220). They were all subtly different which was pleasing to the eye. In the end, the base colour would be a mottle of the Hataka and AKRC shades with further mottling on top with Mr Color 325.
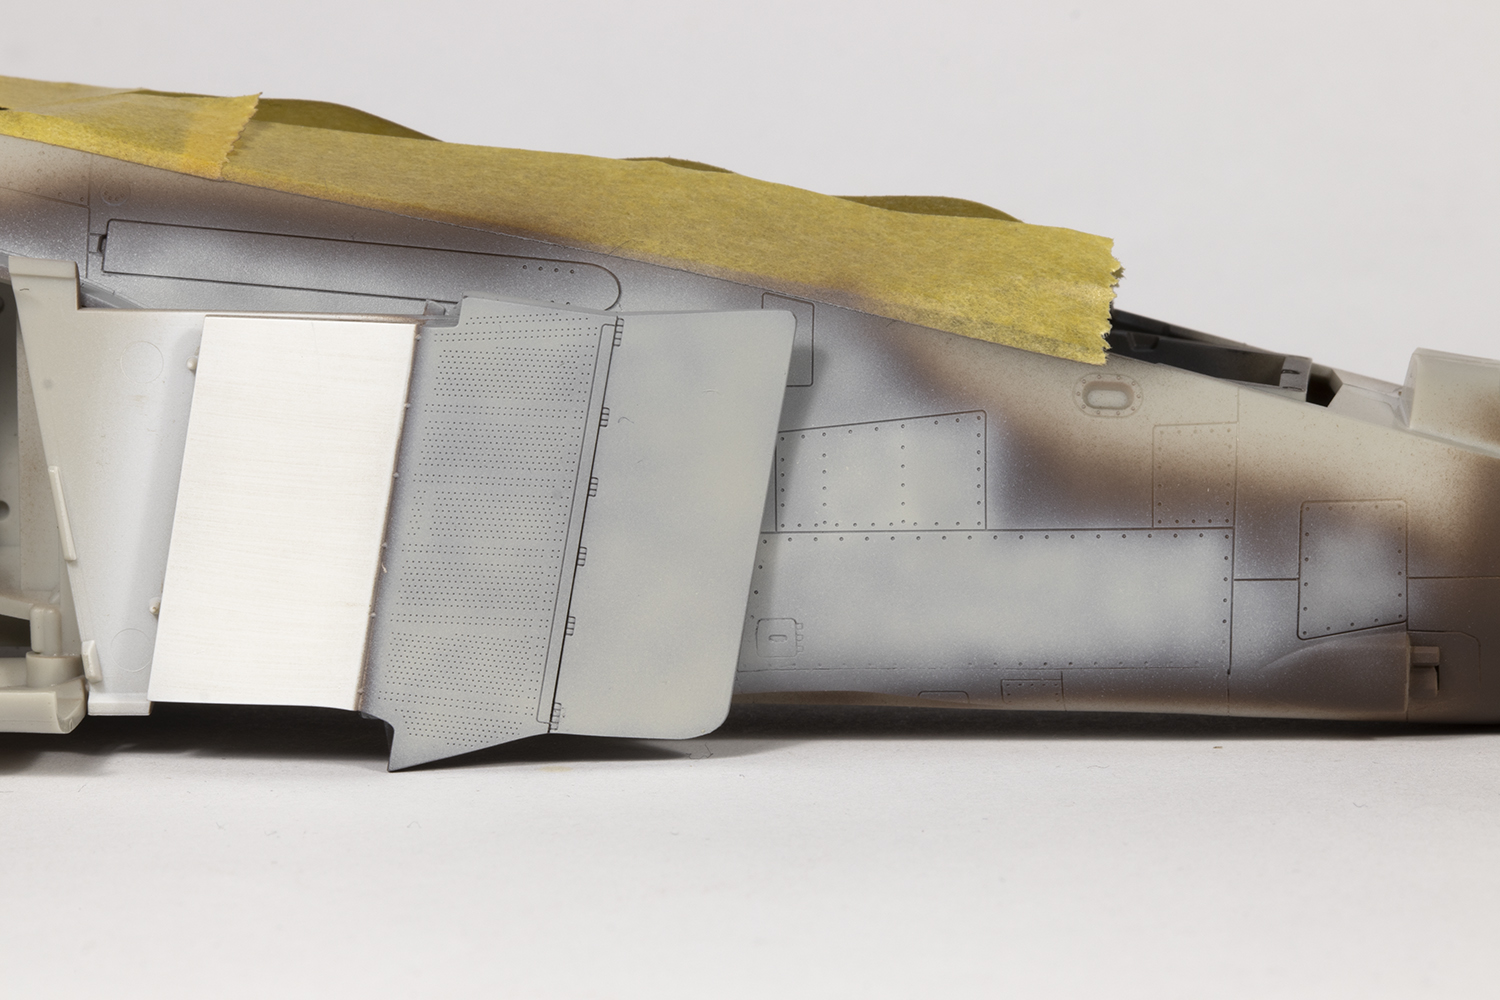
The intakes were perhaps the most challenging part to fit. Not that they didn’t fit well, just not perfectly. As per pretty much every Phantom model I’ve built, filler was required, but less than for other kits.

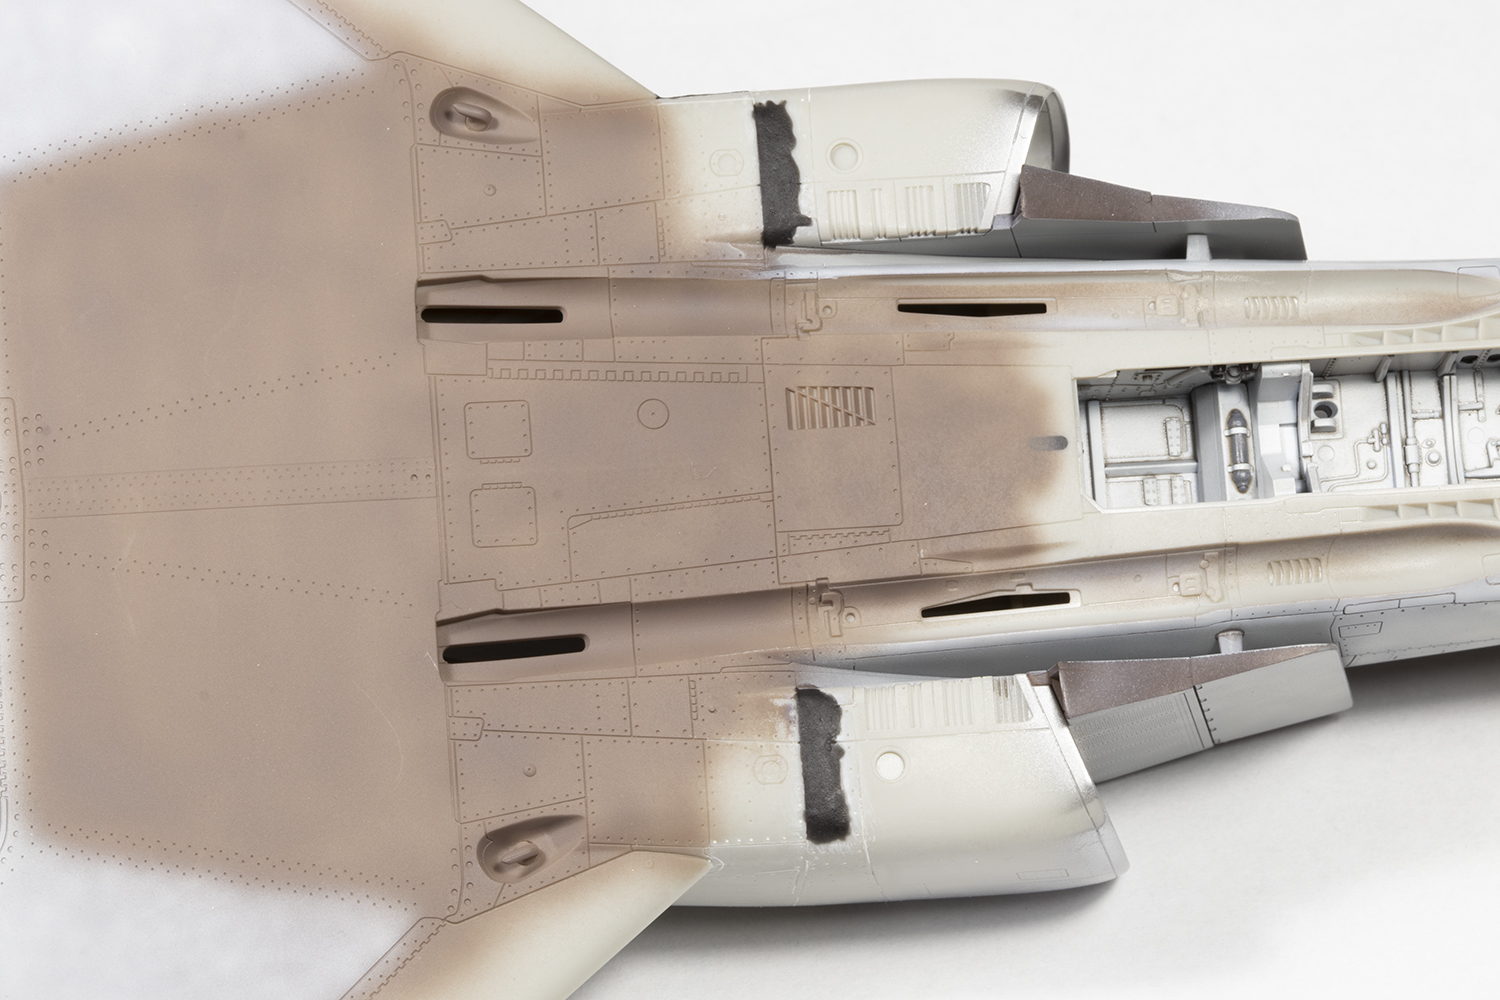
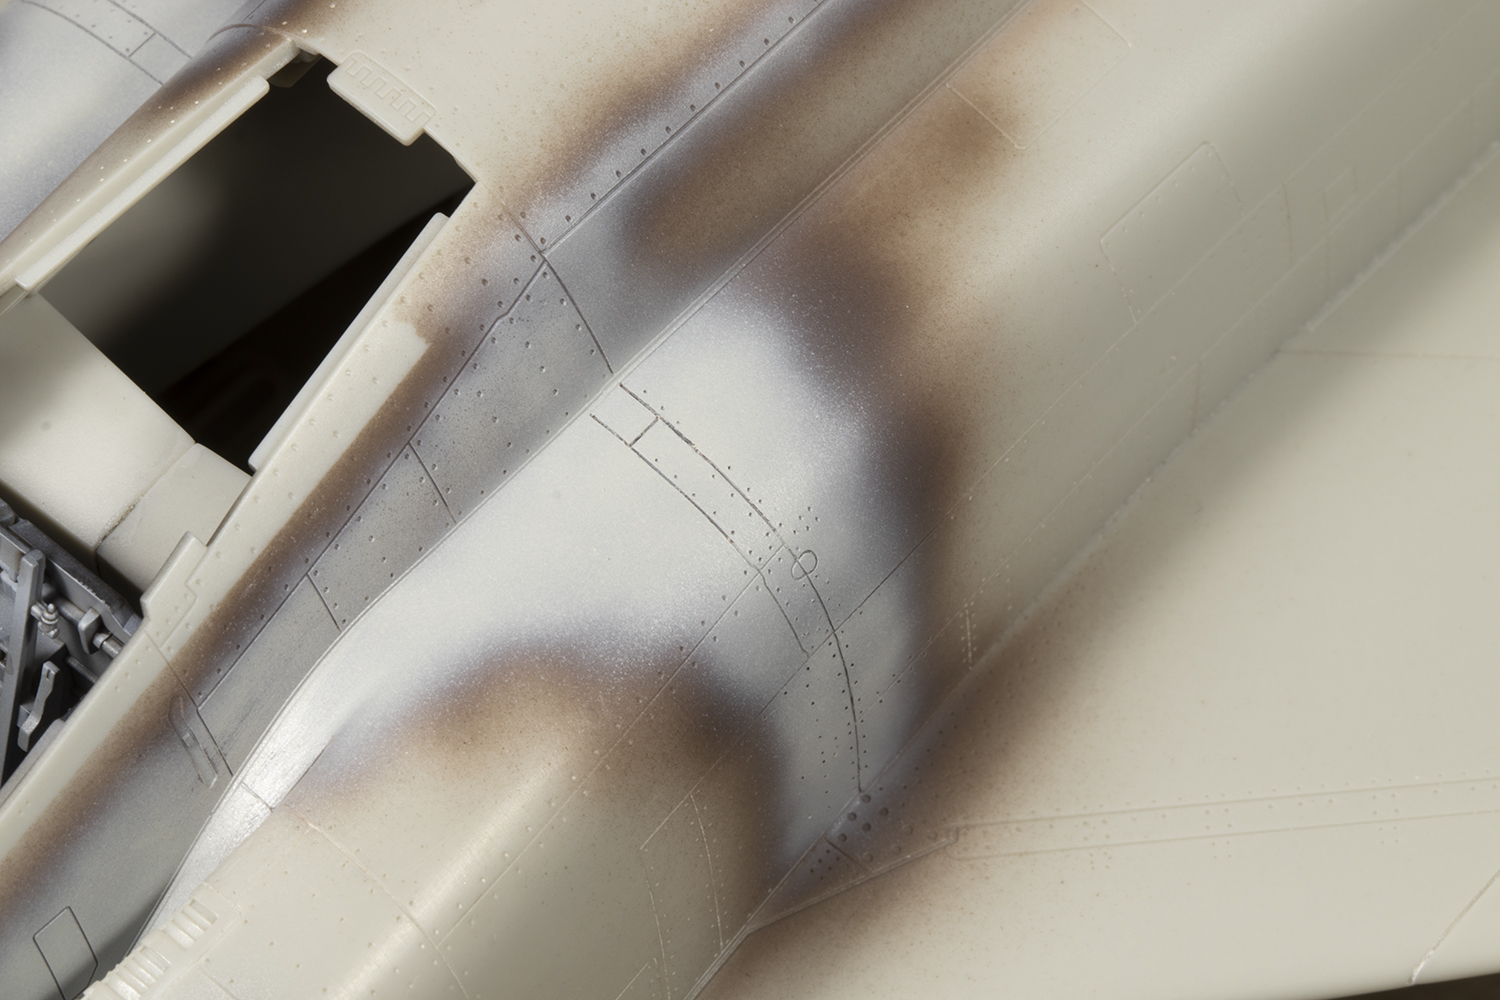

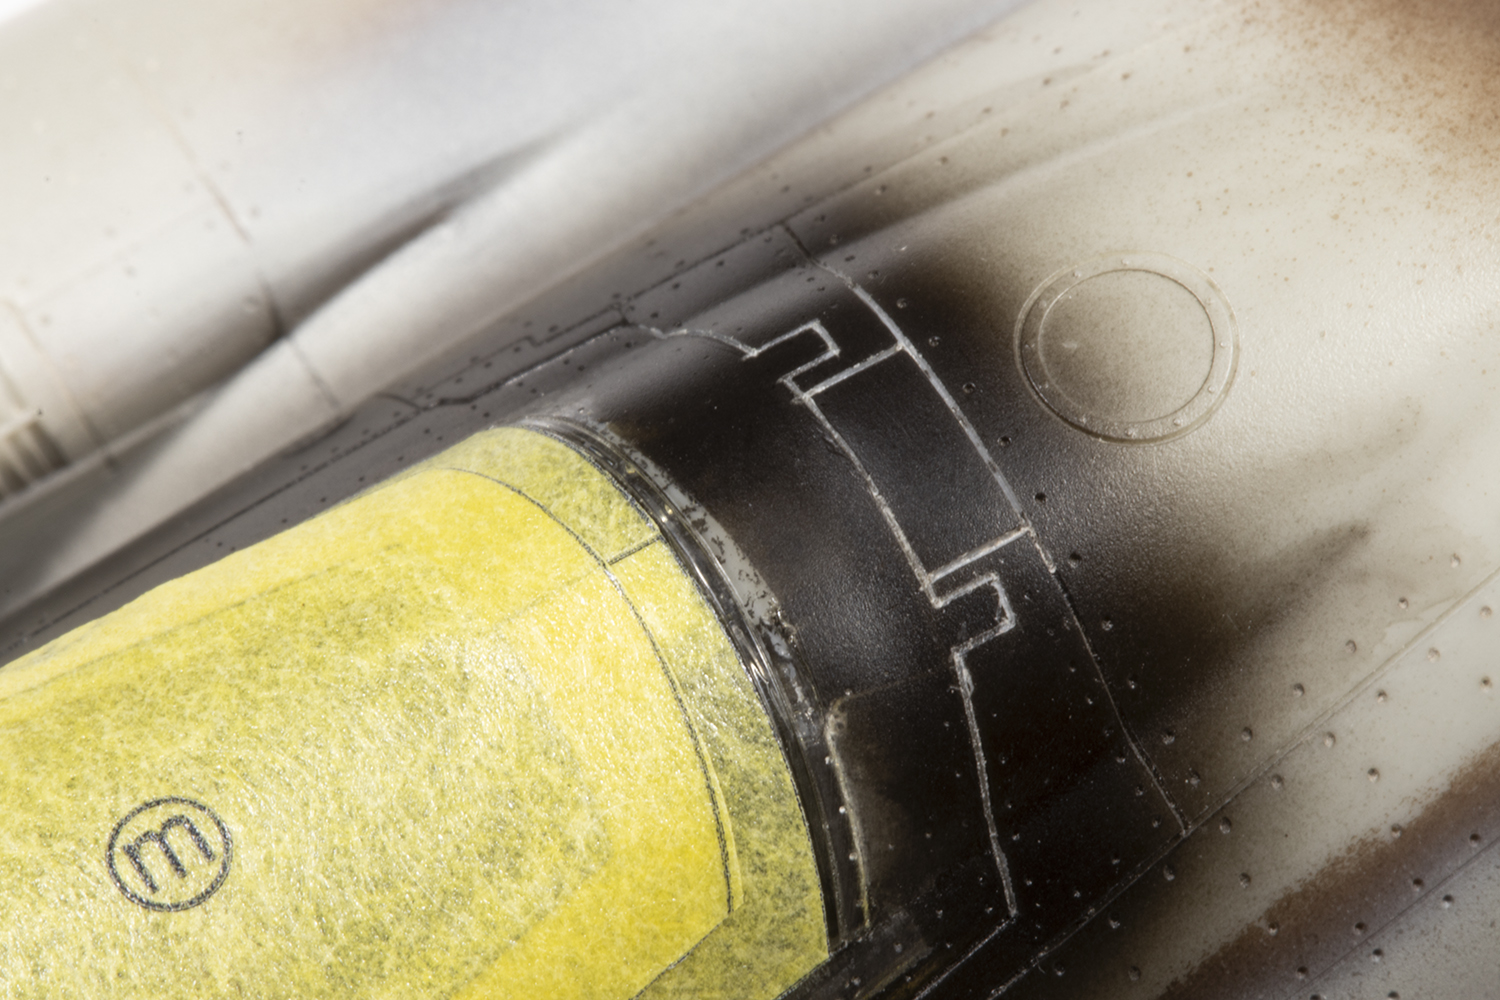
Continuing the theme of not needing to upgrade parts, the engine exhaust cans are spectacular and fitted immaculately. I didn’t use any metallic colours and simply went for lots of brown, black, dark blue and tan washes over a black and smoke base.
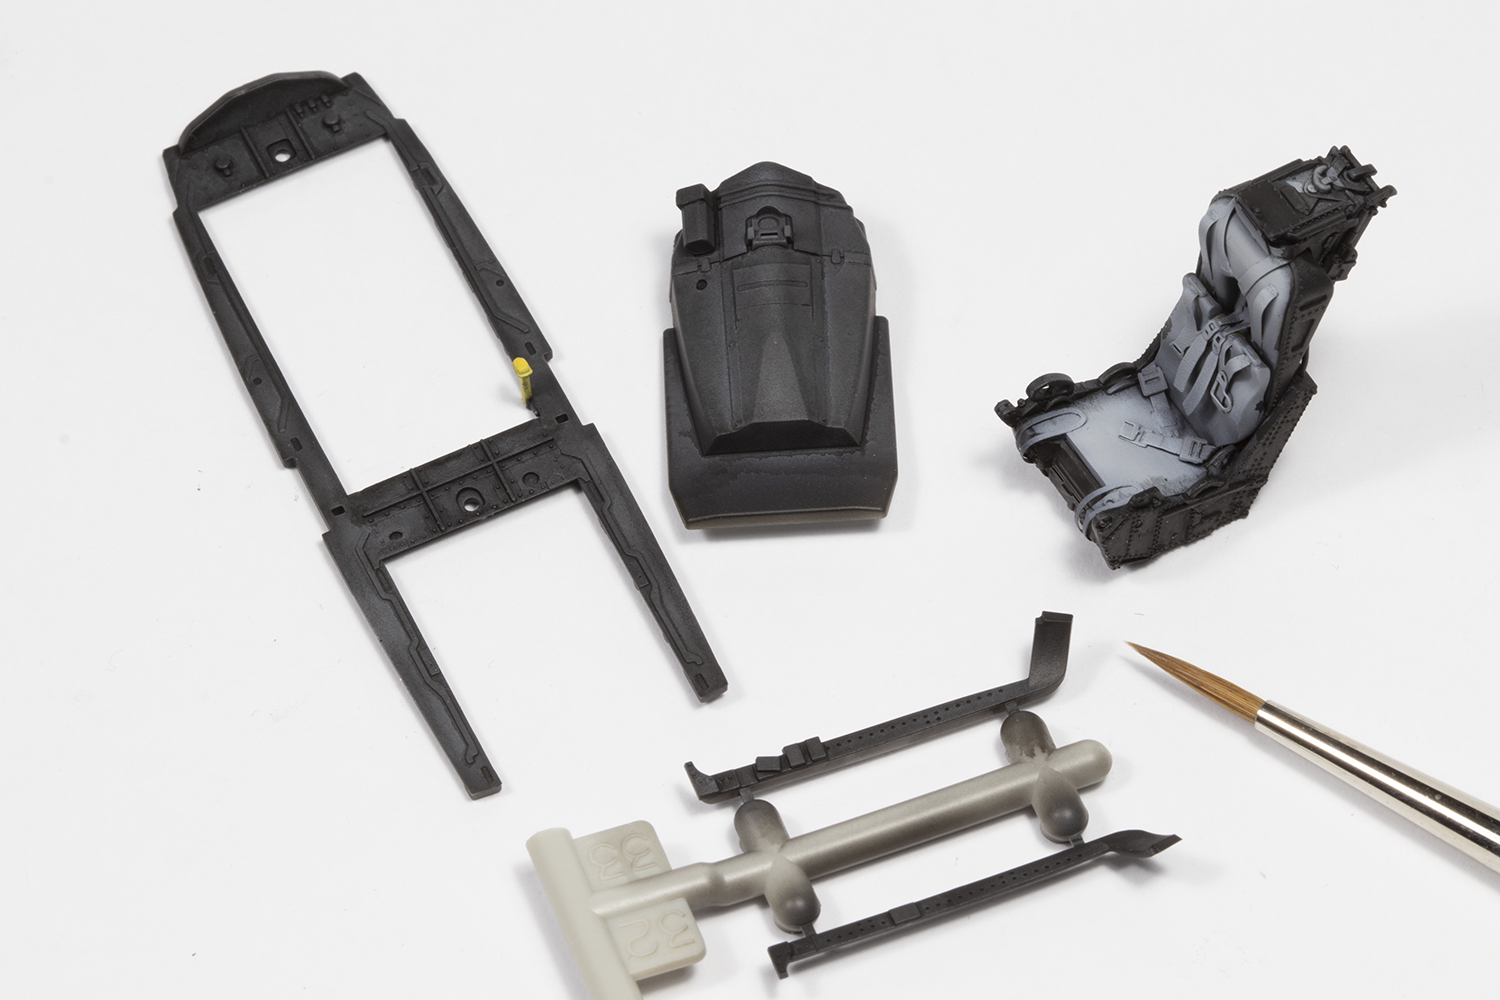

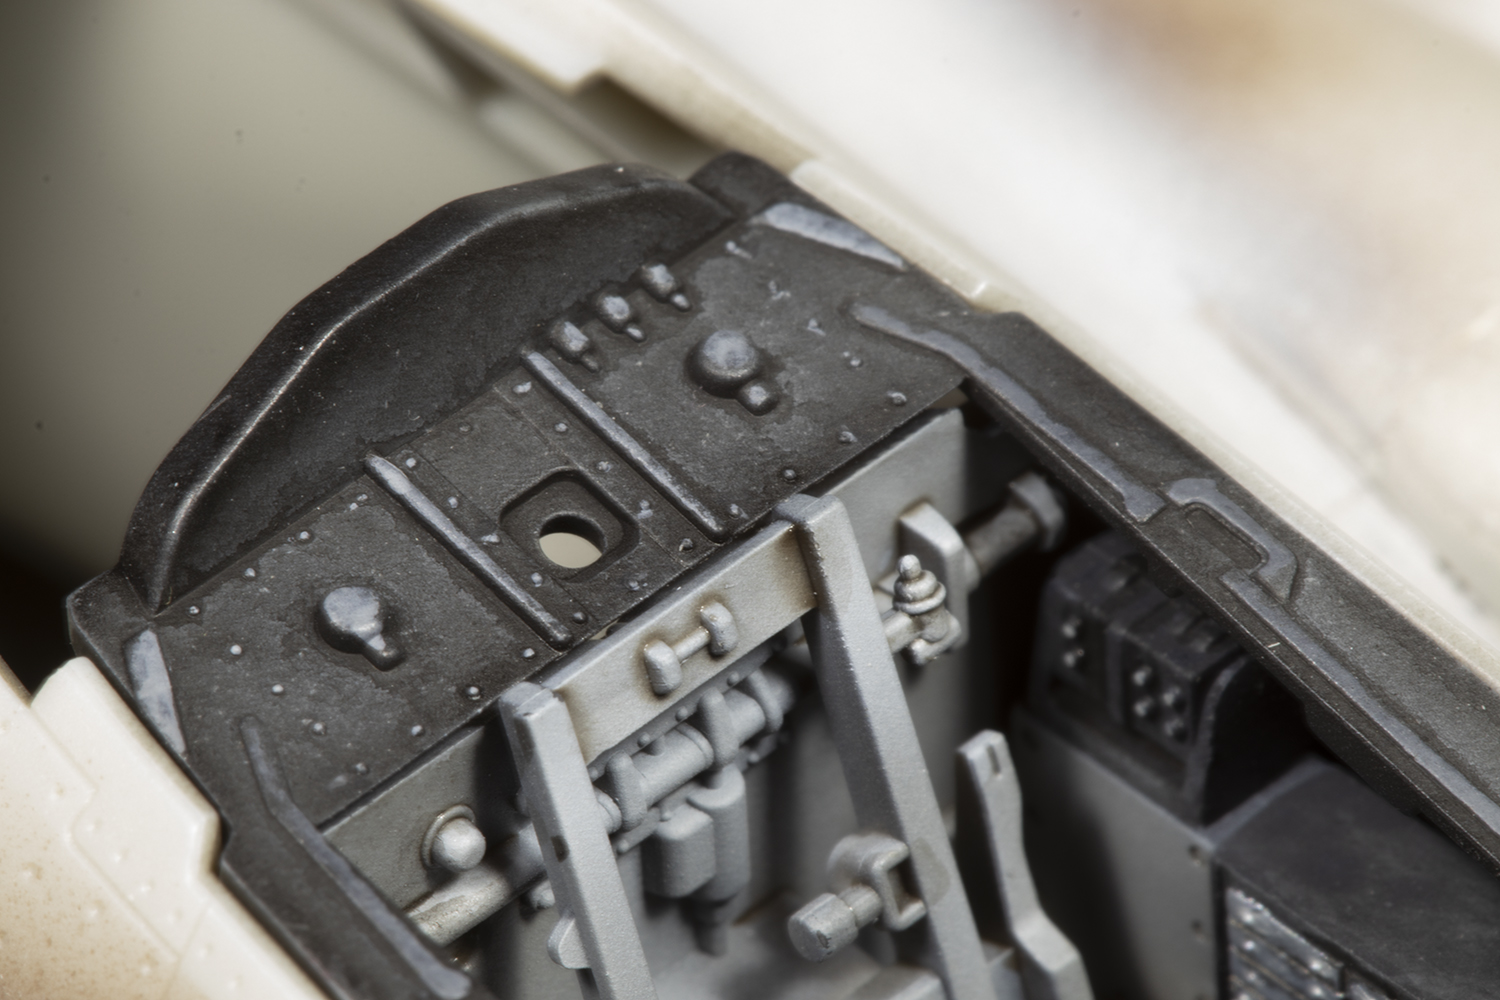
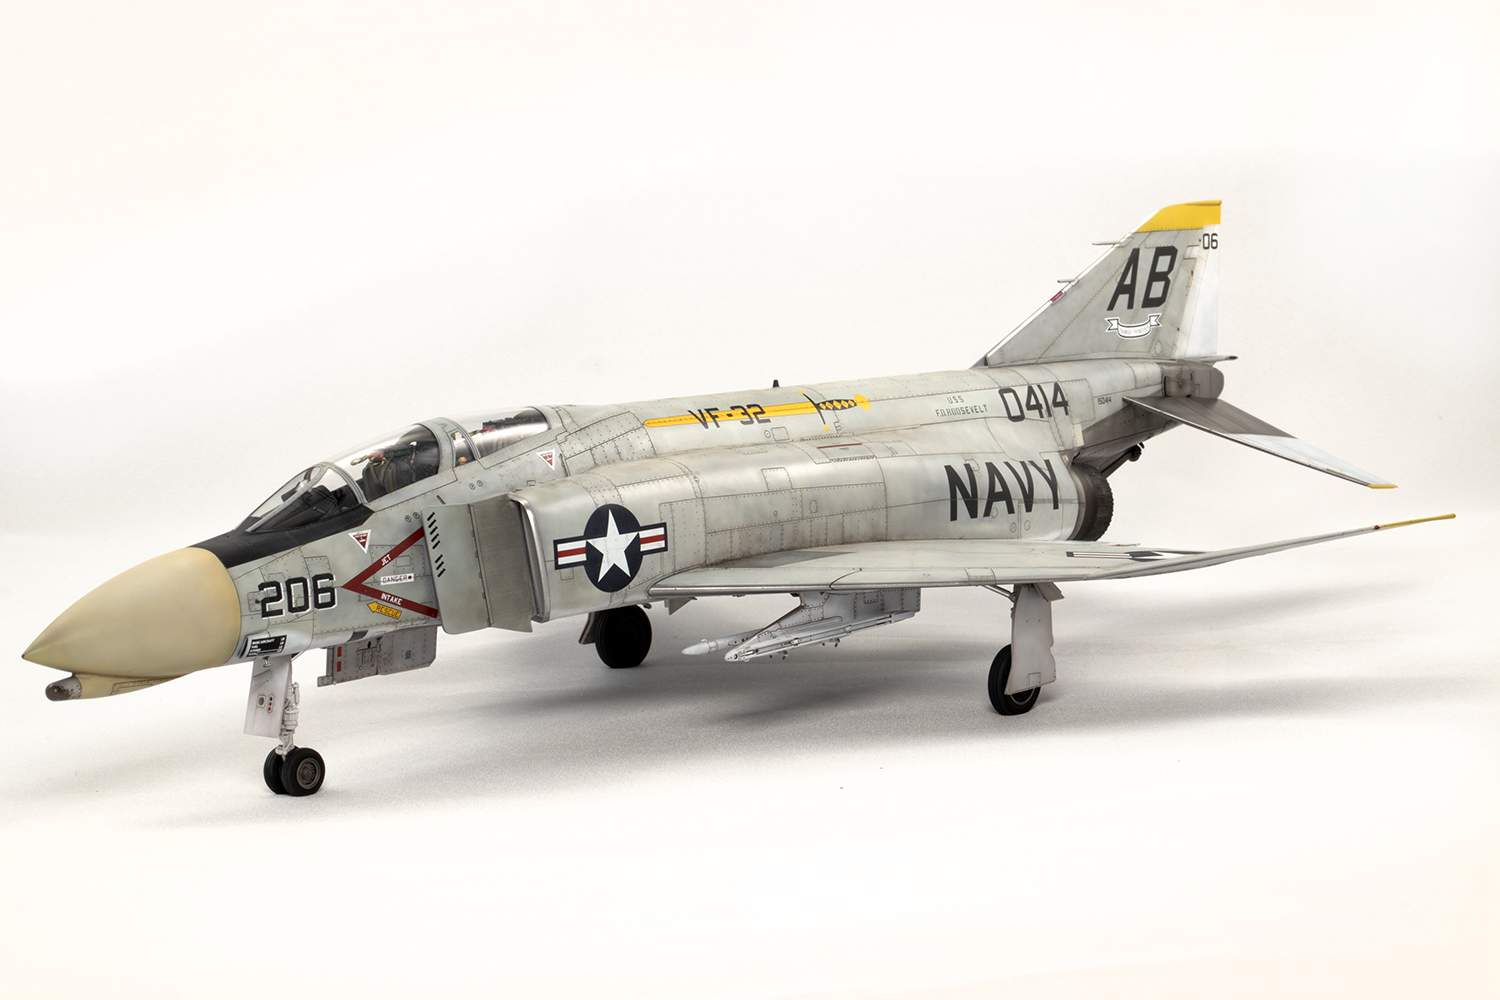
There are tons of cockpit parts to add before the single-piece canopy can be added (options for open canopies are included). Again, these parts were amazing and I painted them by adding lots of glazes of black acrylic paint over a grey base. The seats are by Eduard and are fine; the belts are very two-dimensional which is disappointing, but the detail is nice. These were also painted by hand, carefully highlighted for effect and the ejection pull handles made from twisted black and yellow cotton thread.
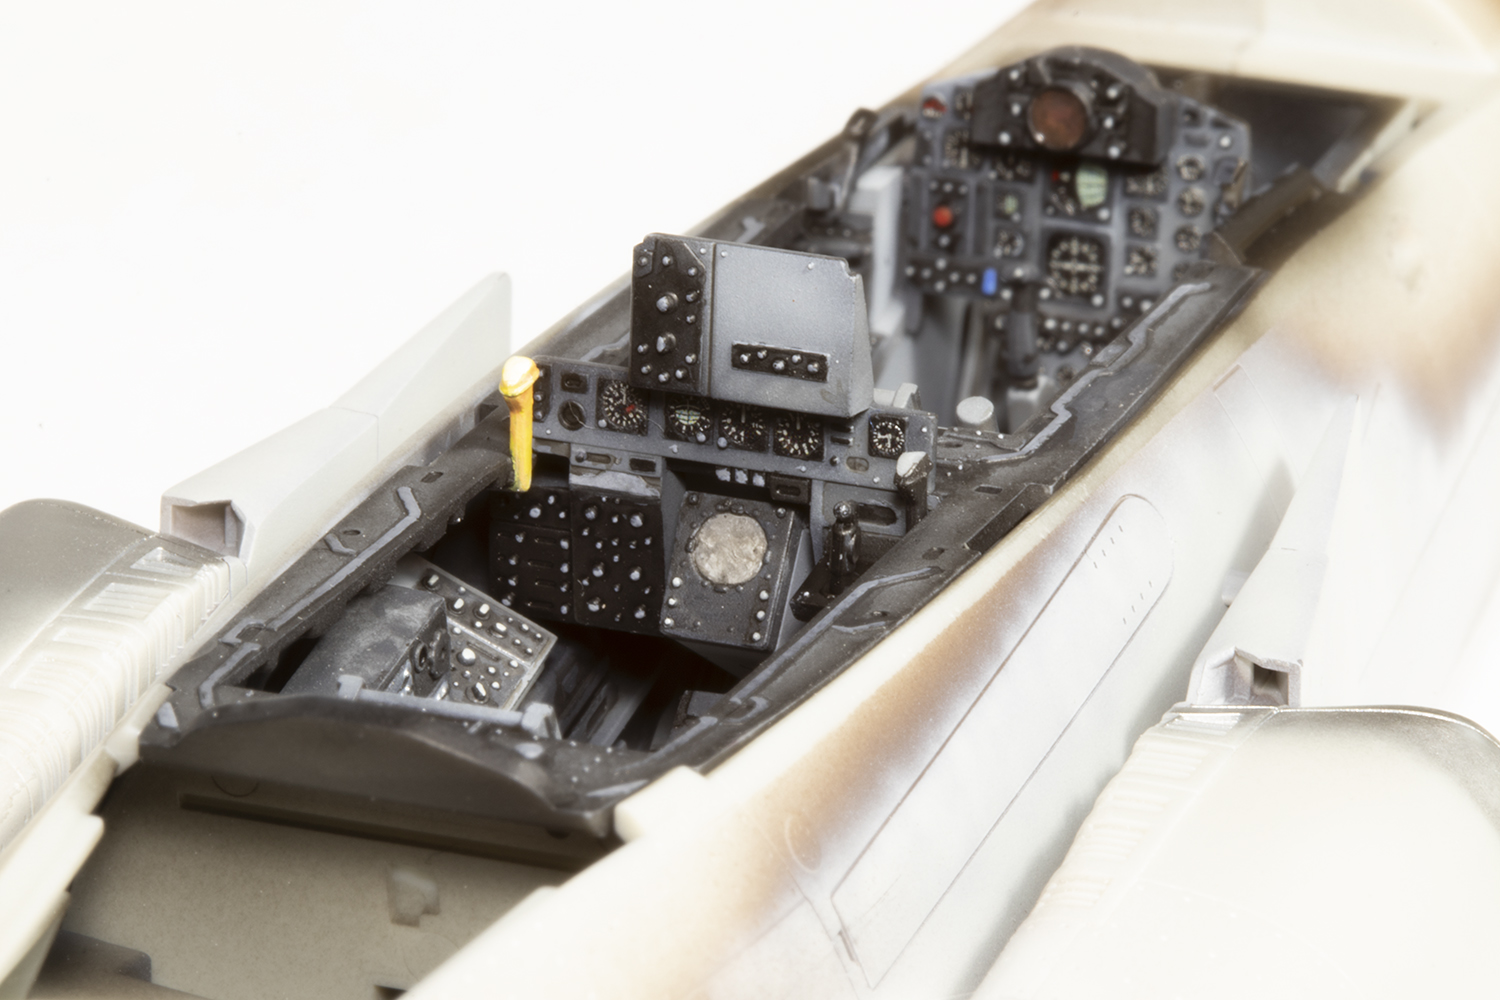

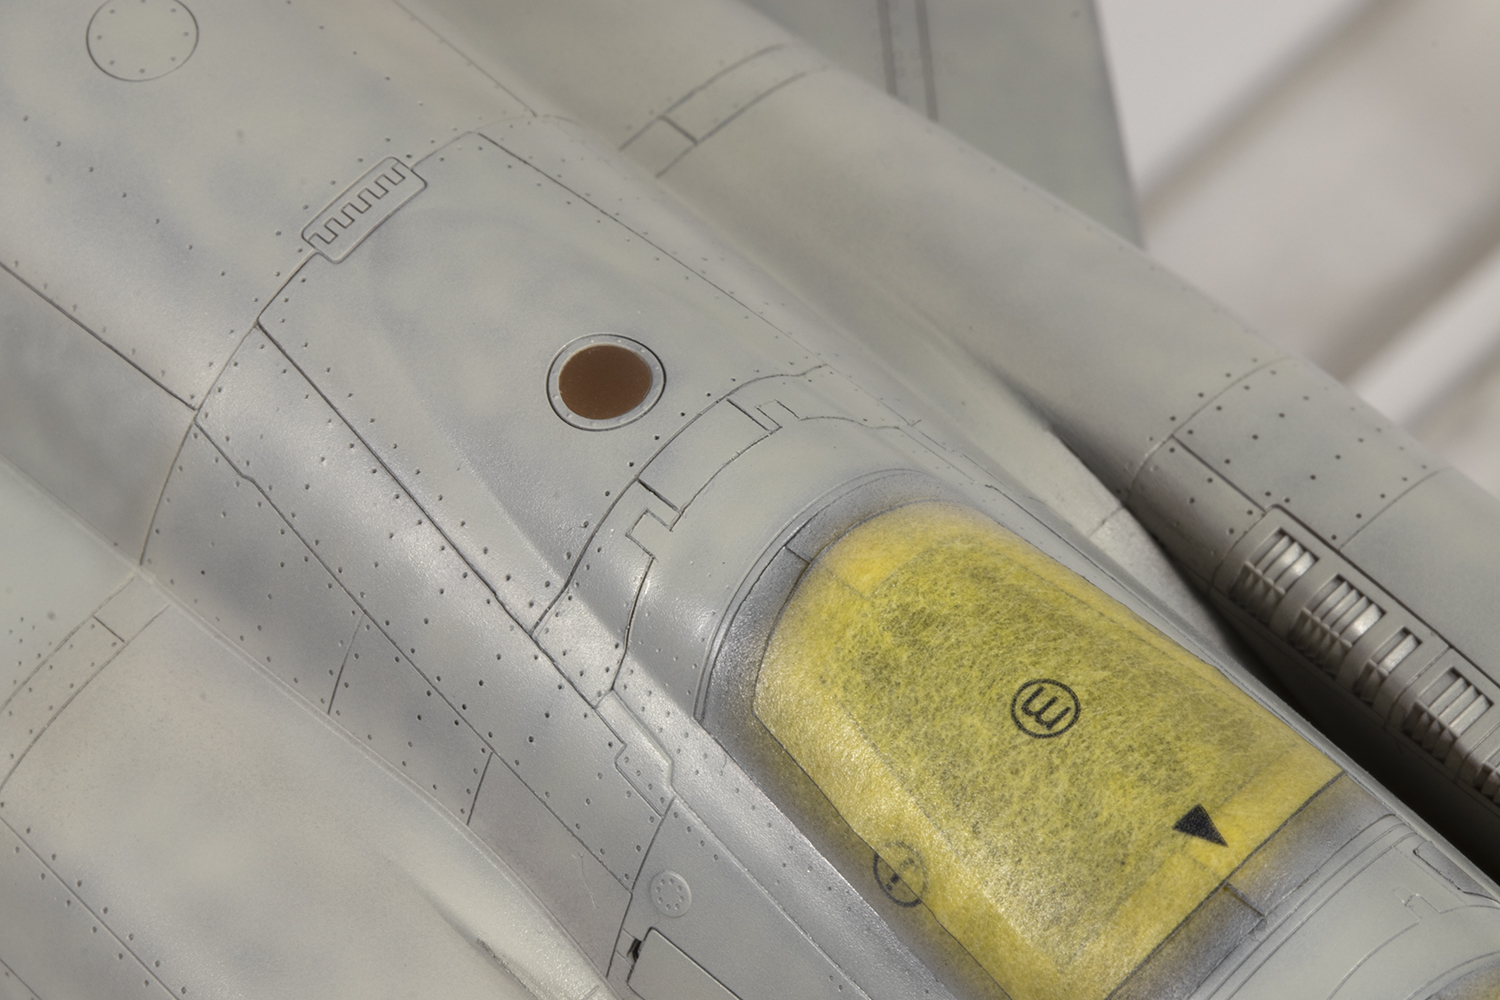
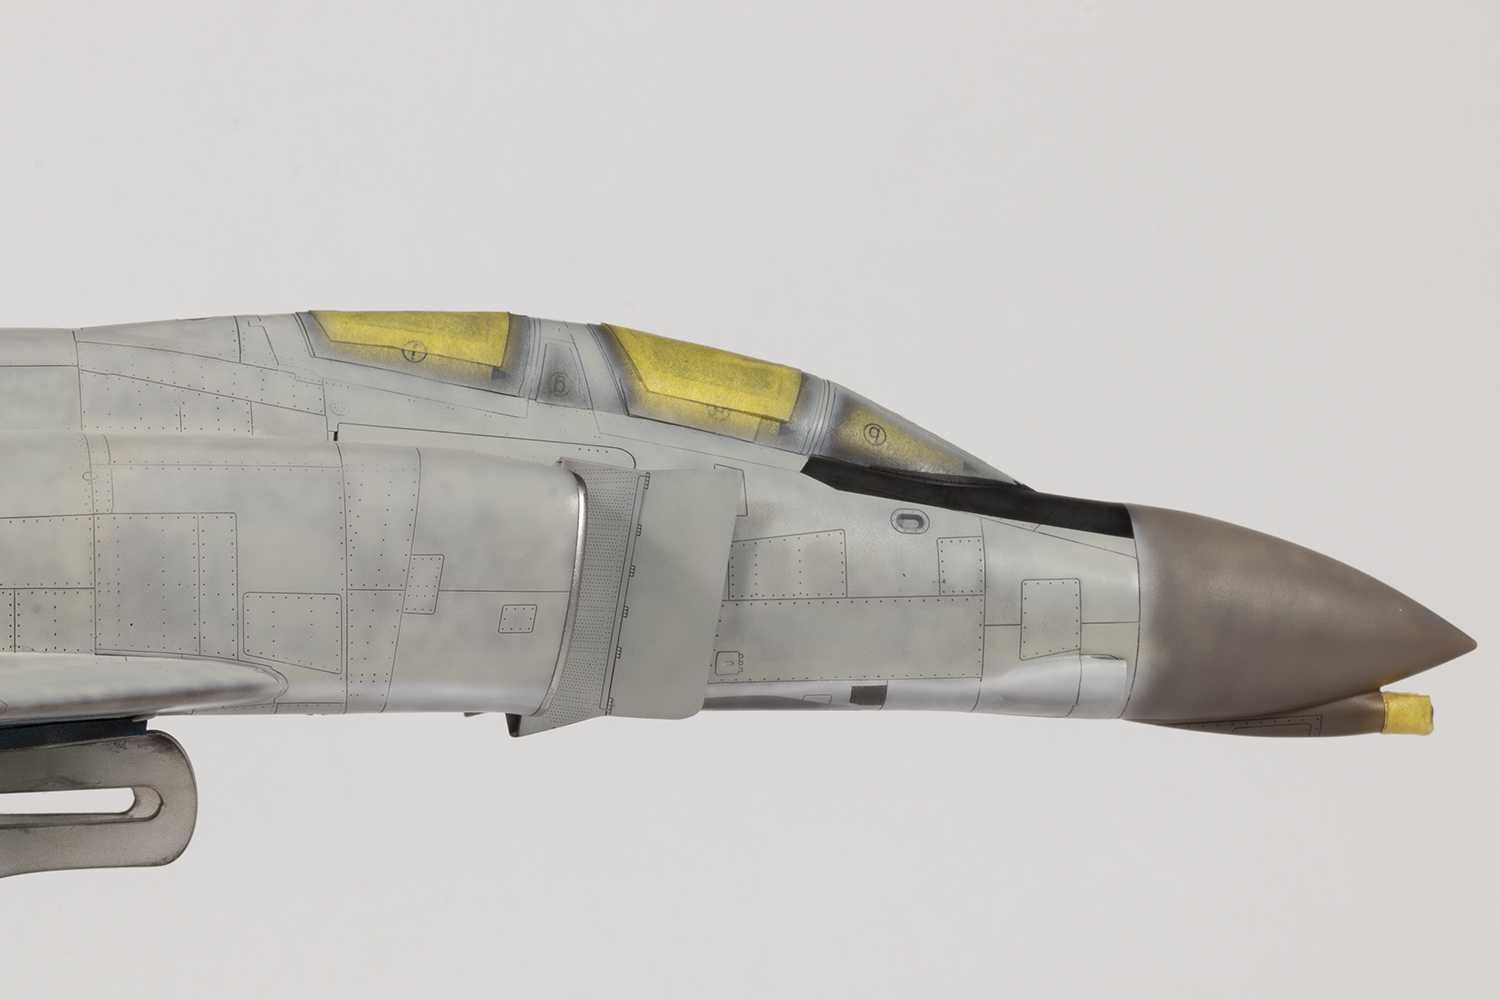
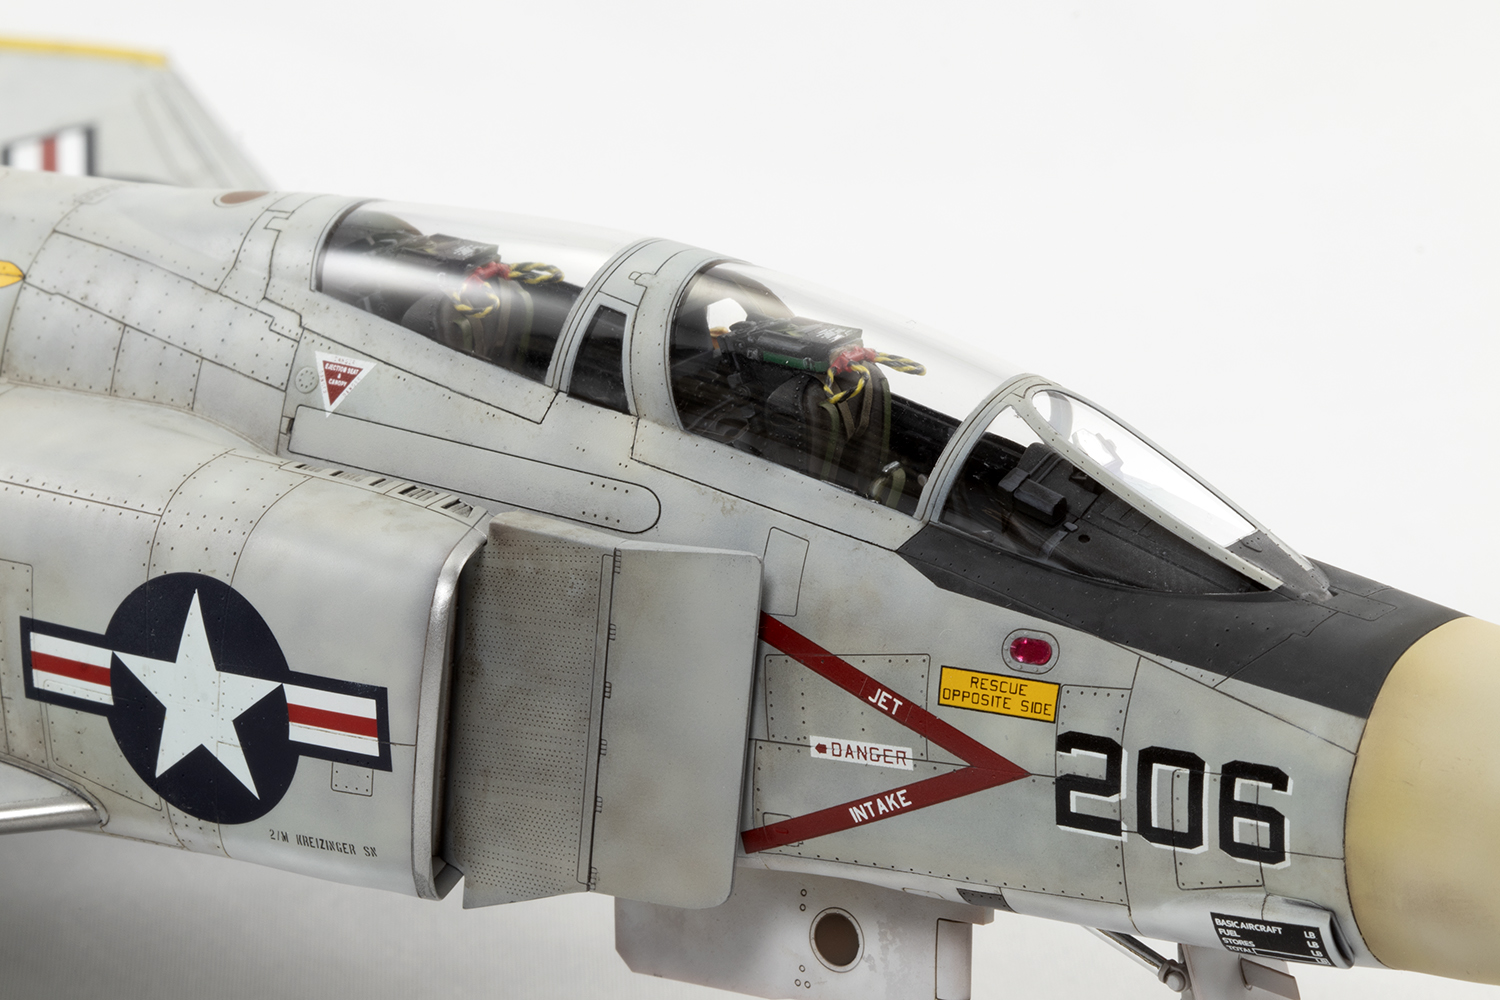
Predictably the clear parts were a very good fit, but the hinges at the rear were too small and left an unsightly gap. Having already dealt with this on the Academy and Hasegawa kits, I filled them with CA and rescribed the hinges using a MadWorks DLC scriber. This is such a lovely tool for scribing with. Tamiya provide masks, but they are not pre-cut. I simply cut them out with a scalpel and found they were an excellent fit, but had a bit of a tendency to lift, so care is required during painting. I did take care to remove the seam between the central arch and the fuselage as this is much less prominent than the canopy shutlines, and the mould line that ran down the centre of the part.
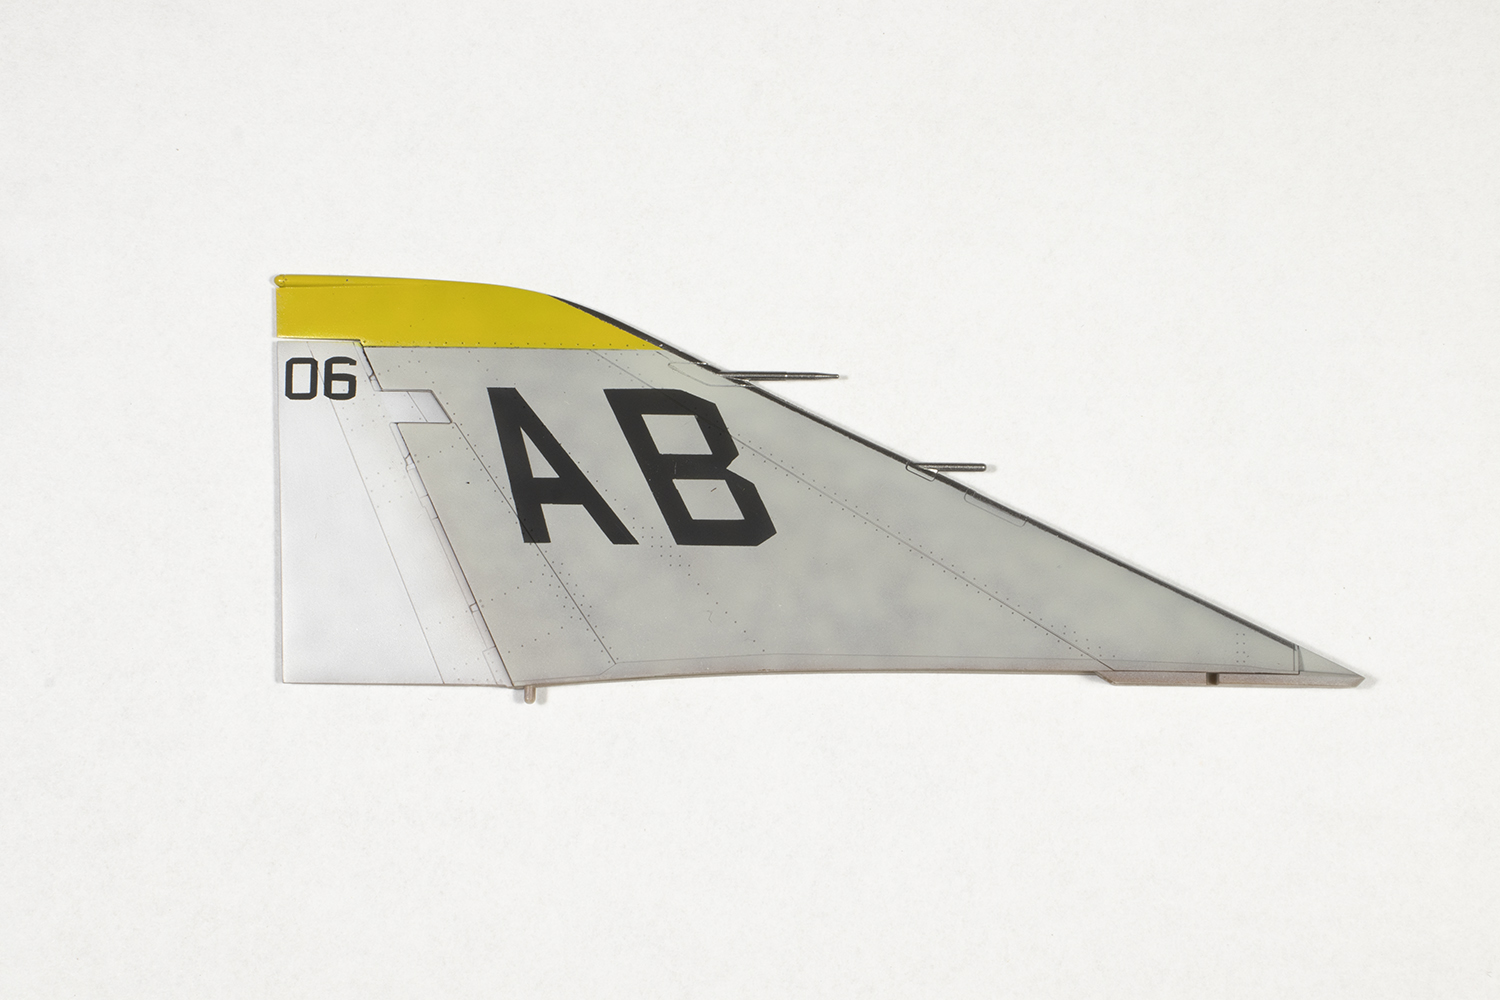
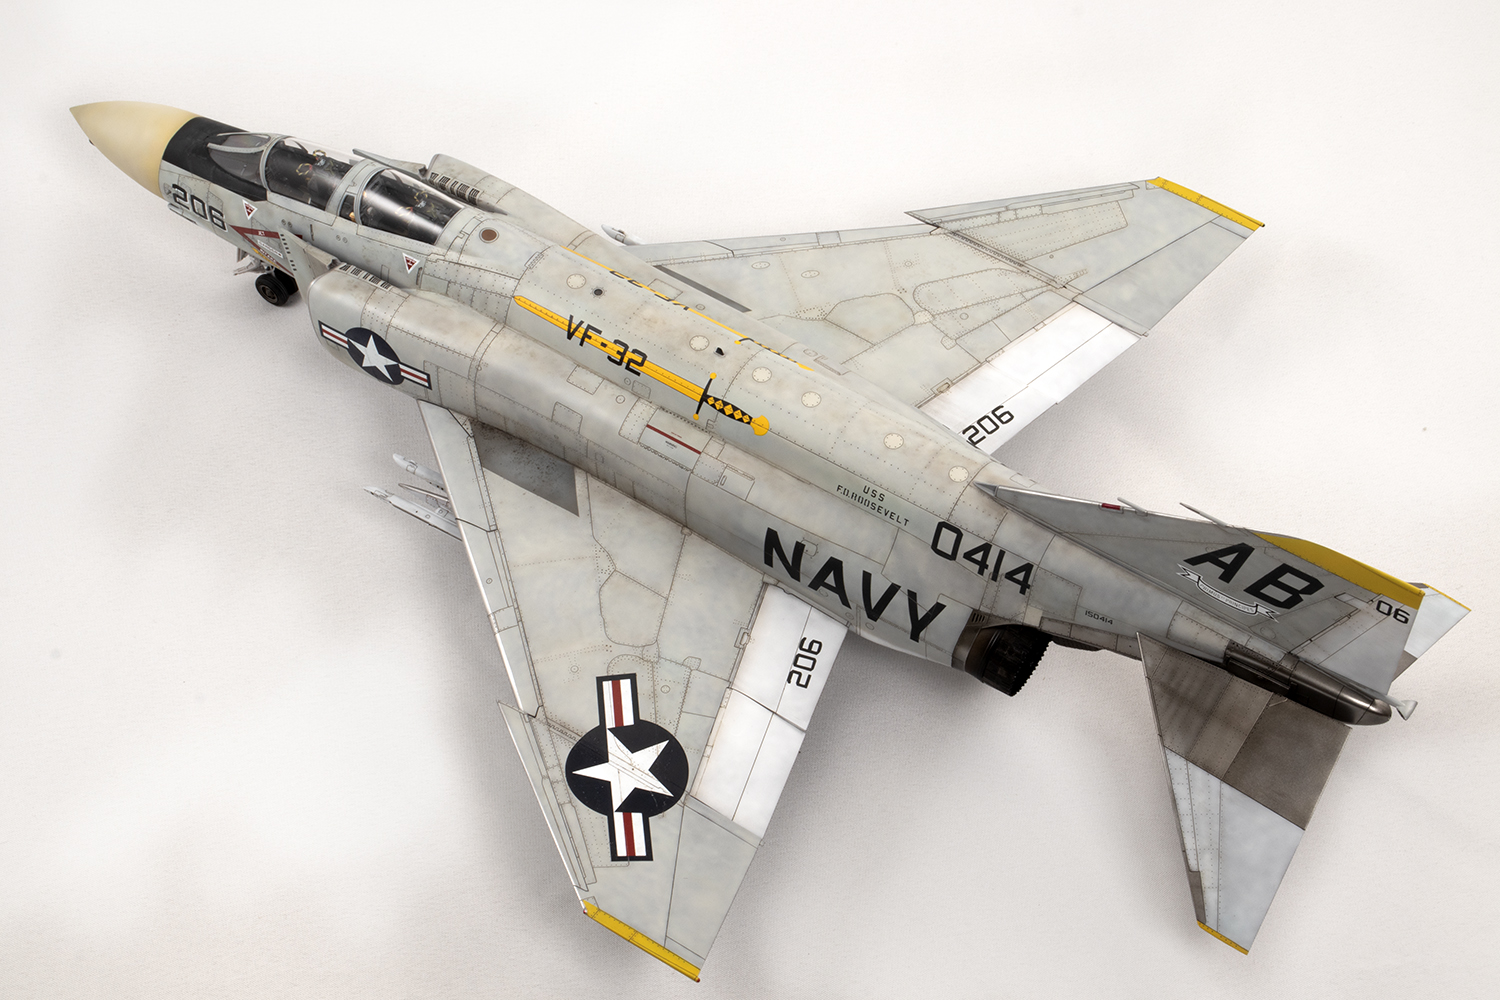
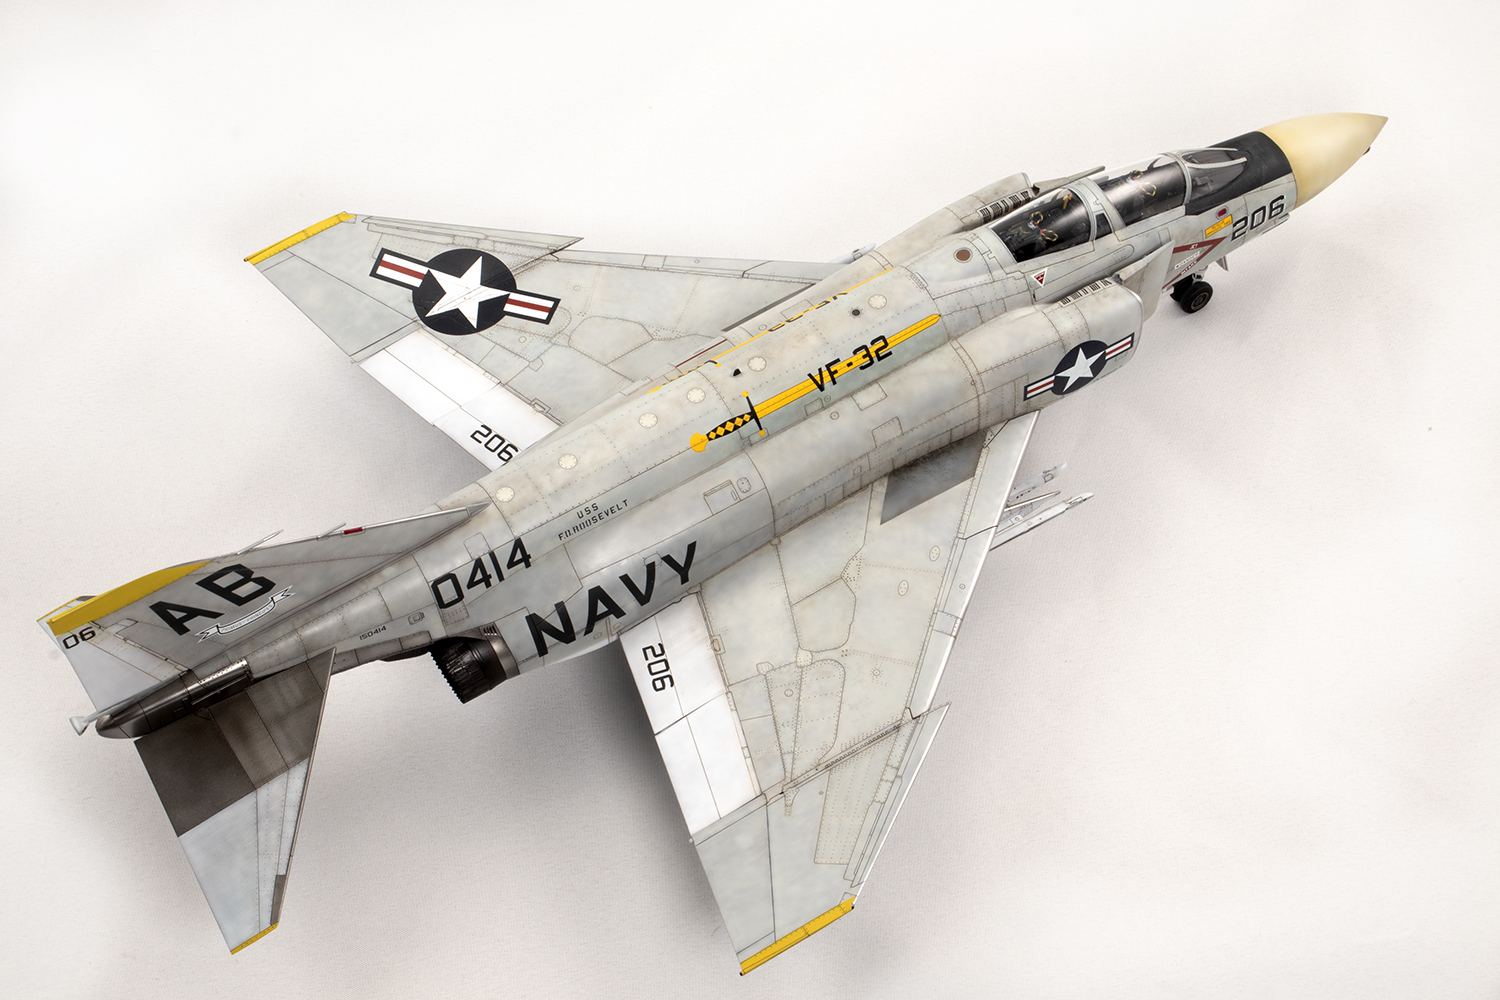
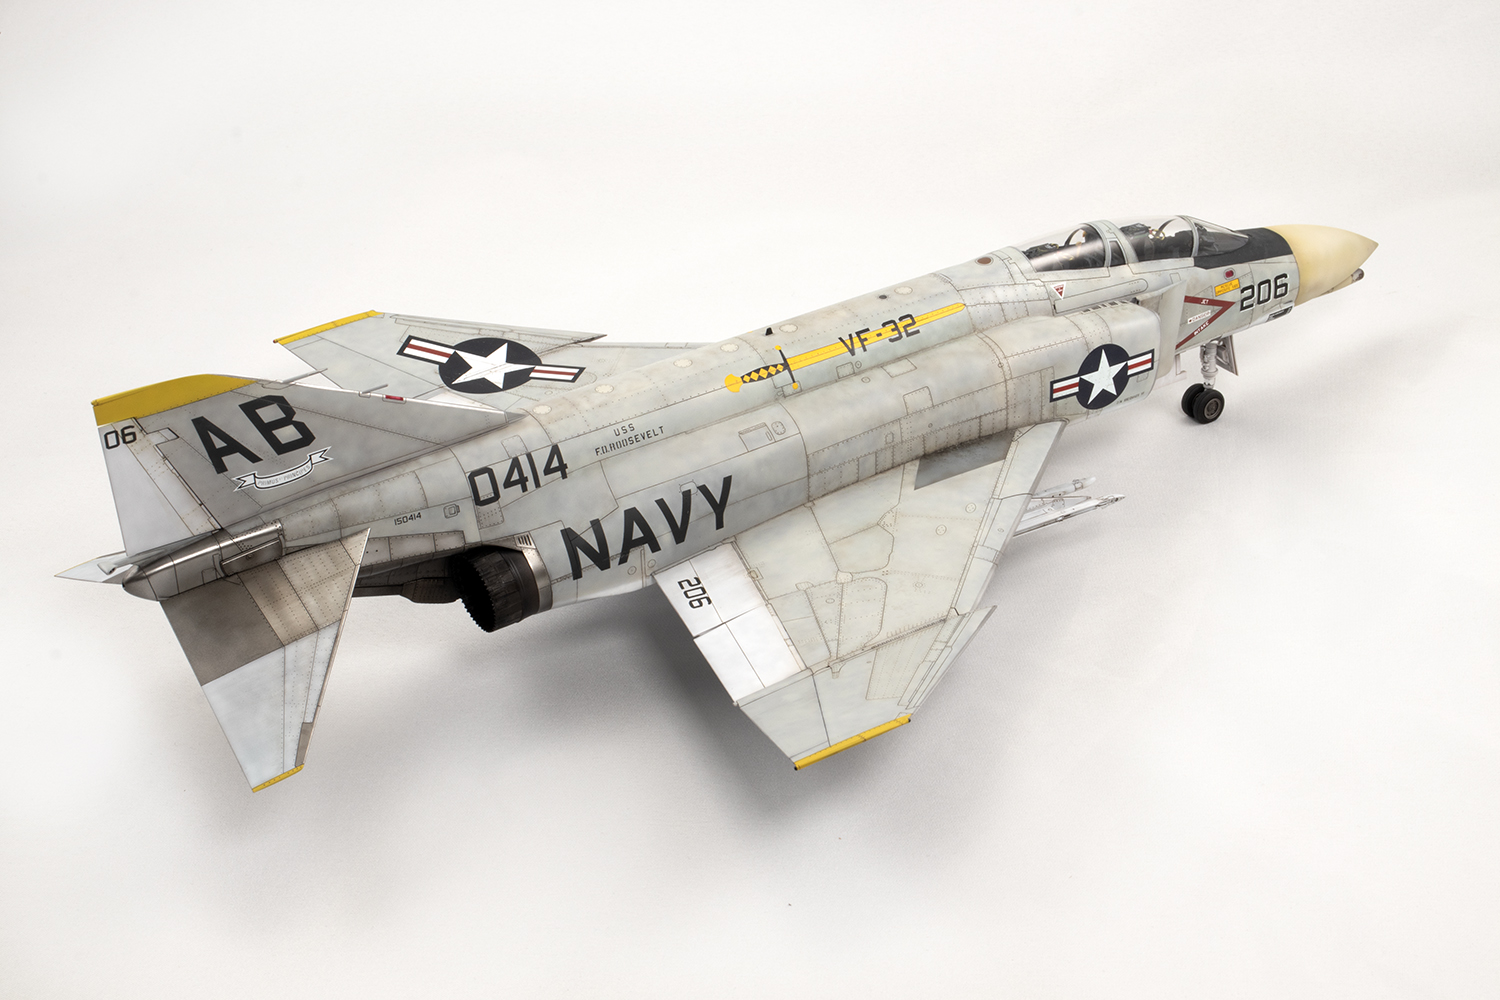
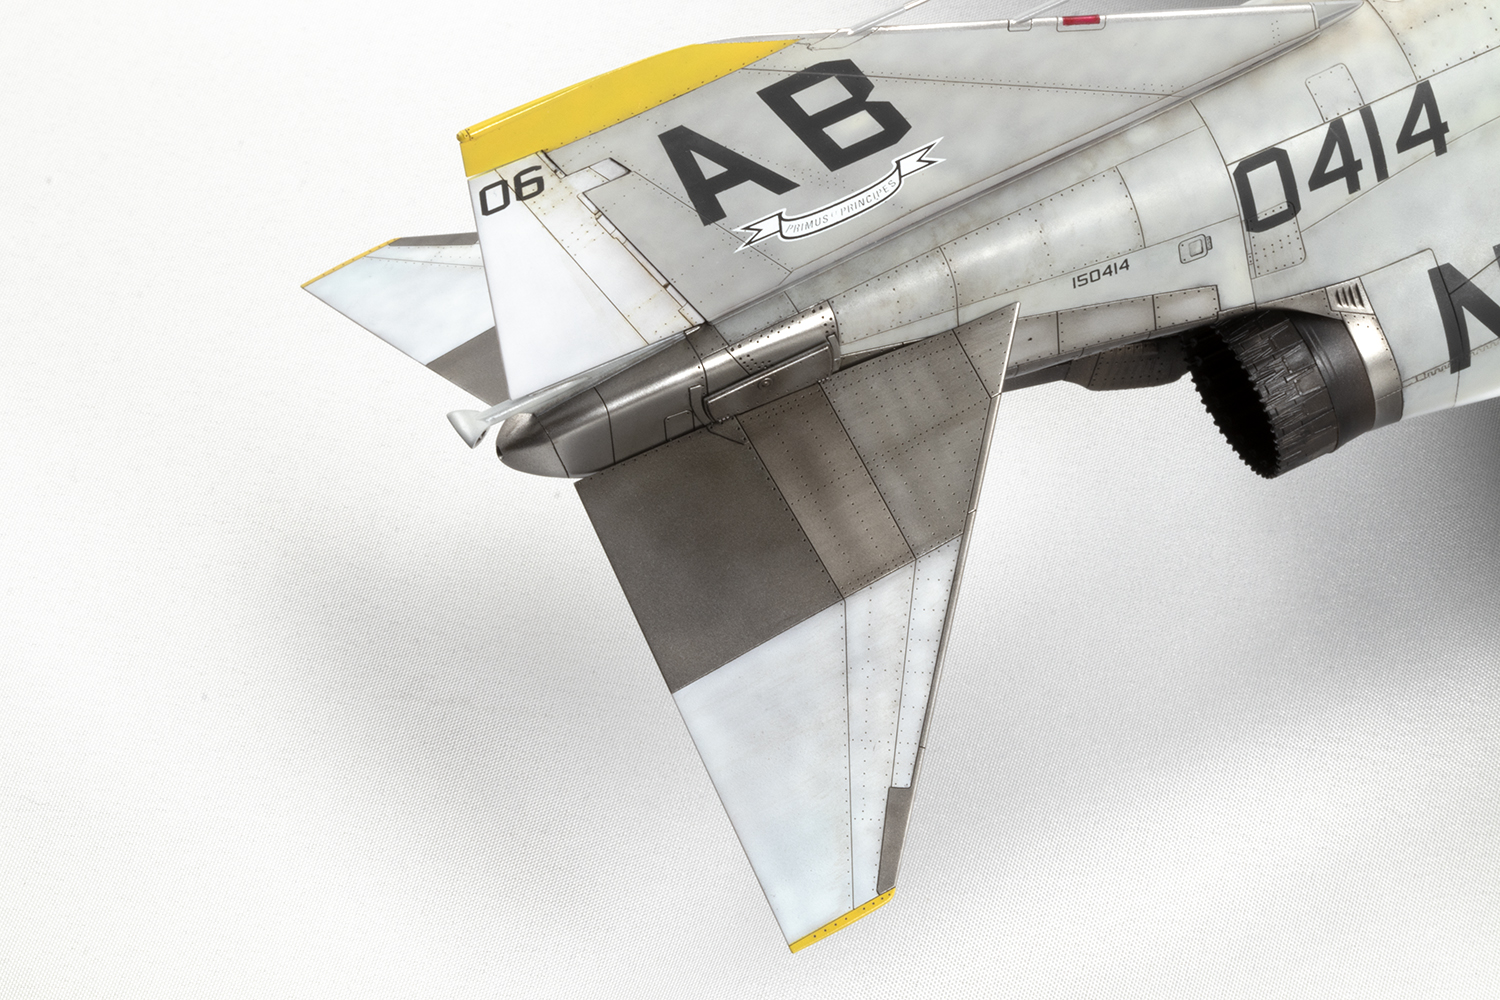
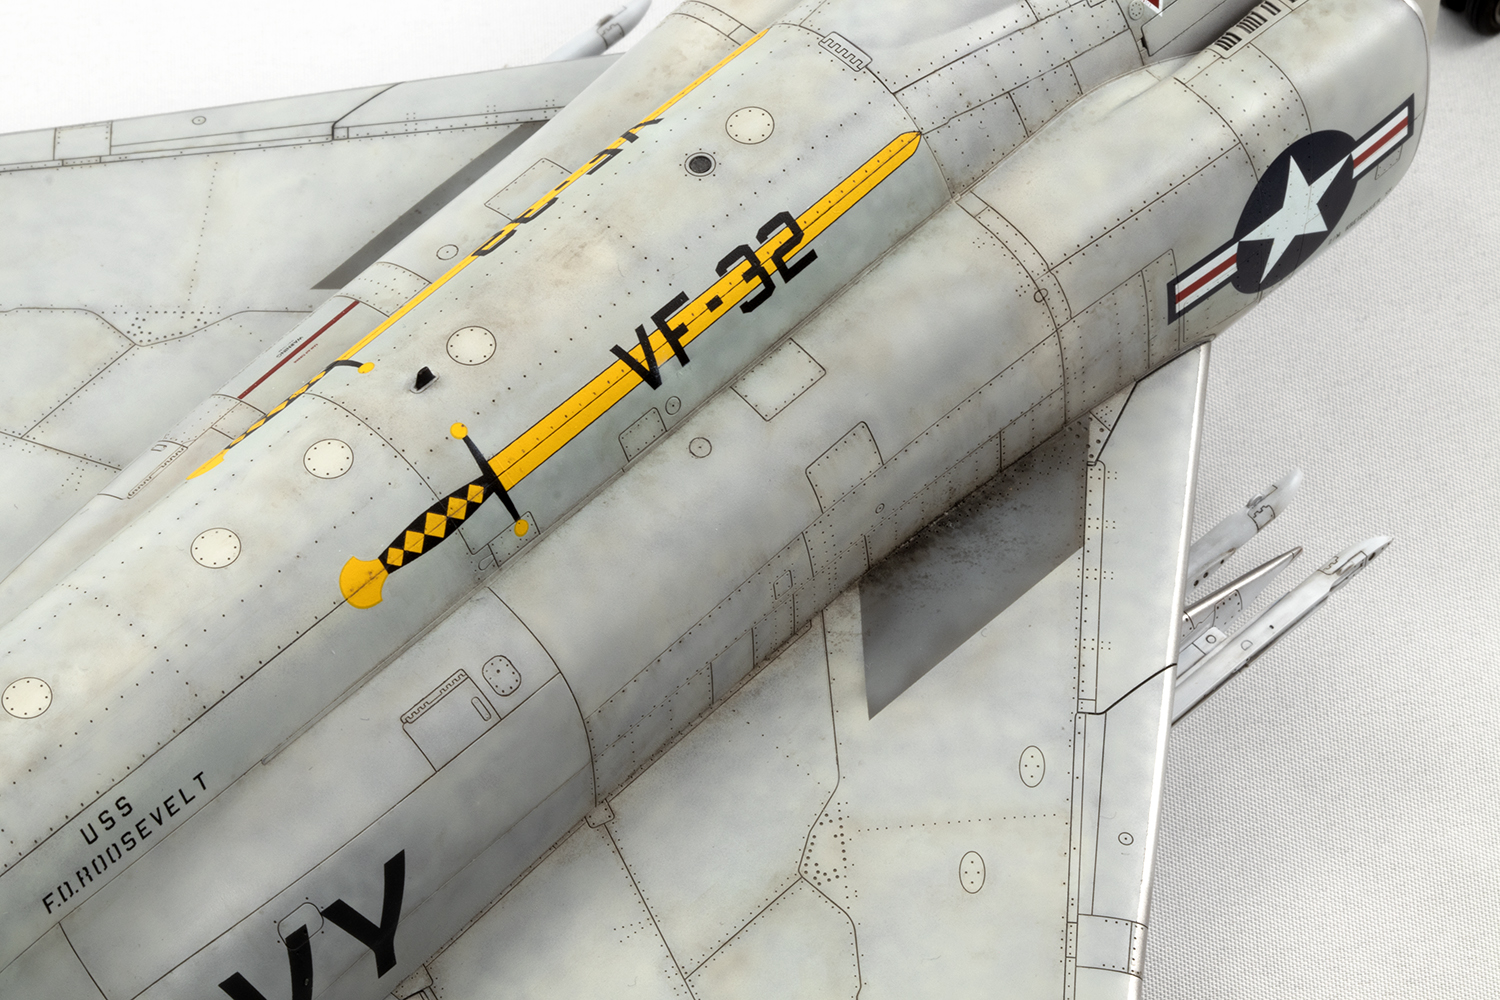
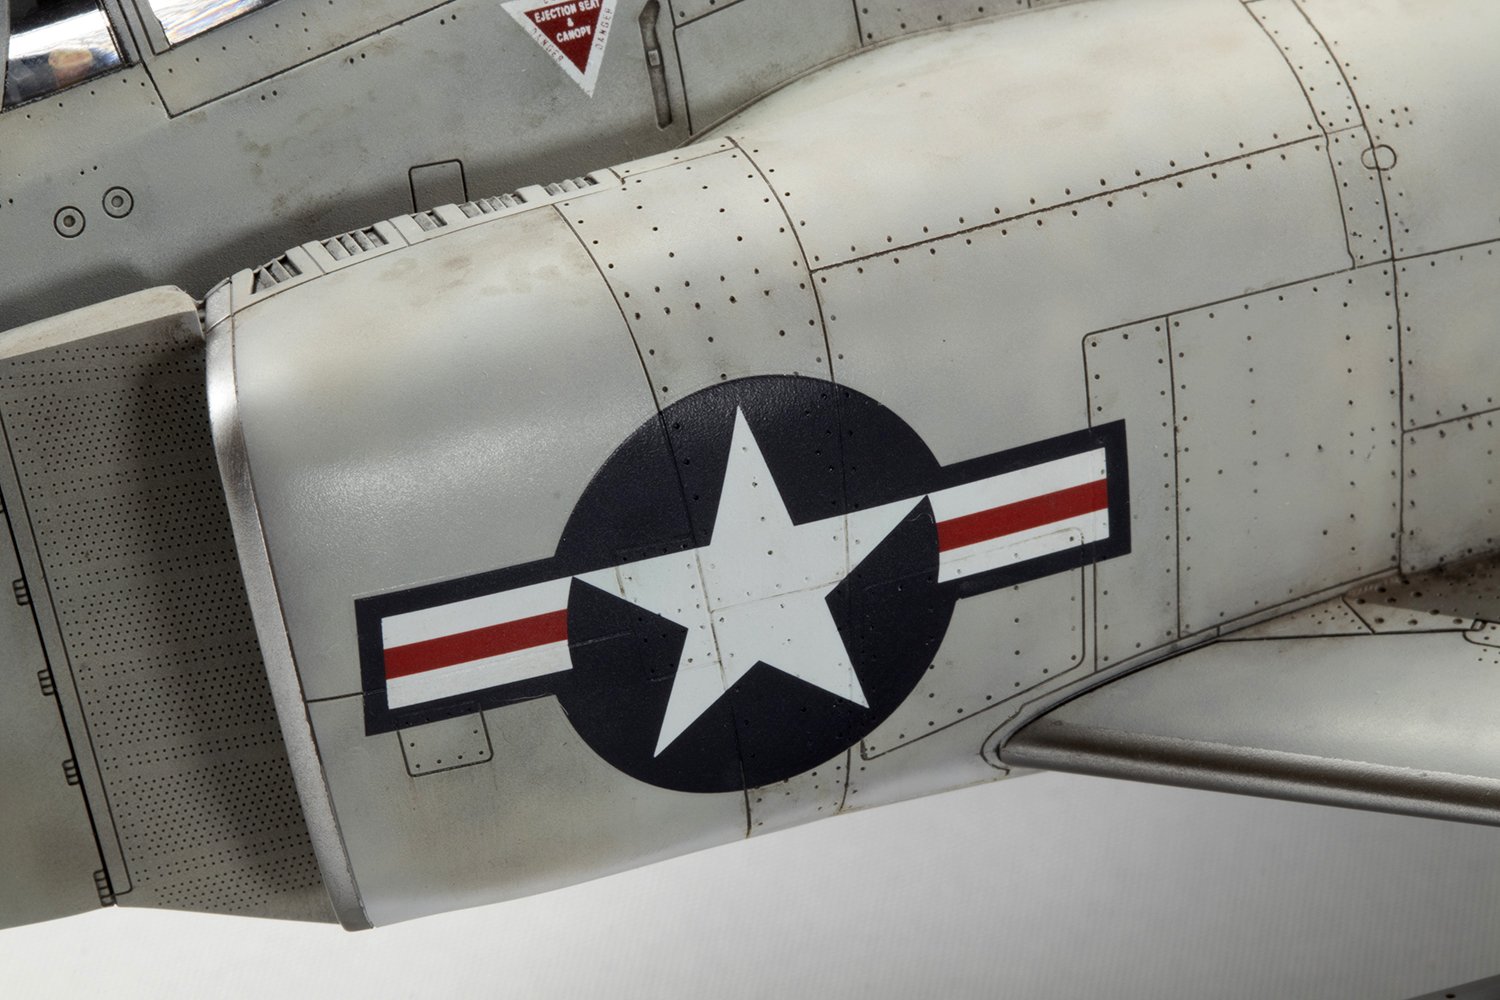
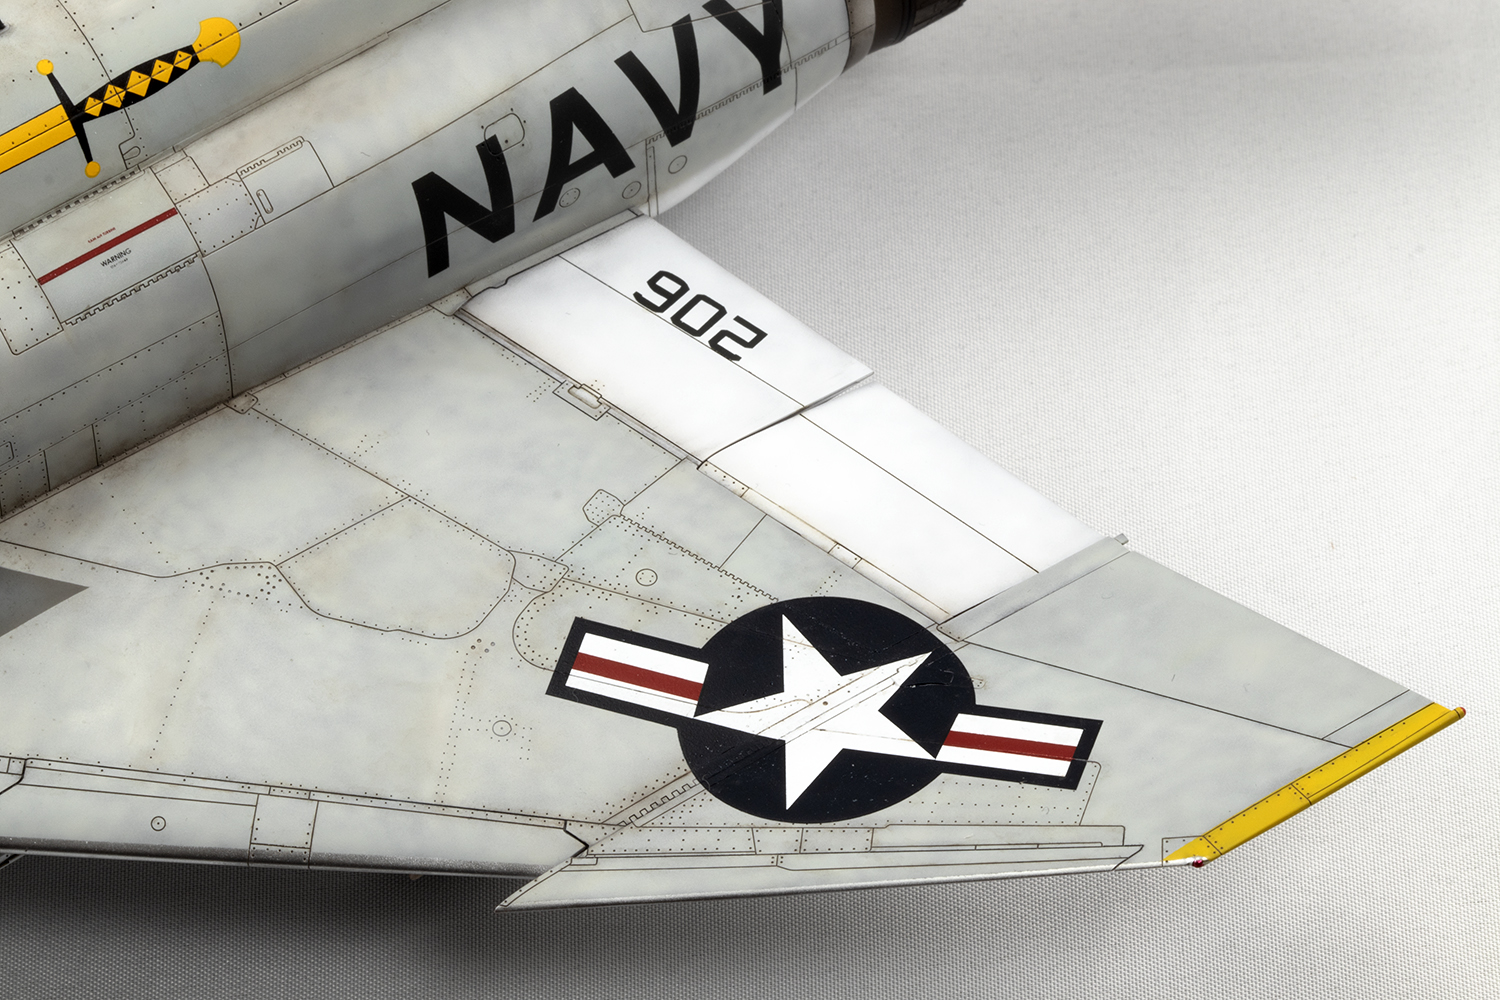
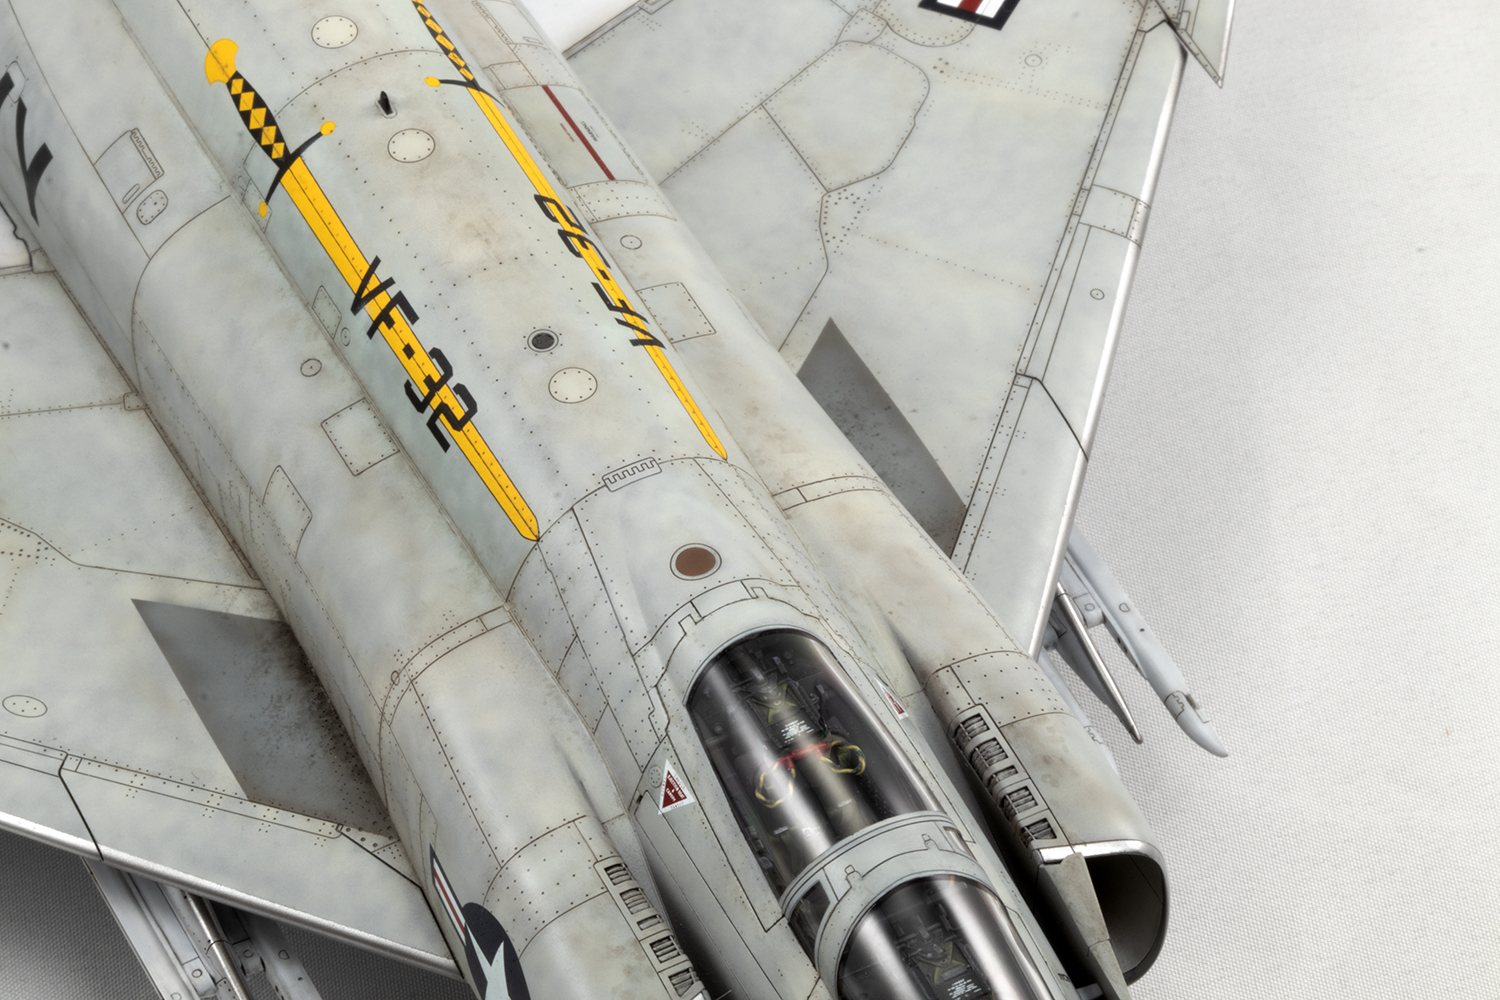
I like to study photos of what I’m building if possible, and in this case I could only find one of 150414 with VF-32, which was a low front three-quarter shot from 1966. My choice for this aircraft was dictated by my desire for a cream-coloured nose cone (I’ve always wanted a Phantom with one of these) and the simple tail tip. I had acquired a sheet by Meridia-Hobby, advertised in these very pages, and was pleased with this option on their sheet. There are some photos of this airframe in 1967 at the end of its cruise when it had a repaint in a different scheme, but I was stuck with the single photo and a couple of shots of other aircraft from the same squadron in 1966; VF-32 does not appear to have been well-photographed at this time. Nevertheless, I was able to deduce the following: There was no red edging on any of the undercarriage doors, which I was grateful for, and no walkways on the fuselage, only the inner wings. I should have been grateful for the complete absence of stencils on the aircraft, but I’m a masochist and actually love applying them. I was sad my model would not be flecked with the bazillion decals on other airframes. The leading edges of the wings, intakes, tail fin and pylons had coroguard applied, which is aesthetically pleasing, as were the yellow wing and tail plane tips. The port side is complete speculation, especially the bomb markings, but I decided to add them as most F-4s from the two squadrons deployed on the USS Franklin D. Roosevelt on this cruise carried them at some point. Whether there should be any names on the canopy rails is sadly unknown.
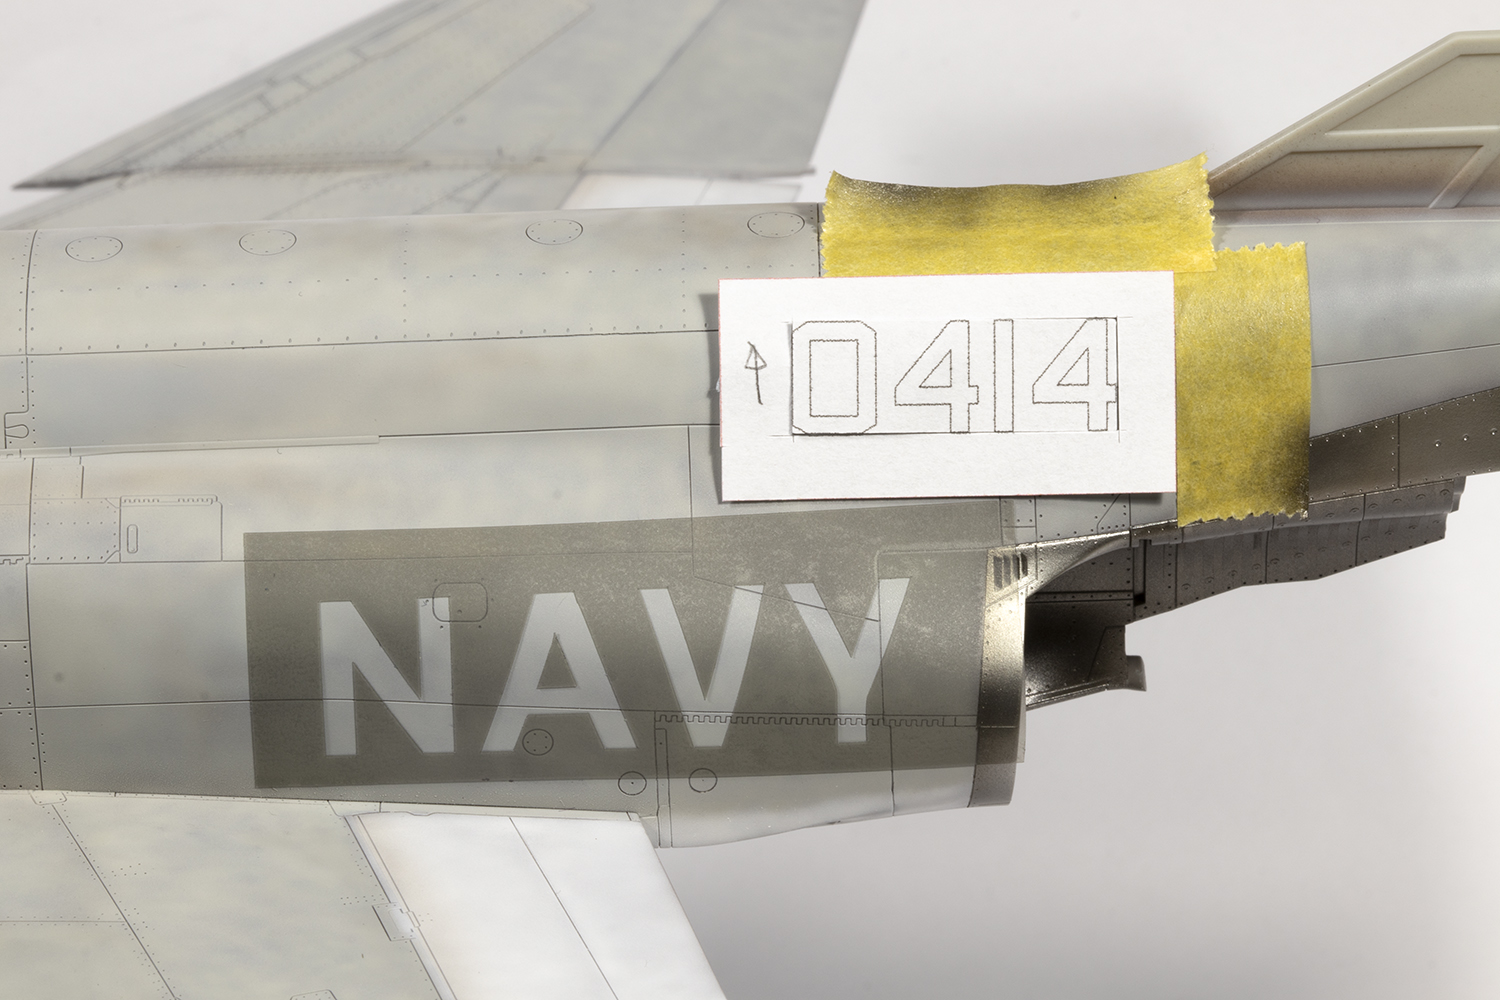
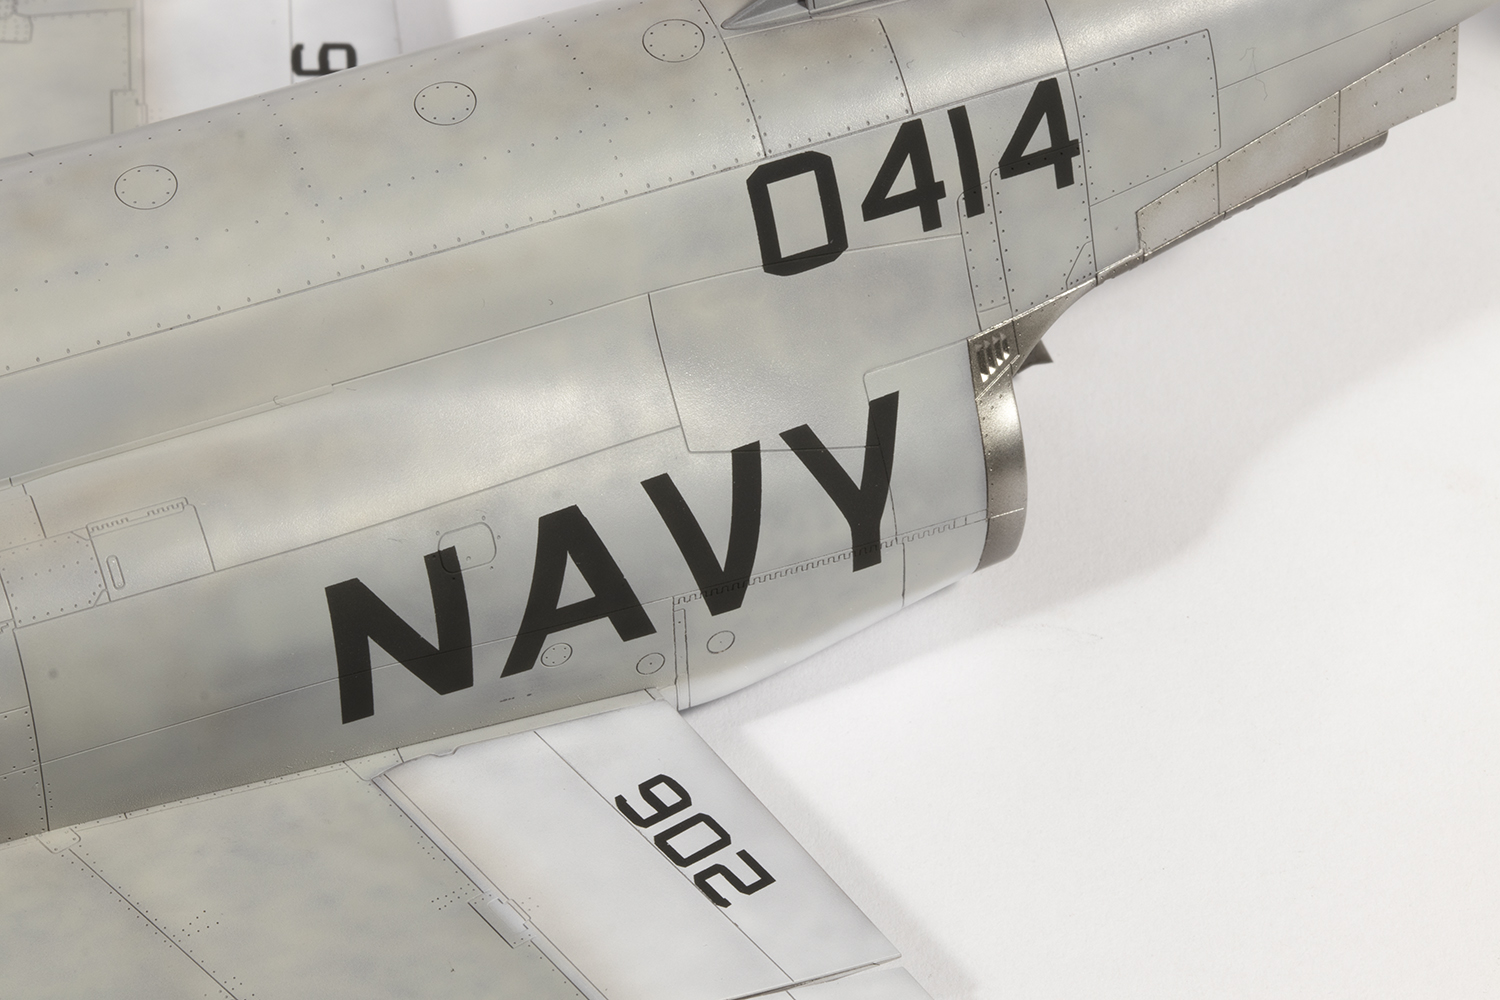
Airbrushing then ensued, with various shades of white and light grey (Mr Color 316 Insignia White, 69 Off White, 311 Light Gray and MRP White) over the light brown undersides and the aforementioned FS16440 Light Gull Gray colours over the darker brown upper surfaces. There was plenty of mottling and adding in various other shades to build interest into the paint. The nose was a variable mix of Mr Color 318 Radome Tan with 45 Sail Color and 69 Off White, with some shading with MRP Red Brown Clear. Painting concluded with the markings I decided to design on my computer in Inkscape and cut with my Silhouette cutter: the ‘AB’, ‘NAVY’, ’06’ and ‘206’ legends. Meridia-Hobby printed the ‘AB’ slightly too far apart, which I neglected to correct. These were all done with Tamiya XF-69 NATO Black as I find Tamiya colours the most forgiving to spray through vinyl masks.
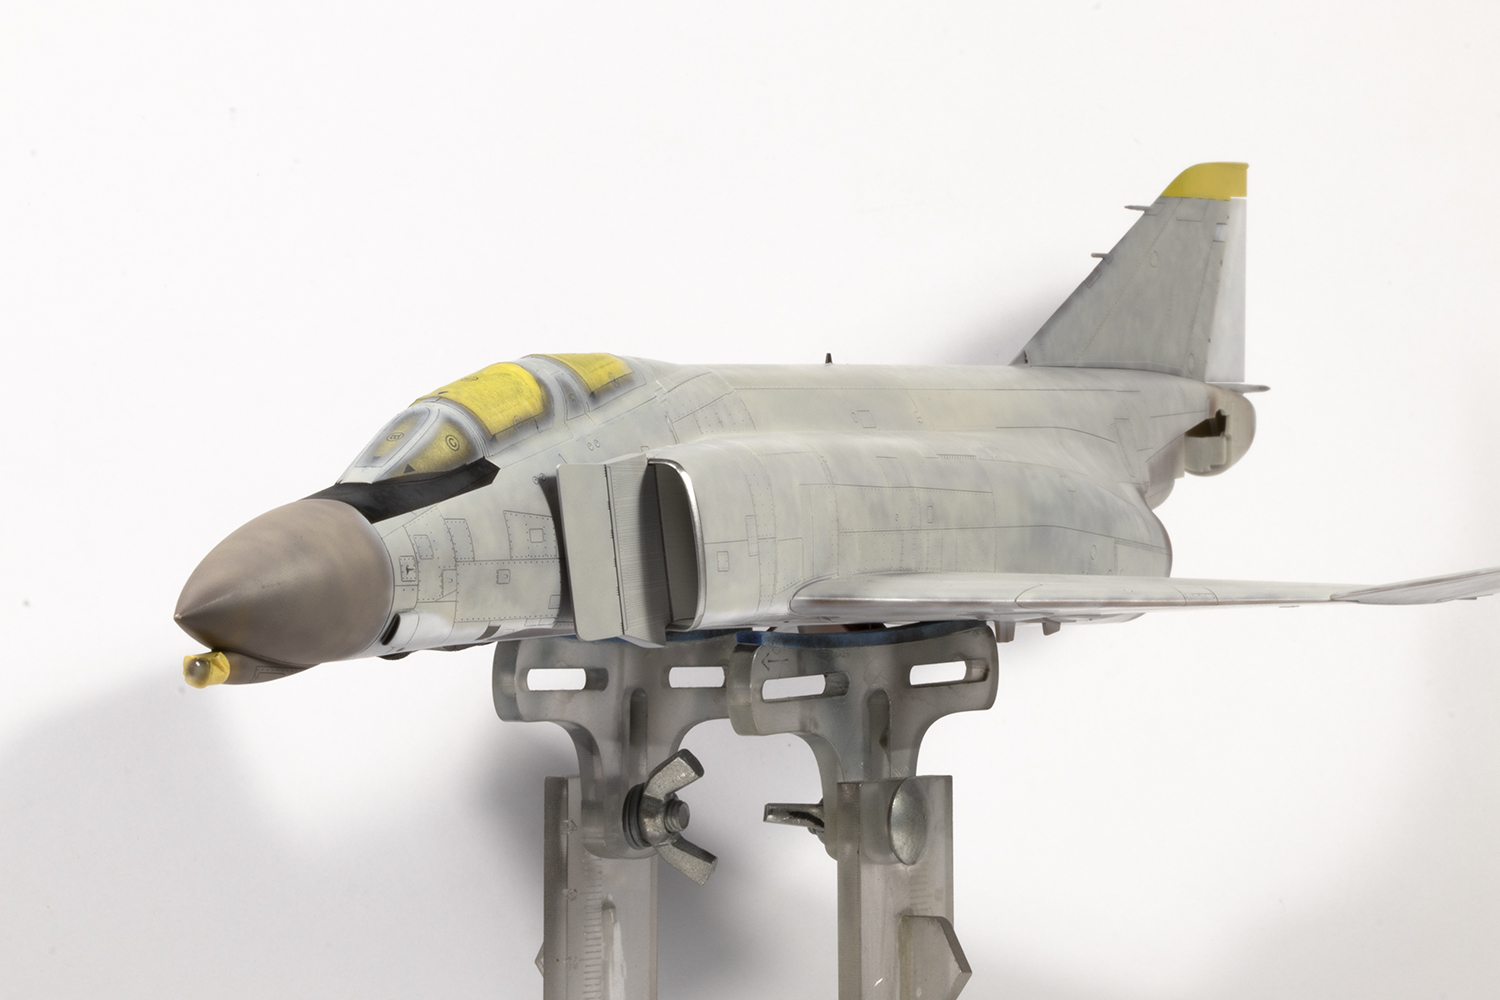


With airbrushing done, I contemplated oils. The surface detail was actually pretty prominent as it was and I considered leaving it alone, but in the end I could not resist adding a pin wash with various brown and grey shades of ABT502 oil paint, leaving black for moving surfaces like the leading edge flaps and canopy shutlines. This was painstakingly applied with a fine liner brush, and then cleaned up with a thinner soaked small brush. The surface detail is extensive and way more complete than any other F-4 model I’ve made. The result had a lot more contrast than is realistic, and I completely accept that. I do agree with Matt McDougall, who contends that kits often need ‘stage make-up’ to make them pop. My personal opinion is that it’s more interesting to look at as a model, even if it’s not very true to life.
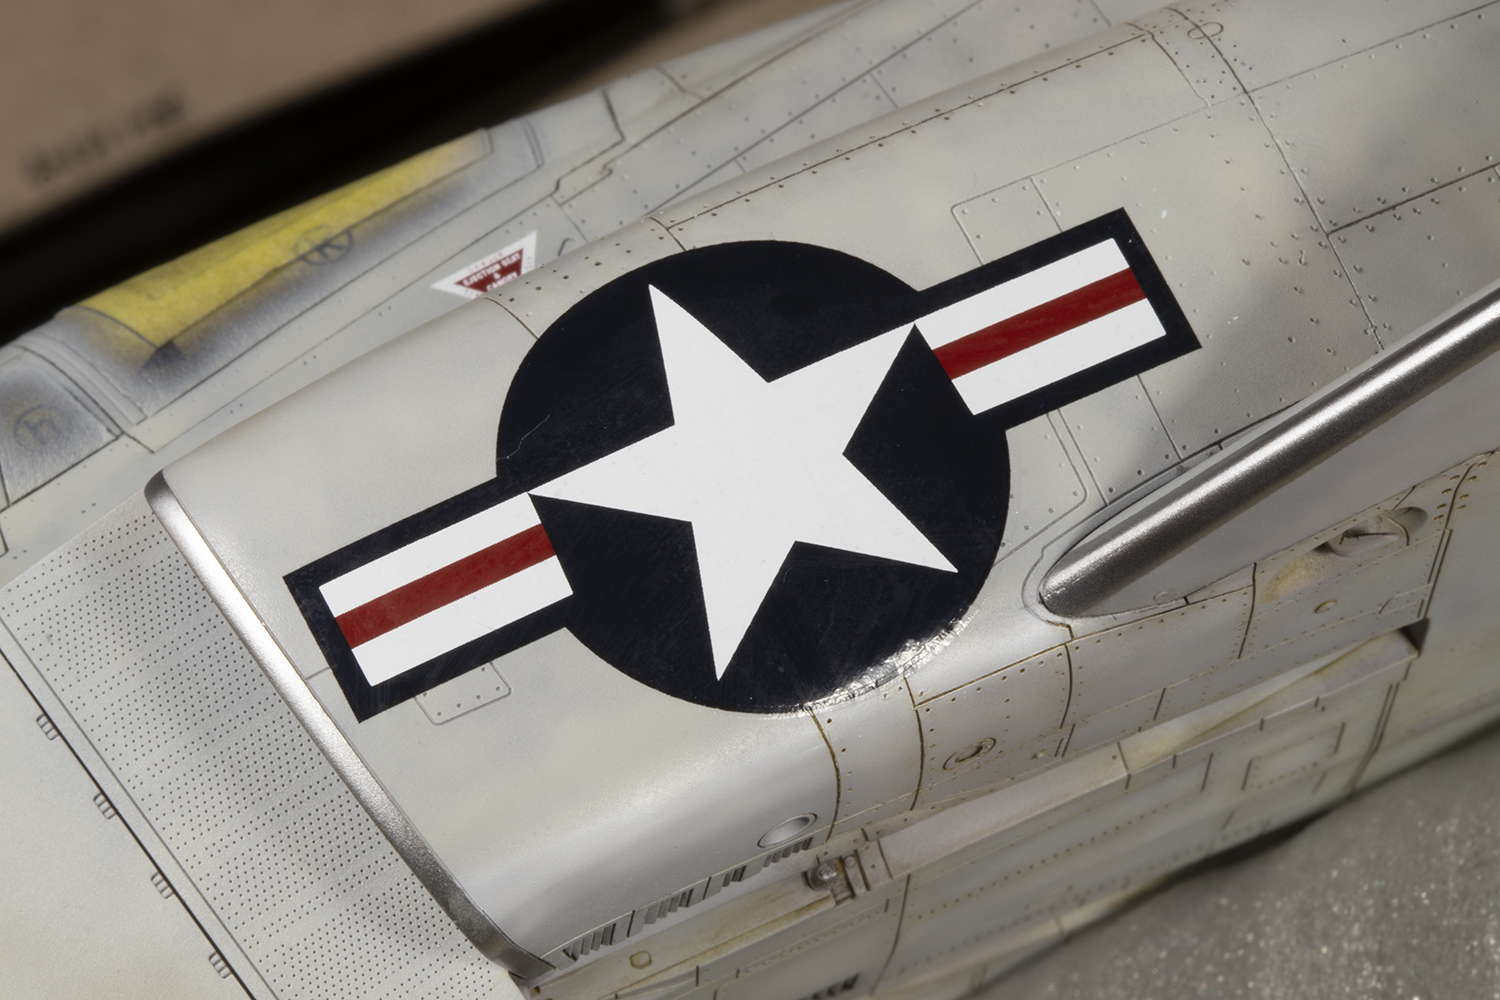
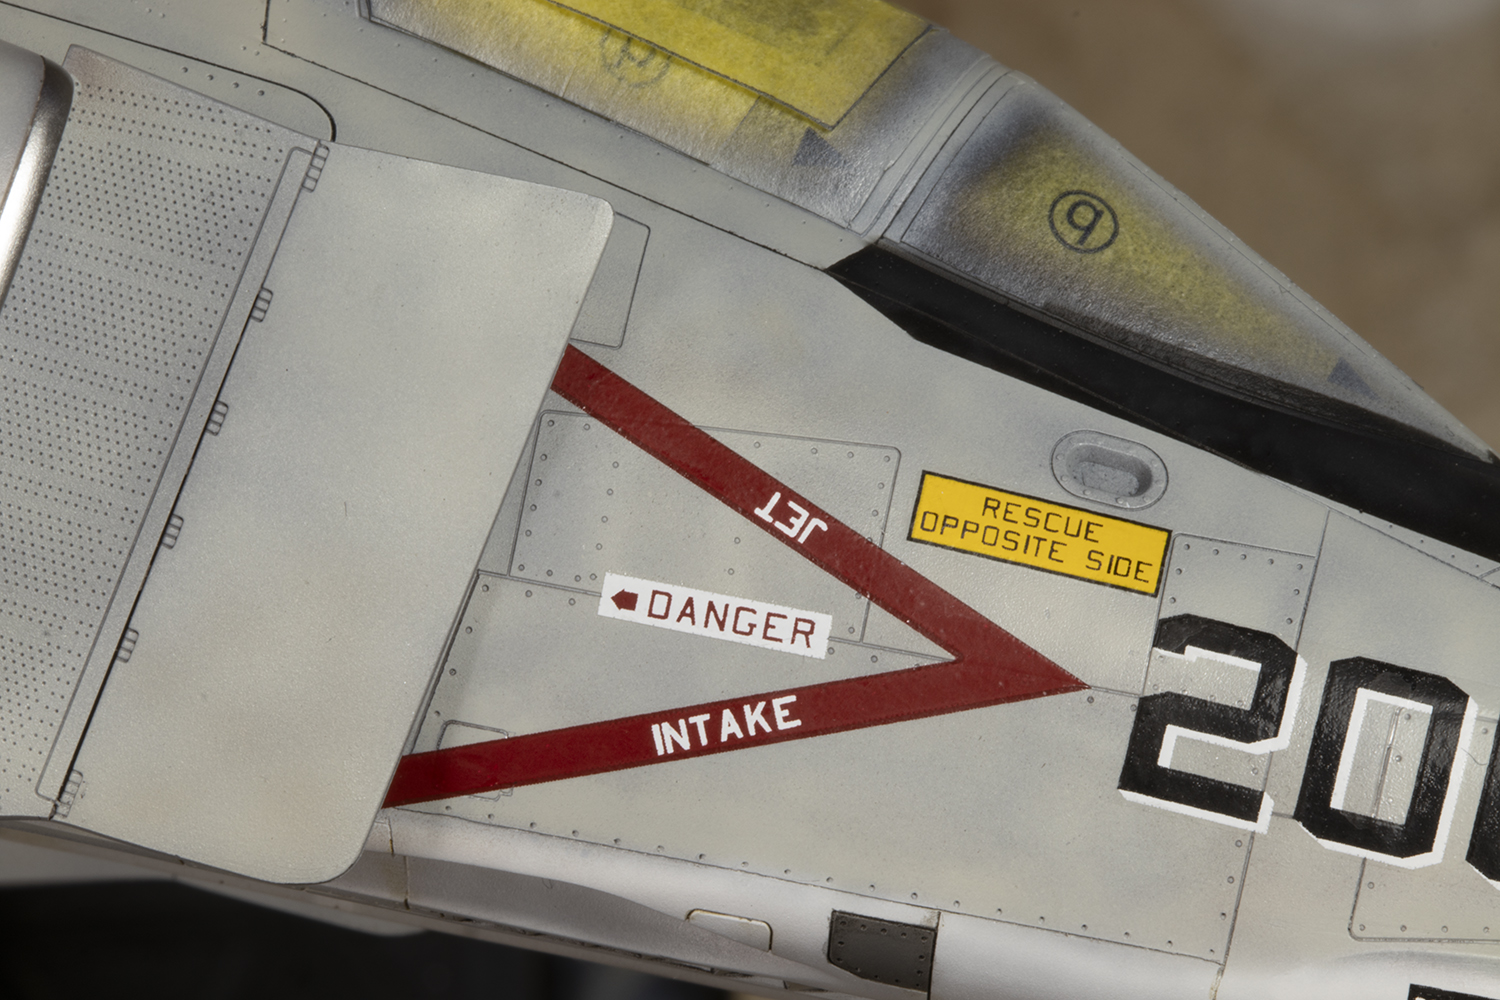
Decals were applied alongside the oils, directly over the paint, and due to there being practically no stencils, were few in number. The Meridia-Hobby transfers went down very well and were nicely printed. Sadly, the fuselage stars and bars looked way too big when applied. I rippled them off and used some from an Academy kit which matched the colour of the already-applied wing markings. The other error is that the ‘JET’ legend on the starboard warning triangle was printed upside-down. Meridia-Hobby are pretty generous and supply enough markings to make two complete airframes, so I cut this part out of a spare decal and applied it over the top.
It was at this point I decided I wasn’t happy. That drop tank loomed large on the bench and demanded weathering, and I couldn’t face it. I really avoid hanging from pylons if possible, and so bit the bullet and ordered the Hypersonic resin centreline pylon designed to fit over that massive mounting lug. While I was at it, I also bought Quickboost’s missile pylons as Tamiya don’t provide any launch rail retail, which looks odd without the Sidewinders fitted.
Final construction is never, ever fun. Except when it comes to this Tamiya kit. The landing gear is the best-engineered I have ever experienced, and adding all the legs and doors was pure pleasure. The exception, sadly, were the wheels. Tamiya moulded the mounting pegs as a cone, which fits their wheels, but not Eduard’s (I’d bought the latter as I’d messed up the kit tyres). This means the resin wheels flop around all over the place and your adhesive options are limited to superglue (sets way too fast to get the flats flat) or epoxy (sets way too slow). I inevitably had to use the latter and a complex jig made of a baking sheet and magnets, but the wheels are still not quite straight. I was uncertain as to the colour of the wheels, especially the nose ones, and convinced myself from photos they were a steel colour. Whether I’m right or not, who knows?
I was not prepared to particularly like this kit. It was expensive and as the 13th Phantom in my collection, I’m a little burned out on them. But this is without a doubt the best-produced model kit I’ve ever had the pleasure to build. It was a delight from start to finish, turned out to be excellent value for money, and I can not think of a better way to have exhausted all the F-4s from my stash. Until I buy the next one…


Year bought: 2021 (Oxted Model Centre, Oxted, UK)
Year built: 2023 (New Addington, Croydon)
Back to home.
