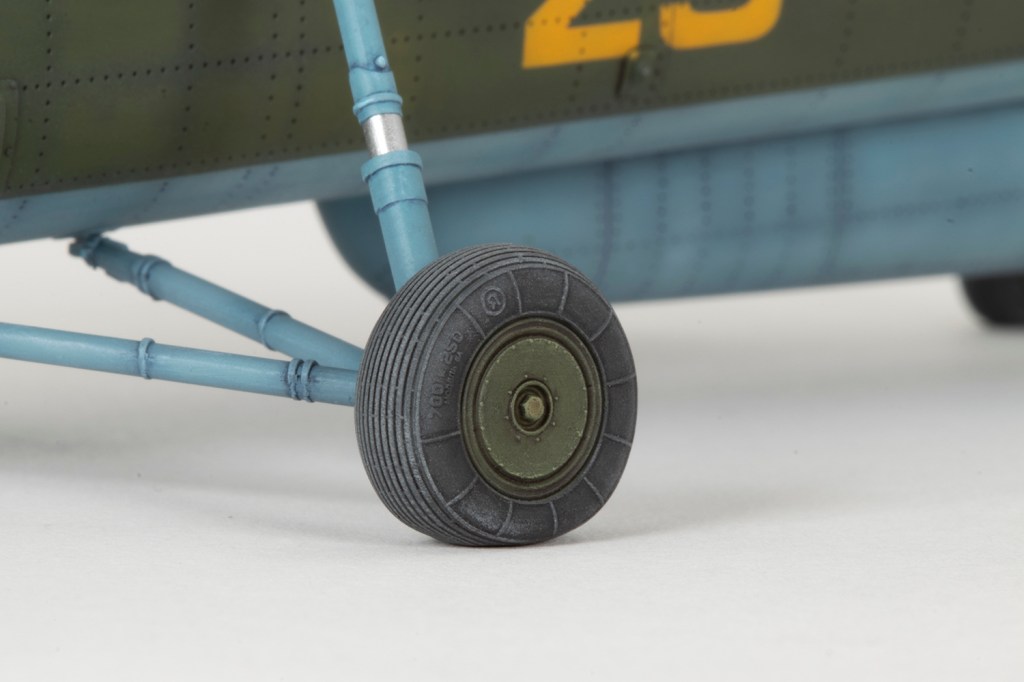
with Eduard resin wheels
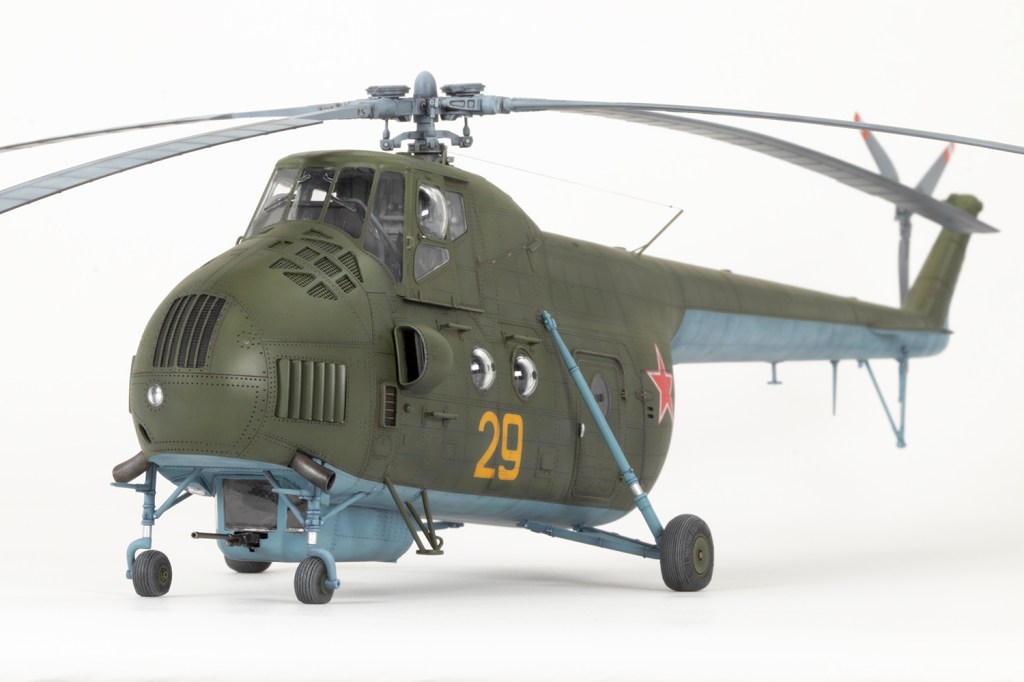
226.OSAP, 3rd Squadron, Soviet Air Force, East Germany
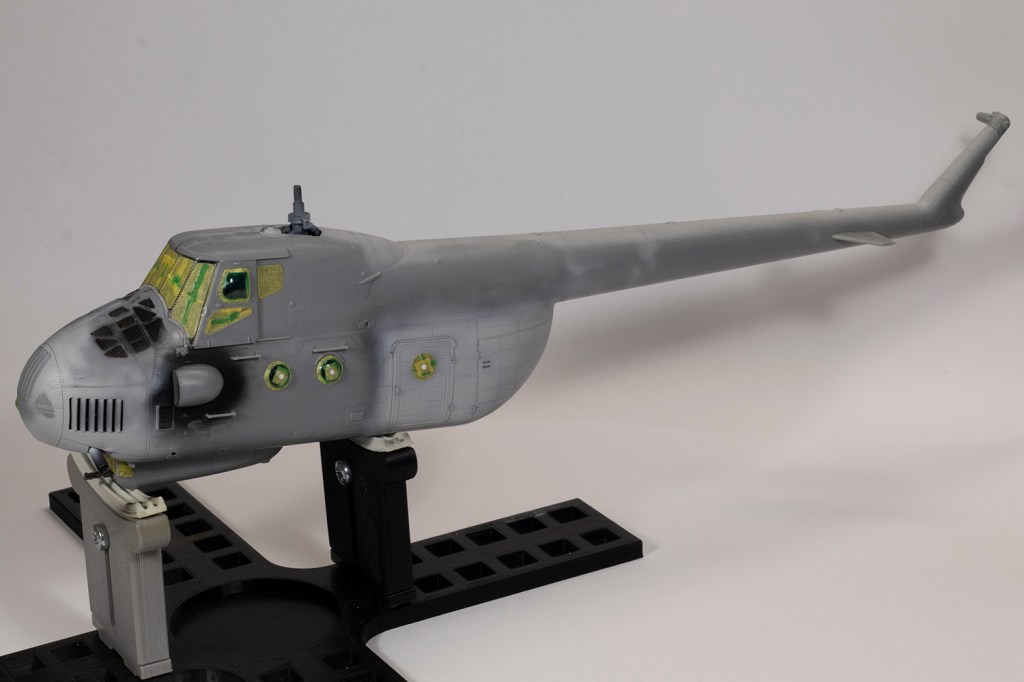
This is another unexpected build for 2024, which is the product of answering the editor’s cry in October’s issue for someone to make a model of this helicopter to follow up the release of the latest Warpaint publication. With the Trumpeter kit in the stash, I was more than happy to oblige.
My happiness abated somewhat when I read said Warpaint volume and proceeded to examine what Trumpeter provide in this, their first 1/48 boxing of the Hound. Oh Trumpeter, what silly-billies you are! This kit is ostensibly an Mi-4. After its release, Trumpeter subsequently produced Mi-4A and Mi-4AV kits. If you haven’t bought one yet, and are interested in doing so, do yourself a favour and do not buy this boxing (05816), but get the A (05817) or AV (05818) versions.
The problems with the vanilla Mi-4 kit are manifold. Trumpeter provide late style rotor blades, which precludes making an early Mi-4, but most egregiously they don’t provide the bulged side windows or transparencies for the gondola under the fuselage. Even a cursory glance at photos will show that the flat windows provided are very rare, and the Soviet decal option (which is a museum piece) patently has the bulged windows, as per the box art. Whilst the gondola (the long version – not the short one) and gun are provided, the clear parts are not. All of this is to say that if you want to make a Soviet Hound (as I did), the parts are not in the box – but they are in the A and AV kits. I was going to have to make my own bulged windows and fabricate the clear front of the gun gondola. Challenge accepted.
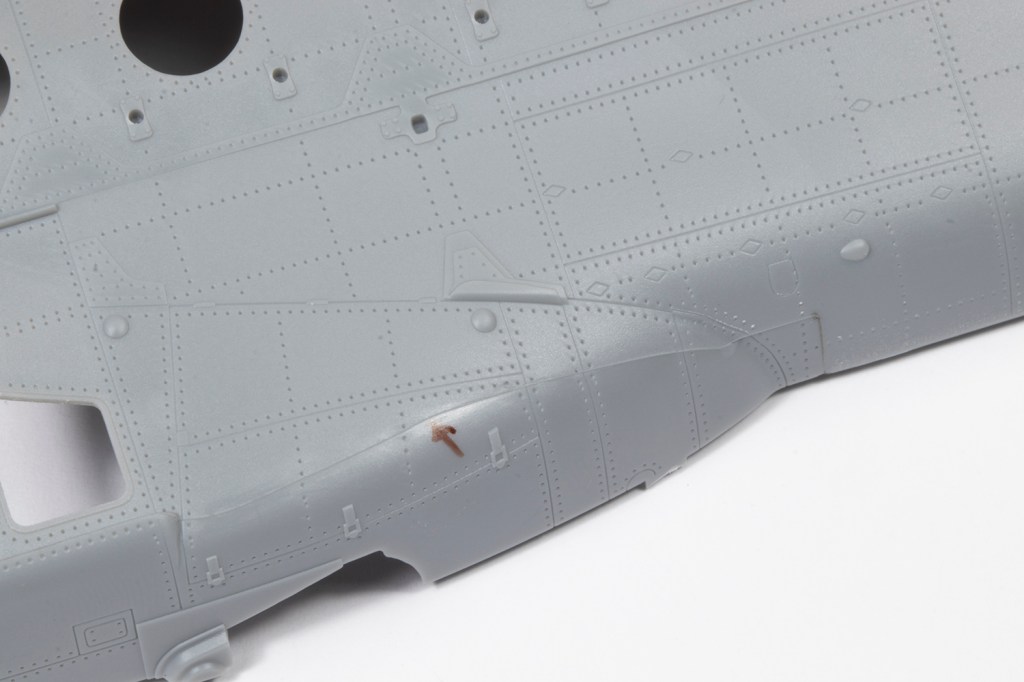

When opening a Trumpeter kit and examining the plastic, the first thing I look for are the moulding lines on the fuselage halves. The plastic is very nicely moulded, with extensive and finely produced detail, but if I look closely I will invariably find where the multi-part moulds meet and the resulting defects will need to be cleaned up, and this was the case in several places on this model. The soft plastic makes removing these easy and Trumpeter are very discreet with them, so it’s not a terribly onerous job. Unlike the real thing, the rivets are all recessed, but I am more than happy to live with that in this scale.


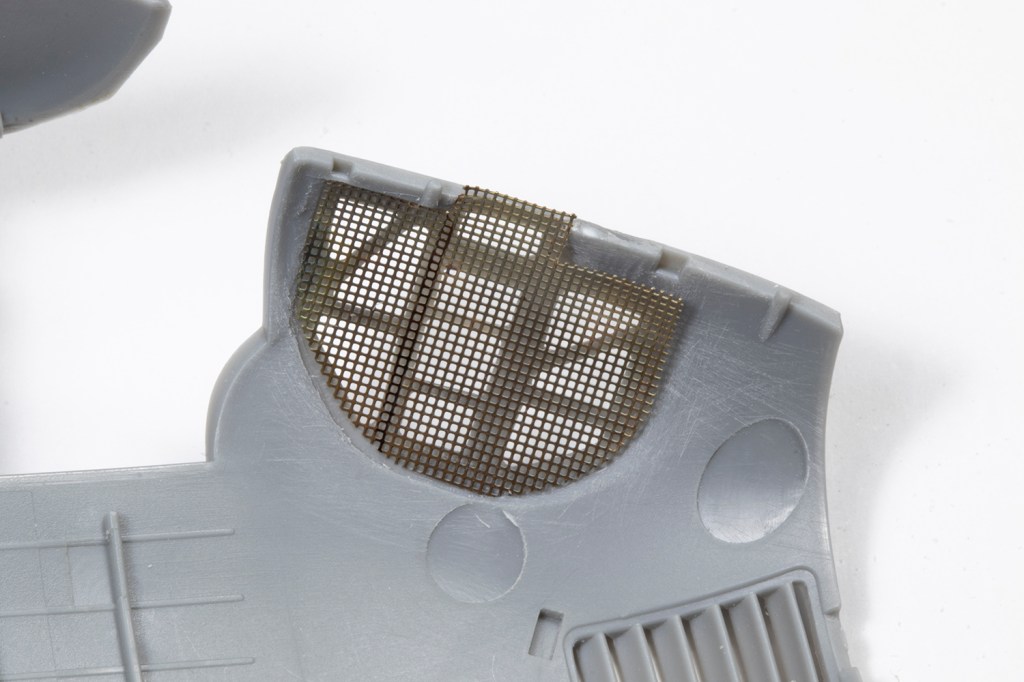
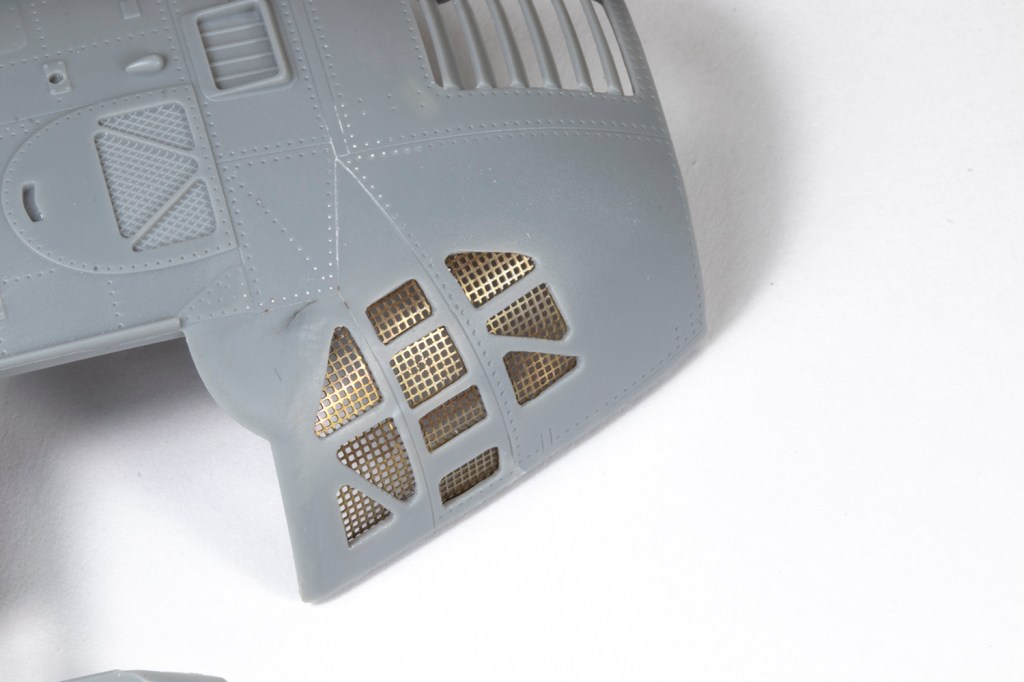
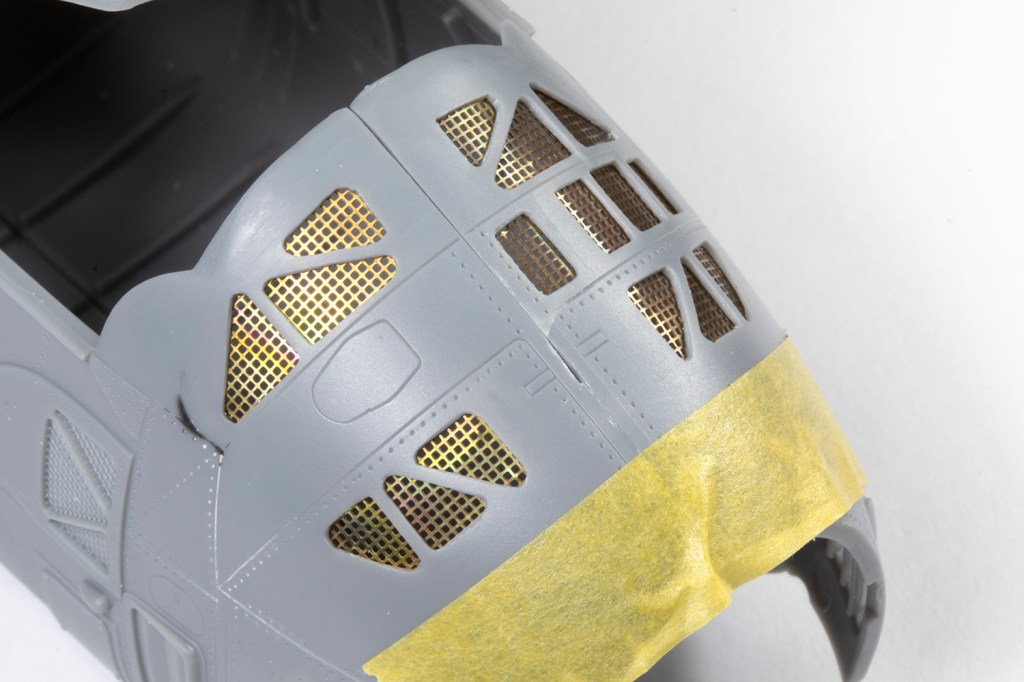


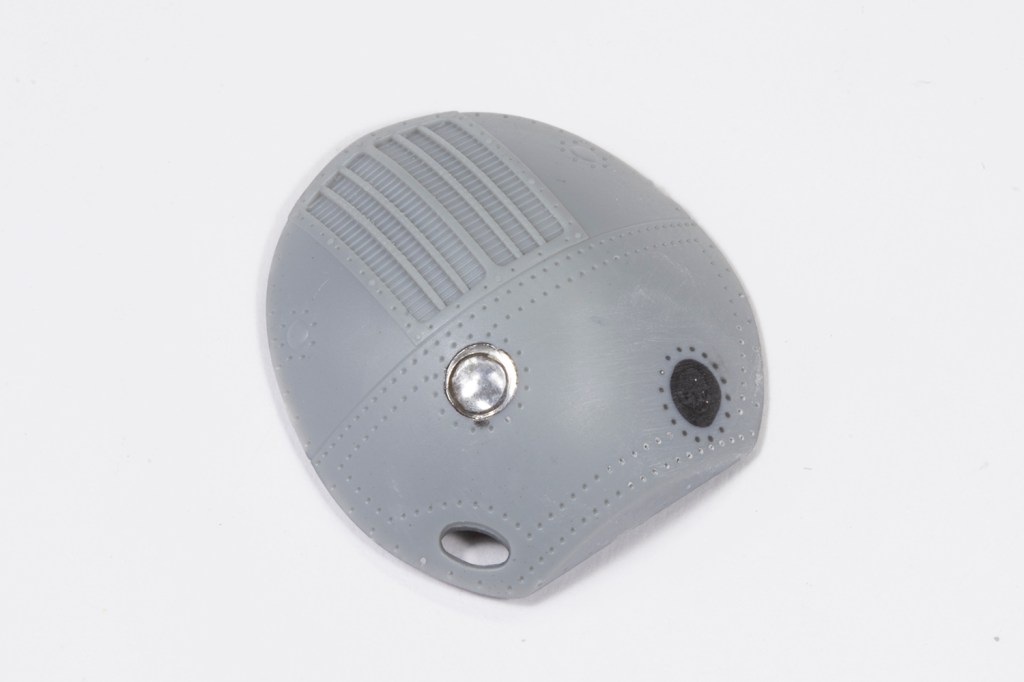
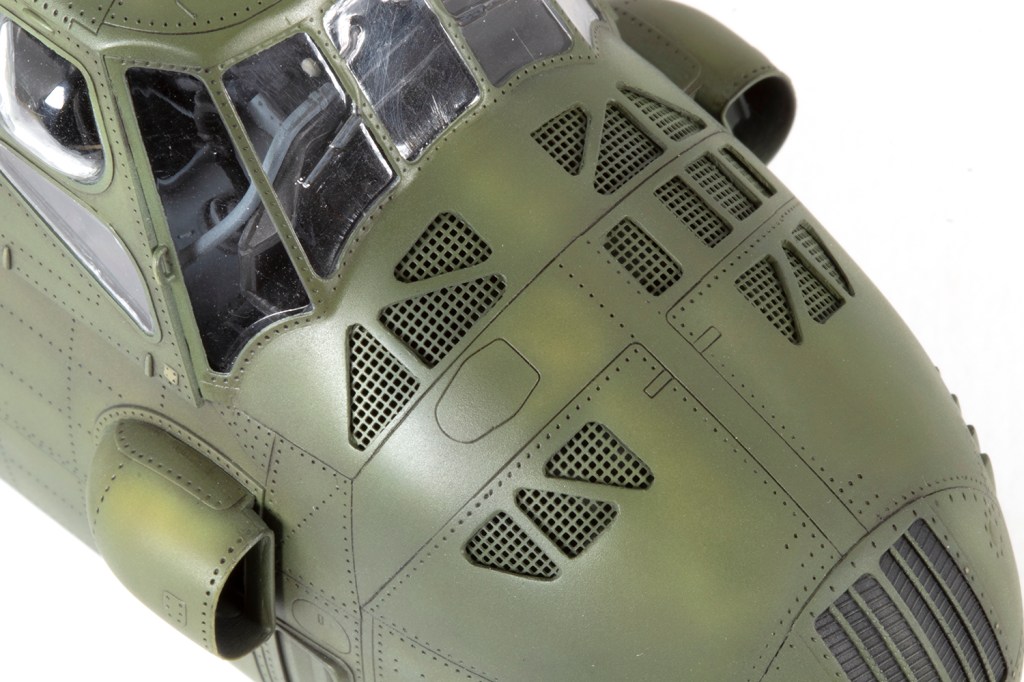
A surprisingly complete engine is included, the rear half of which will be completely invisible, and the front half just discernible through the cooling vents in the nose. There are lots of grilles moulded in solid plastic in the nose over the engine section and I decided to open these up. In theory this would mean the rear of the engine could be seen, although only if you looked really hard and with a good torch.
I’ve never been any good at removing sections of fuselage neatly, but wanted to try anyway. I started with various grinding bits in a Proxxon motor tool and milled away the centres of the moulded mesh sections. The plastic is pretty thick and this took a while. I could then refine the shape properly with some Sujiborido metal files, taking it slow and frequently changing file to make best use of the different shapes I had available. After some time, I had the holes cut out. Next was to reduce the thickness of the plastic from the inside, again with a motor tool along with a scalpel and chisel where appropriate. The plastic was still much thicker than it should be, but I needed to keep some thickness so the plastic would withstand filling and sanding across the fuselage joint.
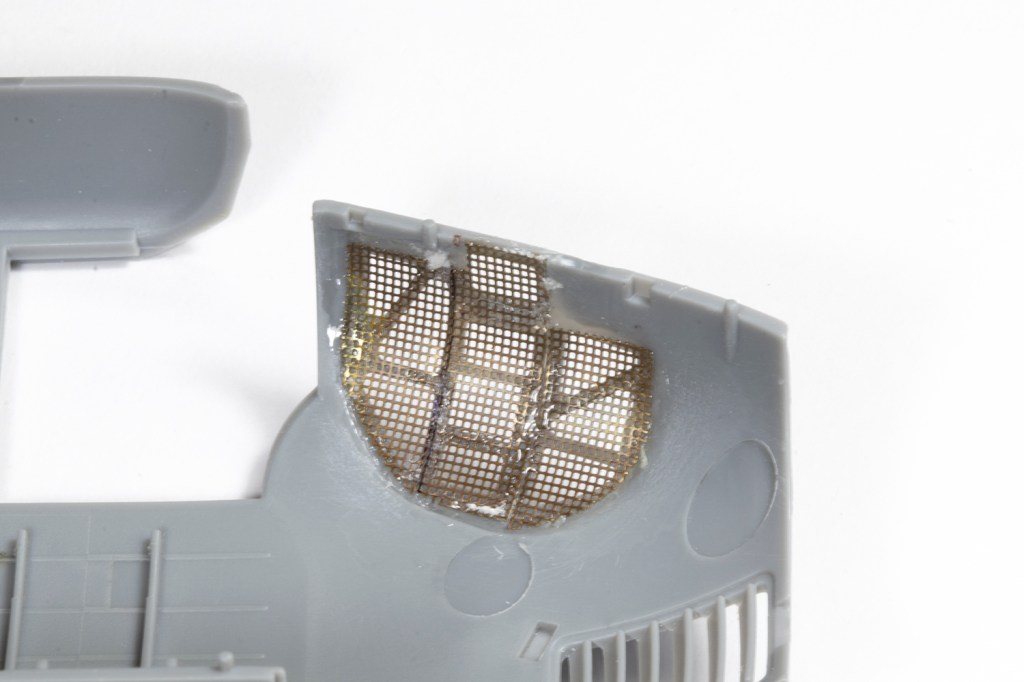
Finding a fine enough mesh is not easy and rather than spend ages trying to source some, I used a generic sheet of Eduard PE mesh I had lying around. It’s rather too coarse, but definitely better than the moulded plastic. I stuck some masking tape on the inside of the nose and drew on this the shape of PE I would need. With this overlaid on the PE sheet, the mesh could be cut to shape and glued from the inside. In the end I was pretty happy with my attempt.


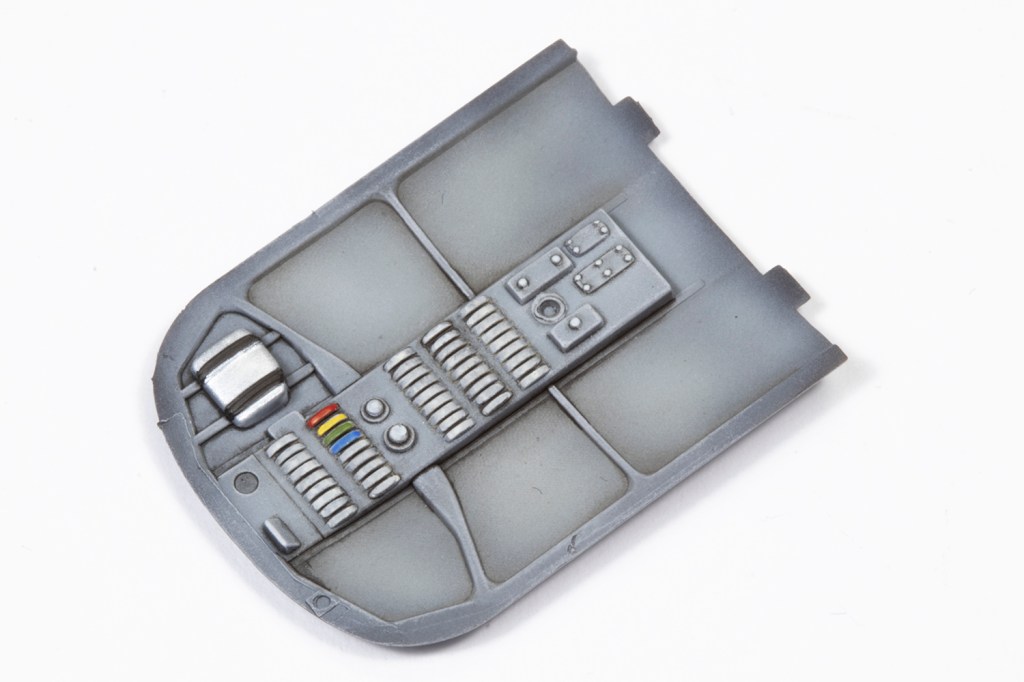
I installed the complete engine as it would assist with weight in the nose, but only painted it black with some green shading as it is effectively invisible. The same is true of the main cabin of the helicopter, and so to save time the nice detail was largely ignored and everything just painted black. With the doors all closed and the limited optics through the bulged windows, I can confirm nothing of the main interior is visible, but what Trumpeter provide is rather nice if you wanted to open it all up.

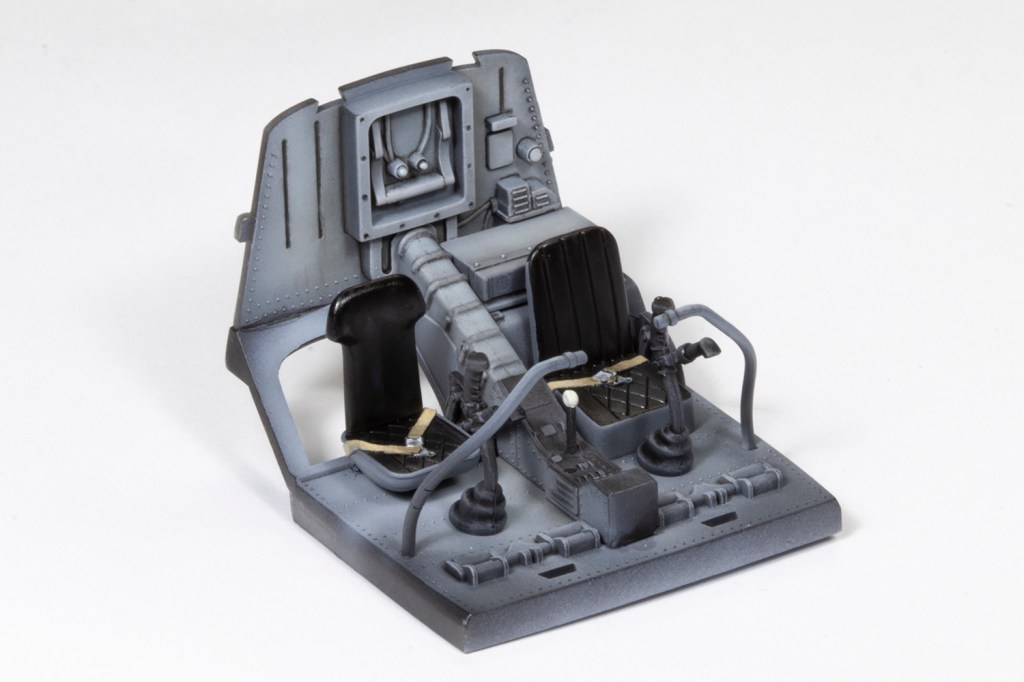
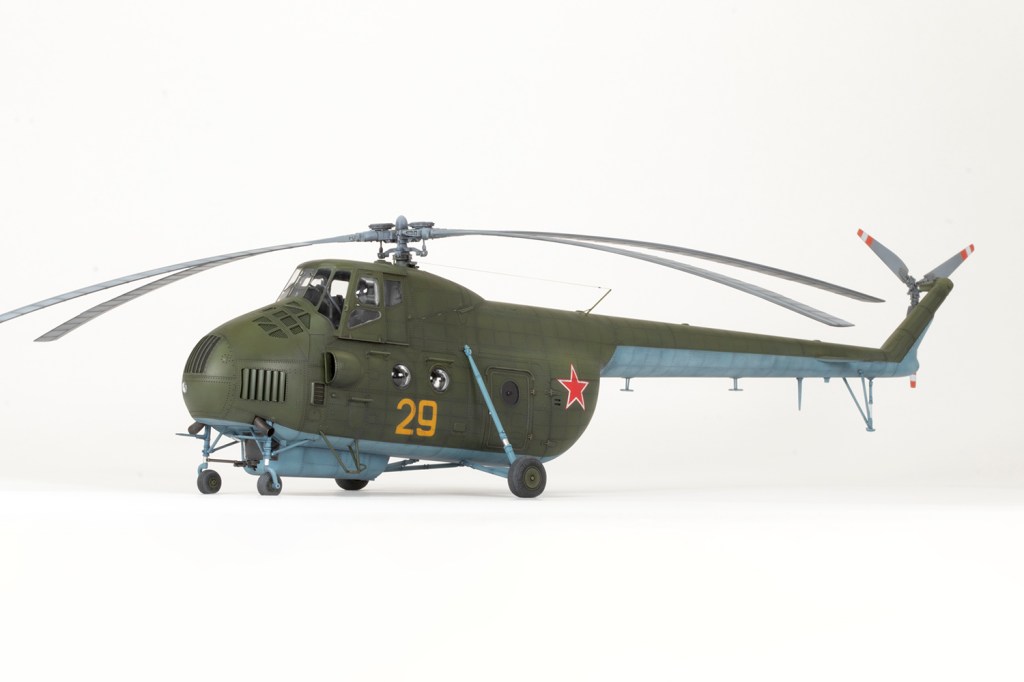
The cockpit, on the other hand, is very visible. I kept everything out of the box aside from some ANYZ etched belt buckles threaded with thin strips of Tamiya tape. Trumpeter provide instrument decals but I used some Airscale dials instead – definitely not accurate, but whatever fitted the bezel. Despite the extensive canopy glazing, the panel is very difficult to see. I drybrushed it with ever-lighter layers of grey oil paint, locking each shade in place with lacquer matt varnish before applying the next, paler shade. This way I never have to wait for the oils to dry and the entire panel can be done in a few minutes.


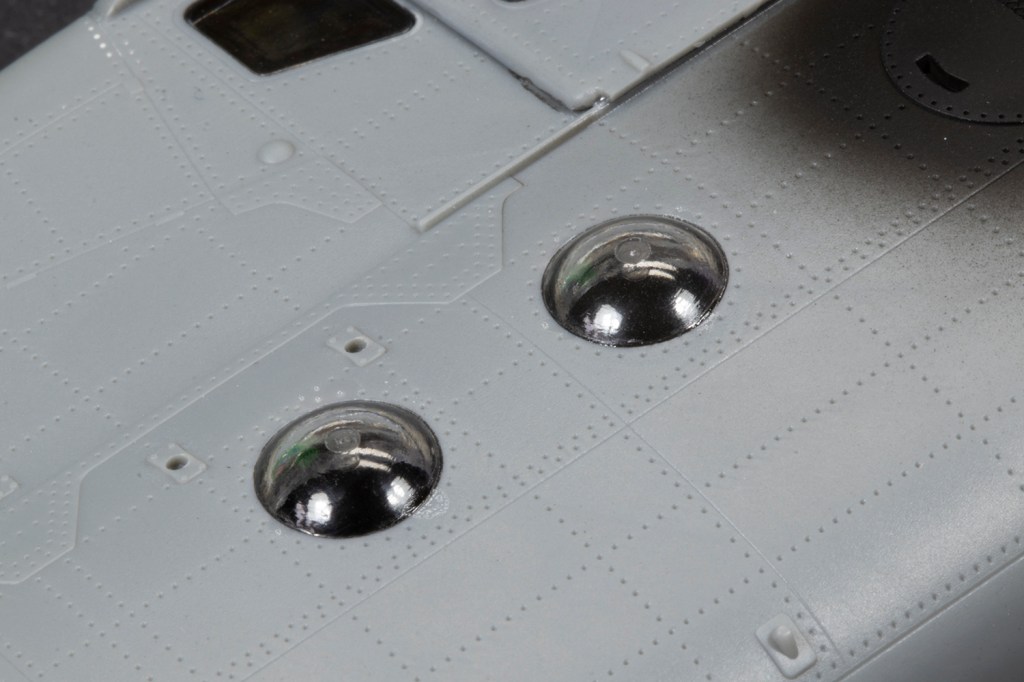
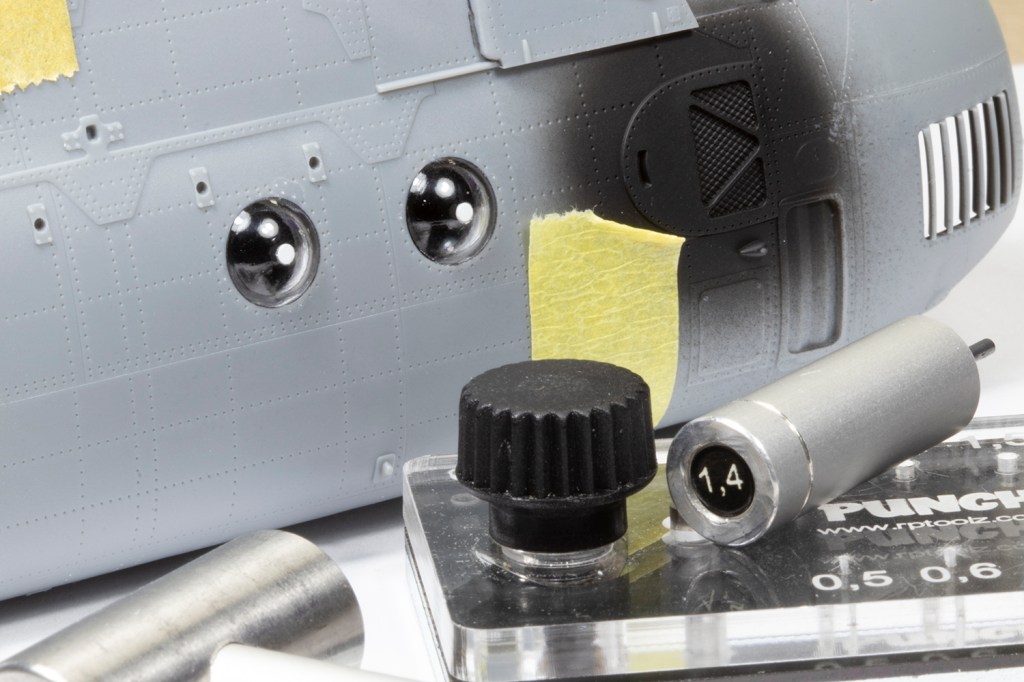
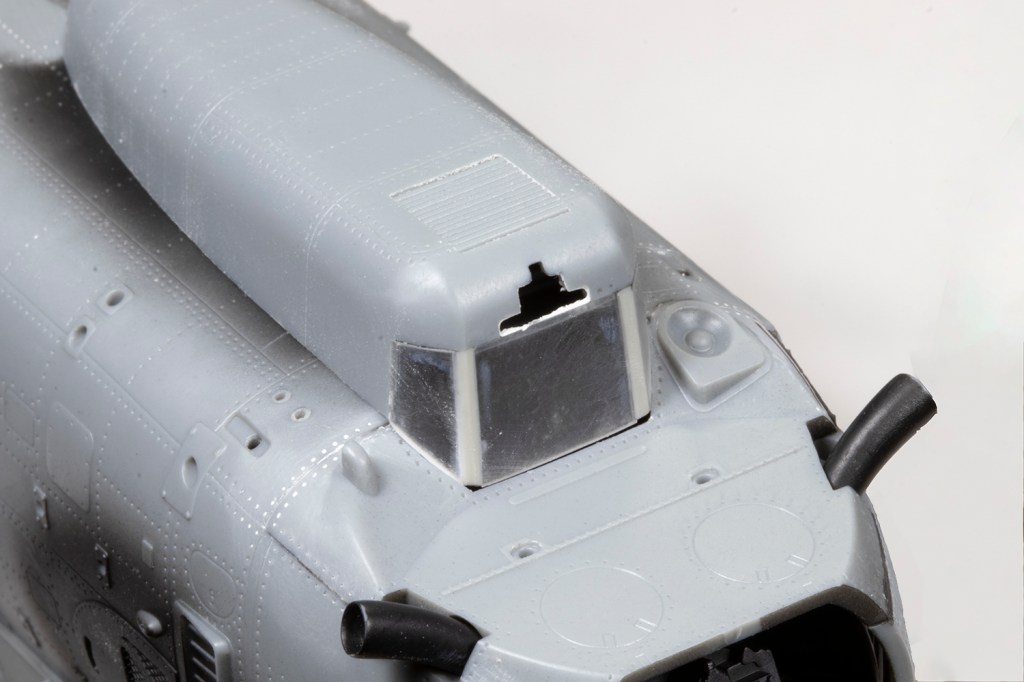
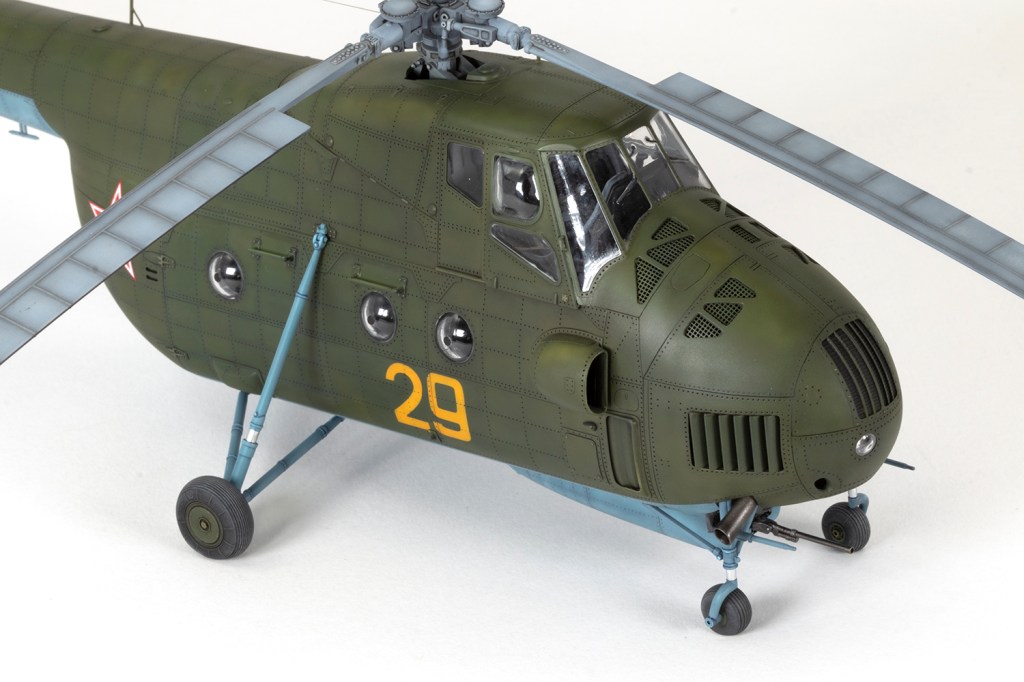
Before closing the fuselage halves I had to figure out how to bulge the windows. I needed five as the cabin door was often fitted with a flat window. On the off chance, I checked my spares box and found six unused bulged windows from an Academy CH-46 kit. These fit the bill almost perfectly, and although the shape is not exactly right, it was good enough for me. When fitted they looked pretty ugly on the inside, but as already mentioned, this would be invisible. Hound windows had circular openings in the centre which were gun ports, and these often seemed to be plugged. I drilled a shallow hole using a 1.5mm Godhand Spin Blade and then dropped in some 1.4mm discs punched from thin plastic card. I didn’t get the locations perfect, but again, good enough.


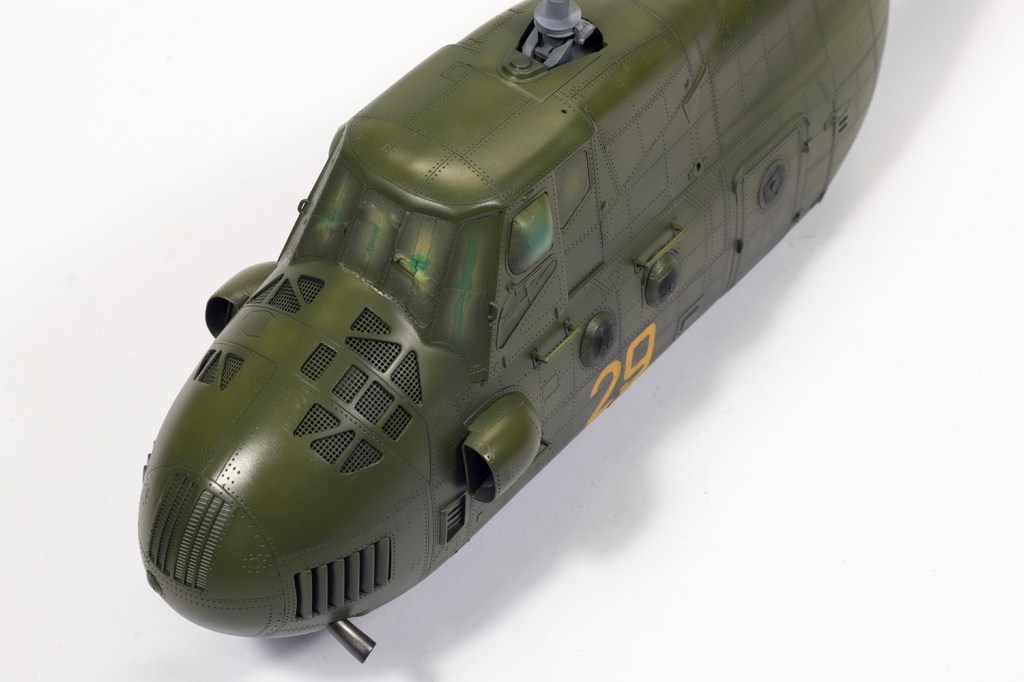
With my transparency issues largely sorted, I spent a while Googling the Hound to try and find a Soviet airframe to model. I happened across a black and white image of such an example based in East Germany in the 1960s with bort number 29. Close examination of this and photos in the Warpaint book showed that Trumpeter were unable to account for the detail variations as the Hound evolved. For example, the nose cap could be quite different with various holes either present or not, and I needed to remove that on the port side with some filler. The kit is a real hodge-podge of features, and doesn’t include the distinctive curved cooling gills on the nose of early airframes, but does have the early rectangular vent on the port side just in front of the ‘elephant ear’ intake. I can’t claim I got the details right, just better than what came in the box.


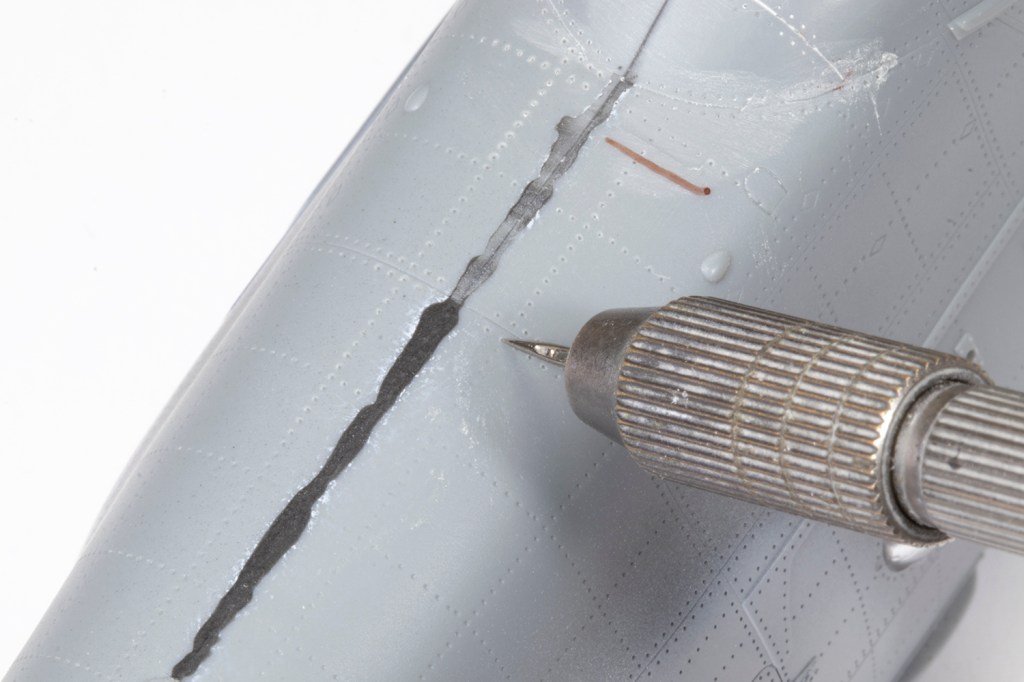
Eventually the fuselage halves came together and fitted pretty well except around the upper nose. I covered the entire seam in black CA and VMS filler powder anyway. When examining the tail boom I noted that several panel lines did not carry over from one half to the other. These were scribed in easily enough, but the soft plastic doesn’t take a scriber very well. The rivets also inevitably wash out towards the edge of the parts and I painstakingly reinstated each of them with a needle.
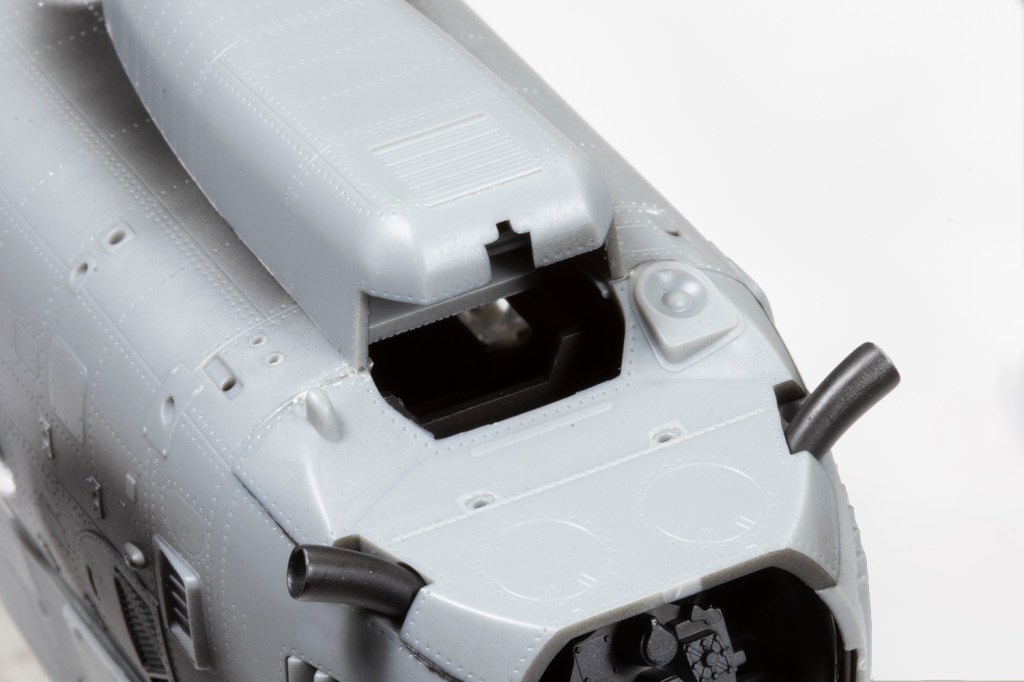
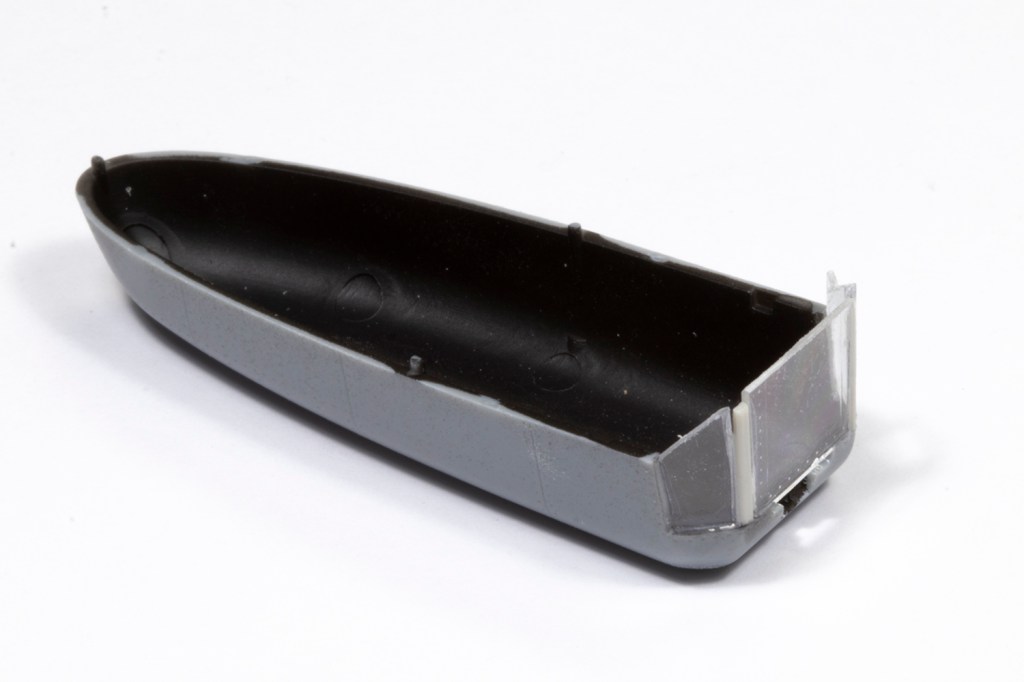
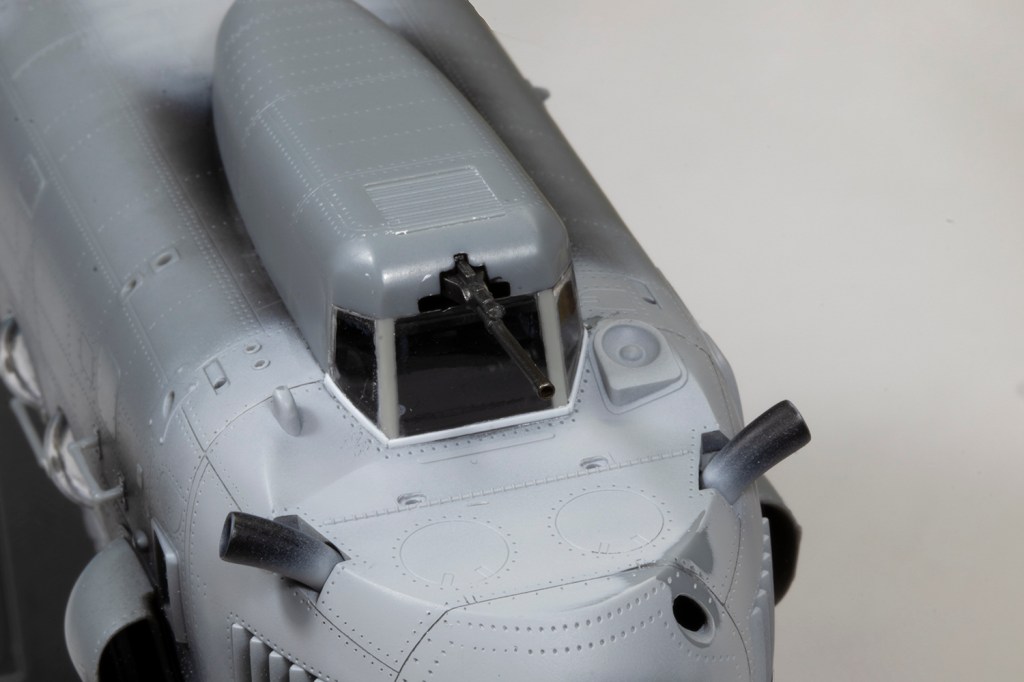
With the cabin windows sorted, the biggest challenge was scratchbuilding the transparencies for the front of the gun gondola. I started by dry-fitting the gondola in place and then using some spare plastic strip to make the frame for window panes. This gave me the basic shape which I could fill with panels of clear plastic cut from the windscreen of a discarded Revell MH-60L kit. This was all very rough and ready and the gaps were filled with superglue. I gently adjusted the shape of the windows until it fitted adequately to the lower fuselage. Try as I might, I couldn’t figure out a way to add the gun after the gondola, so it was added as per the instructions (downloaded from https://www.1999.co.jp/eng/plamo/ since my boxing marked these parts as Not For Use) and made do with cutting part of the barrel off to be replaced later with Albion Alloys brass tubing.


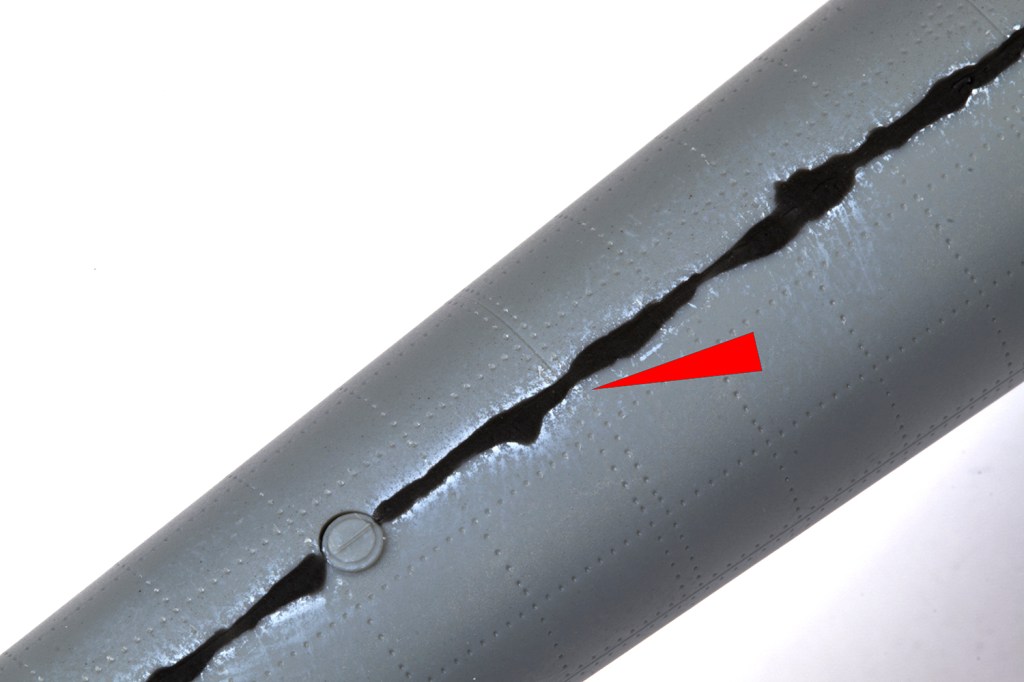
The last major addition prior to painting was the windscreen. I went out of sequence from the instructions and added the side doors first, and then the front canopy. This was probably a mistake as I couldn’t get the windscreen to meet properly with the doors I’d added. I was left with no choice but to glue the starboard side of the windscreen in place, wait for the cement to cure and then use quite a lot of force to join the port side. I feared this would induce stress cracks, and these duly developed slowly over time. Oh well. I covered them up with masks from New Ware (which fitted very nicely) and tried to forget about them.


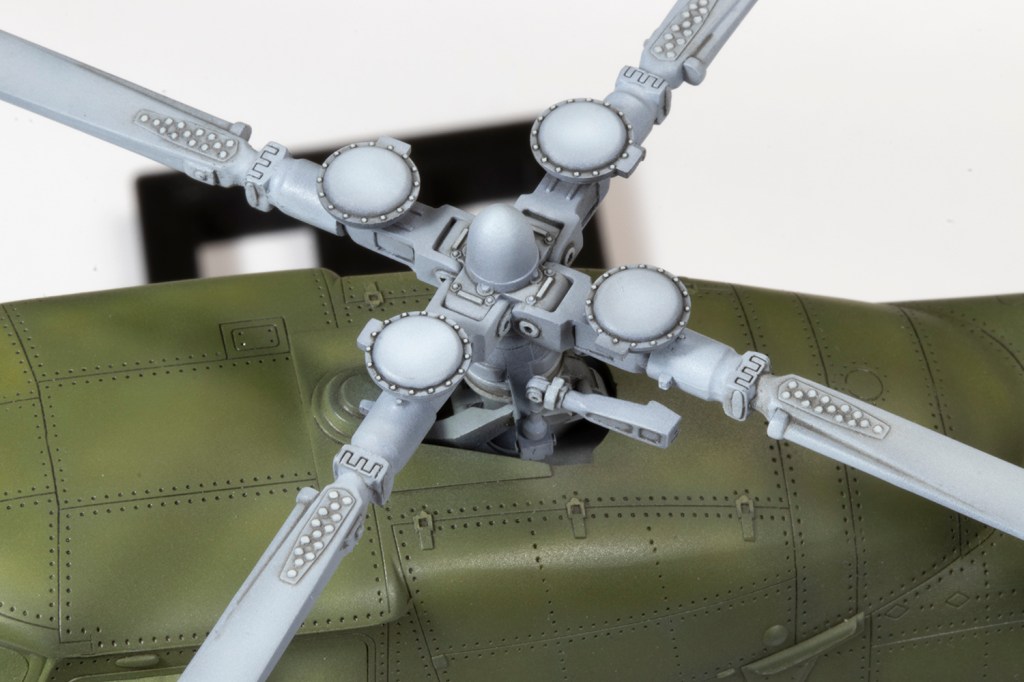
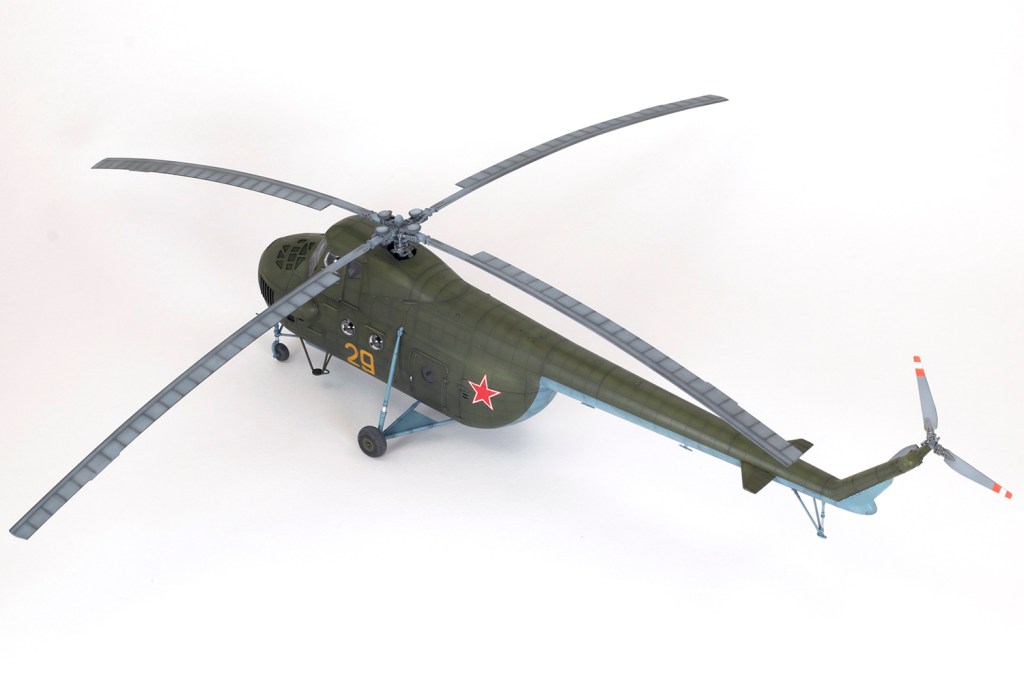
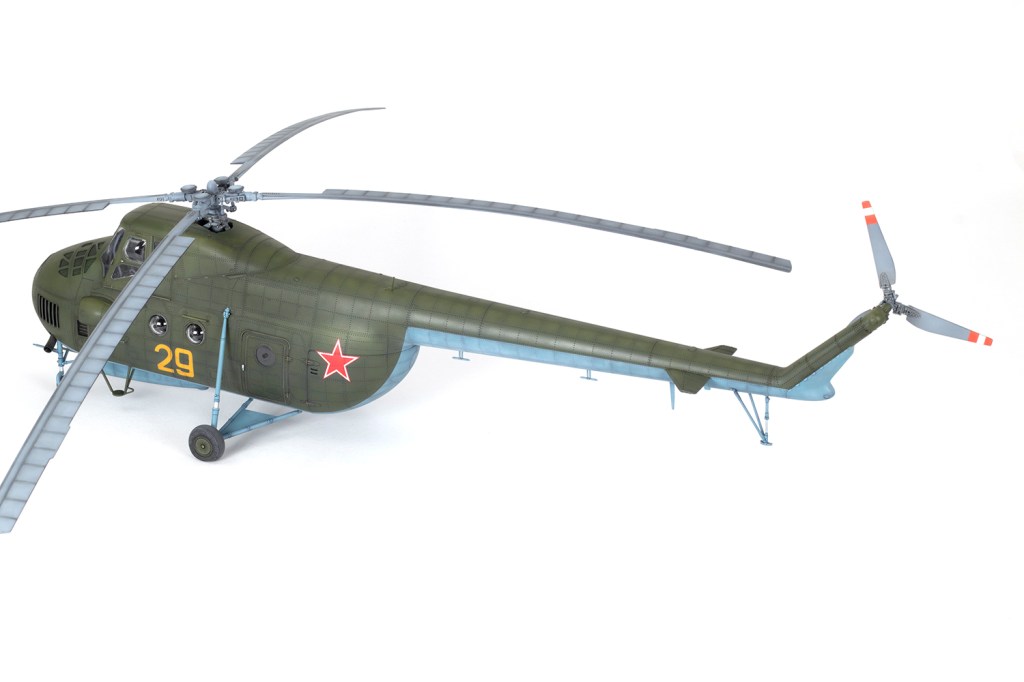
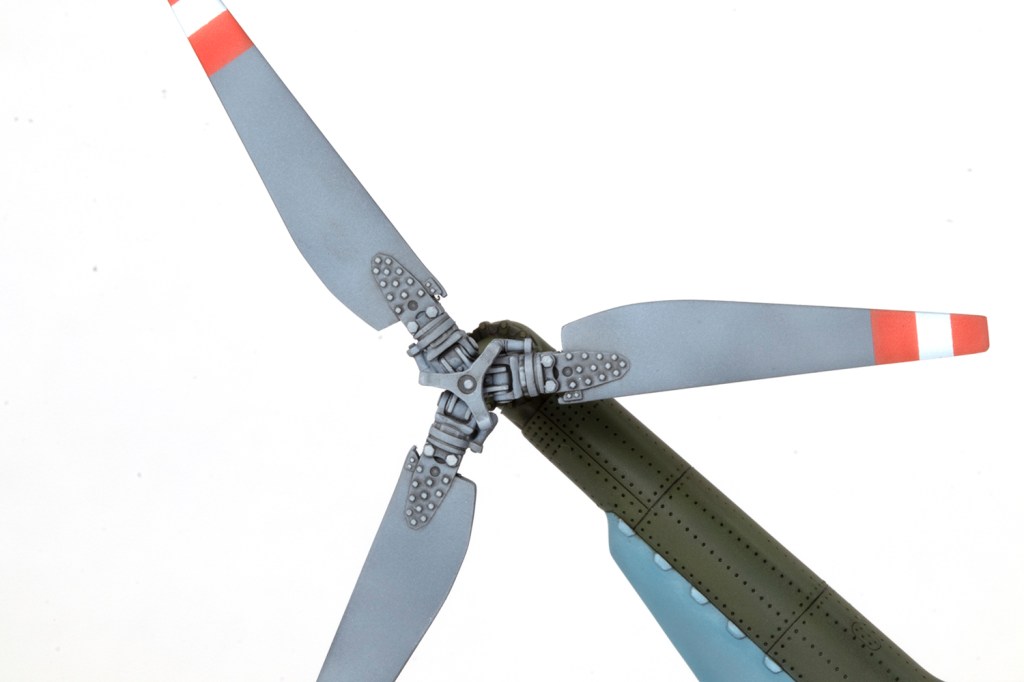
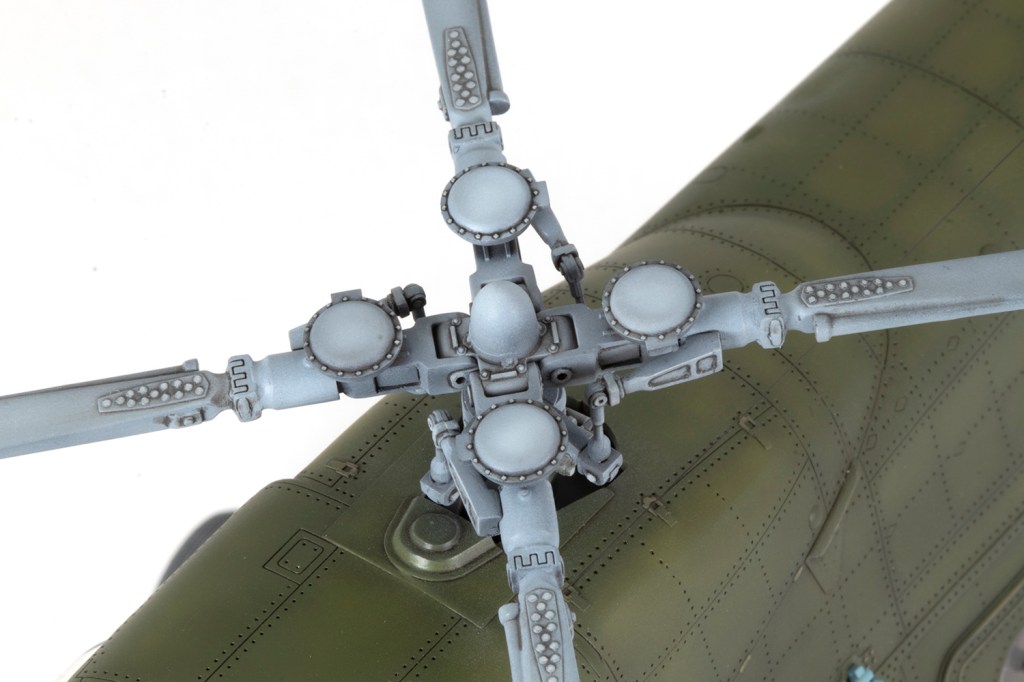
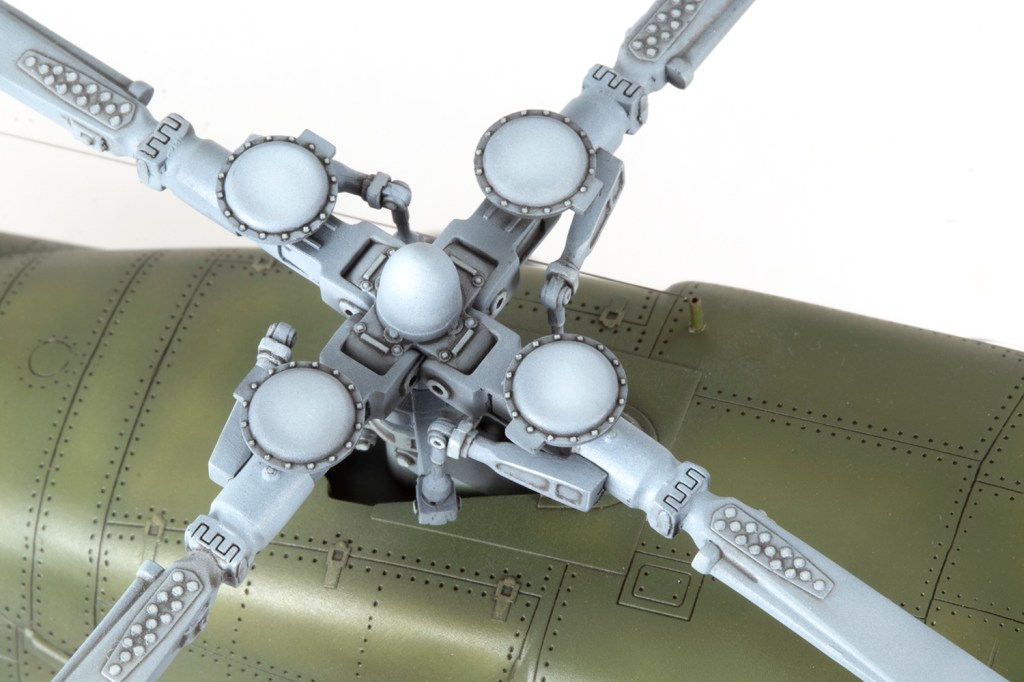
One might as well pause to mention the rotor blades. I feel these are the tank tracks of helicopter modelling – tedious, repetitive and generally they get in the way, especially when they are as big as these. The Hound has a rotor diameter larger than a Sea King or a Merlin, and Trumpeter were forced to make them in a way that means the blades cannot be detachable. Below the main rotor head is another ring which mounts over the mast. This is attached to the blades by some actuating arms, meaning the whole lot has to be built up while fitted to the main body so the parts all line up. What is excellent, however, is that Trumpeter moulded in the significant droop, which is a big improvement over their earlier 1/35 scale kit of the Hound. The rotor head is horizontally split, which makes for a difficult seam to clean up in the recessed areas; I covered them with some scrap PE cut to shape.
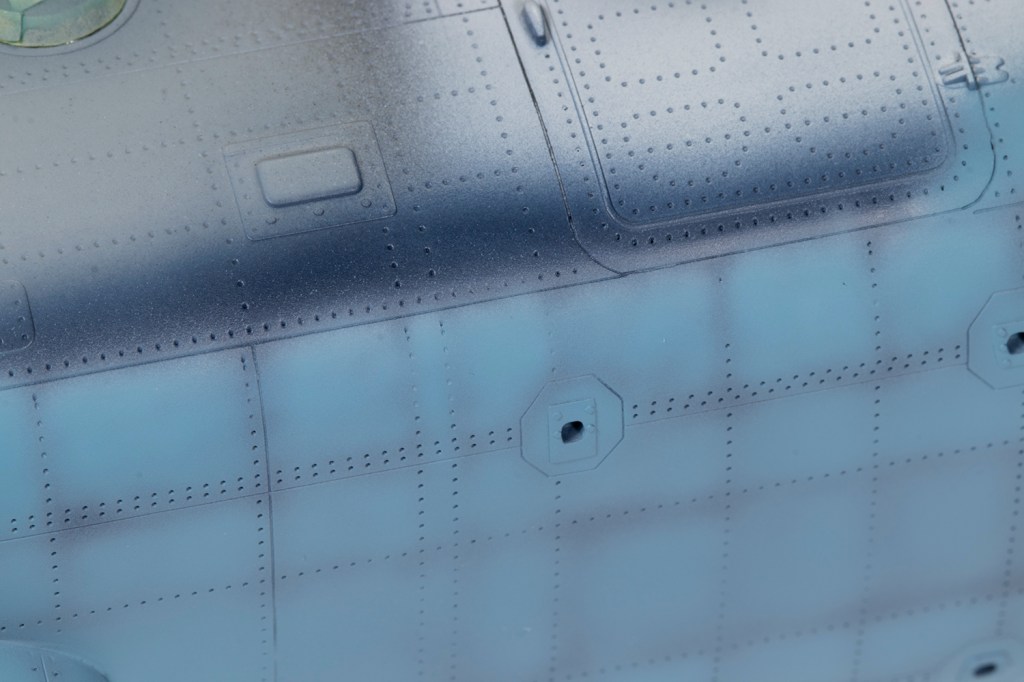
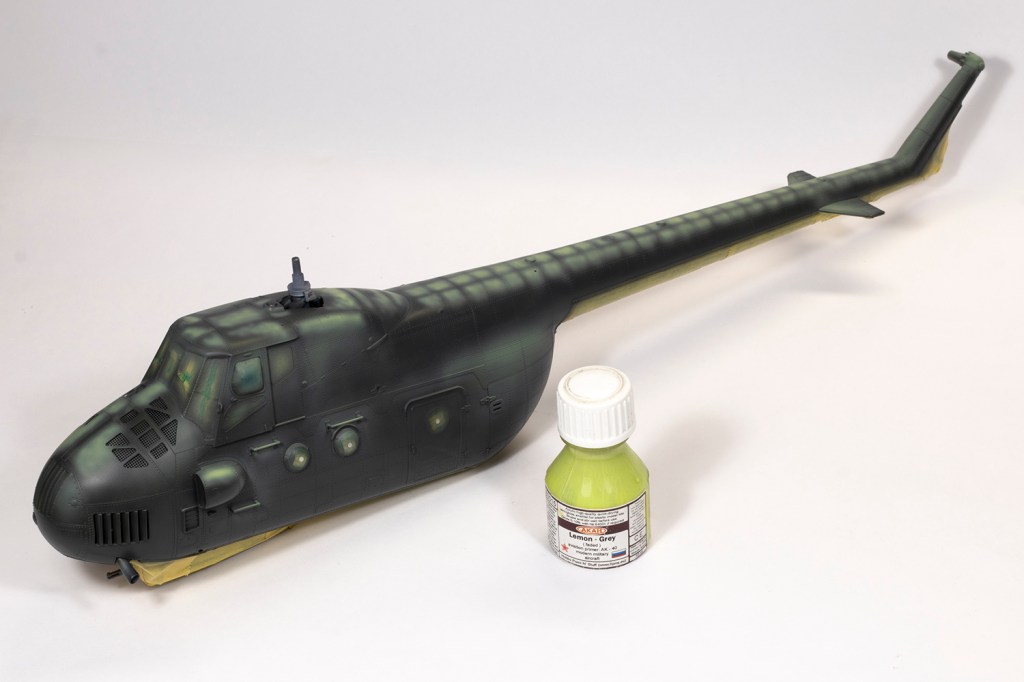
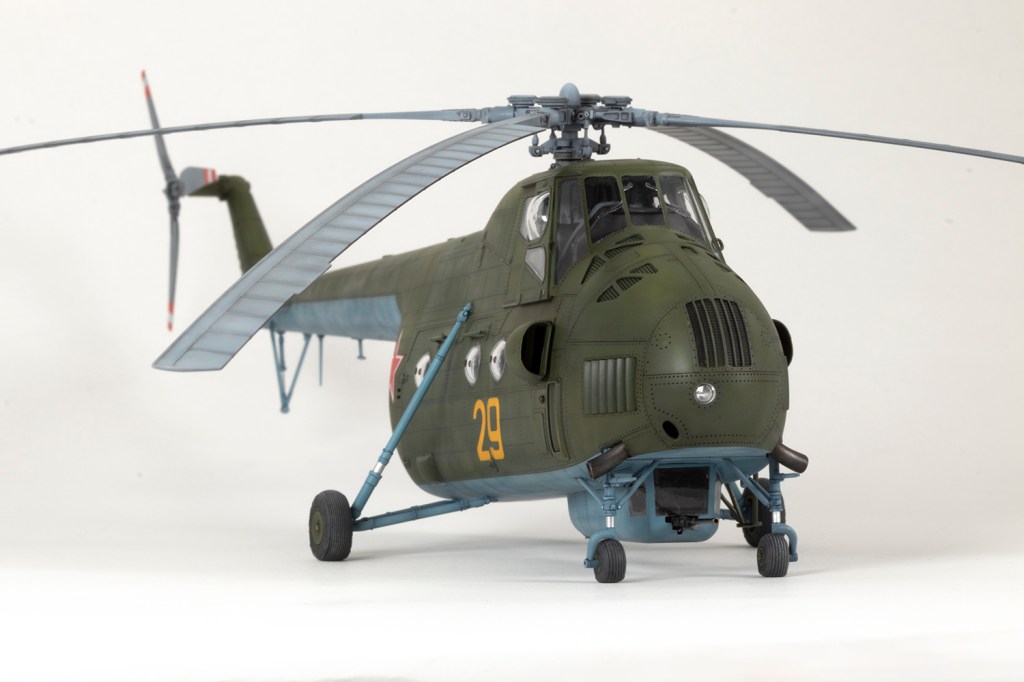
With that, the Hound rolled into paint. Over recent years I’ve tended towards black-basing (i.e. using black as a primer) but sometimes this adversely affects the tone of the overlying paint. With this model I just used dark shades of regular blue and green paint, but the downside is it doesn’t really act as a primer and microfiller for surface defects. I could have used a primer underneath these shades, but I prefer to spray as few layers as possible prior to the panel line wash to avoid unnecessarily clogging the detail. In the end the blue was undercoated with Mr Color 375 Deep Ocean Blue and the green with 18 RLM70 Black Green, but next time I might try adding some 30 Flat Base to try and thicken them up and make them a little nicer to sand.


I have a problem with finger oils – even lacquer paint thinned with cellulose thinners is repelled – and so clean the plastic prior to painting with 99% IPA, and then handle with gloves. Even so, some areas still always slip through, and some testing of my blue undercoat with masking tape revealed a few areas where the paint lifted. This is annoying, but better to catch it now than later on. Some gentle sanding with 1500 and 2500 grit Infini sanding film allowed the areas to be repainted prior to the final shades of blue.
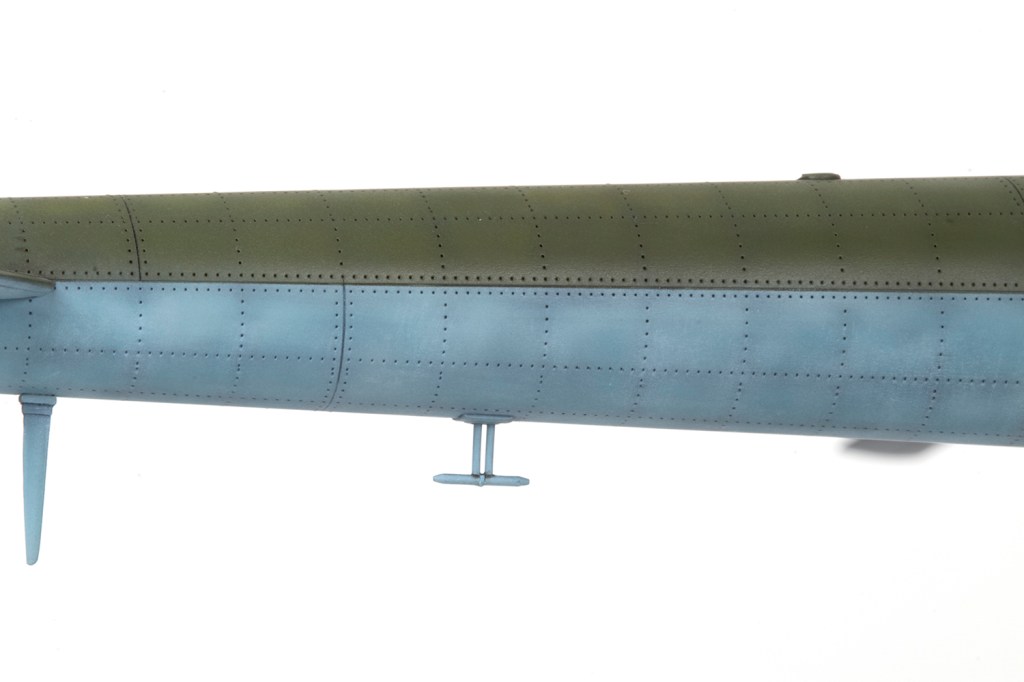
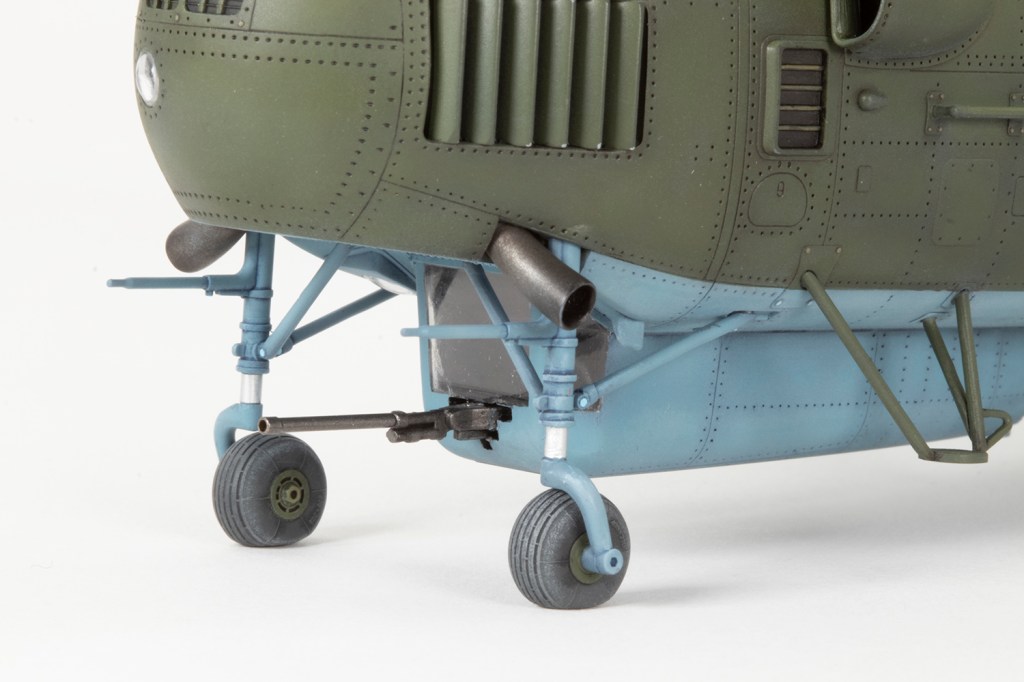
My paint of choice for the simple blue and green scheme was Akan lacquer. I couldn’t tell you the product number for the blue because the label had long fallen off, but decanted and heavily thinned with Mr Leveling Thinner it sprayed beautifully. This blue shade was too vibrant for my liking, so I mixed it with more and more light grey (also by Akan) to fade and desaturate it. This produced a pleasingly patchy finish. It’s worth noting that the green/blue demarcation varied a lot, especially around the rear clamshell cargo doors and the very end of the tail boom. The main undercarriage legs could also be blue or green – mine were definitely blue.
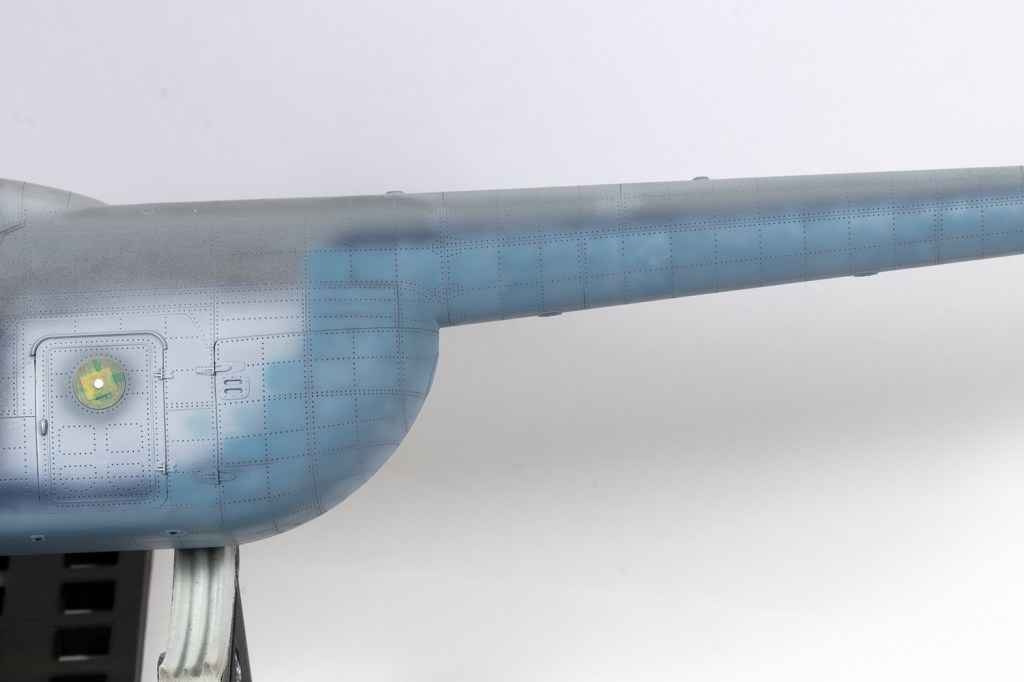


While masking out the blue, I realised I’d done something wrong with the horizontal stabilisers on the tail. I’d blindly followed the instructions, but the vast majority of photos of Mi-4s on the ground show them deflected with the leading edge down. The attachments are circular, so this would have been easy to do had I seen it in time, but I didn’t. With the blue masked off, the Black Green was applied, and then highlighted with Akan Lemon Grey. I know that in real life the actual thing was probably a very uniform shade of semigloss green, but I think that looks a bit boring, so adding in a lot more contrast was an artistic choice I wanted to experiment with. Over this ‘preshading’ went Akan 63017 Green (which I don’t think is quite the right shade, but close enough), sprayed nice and thin. The last touch was to create some masks for the ’29’ by tracing the photograph in Inkscape and cutting it out of vinyl with my Silhouette machine. I had to guess at the colour (the photo is black and white), but yellow seemed pretty common for Soviet Hounds. it’s possible it should be edged in black, but I couldn’t make that out and wanted an easy life. As usual, I took things for granted, didn’t look closely enough at the photo when applying the masks, and so they’re too far aft – they should be centred under the forward cabin window.


More contrast was added via oil paints – ABT502 Paynes Grey for the blue, and Starship Filth and Sepia over the green. I learned that, unlike most lacquers, Akan paints will lift if scrubbed with AK Interactive’s mineral spirits, so some touching up was necessary, which added to the overall tonal variation. Highlights were added to raised features, especially on the rotor head and tail rotor, with brush painted shades mixed from acrylic paints. Tips of the tail rotors were masked and airbrushed in red and white.


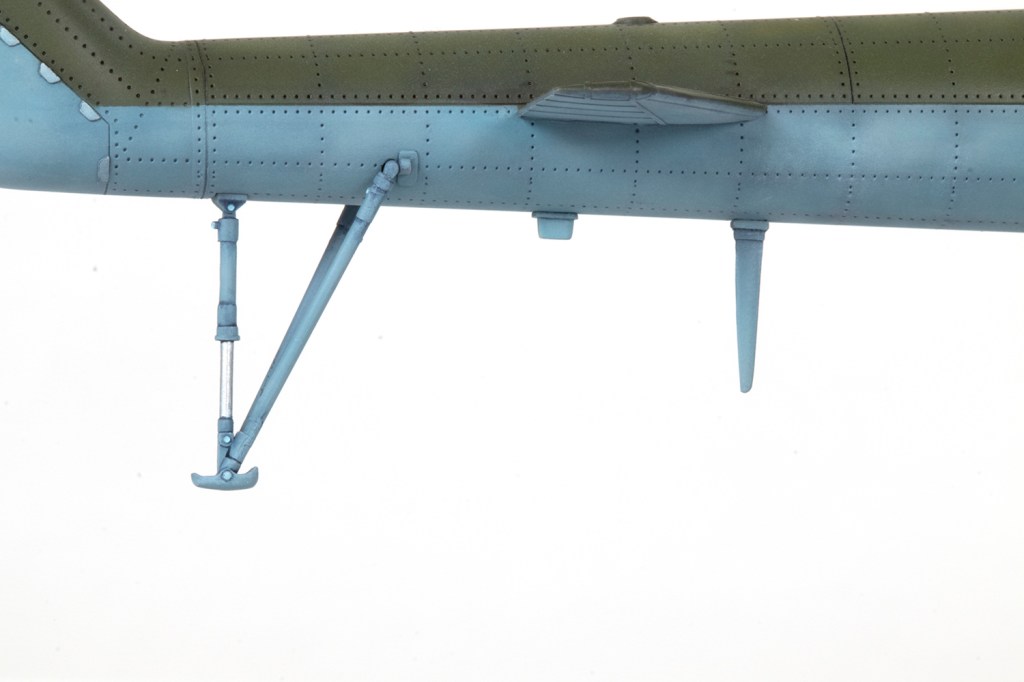
With paint done, a host of minor things needed to be dealt with. Trumpeter don’t provide anything close to an accurate aerial fit (and this varied quite a lot, so go with a photo). I had to scrounge one aerial under the tail boom from the spares box and use a kit item, erroneously marked for the upper fuselage, to go under the tail planes. The cockpit door handle can be removed from the starboard side (I think) and the oleos covered with strips of ANYZ aluminium decals. Talking of decals, only two were added – the Soviet stars from the Trumpeter sheet – and they conformed to the surface detail beautifully. And talking of oleos, most photos seem to show these much more extended at the front.
The undercarriage and cockpit step had all been pre-built when dry fitted in place, so adding it at the end was very straightforward, as were the Eduard Brassin wheels. The gun barrel was made from two diameters of brass tubing soldered together and added last. With that, it was done.
Of course, one discovers things too late, and a nice chap on Britmodeller pointed out that the protrusions on the cabin roof, just ahead of the rotor mast, were only on Chinese-built Hounds and should have been removed. I’m sure there are a host more errors, but this was a fun kit to build and an interesting project. I’ve just go to find somewhere to put it…


Year bought: 2023 (Models For Sale)
Year built: 2024 (New Addington, Croydon)
Back to home.
