with Aeromaster decals
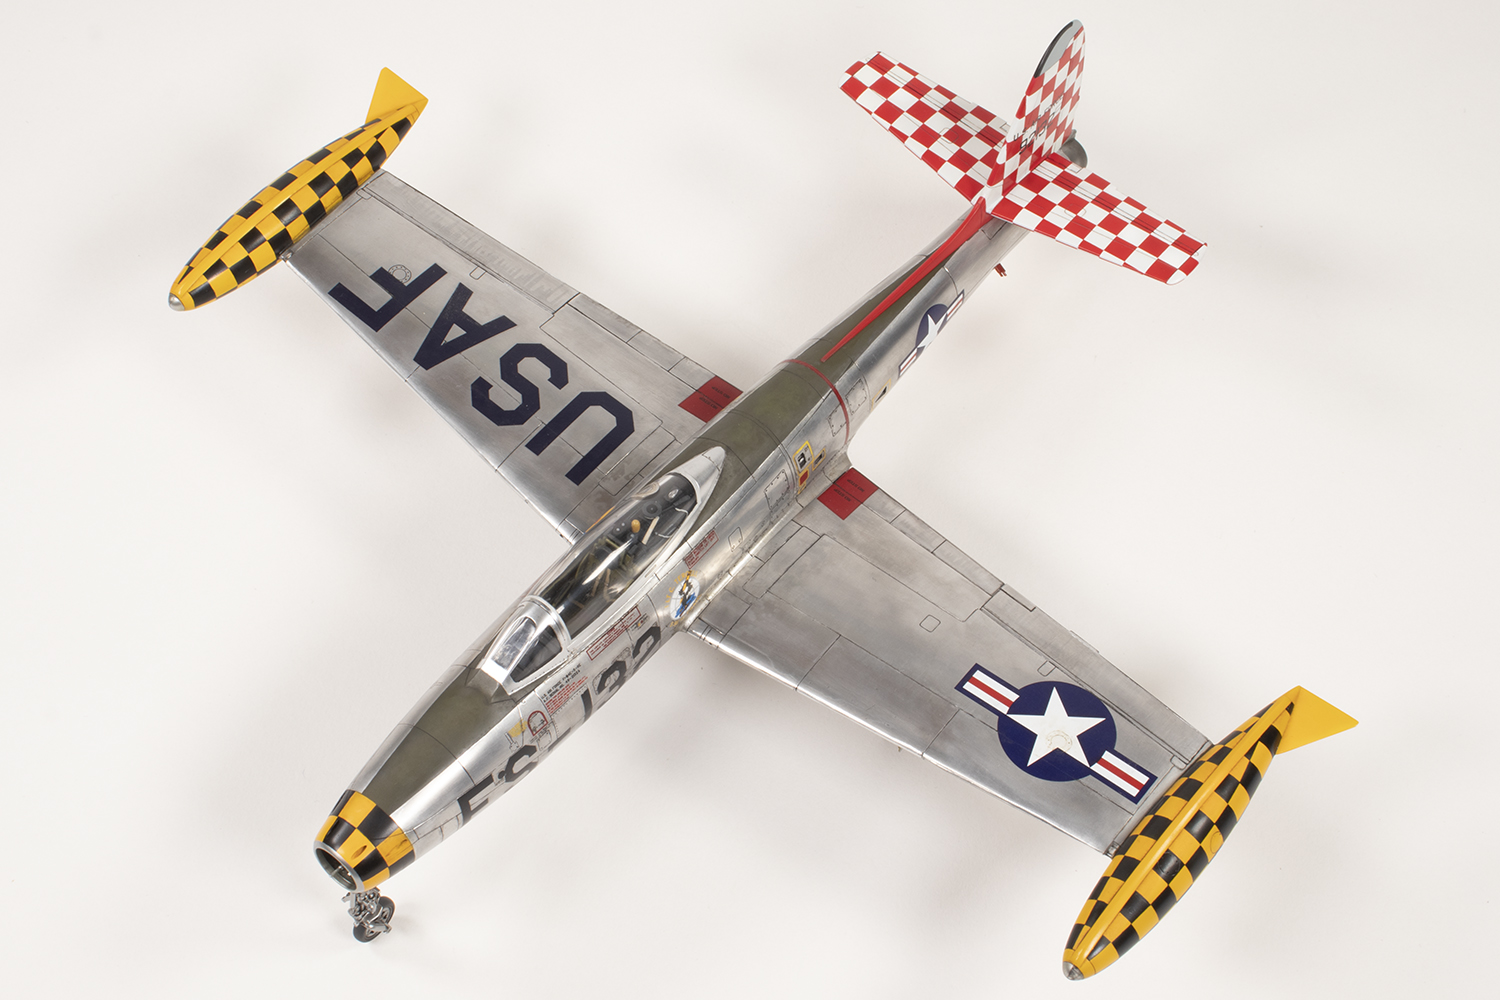
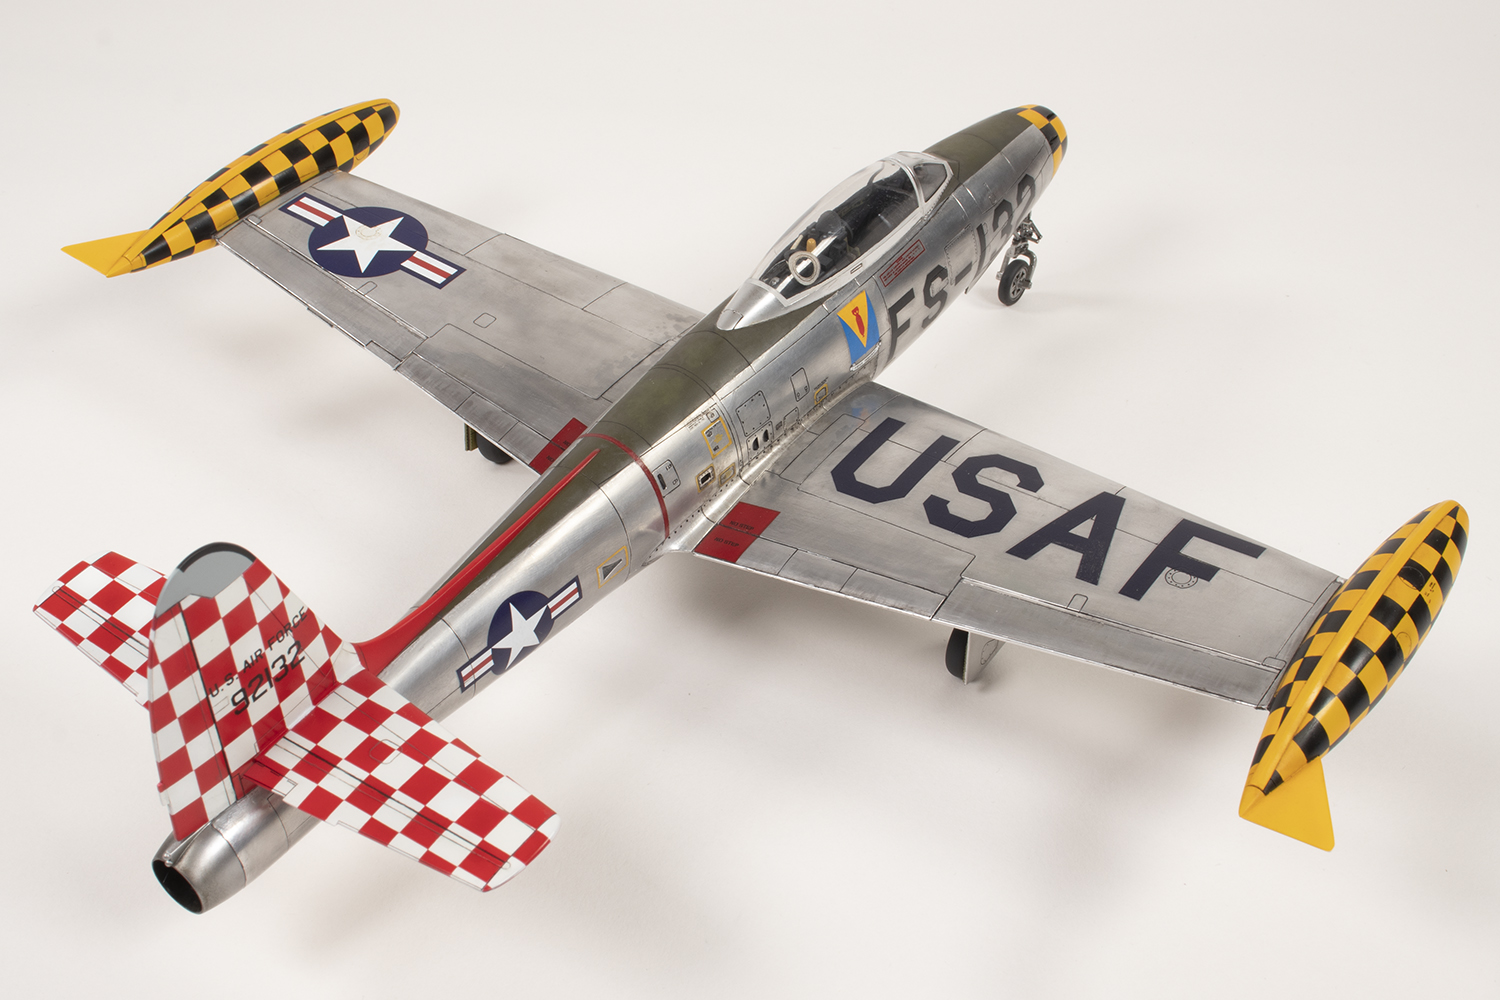
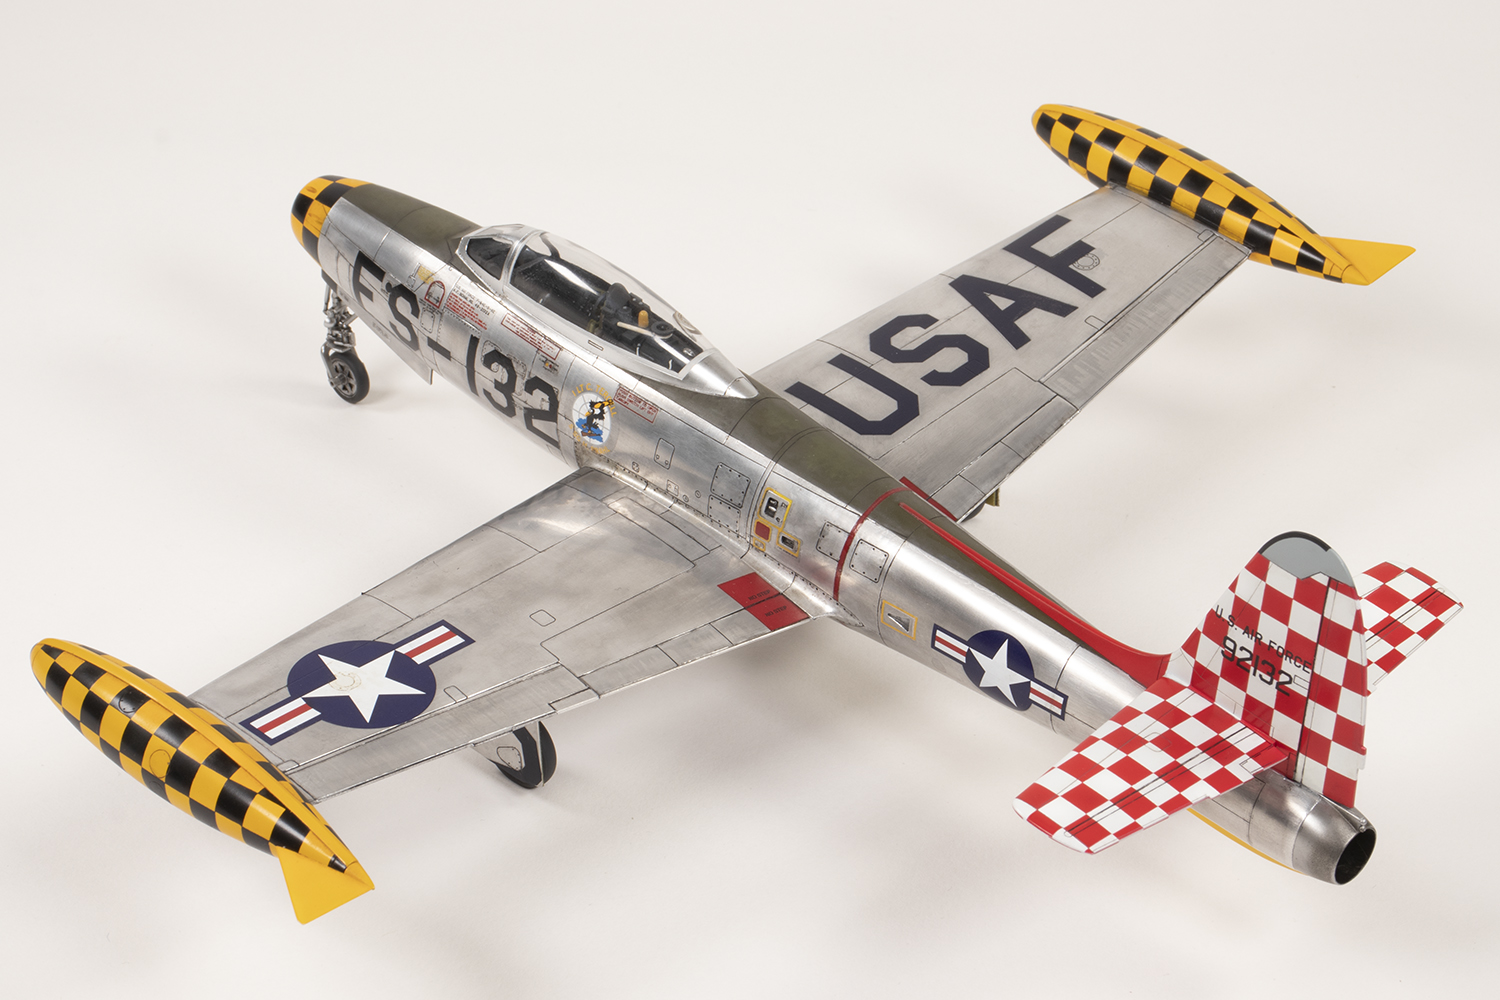
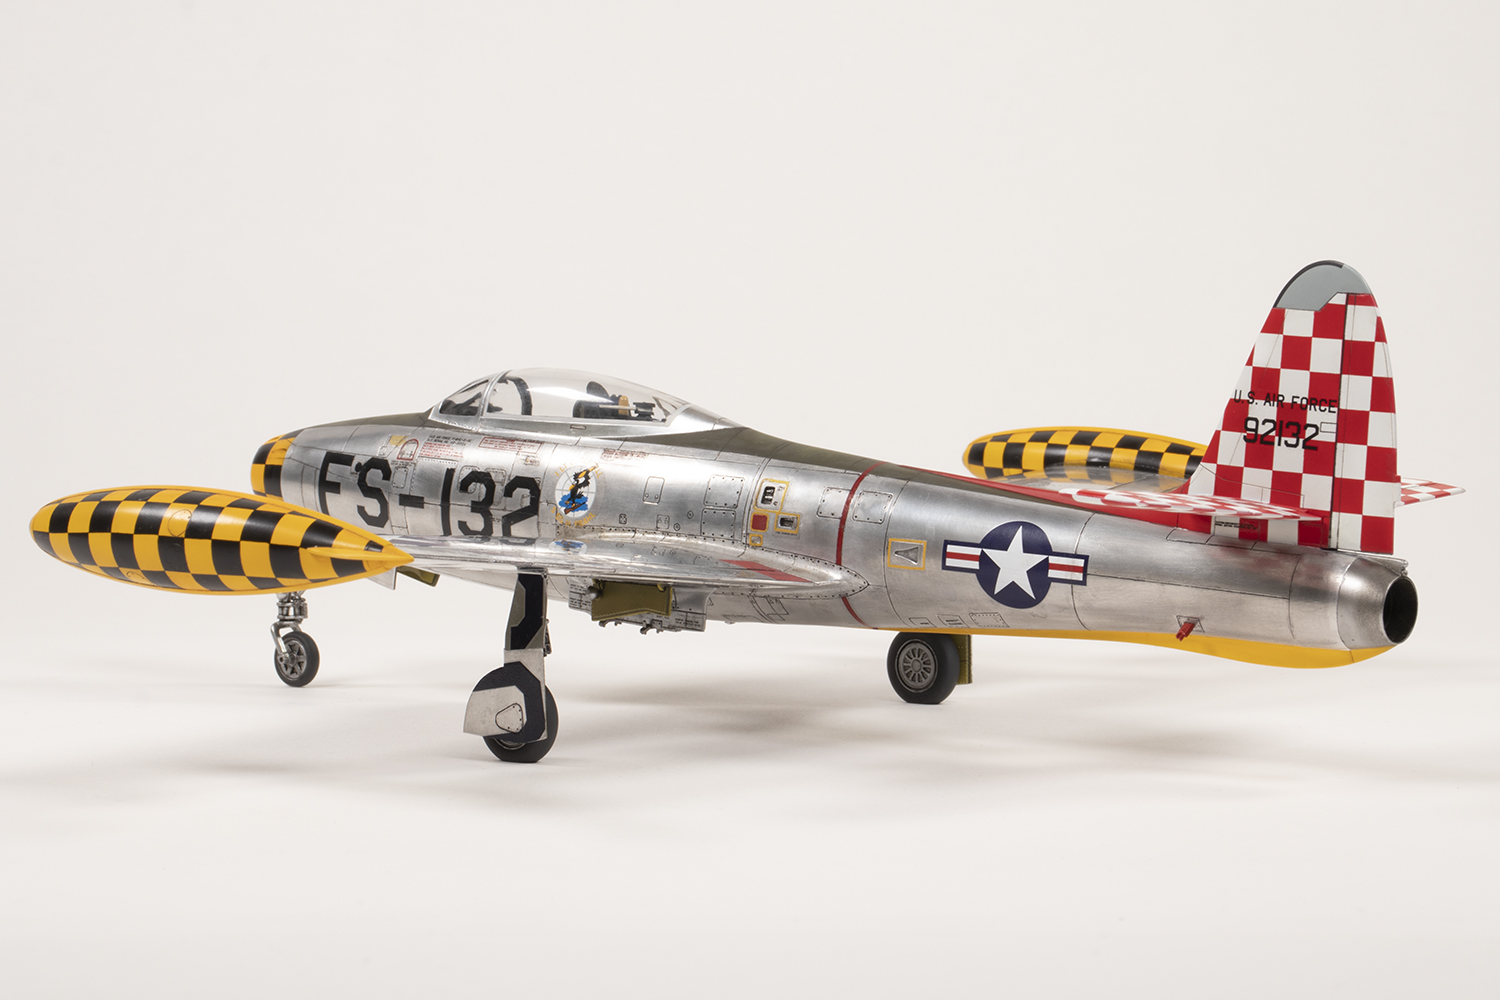
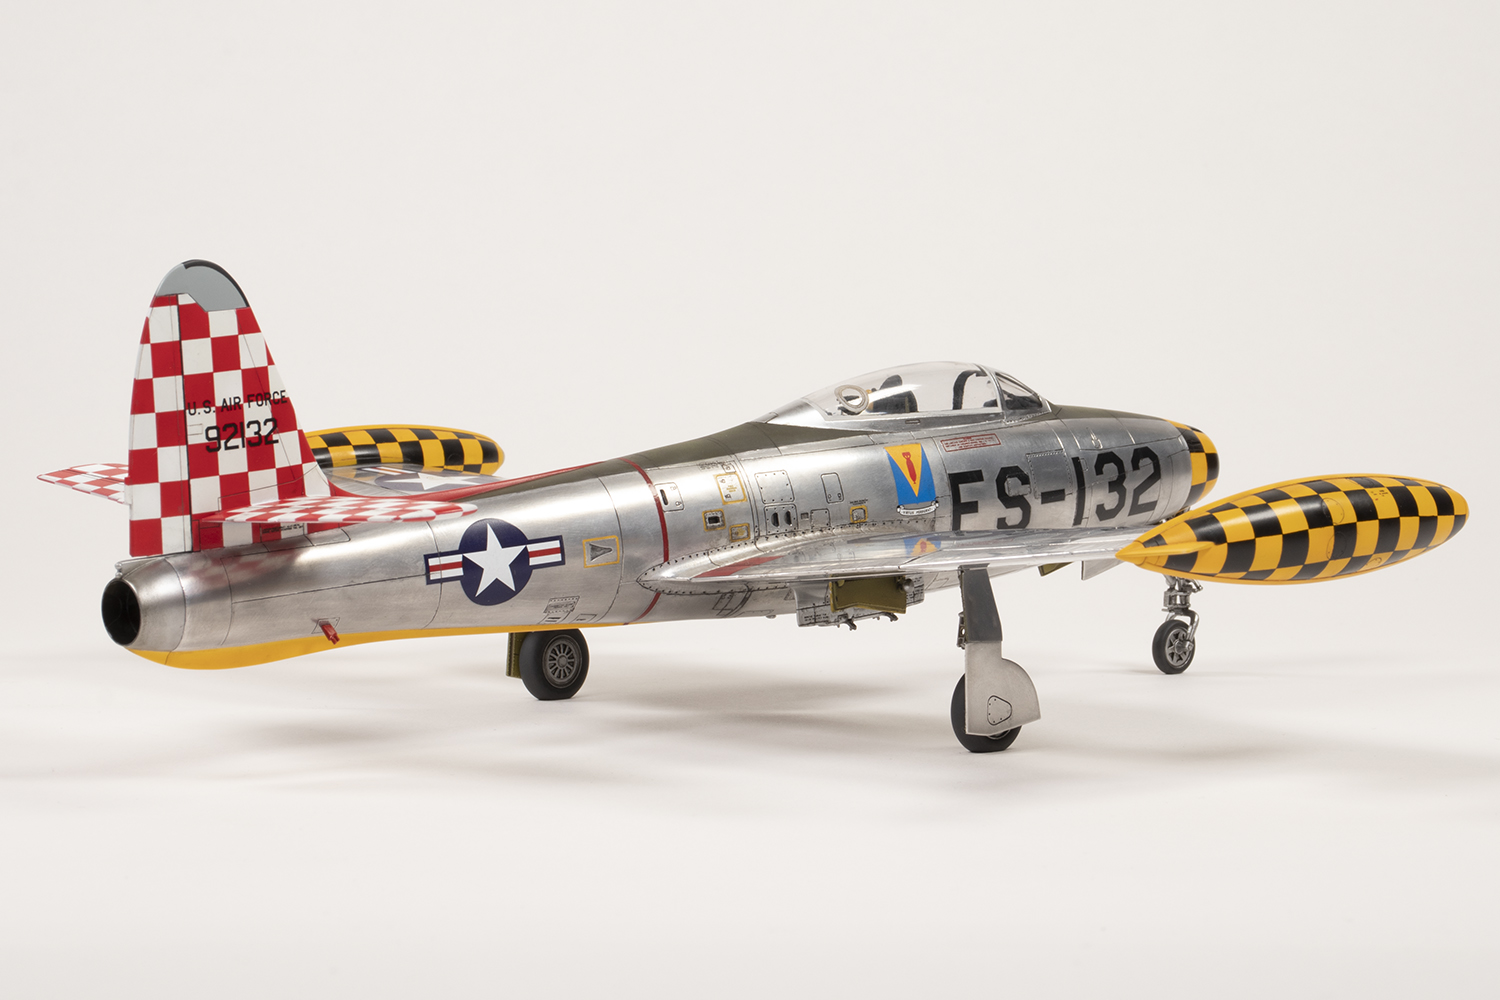
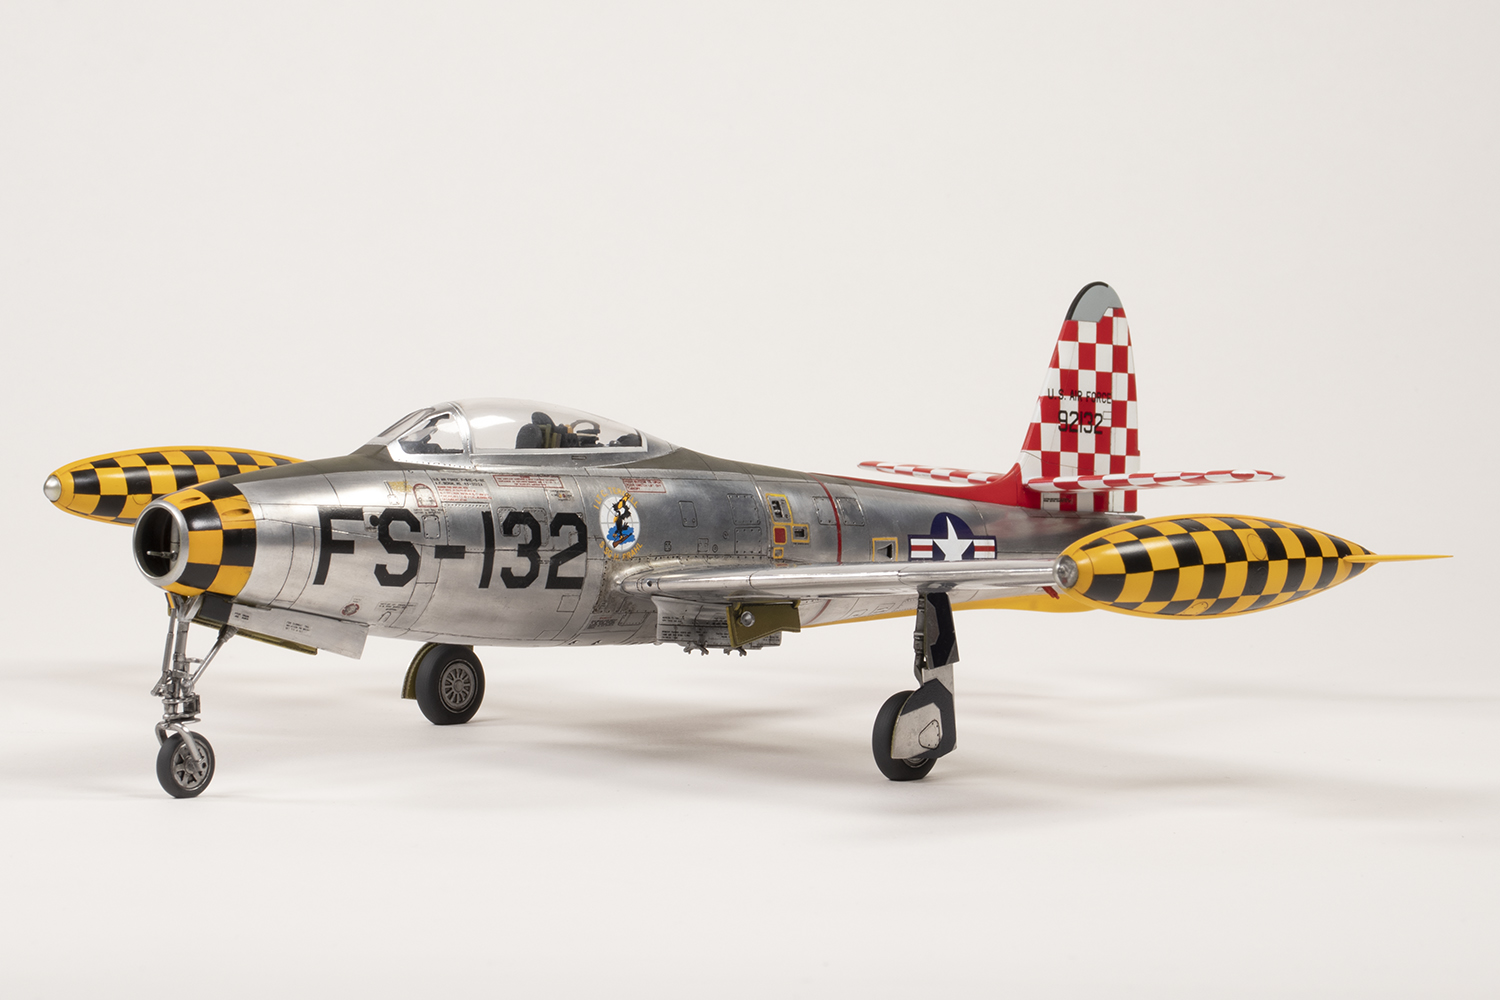
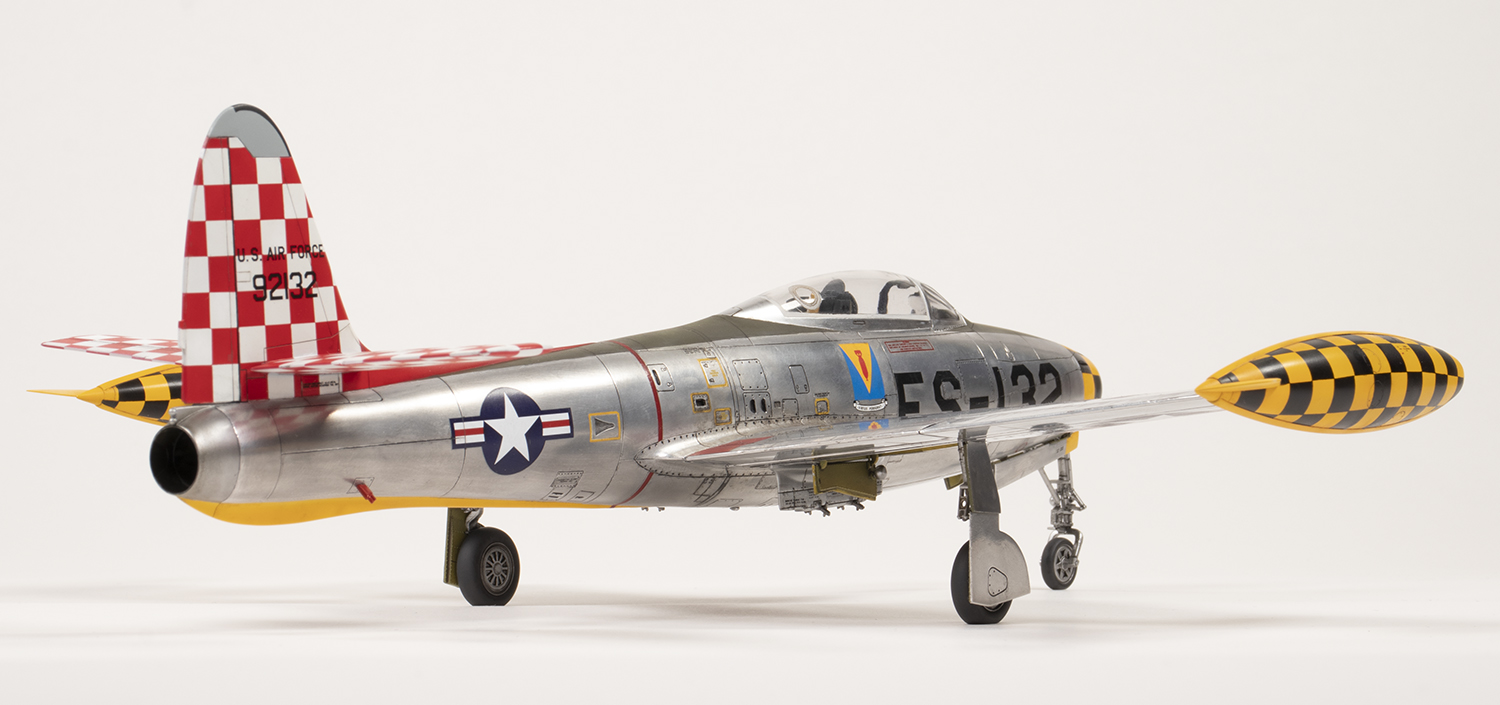
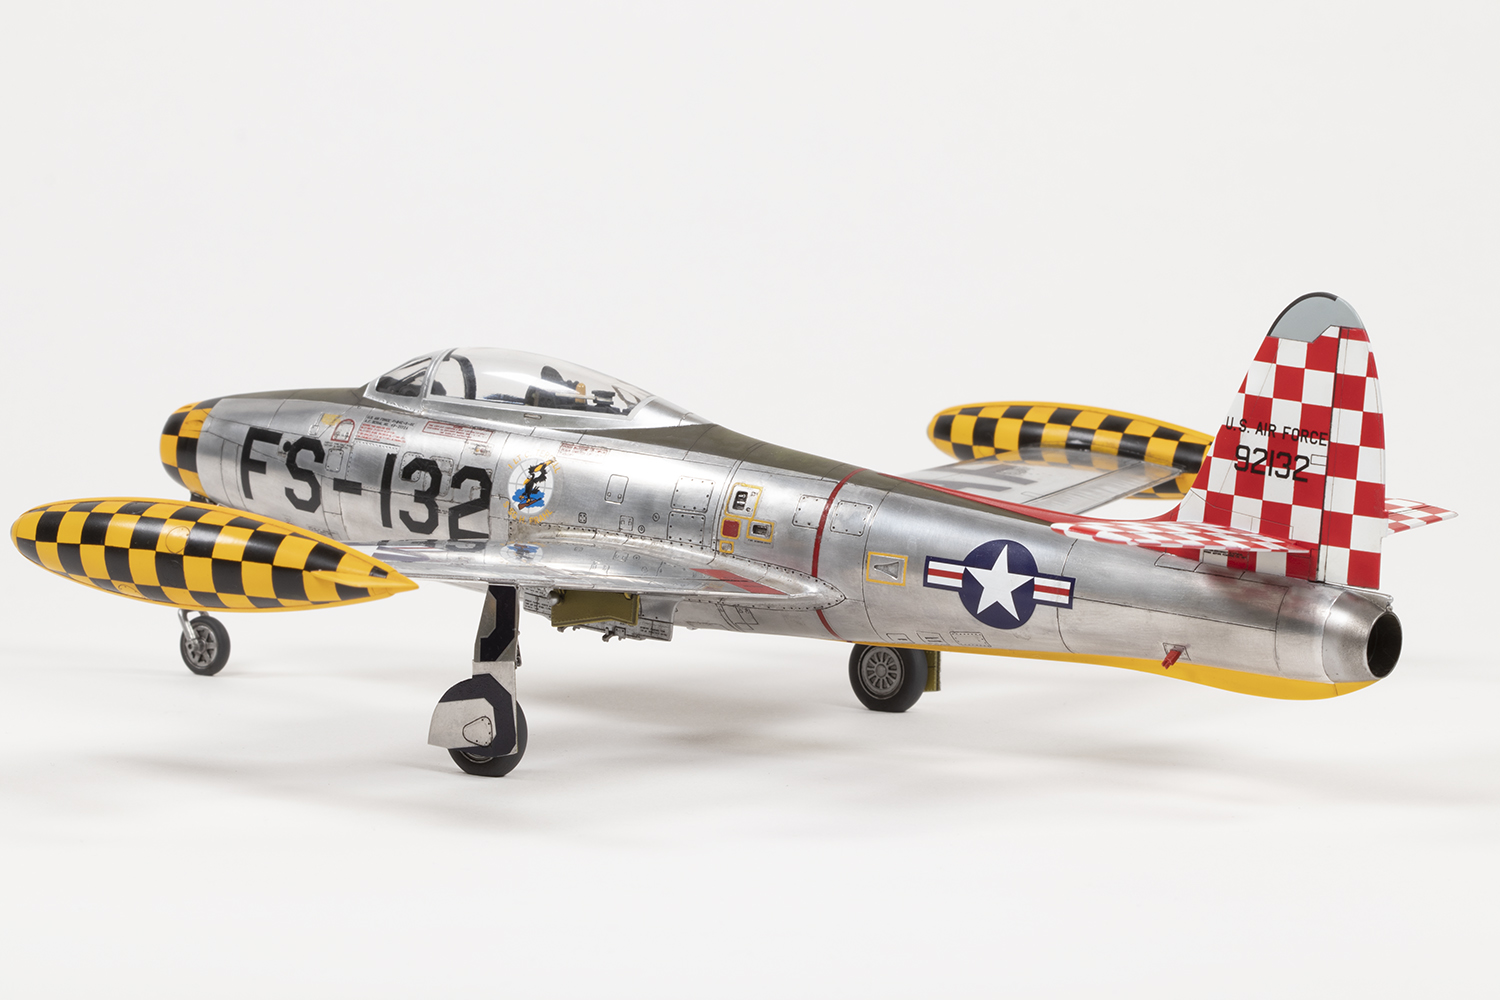
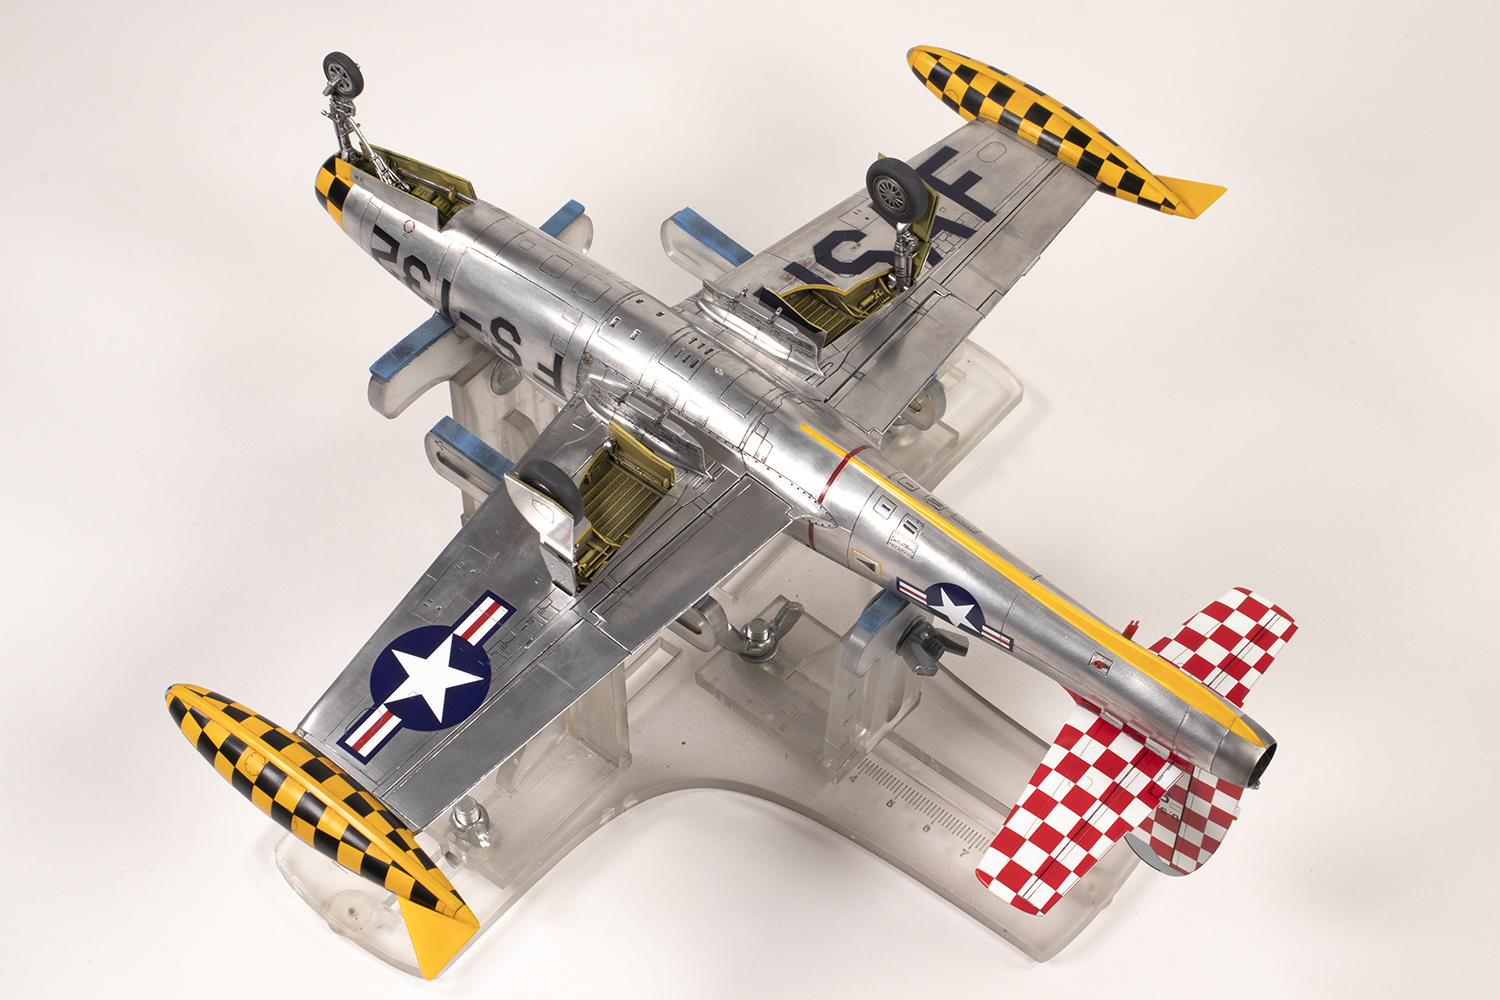
527th FBS, 86th FBG, US Air Force, West Germany 1951

The late 1990s was a good time for the Thunderjet in 1/48. Tamiya released one in 1998, and having built it I can say it’s wonderful, and then Revell manufactured a very similar kit the following year to a very similar standard. The G version was widely available, but the subtly different E was produced in 2001 and never sold in the UK. I ended up having to source one from Squadron USA twenty years ago. In 2022, the Tamiya and Revell kits are still the best available in 1/48 and stand up very well compared to more modern toolings of other subjects. Sadly, no one has seen fit to produce the stumpier B, C and D versions – gaps in my collection that I would very much like to be plugged, but I’m not holding my breath
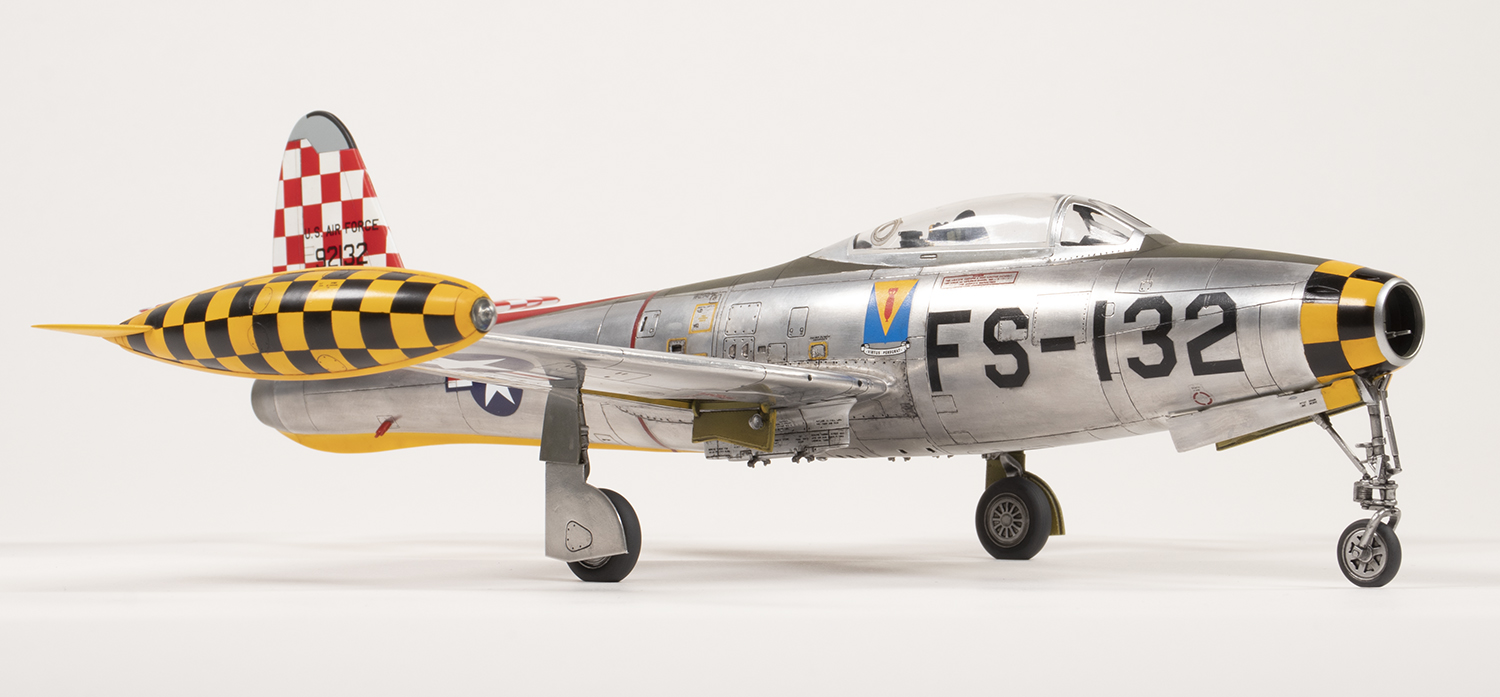
I’ve always found the earlier E model with the unbraced canopy far more attractive than the G, and this limited my options. Revell provide two decal choices, one for each type of canopy, and aftermarket decals for the original style are extraordinarily hard to come by. Fortunately, I managed to source an Aeromaster sheet in 2021 featuring a scheme I liked, which liberated me from the confines of what came in the box and would make my planned foil finish much easier since I could paint the entire empennage and the wing tanks
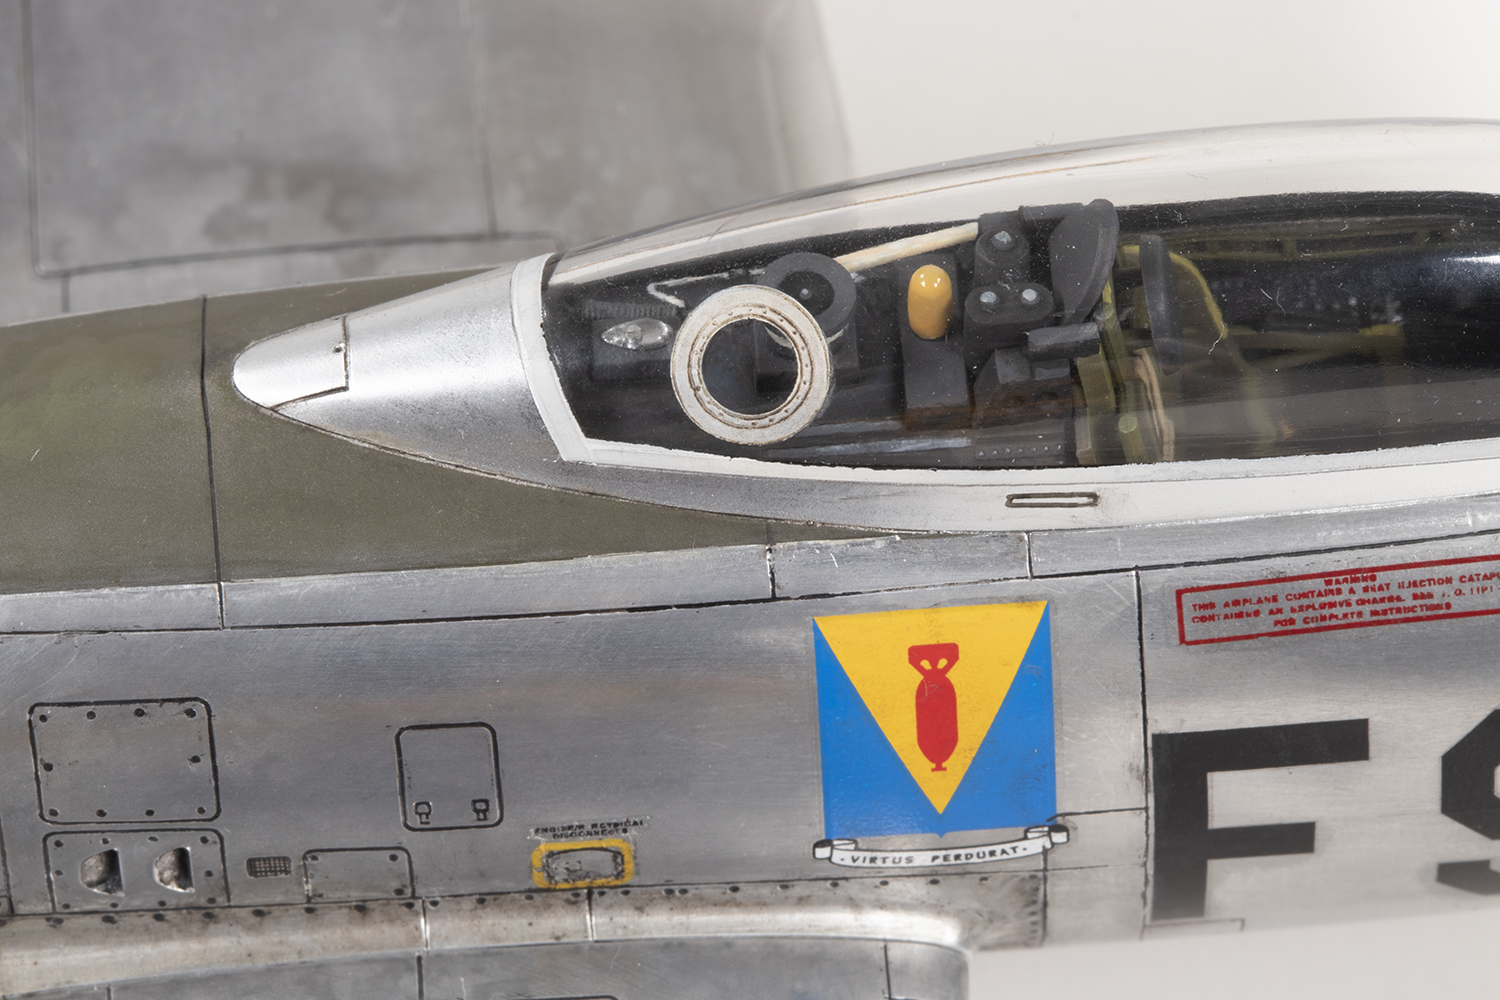
Revell moulding quality peaked around the turn of the millennium, with kits in 1/48 like the F-15E, F-86D, Rafale and this F-84. The plastic is very, very smooth – unlike many current models – and the fit in general precise with refined surface detail (the stamped ‘1999’ and manufacturer name on one of the tailplanes notwithstanding). Ejector pins are fairly plentiful in the cockpit and undercarriage doors and I generally left these alone because I was feeling lazy, aside from those on the side of the ejection seat (note that you can ignore the lower ones as they will be invisible once the seat is installed).
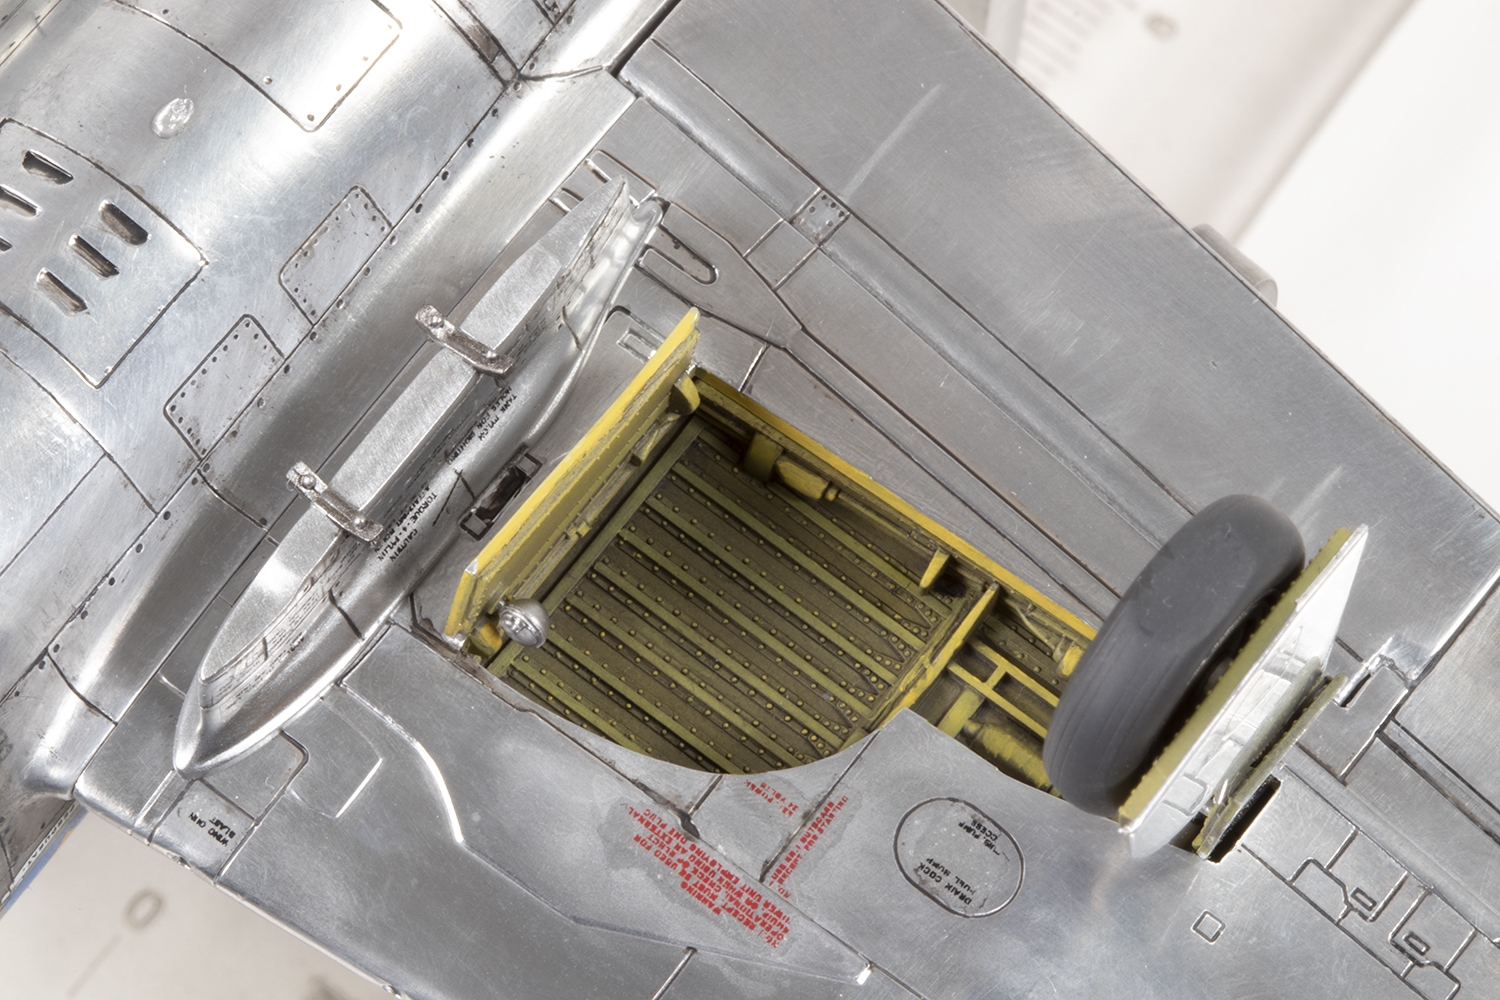
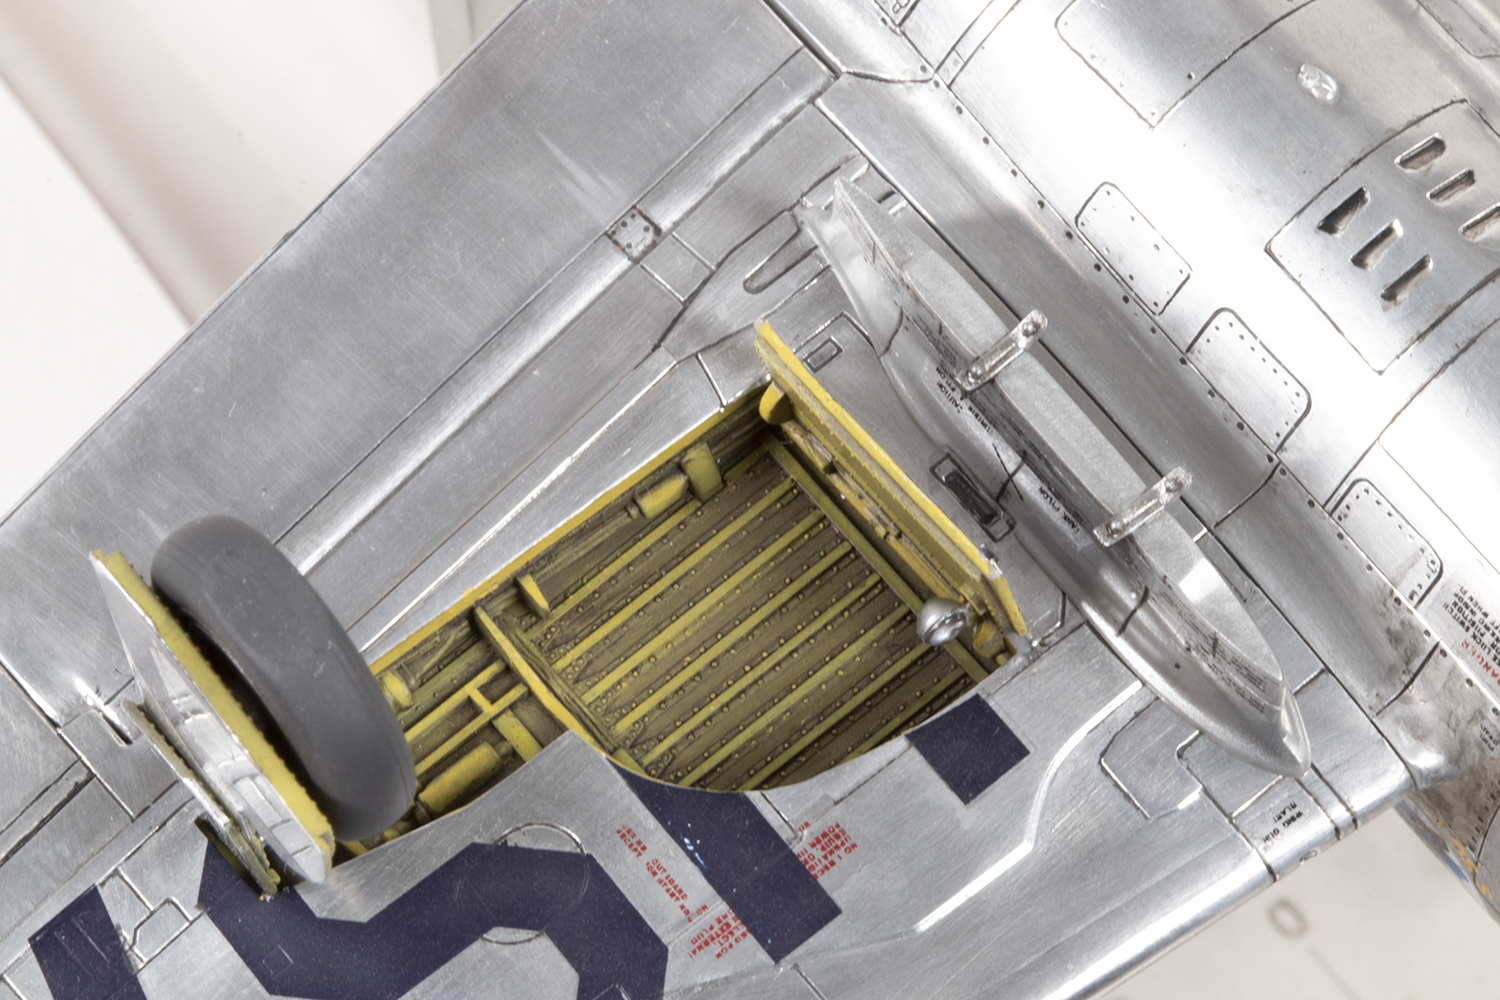
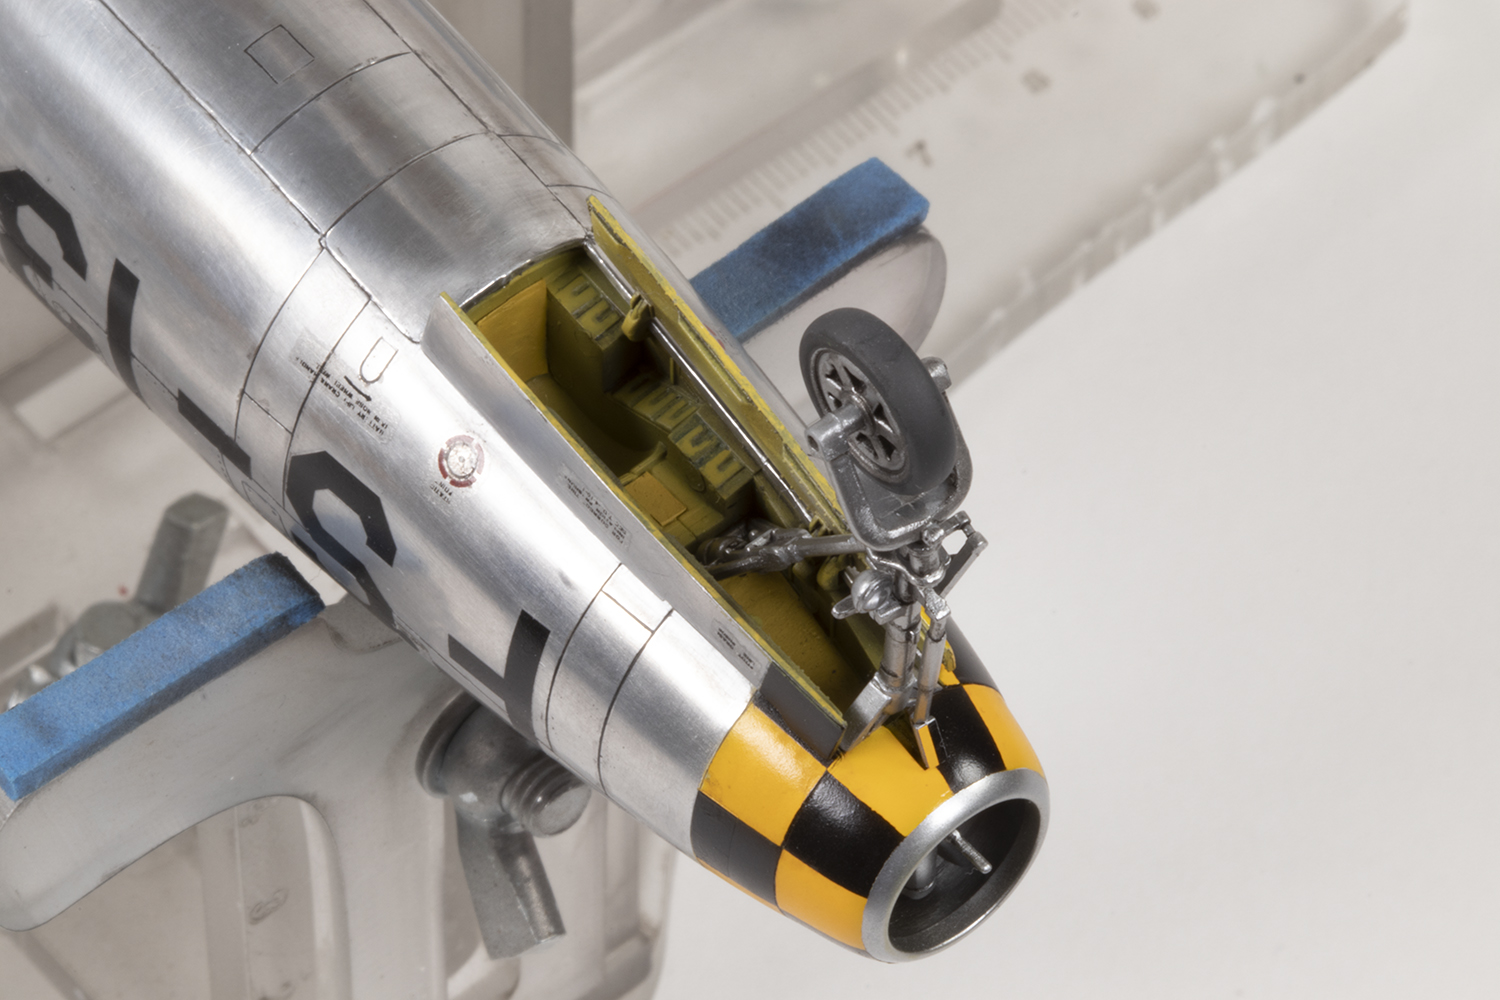
There are some odd engineering decisions, mainly the undercarriage doors which are integrally moulded with the gear bay walls. They therefore need to be installed early and generally get in the way. This was a fad of the time (see also Revell’s 1/48 P-47N and Tamiya’s A-1 Skyraider) that thankfully has not caught on although it still crops up from time to time; it’s a real pain. On the upside, the moulded detail for the cockpit and undercarriage was excellent for the era and more than adequate for my purposes – a more detailed turtle deck (the area under the canopy behind the seat) would have been the only upgrade I would have made if I could. The seat is a late type (and it’s possibly inaccurate for my subject) and I added some seat belts made from masking tape and photo-etched buckles from Anyz and Reheat
The instructions are poor, with low quality drawings and very vague placement diagrams for parts like the undercarriage. Thankfully the kit is simple and it’s not too difficult to work out what goes where. Just don’t forget the nose weight!


Revell provide very nice cockpit detail, especially the instrument panel. I went for a combination of white and mahogany primers to provide some preshading for the very thin mix of Mr Color 351 Zinc Chromate Type I over the top, and the same for the Mr Color 352 Chromate Yellow Primer I used for the undercarriage bays. I highlighted the raised detail with a light mix of black and yellow Vallejo acrylics for some decent contrast. In combination with some Sepia oil paint washes I ended up with an effect I was pleased enough with, especially through a closed canopy.
Like Tamiya, Revell split the nose gear bay in two along its length. I guess that’s the simplest way to mould it, which is a shame as there’s an enormous seam to deal with. I made a half-hearted attempt to cover it with some superglue-soaked paper, but it doesn’t look very good. I’m never that interested in dealing with stuff that will be almost invisible on the finished model.


Against my better judgement, I made a decision early in this project to use foil rather than paint for the aluminium finish. I tried this back in 2019 on a Monogram F-80C and it was not a resounding success, but watching Jen Wright on her YouTube channel made me wonder if I could do it better this time around. The big change would be switching from very thin kitchen foil to a heavy duty wrap. Although I’ve made loads of NMF aircraft and have no qualms about painting them, I never find they quite match what I see in photos of the real thing.
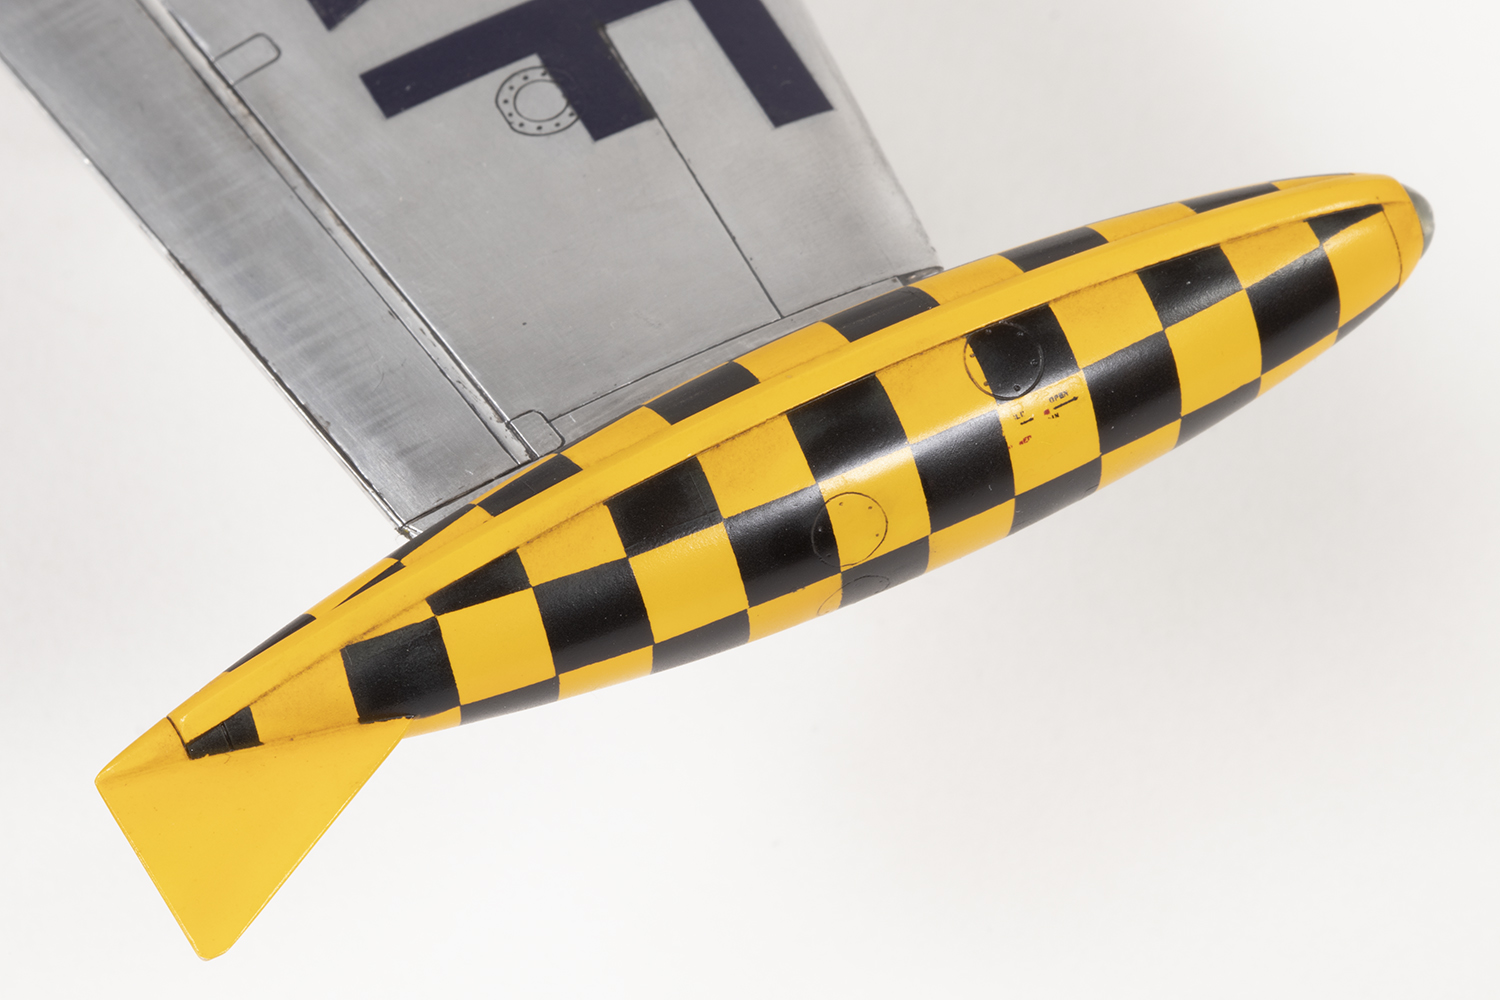
I also made an early decision that I was going to mask the patterns on the tail and the tip tanks as although they are provided by Aeromaster, in my mind I thought I could try and do a better job with paint. This build then became all about foiling and masking.

Because of the integrally moulded nose gear doors, I realised it would be impossible later on to foil around the hinges once the fuselage halves were together. I was therefore forced to start foiling early, before I installed the nose gear bay. This gave me an opportunity to practise. The basic tools I used were some Reynolds Heavy Duty Wrap (bought for a few pounds from Amazon), Microscale’s metal foil adhesive, which I already had a fair amount of experience with, some sharp knife blades and a tapered wooden dowel which had somehow entered my toolbox many years ago from goodness knows where.


My chosen method for applying the glue was with a wide brush. First, I cleaned the foil with 100% isopropyl alcohol (IPA) and then dripped some glue on the shiny side. I spread this around with the brush, and then dripped on more IPA and cleaned off the glue with the brush. I then reapplied the glue in the same way. Sounds weird, but this helps stop fisheyes appearing in the glue and gives a more even coverage. What I found out later on is that it’s much better if the foil is completely smooth before you do this – any creases or dips and the glue will pool in it and give an uneven surface. Once the glue is applied the foil should be left until it goes clear; I leave it under a cover to stop bits of dust dropping in it.
This then leaves a very sticky piece of foil. The plastic also needs to be cleaned with IPA and be free of dust and fibres. I place it where I want it to be and burnish it with my finger or a cotton bud, followed by the sharpened dowel to outline all the recessed detail. The excess foil is cut off using a sharp blade run along panel lines. In some areas, like the front of the wing roots, creases are inevitable. This is where the beauty of the heavier gauge foil comes in, as these can (very carefully!) be sanded out.
For sanding I used a very particular system. I started with an Infini 600 grit Matador sanding stick. The aluminium is hard work on these and the grit will wear away quite quickly as you sand. This is used to level the foil as best as possible and flattens the surface. I then worked my way through 800, 1000, 2000, 3000, 5000 and 7000 grits, all used wet. It’s an extremely messy process and I recommend wearing gloves as your hands will soon be black with fine particles of aluminium. Another reason to wear gloves is that fingerprints are very easily left on the foil.
This should result in a smooth, brushed aluminium surface. I could never get it completely smooth, I think because the foil and underlying glue layer are soft. The final step was to polish with Tamiya Coarse polishing compound using a polishing wheel chucked in a Proxxon motortool. Of course, you could also progress through the Fine and Finish compounds, too, but I felt the Coarse grade was enough.
That’s the basics and I foiled around the nose gear bay and the nose gear doors prior to installing the cockpit and nose intake splitter.


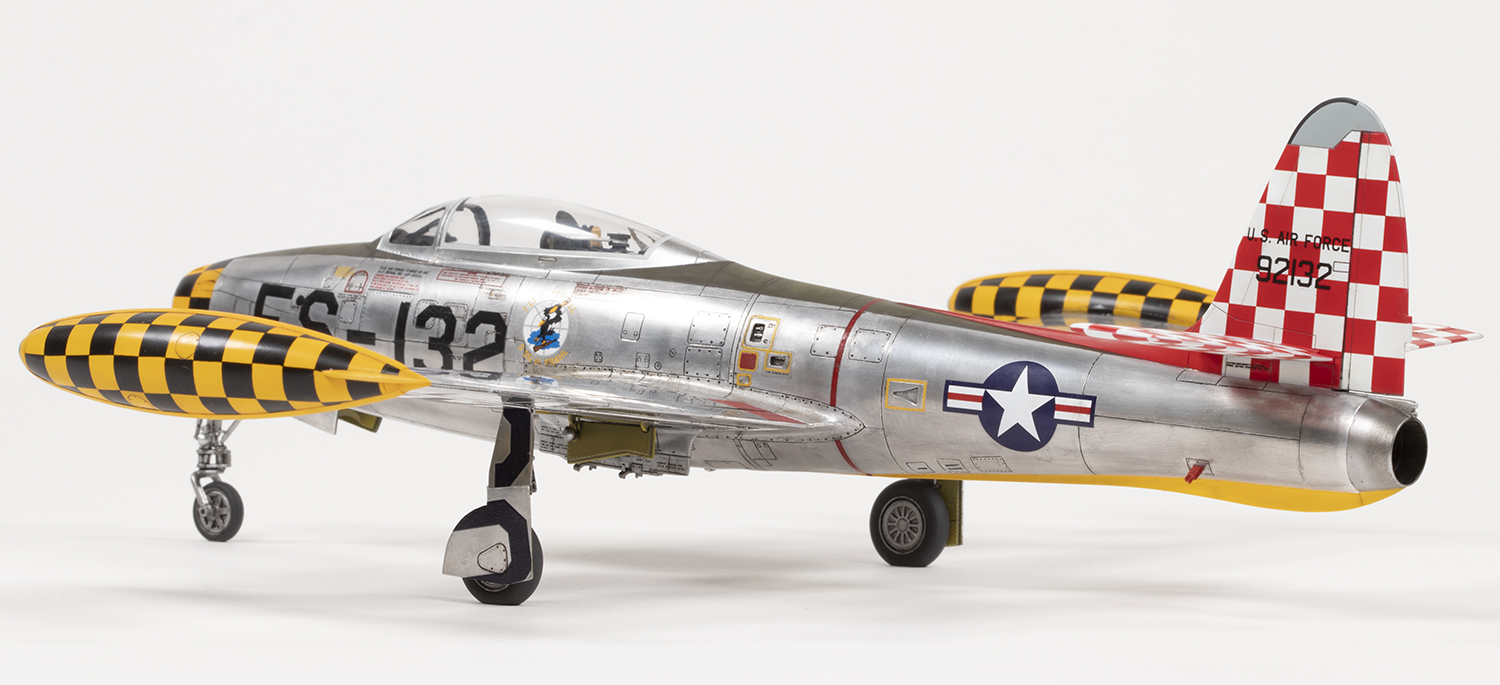
With that done I could crack on with construction. The fit of the wings and tailplanes to the fuselage is so good I decided to add them right at the end. This would make masking the chequers and adding the foil much easier. The overall fit is very good and the main parts were all glued together with superglue and the seams filled with the same. To improve the fit of the clear parts some Tamiya tape was used to narrow the fuselage just a little bit before they were stuck on with Tamiya Extra Thin. I installed all the separate control surfaces in the neutral position and the airbrake closed as per most photos of parked up Thunderjets.


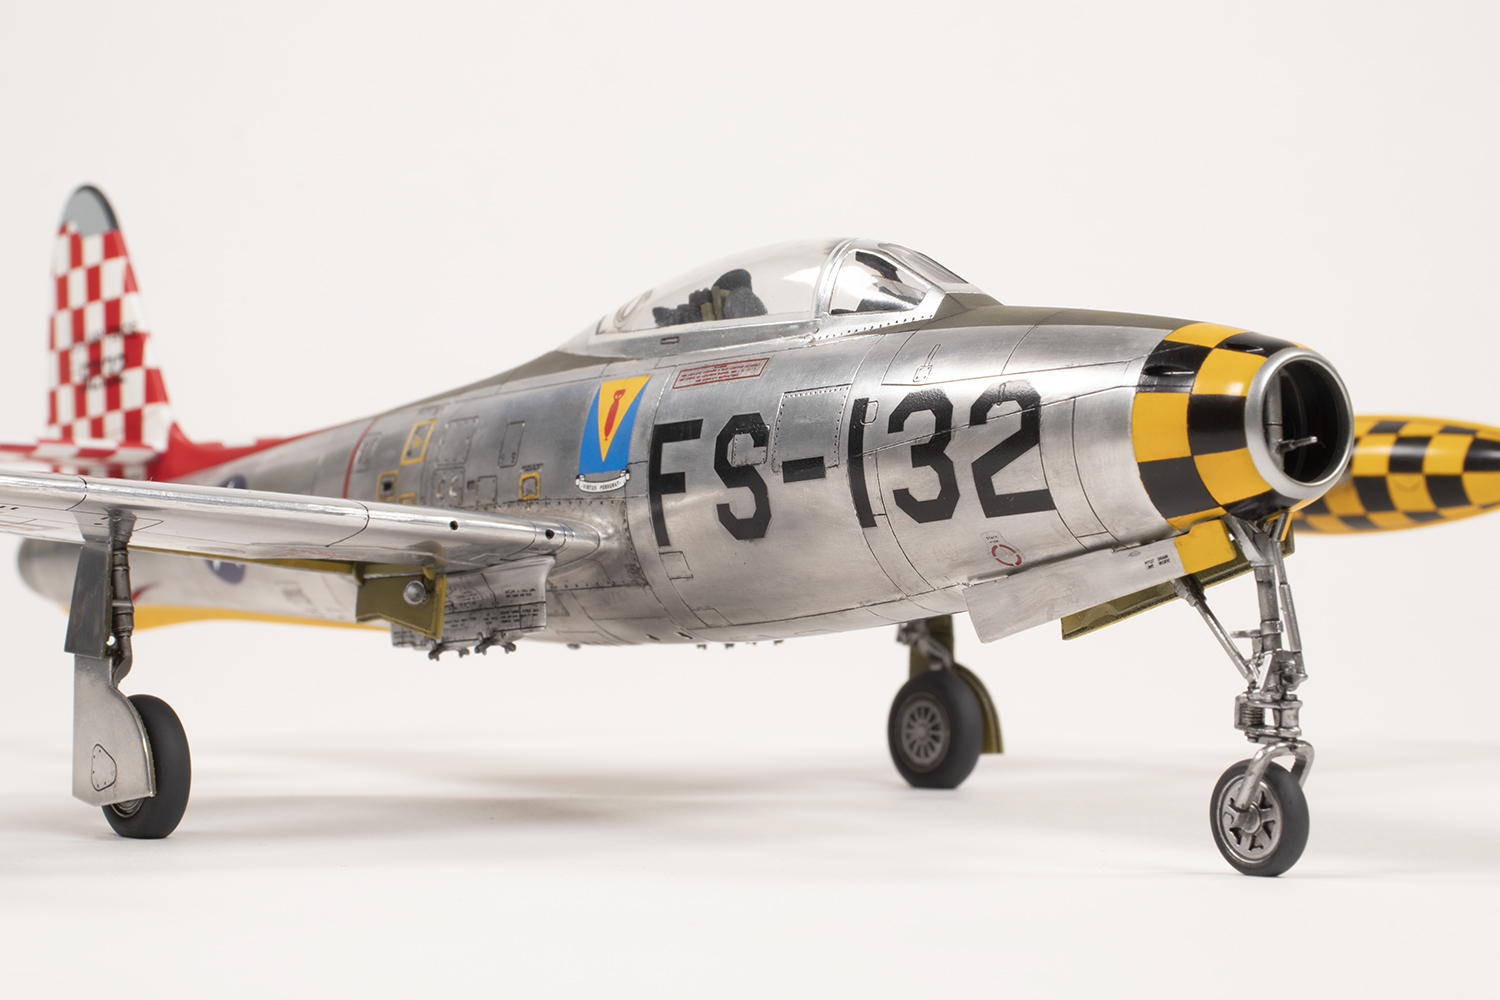
As foiling is difficult, my mind was constantly thinking ahead to try and plan the best approach to take. One critical decision was to decide whether I was going to paint the coloured bits (anti-glare panel, yellow keel, chequered tail, nose and tip tanks) over the foil, or keep them separate. Painting over foil has its disadvantages: paint can chip off easily and masking over foil can be highly unpredictable. The alternative was to paint the plastic and then apply the foil up to demarcation with the paint. The problem with this method is that the foil is a bit thick and so there’s a slight lip where they join. Nevertheless, I decided this latter approach was the lesser of the two evils and began to plan accordingly.
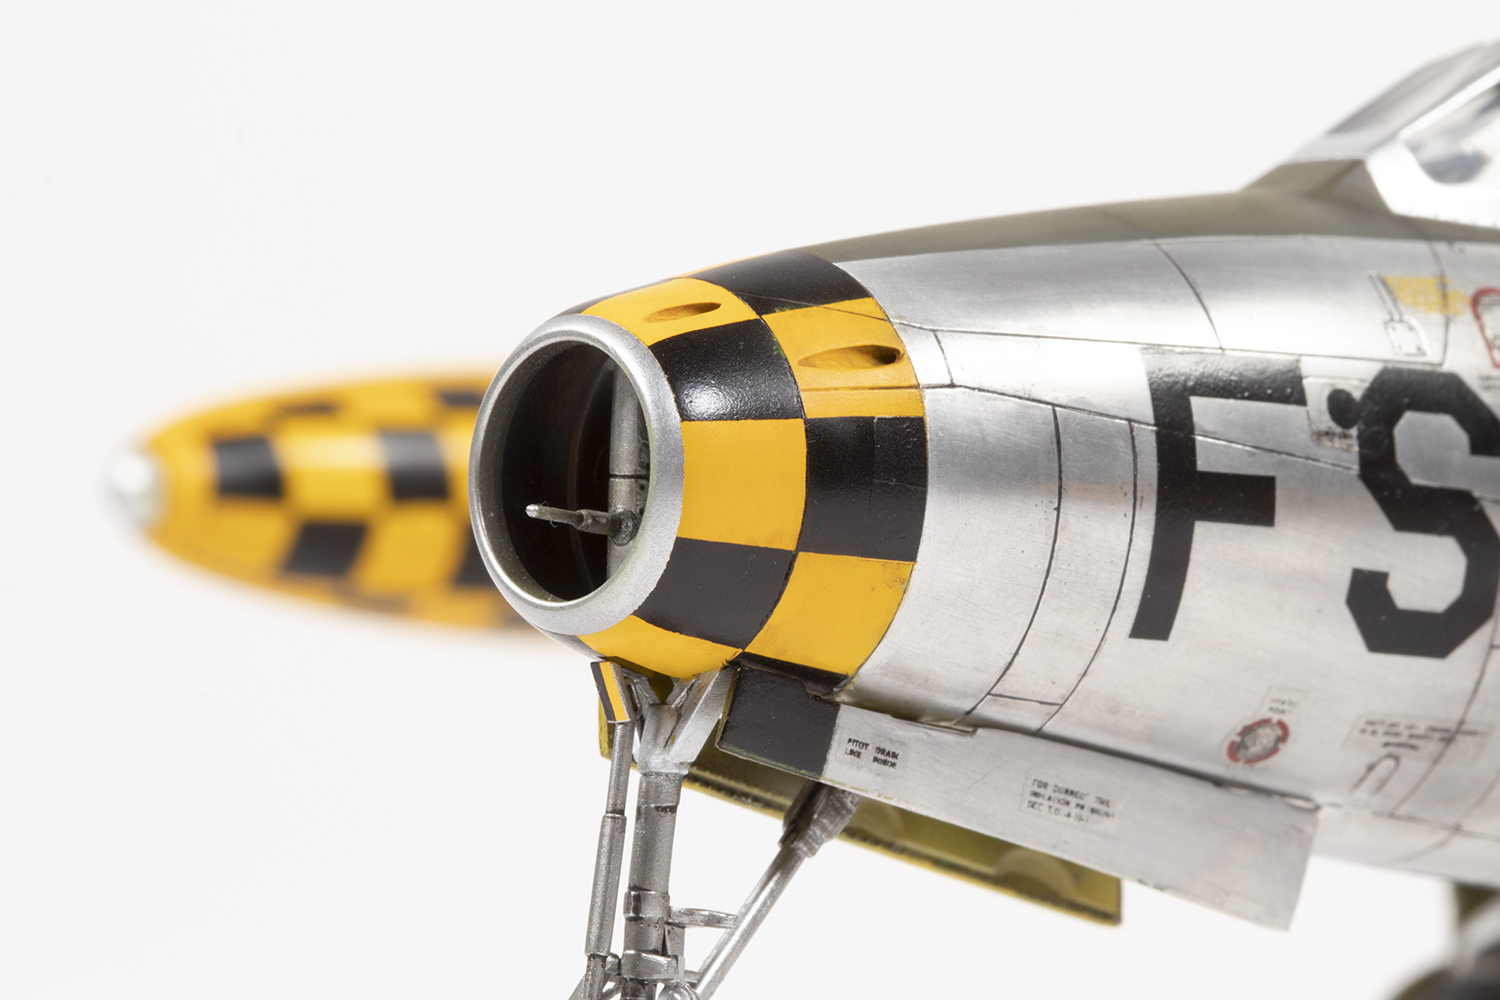
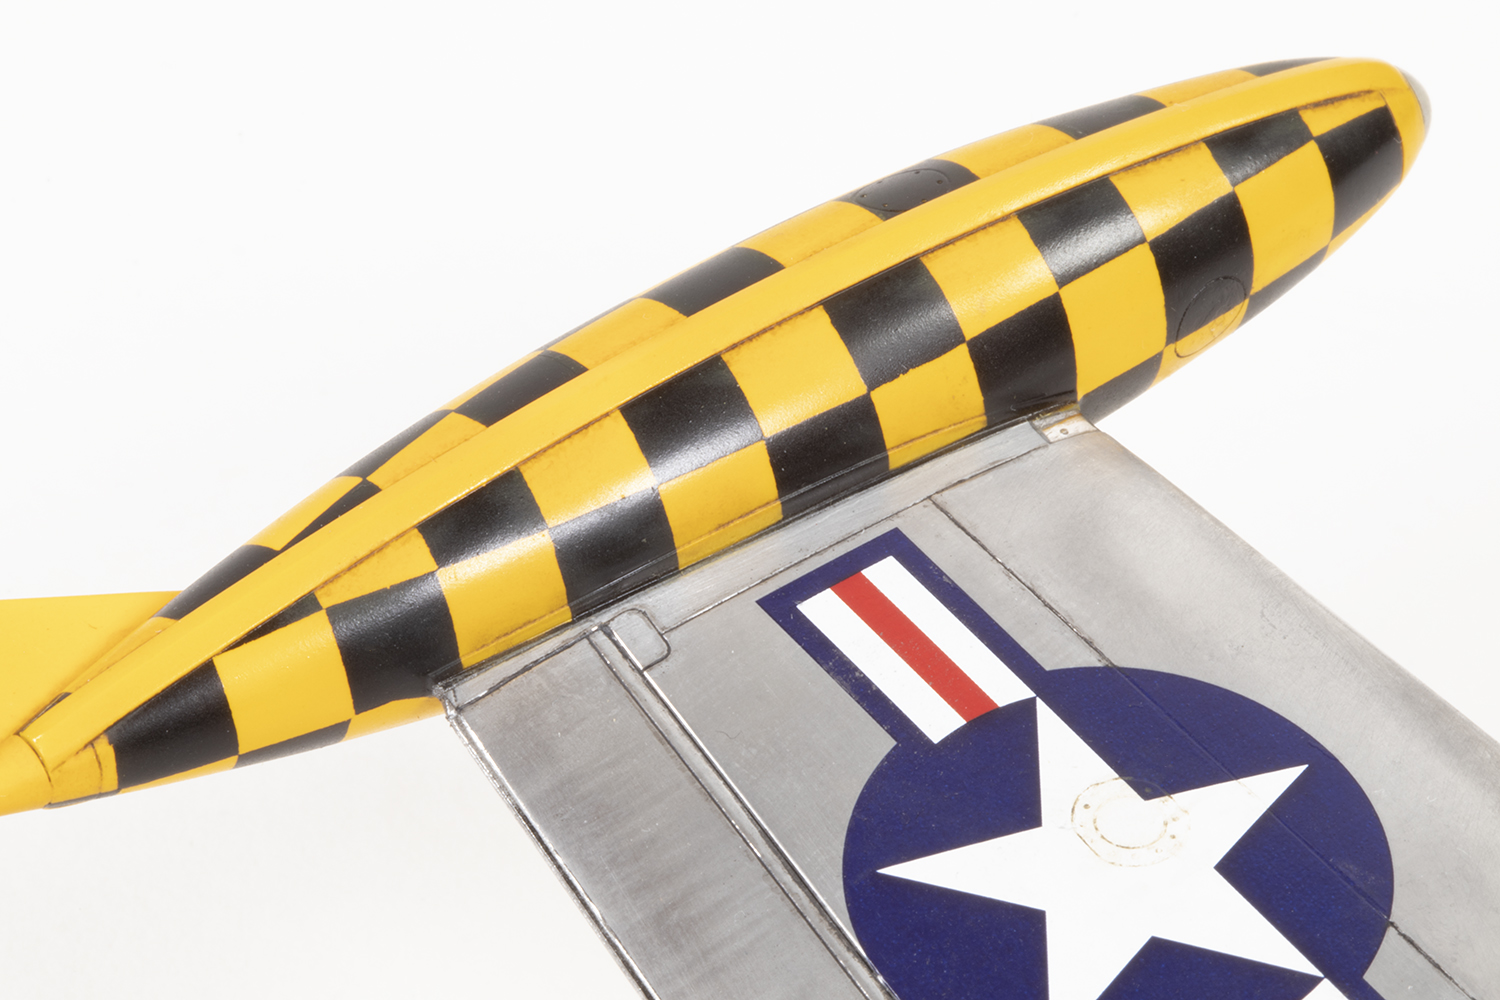
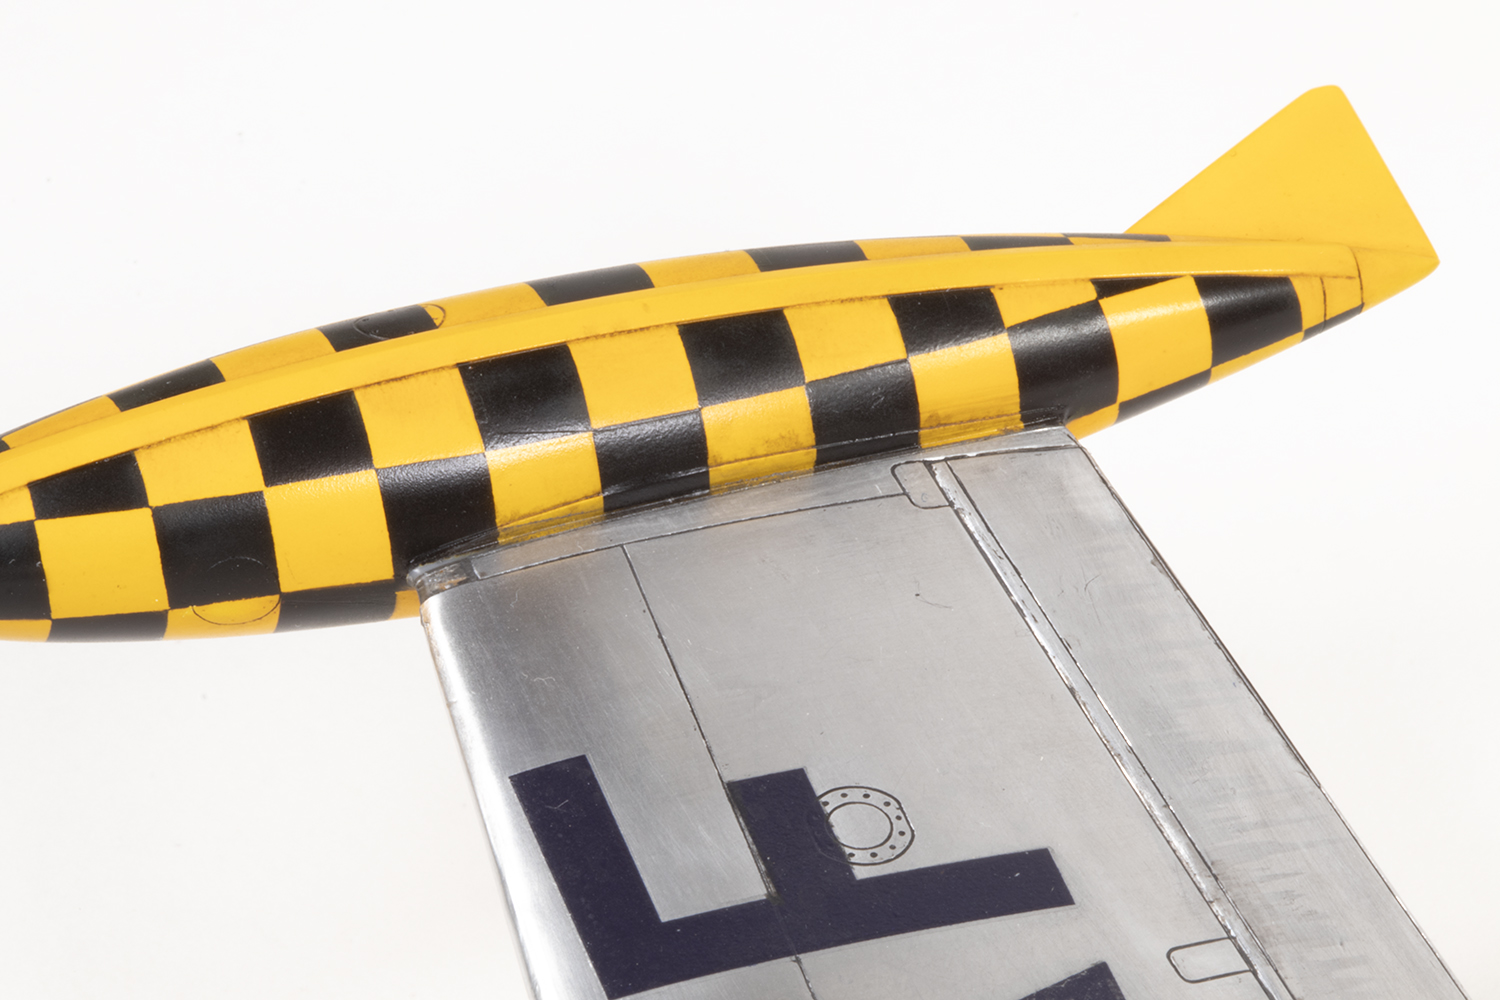
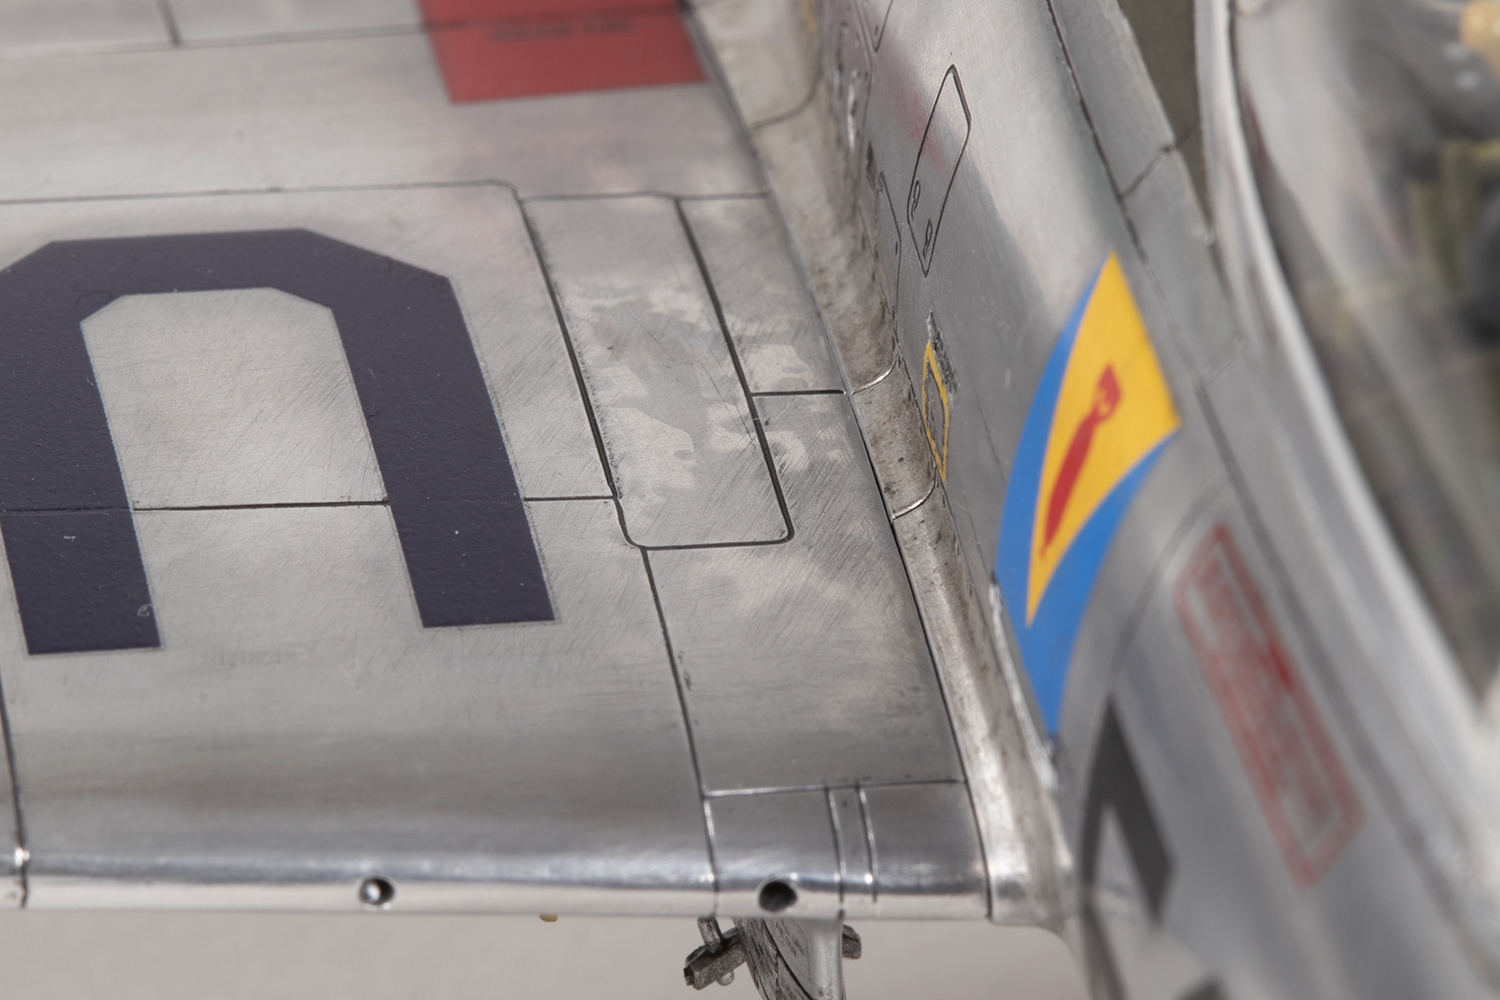
I decided to create false panel lines where the foil and paint meet. The idea was that these lines would then make trimming the foil against the painted areas easier by acting as a guide for the scalpel blade, and this worked fairly well. I scanned the Aeromaster decal sheet and created a stencil for the chequered area of the nose which then became a guide for the demarcation with the aluminium to be scribed in. The very lip of the nose was also meant to be natural metal and I elected to paint this as the radius of the curve would make foiling impossible (for me at least). A similar fake ‘panel’ line was scribed in along the upper fuselage to demarcate the olive drab anti-glare panel.


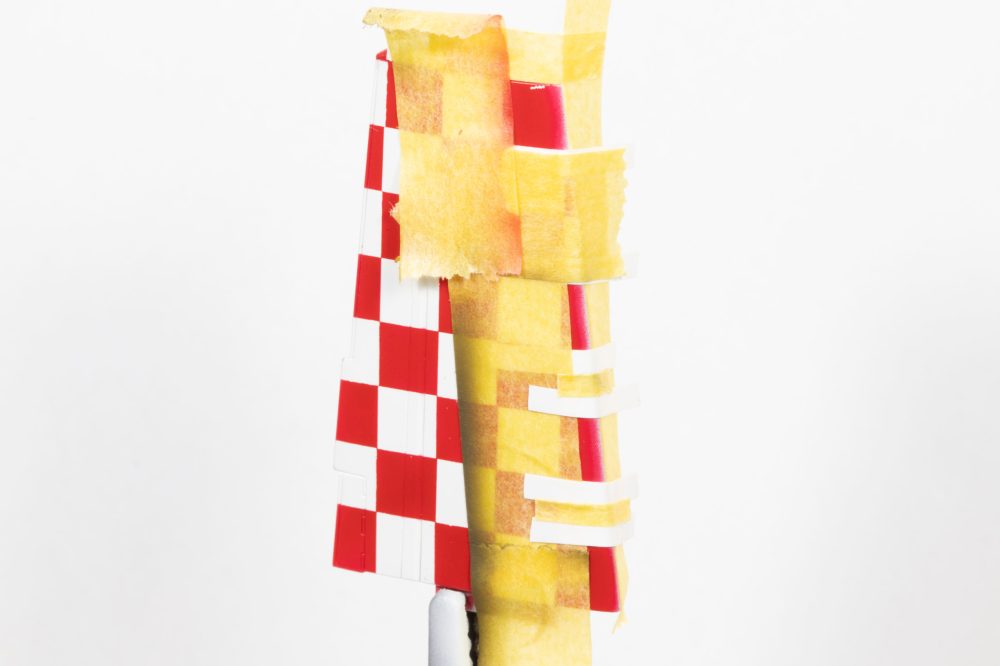
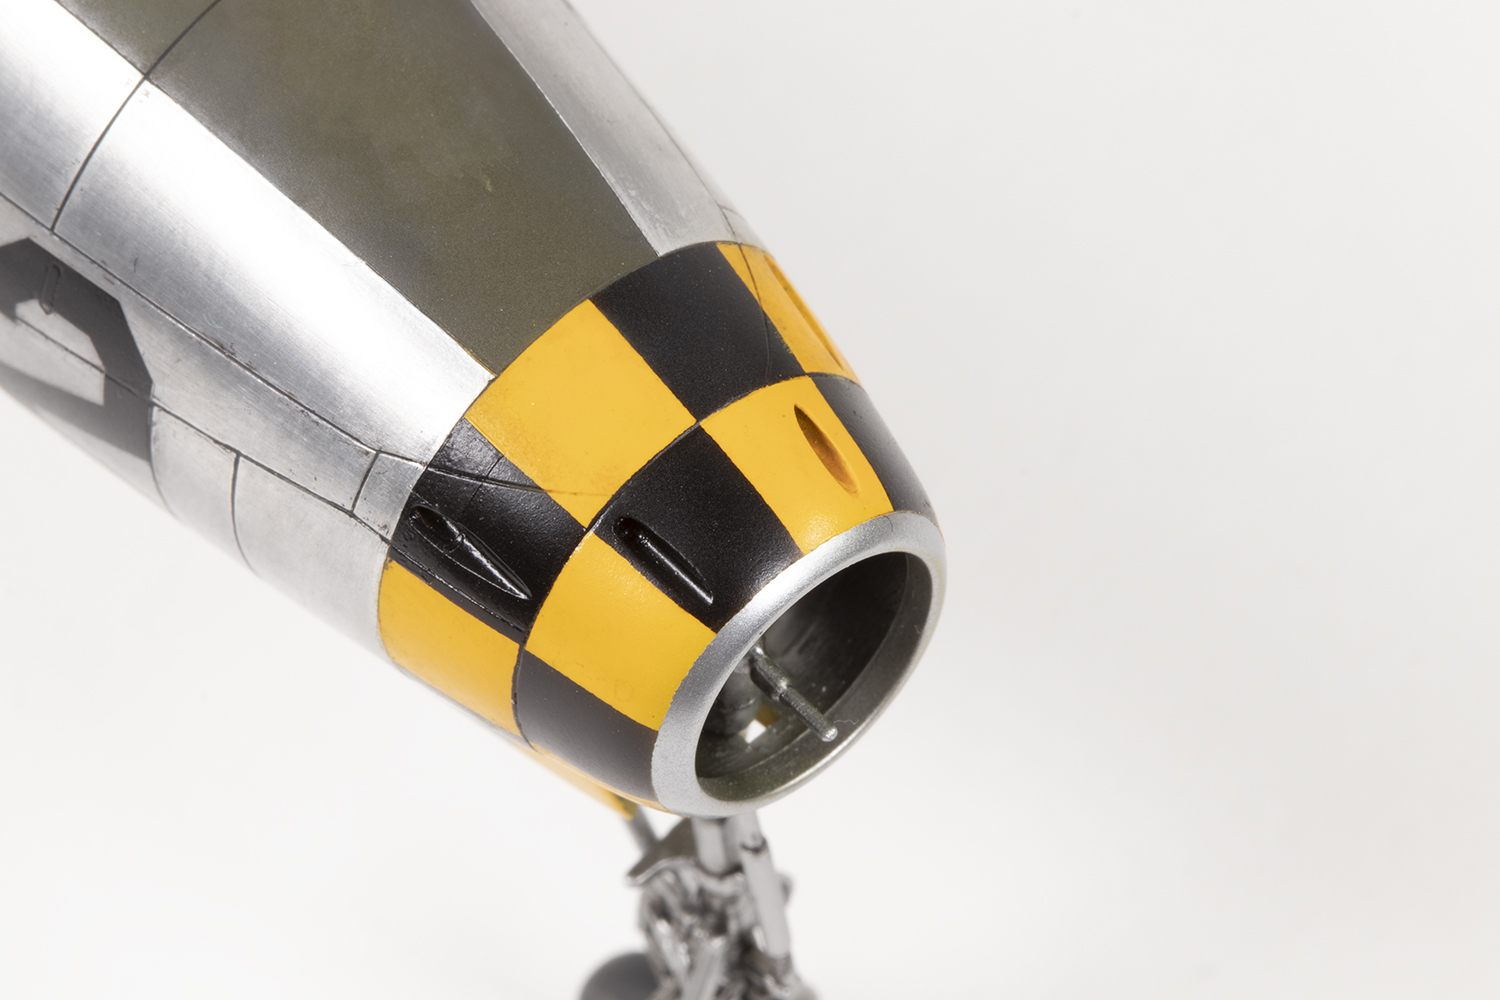
With the lines now scribed in I could turn my attention to the paint. The chequered nose looked the hardest, so I decided to start there. I always like to start with the hardest areas first – if I can’t get it to work, then I needn’t bother continuing! The yellow is MRP-122 RAF Marking Yellow, which was a wonderful match for the colour on the decal sheet. The black chequers were cut from Tamiya masking sheet using a Silhouette cutter with a design traced from the decals. I prefer Tamiya masking material for this kind of location because the curves require a fairly thin and sticky mask. The black was simply Tamiya X-18 Semi-Gloss Black. I was happy enough with the result, although the natural metal lip at the front was not as even as I would have liked. I also experimented with airbrushing the foil on the nose gear doors with Mr Metal Primer before spraying the yellow and black in this area. The idea was that the primer would improve paint adhesion. This turned out to be a mistake as the primer remained sticky for days and was very fragile when subjected to white spirit or alcohol. In the end I just wiped it off with these products.


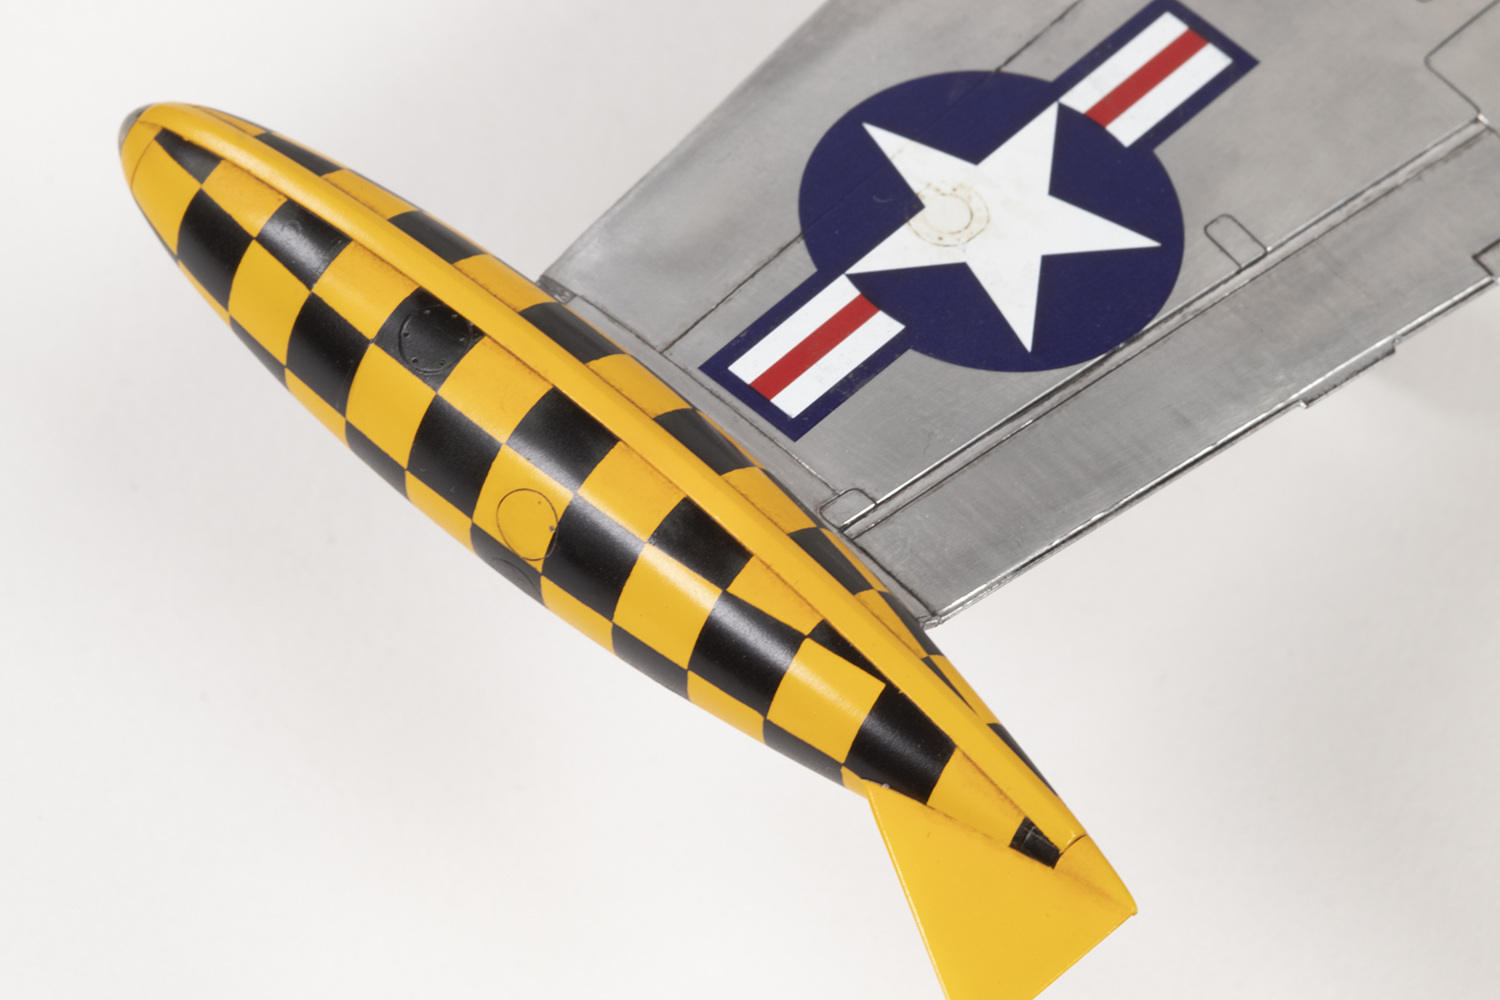
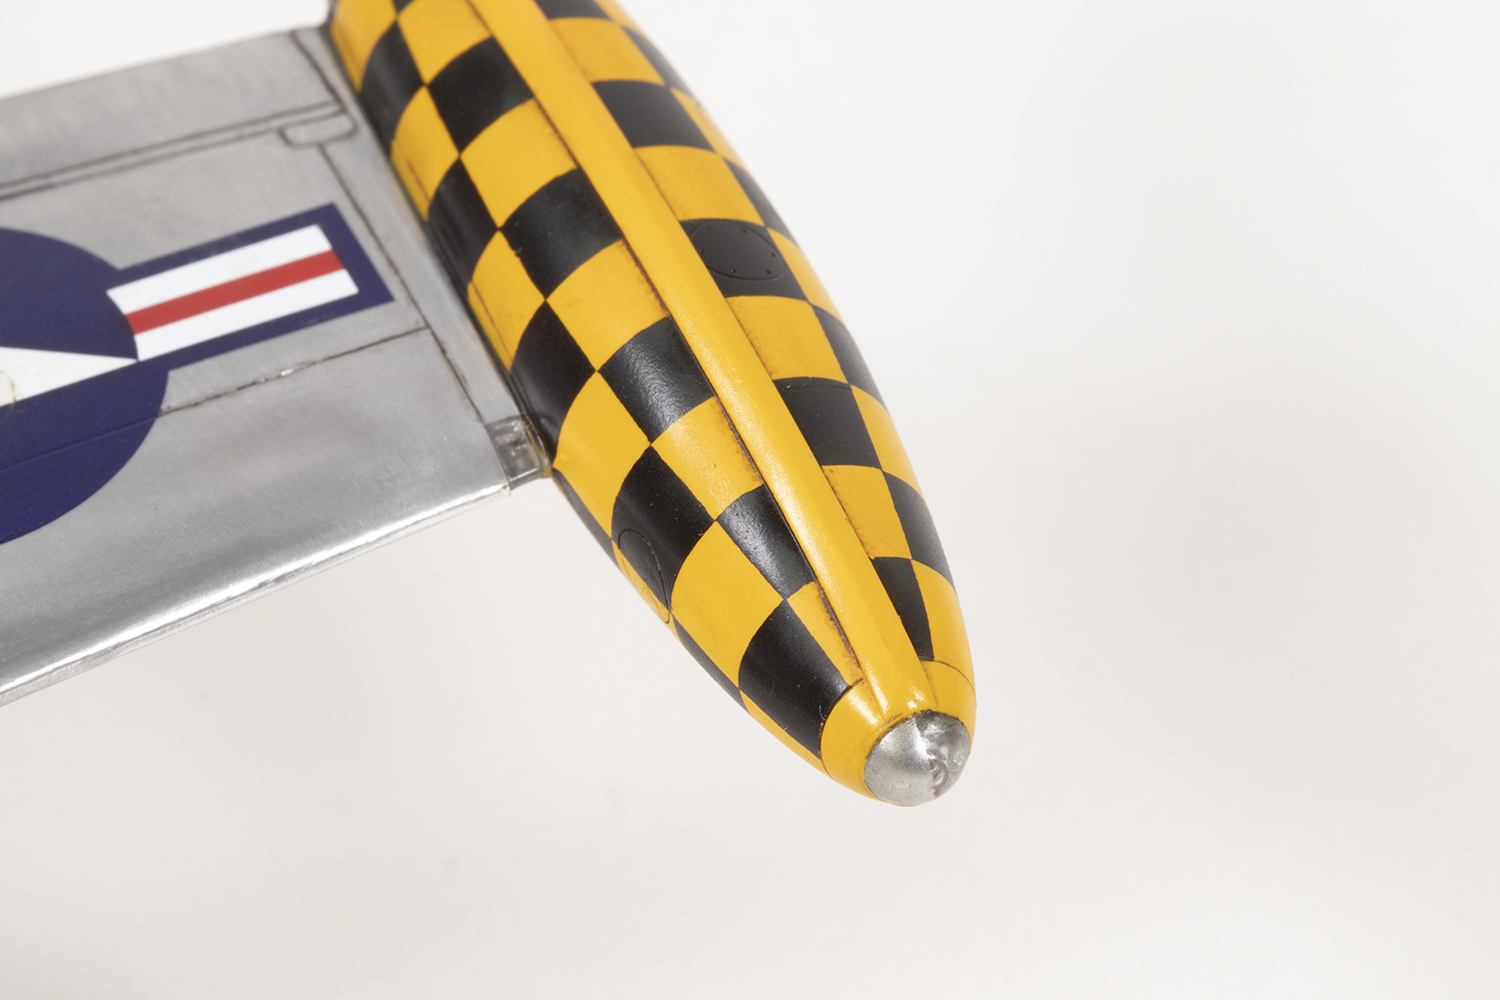
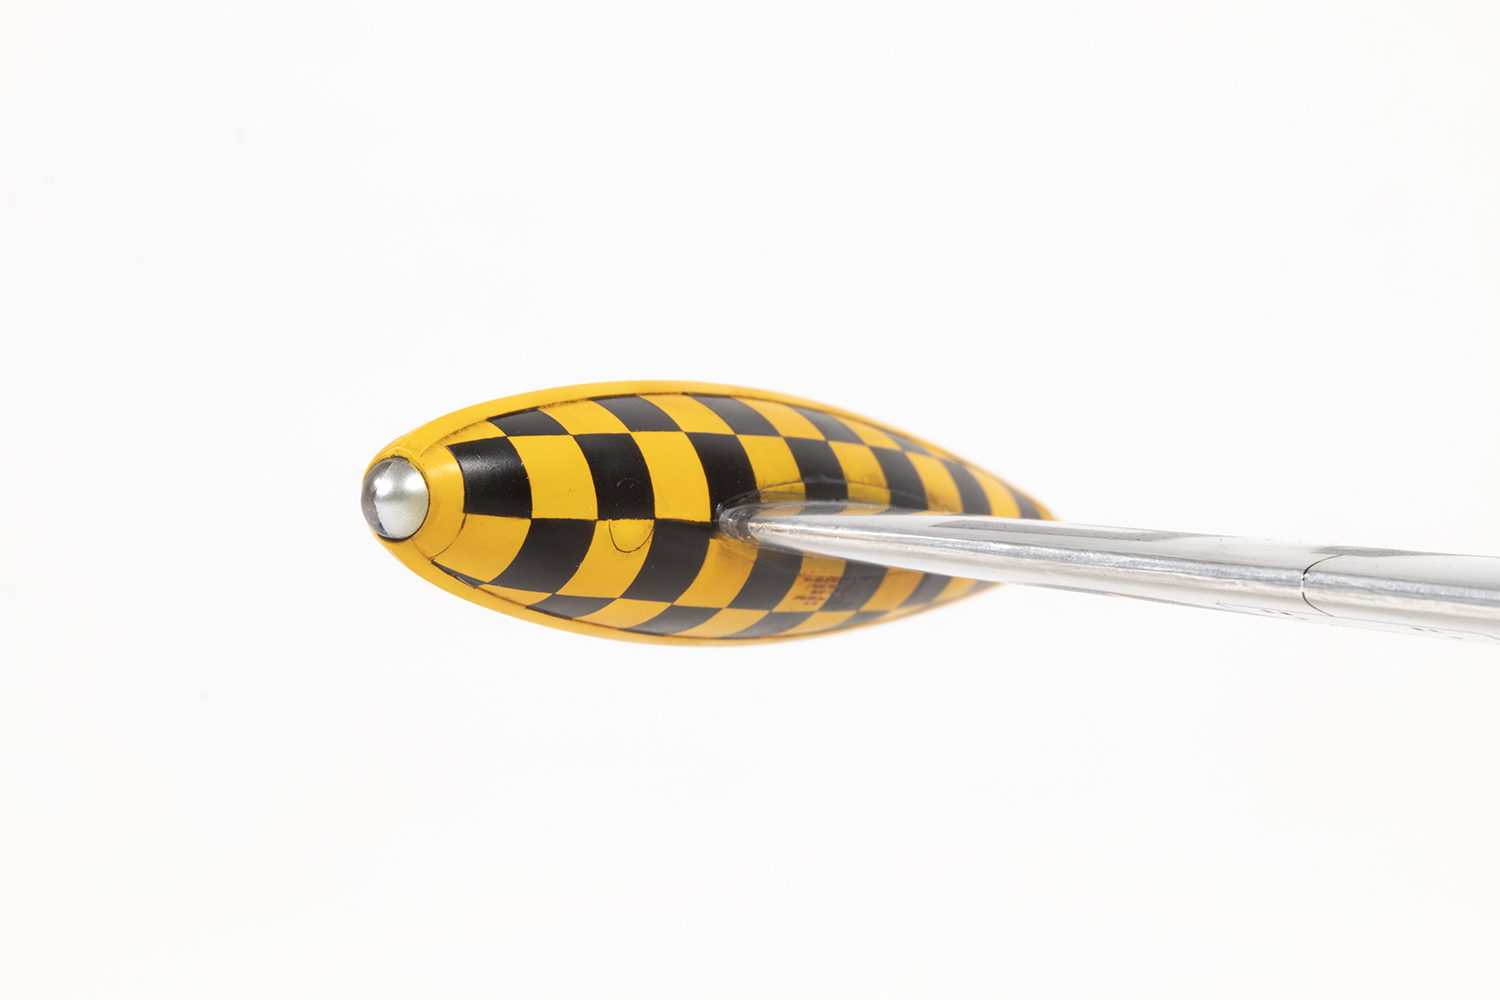
Masking and painting the tip tanks was then completed in the same manner, again using masks made from the scan of the decal sheet. Doing this area definitely made me go cross-eyed a few times as trying to keep track of everything was a bit mind-bending. I knew the result would not be perfect and planned to use slivers of the black chequers from the decal sheet to even any edges out later on. This transpired to be an excellent idea.
Whilst on the tip tanks, it’s worth mentioning the lights at the front. These can be improved by painting a blue/red bulb in the lower half and then painting the inner half in aluminium as per photos of real F-84s. I tried for many hours to locate a photo of FS-132 online and failed to do so, which means I’m trusting Aeromaster’s research and filling in a few gaps from photos of similar airframes.


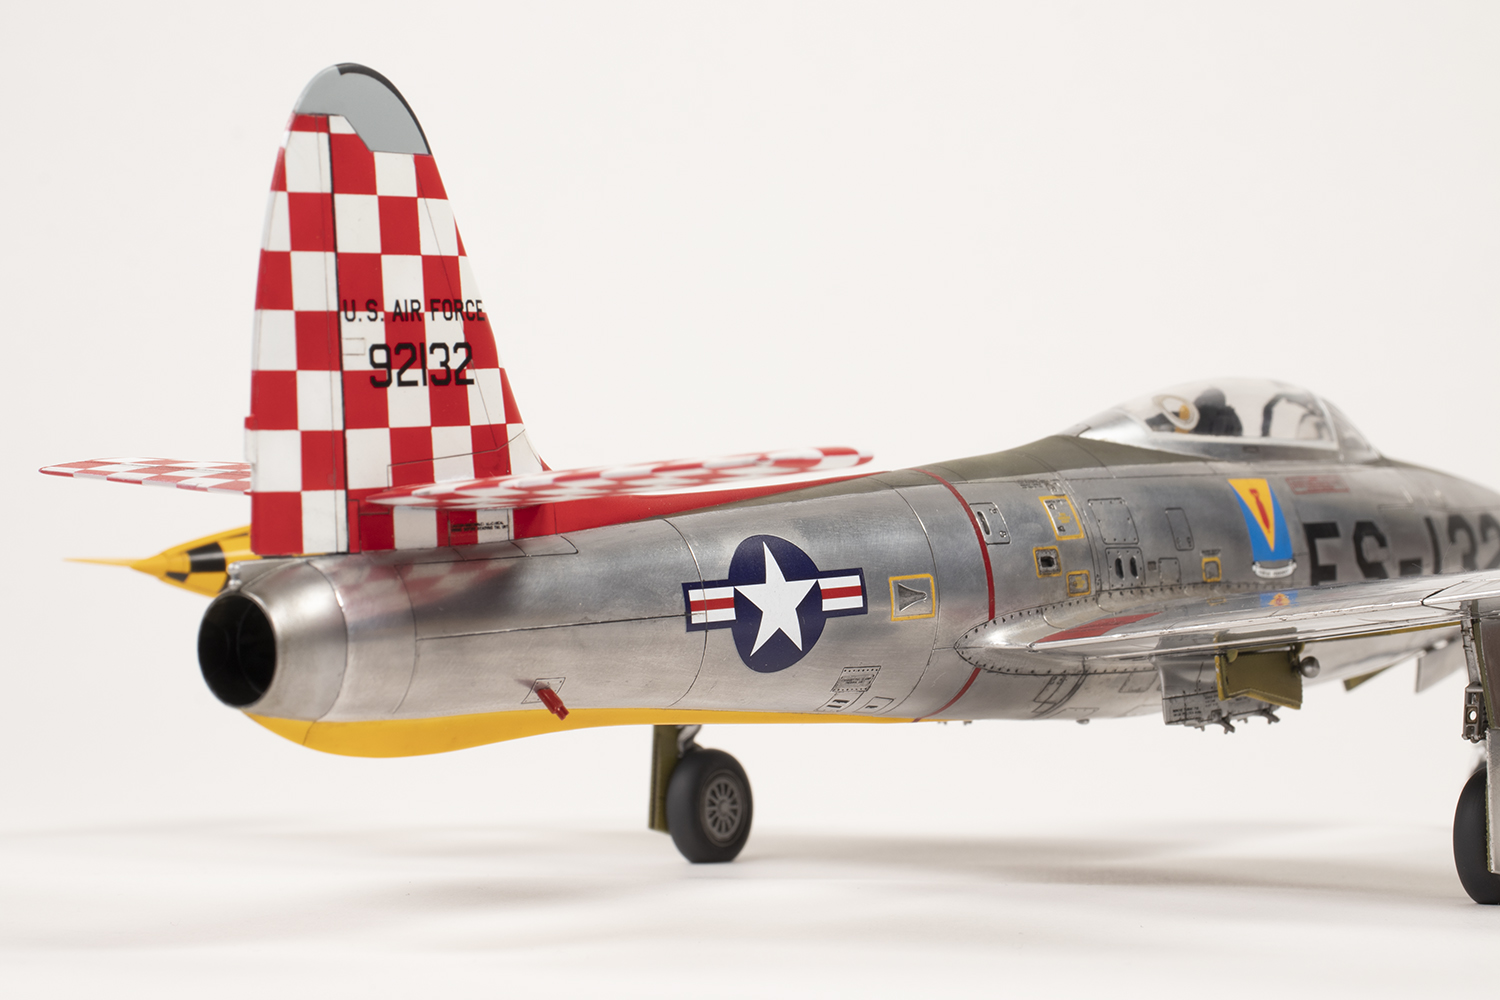
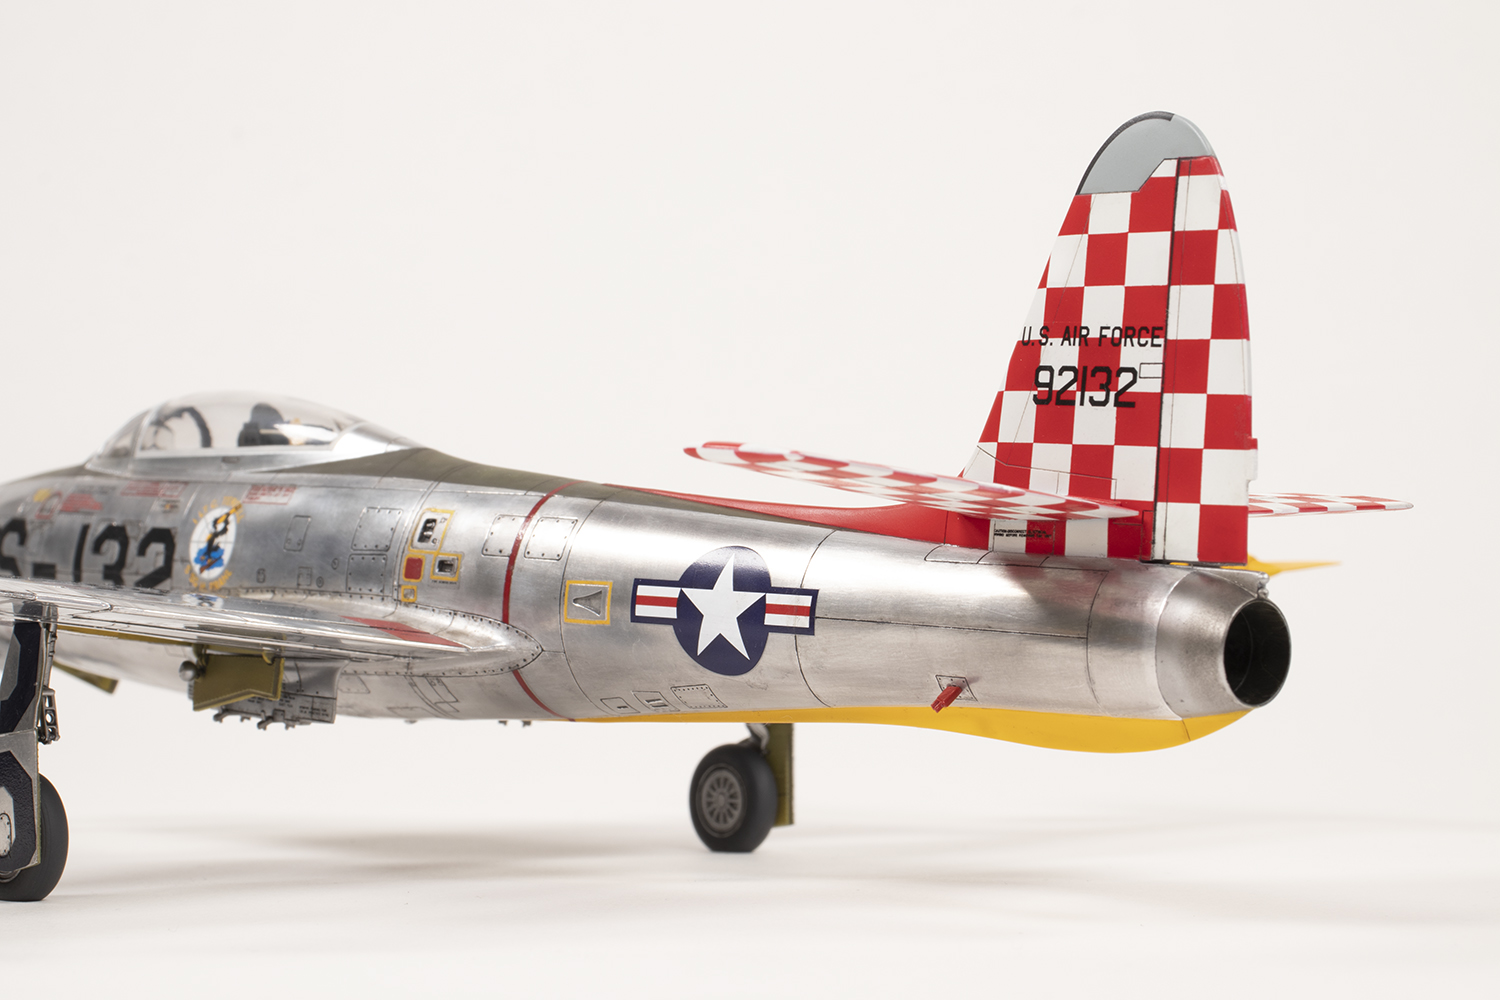
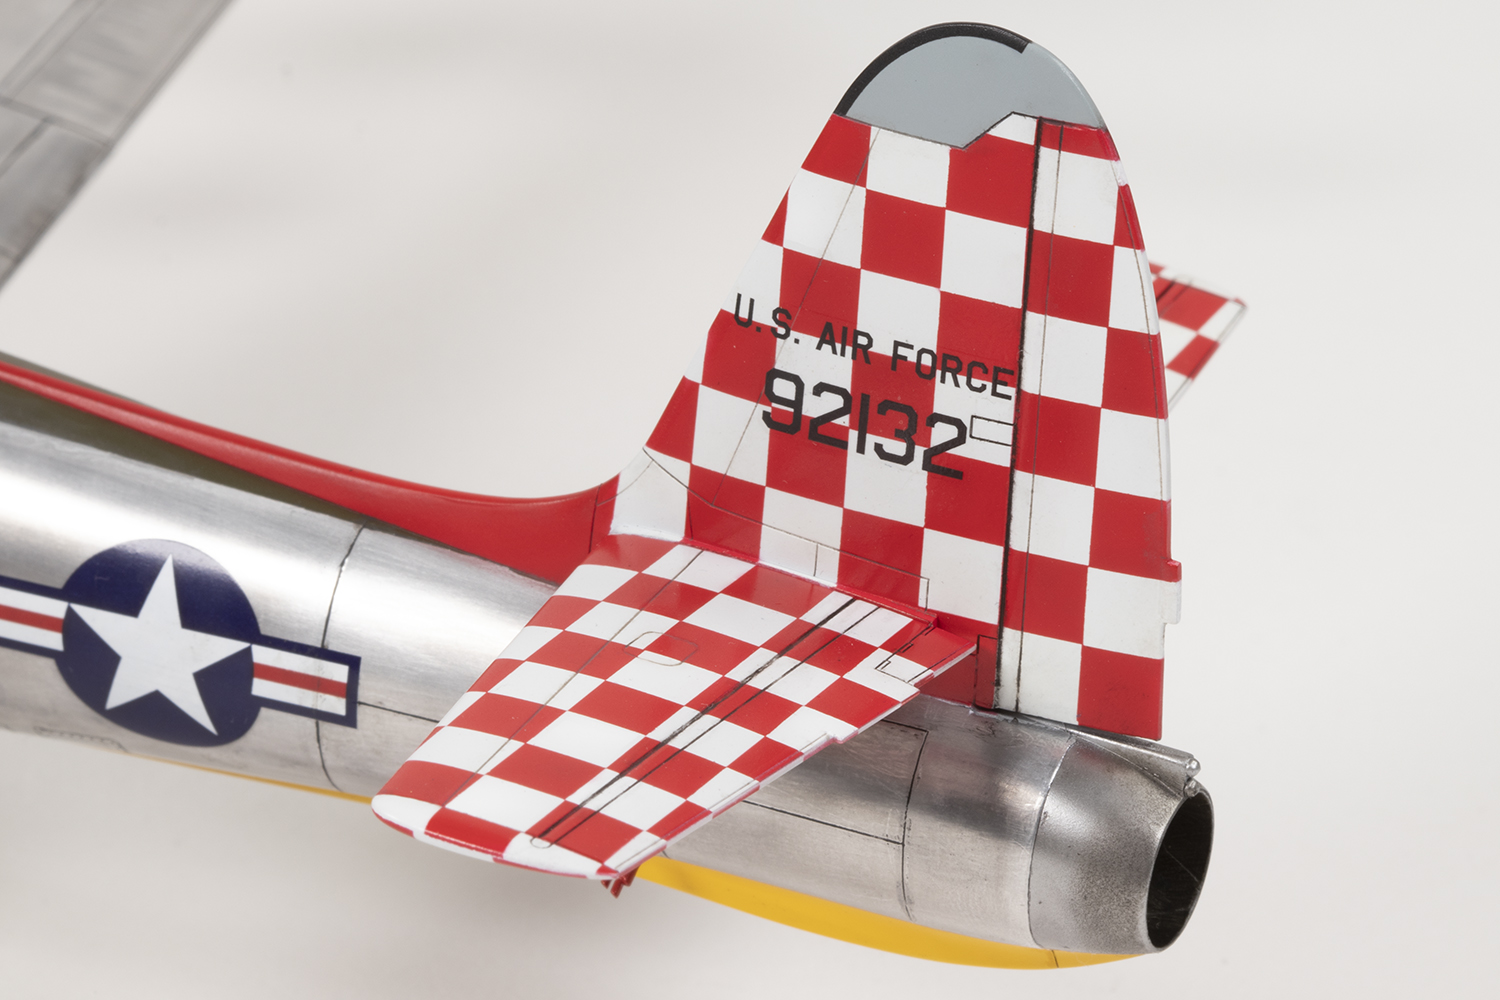
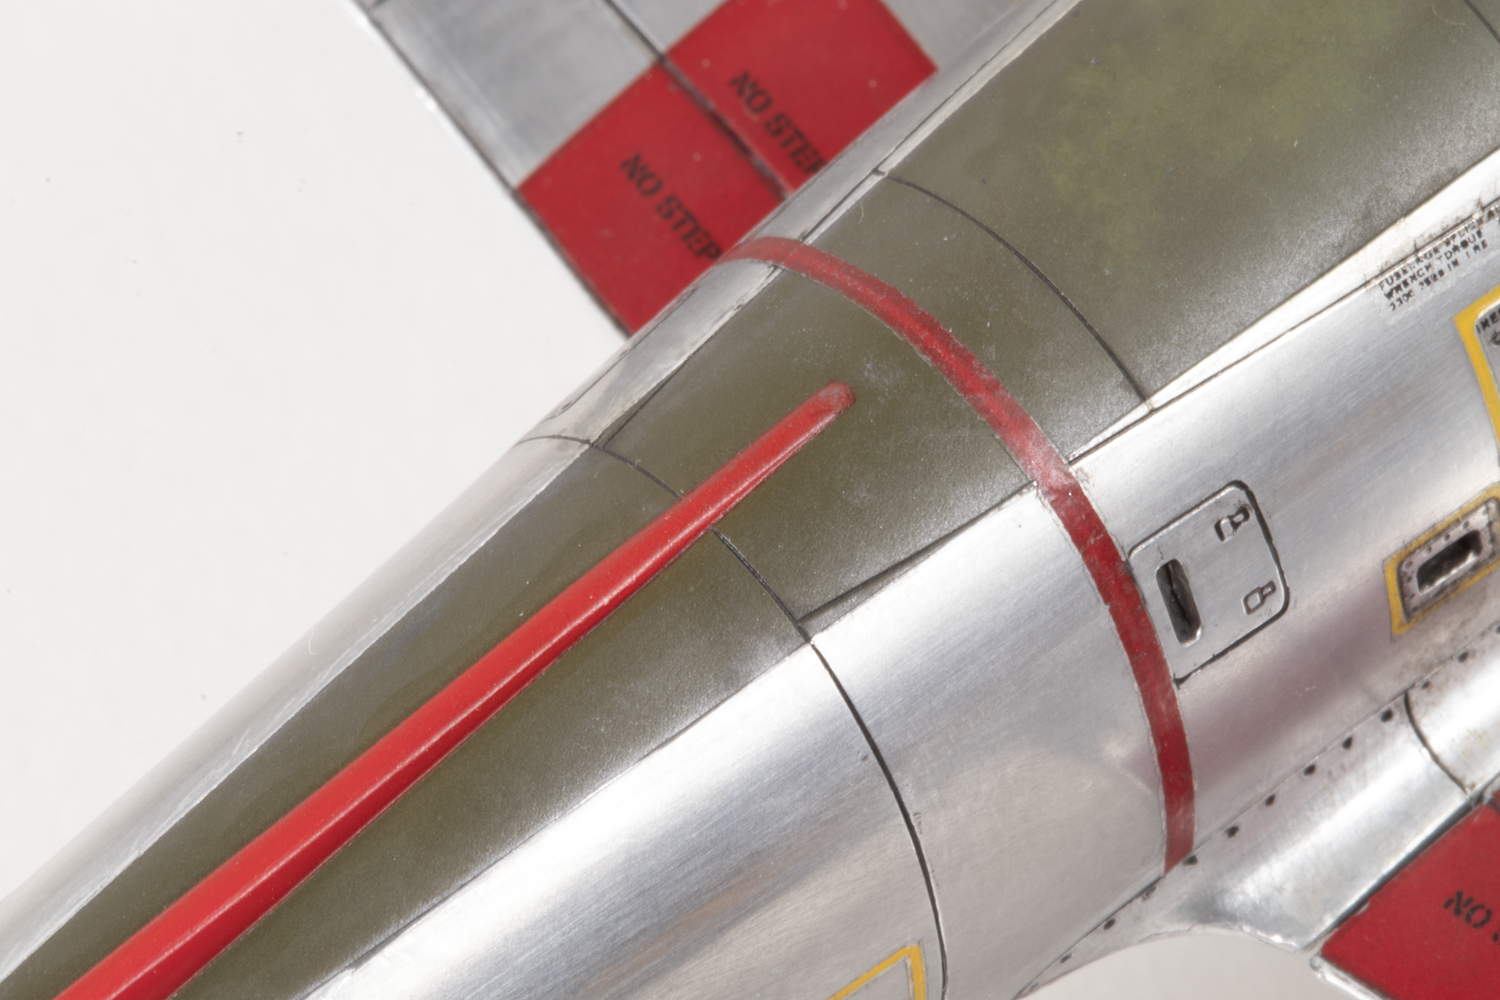
For the red and white tail chequers I adopted a different approach. Since they were flat I could use vinyl masks which are a little more forgiving to use than those cut from Tamiya sheet. The base coat was MRP white lacquer and the red Tamiya X-7 acrylic. I find the Tamiya paints spray better over masks than lacquers. Prior to painting the tail, I’d finished the olive drab anti-glare panel using a few shades of Mr Color Olive Drab (12, 38 and 304).
As with the black and yellow pattern, I knew there would be plenty of touch ups required, especially where the vinyl masks didn’t conform very well at the rudder hinge. However, rather than use decals to fix the problems, I went back and forth with the masks and paint in an iterative process until it looked good enough. I dealt with the leading edges separately and whilst the chequers don’t match up perfectly, I felt it was adequate. This was my first attempt at masking chequers and I’d happily try it again.


With the paint all done I could now start the foiling in earnest. Again, I started with the hardest area, which was the front of the wing roots. It took several attempts to get it right. Once I was happy enough, I worked my way down the fuselage.
The wings brought their own challenges, especially foiling around the undercarriage bay opening, the navigation lights and the leading and trailing edges. For the latter I made sure to have a single piece wrap all the way around so there was no join on the leading edge. This didn’t work so well when I was sanding and polishing the left wing as the foil cracked and flaked off. This brings me to one of the main disadvantages of foiling (and there are several): it’s impossible to fix it if it goes wrong.
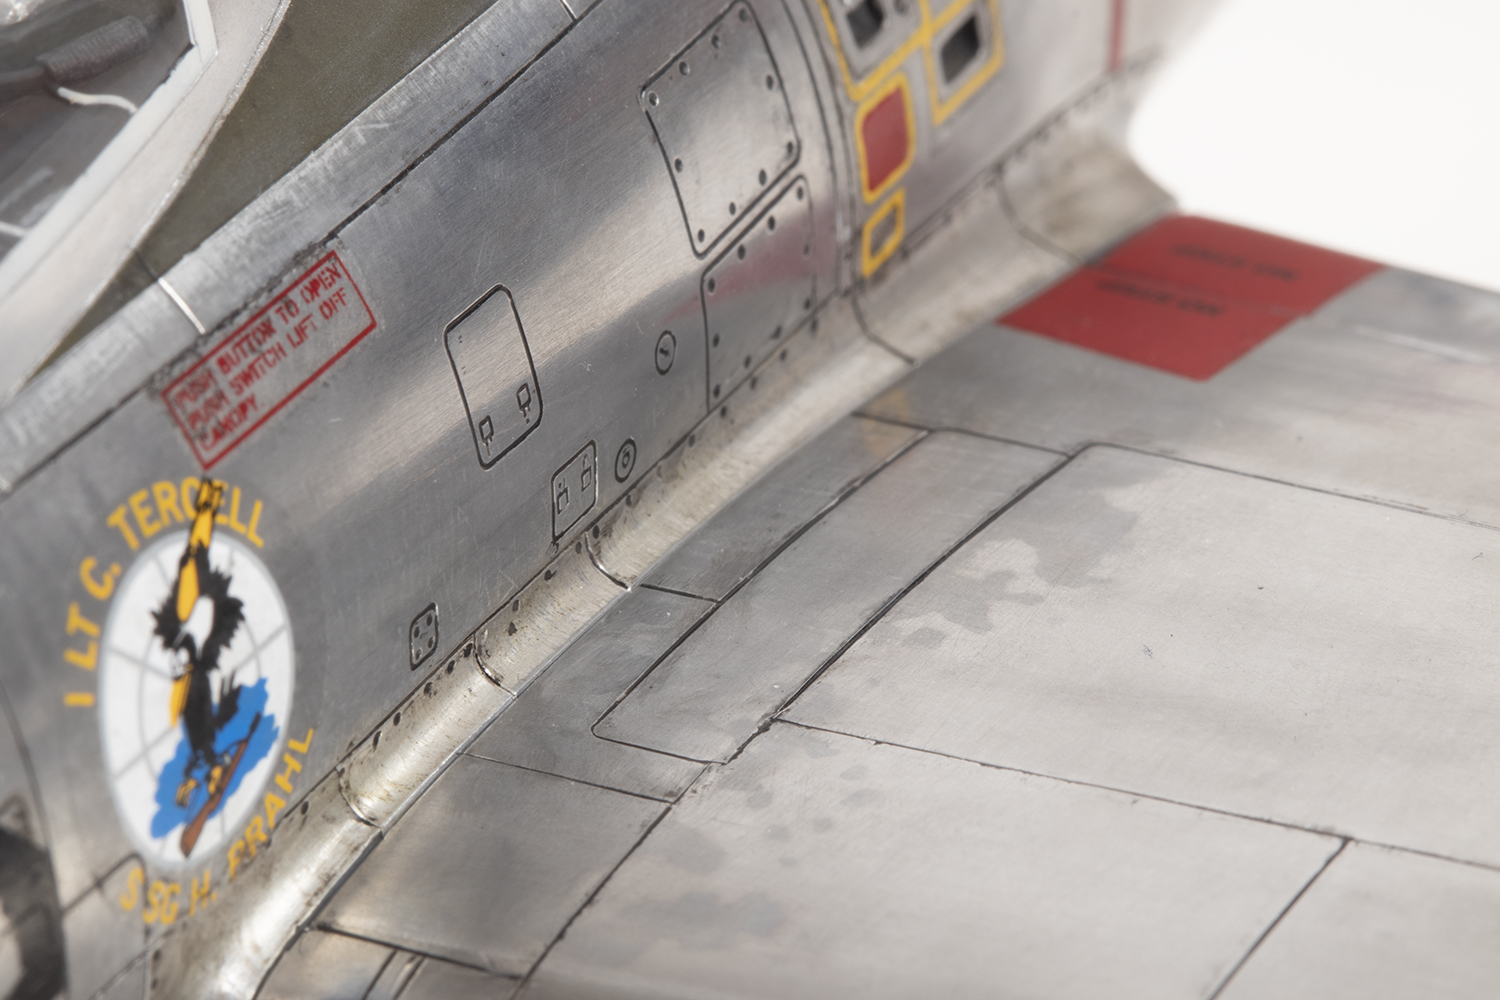
There are very few parts of a model that cannot be fixed. Clear parts are one (you can’t fix a crack in a canopy), but foil is another. Microscale’s foil adhesive is very strong and once it’s set removing the foil is very, very difficult without damaging the plastic. It can be done (I did it for one panel) but it takes an extremely long time. This means foiling is a one-shot endeavour; if it doesn’t work, you’re in trouble. I patched the port leading edge as best I could, and at first glance it looks okay, but it does not stand up to close inspection.
Using thicker foil was definitely a benefit and imperfections like trapped dust can be sanded out easily. I never got as smooth a surface as I would have liked and the foil also has a tendency to lift at sharp corners, like the edge of undercarriage doors. It’s a difficult and unforgiving material to deal with and it takes a long time to apply and sand out. When cutting the excess off along the edge of the anti-glare panel my scalpel blade wandered in a couple of places leaving some highly visible errors. I used some slivers of Anyz chrome decal in these areas, which did not fix the problems but distracted the eye from noticing them too much.


Eventually, after what felt like a very long time fighting a battle I was slowly losing, I had a completely foiled and painted airframe aside from the canopy. I had planned on foiling this, but lost my nerve. I made a quick purchase of an Eduard mask set (for the G) and sprayed the framing with Mr Color GX2 Gloss Black followed by KColors (now Kustom Service) Aluminium. This paint is wonderfully shiny and matched the foil pretty well, but exceptionally fragile. I also airbrushed the pylons and tail pipe to avoid foiling these tricky areas.

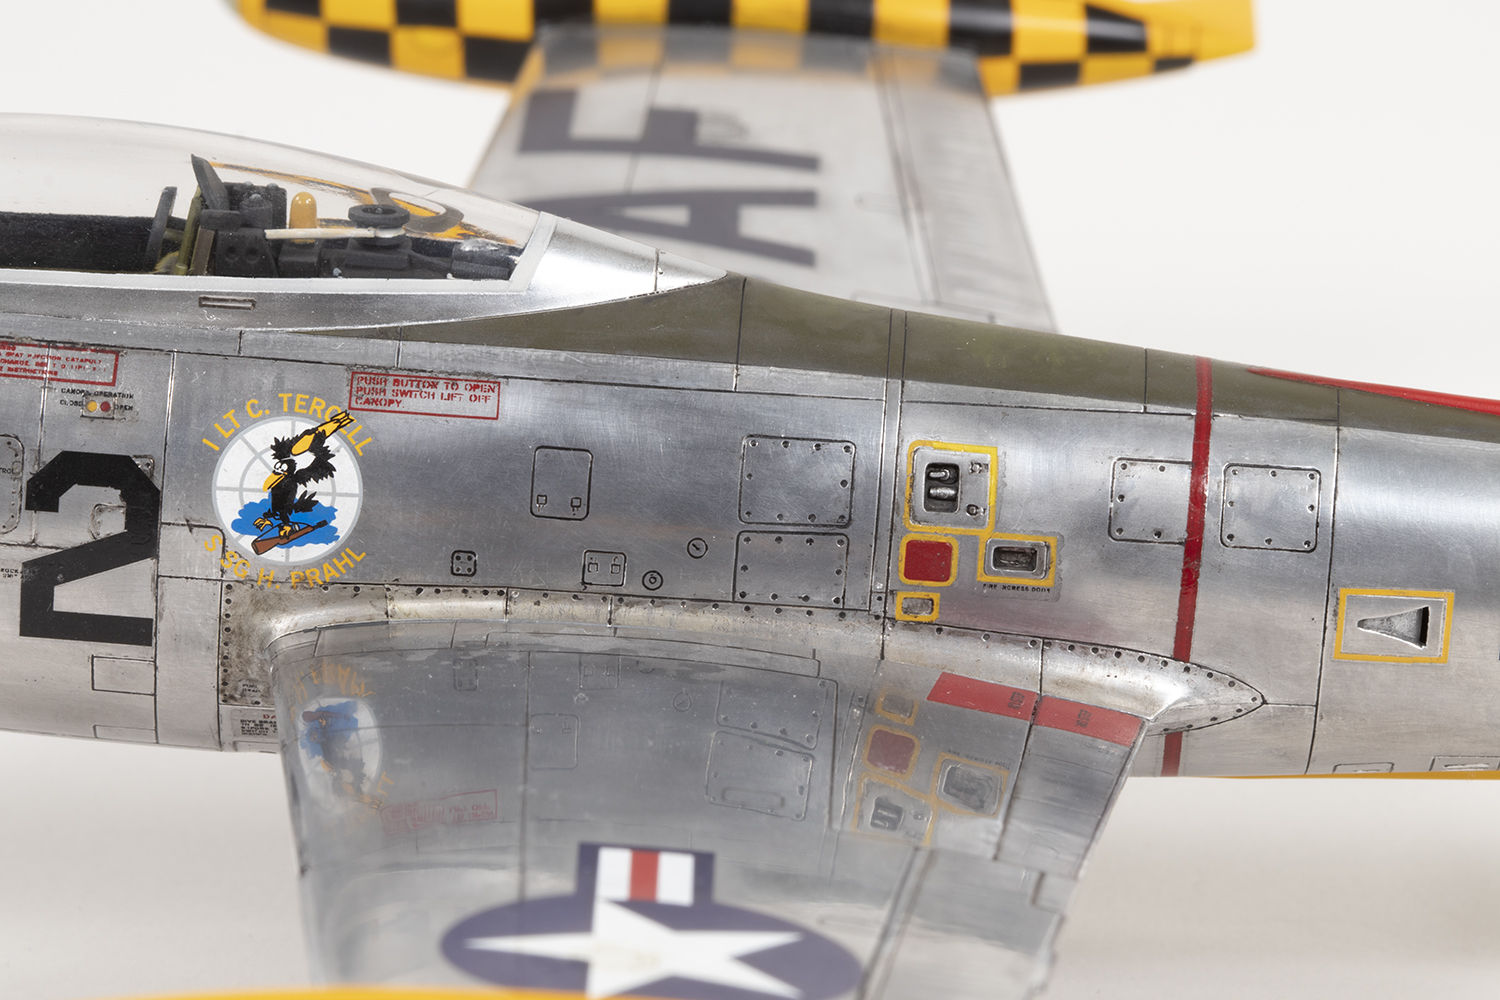
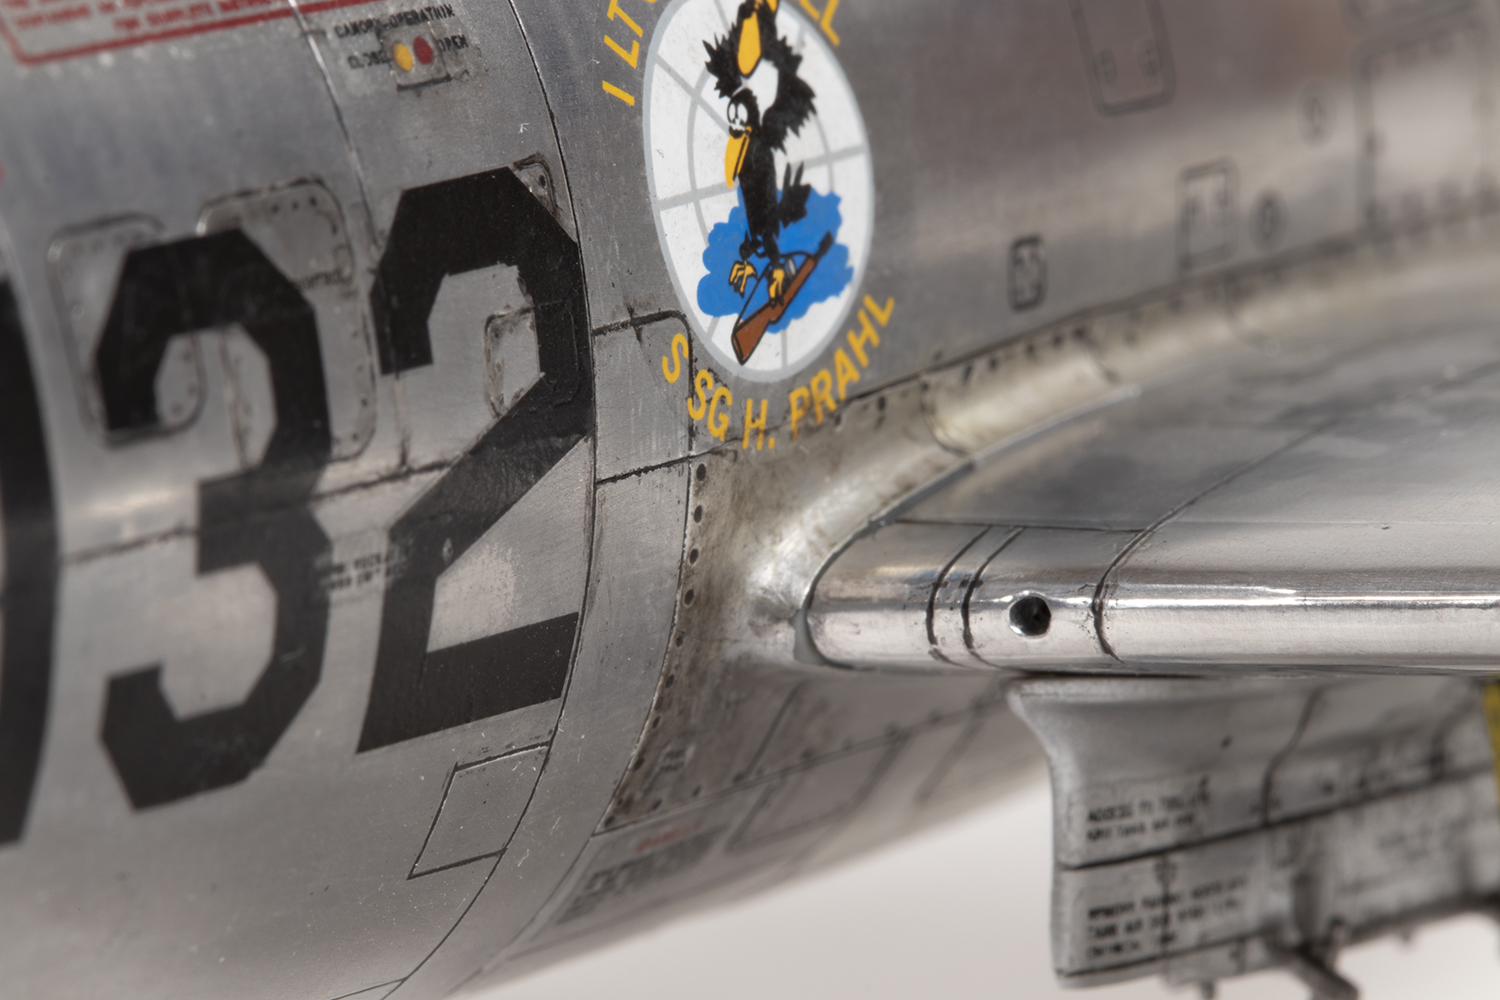
I was expecting the decals to be a bit of a challenge, as there’s nowhere to hide carrier film over foil, but what was to follow was the most disheartening aspect of the whole project. The main markings came from Aeromaster and on the whole these were fine. It was disappointing that despite being designed for this specific kit, the USAF decals did not line up with the undercarriage openings or doors at all, but what was more annoying was that the black buzz number letters refused to stick properly to the foil. The rest stuck down fine, so I don’t know what the issue was.
The stars and bars were not provided by Aeromaster and I used some from Furball. The starboard decal settled fine; the port side refused to budge. Identical application methods with widely differing results. This is the voodoo of decalling.
Stencils are a feature of the F-84 and I was looking forward to applying them. It was a disaster. The Revell decals are quite thick and the edges of the carrier film are rough. All the Revell stencils wrinkled. I tried every application method to avoid this: water only, Microscale, UMP, Daco, Gunze…each method produced identical results – horribly wrinkled and rough stencils. I pulled most of them off but had to leave those around the hatches as they are so distinctive. This is by far the aspect of the finished model I dislike the most.
I also knew that weathering was going to be a challenge. A panel line wash of some kind would be essential to avoid the panel lines glinting in reflected light. I tried an ink wash as it dried quick and hard, but getting it consistent was very difficult. I wanted some dirt build up around the wing roots and fuselage hatches, but in the photos the latter looks too messy. One thing I realised when working with such a shiny metallic surface is that it’s really hard to see what’s going on. The reflections drove my brain crazy and the appearance can change quite dramatically depending on the light and the angle it hits the surface.
Somewhat disconsolate I flattened the chequers and decals with a mix of Gunze GX100 Gloss and GX113 Flat varnishes, and a coat of the latter on its own for the anti-glare panels. I also airbrushed some of this in a streaking pattern over the control surfaces to break them up a bit.


After two months of pretty intensive modelling the time came to join the wings to the fuselage. A combination of gel superglue and Tamiya Extra Thin gave me just enough time to ensure the joint was okay and the dihedral was set correctly. It was definitely a good decision to leave the wings off until the end.
Adding the undercarriage was the last step, and kept the project stressful until the end. The starboard leg joined beautifully, but the port leg insisted on adopting a slight twist. I was holding the model with cotton gloves to avoid fingerprints, and the cotton is pretty slippery and I didn’t want to end up dropping it, so the leg never really got straightened out. The nose gear has a very odd joint (the upper half is moulded with the undercarriage bay) and the instructions are hopeless in telling you where to add the separate drag link. Mine is not fitted correctly, but it’s a minor issue. With the legs on I added the wheels, which are moulded with nice flats, using a slow setting solvent cement to ensure everything sat square. My work bench must have a slight lean because it sits on all three wheels fine, but in my display case it rocks back and the nosewheel is about 1mm off the ground!
All in all this was a more challenging project than I anticipated. The kit itself is beautifully simple and aside from the odd engineering decisions, is highly recommended. Likewise, I would definitely recommend giving chequers a go. But I fear that foiling is a mug’s game. It’s messy, high-risk, very finickity, unpredictable and unforgiving. The finish of the foil looks great from a distance, but up close doesn’t really cut it, especially with low quality decals on top. I’m glad I’ve given it a go, but I don’t think I’ll try it again. The problem is, that’s what I said last time…


Year bought: 2003 (Squadron USA)
Year built: 2022 (New Addington, Croydon)
Back to home.
