with PT-Decal decals
GC 3/5 Normandie-Niémen, Armée de l’Air, France 1946

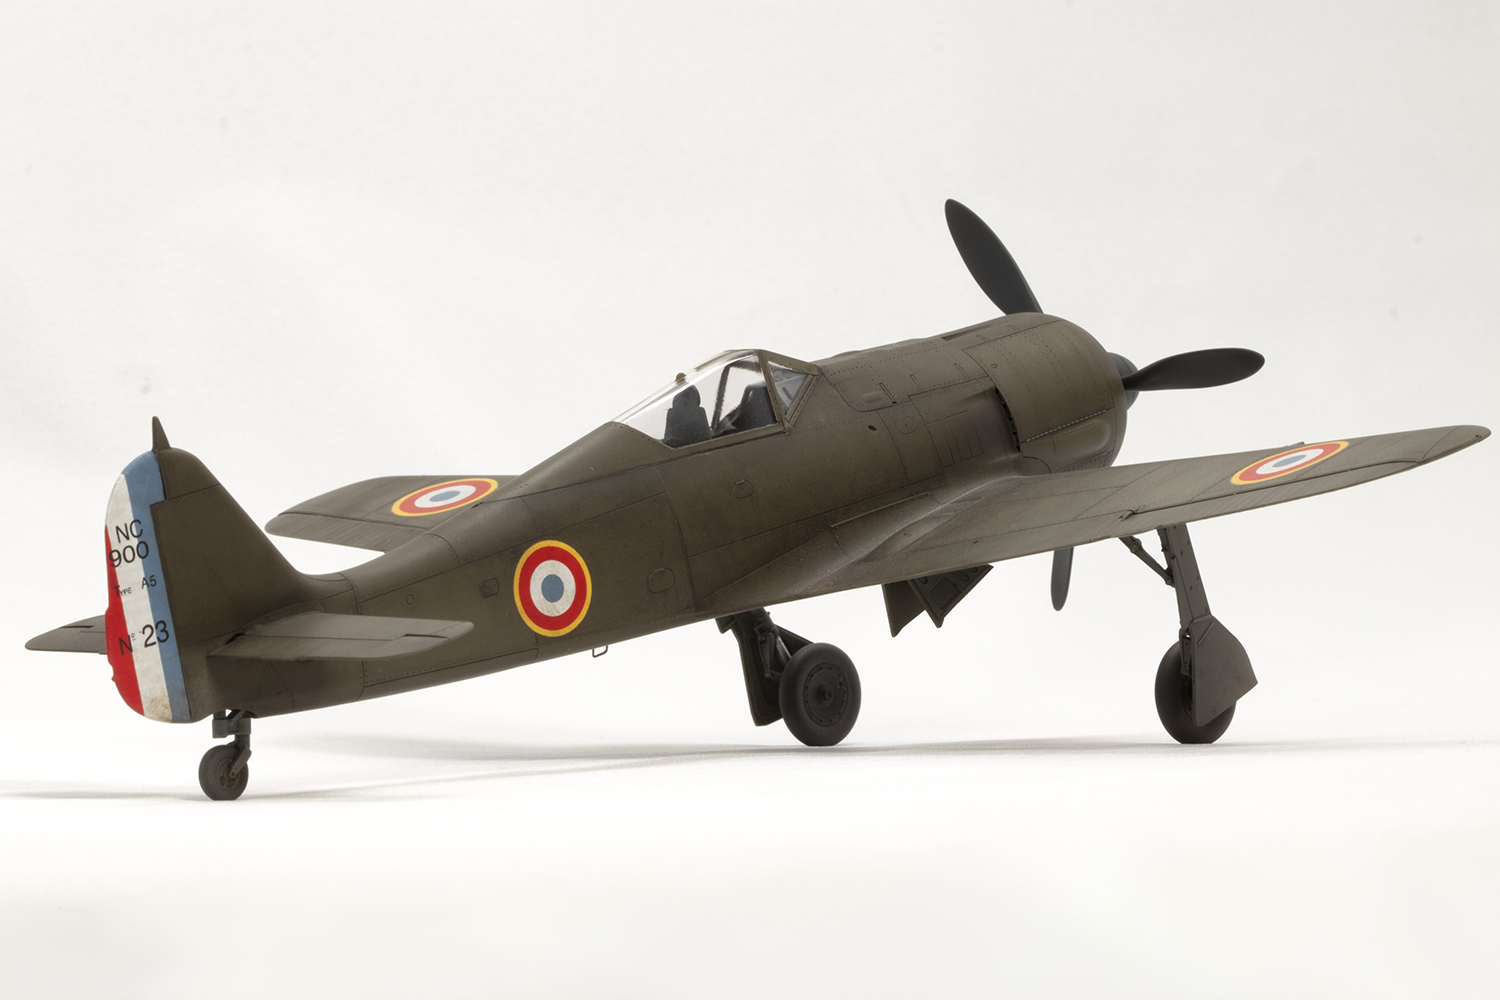
Until 2010 I had no idea that an Fw190 could fit into my collection of exclusively post-war aircraft, but that summer when we were back visiting family in the UK, I took a very happy trip to The Aviation Hobby Shop, then Hannants Colindale, and then back to THAS and acquired a decal sheet and Eduard kit to build an SNCAC NC.900. Which, to all intents and purposes, was an Fw190A-5 or A-8, depending on the airframe.
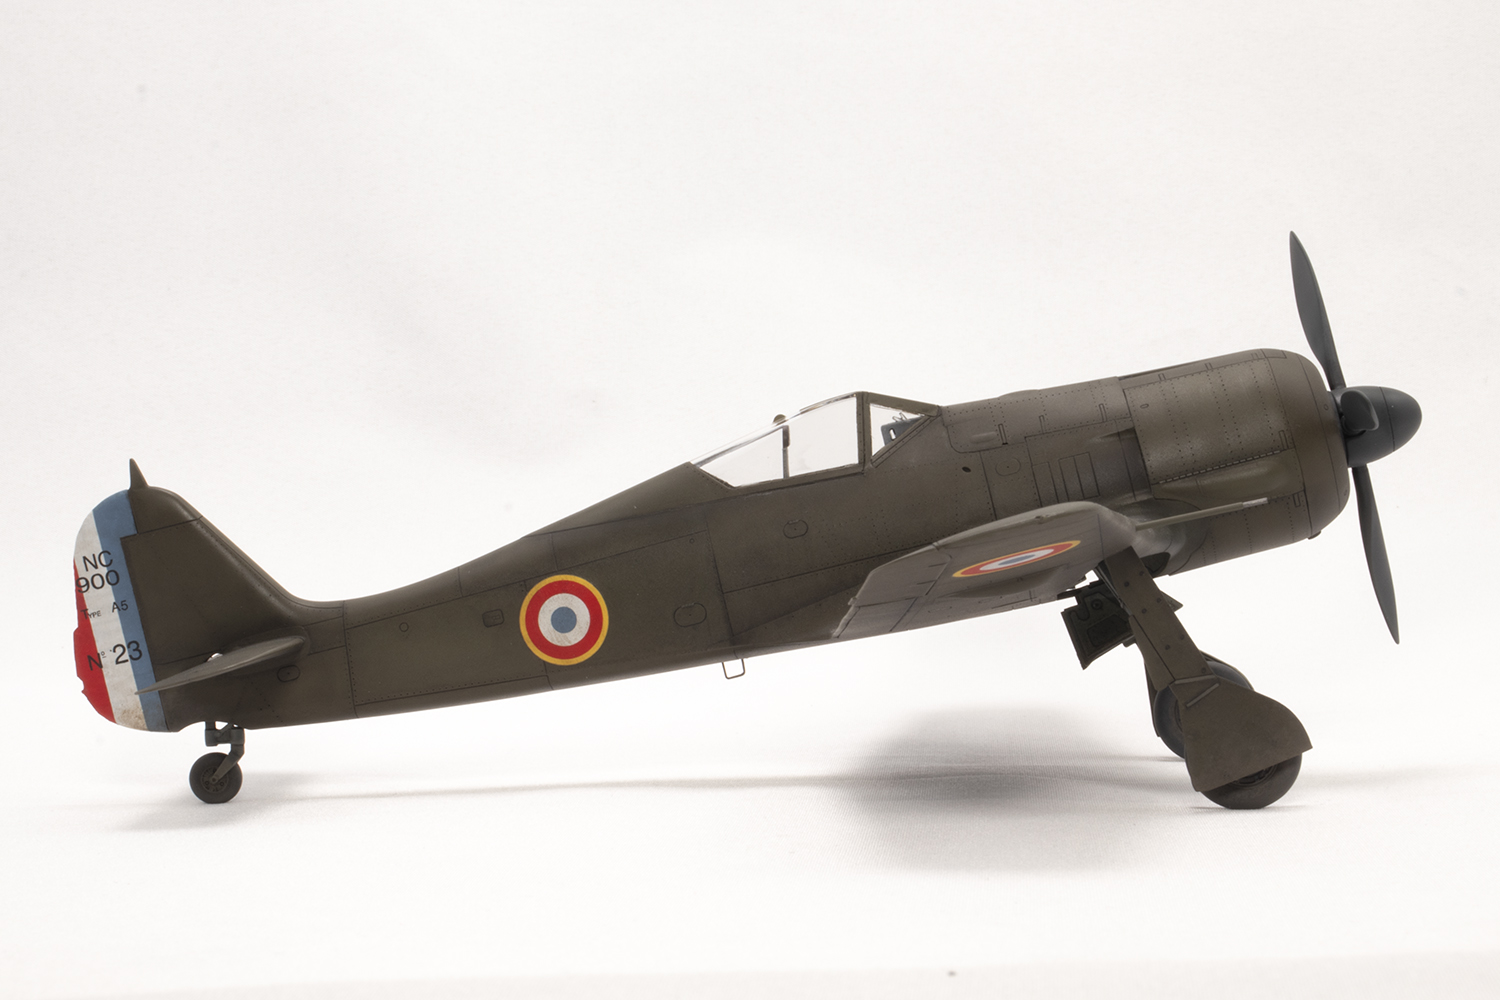
The NC.900 was the product of a plan to rapidly re-equip the Armée de l’Air after the end of WWII by making use of abandoned Fw190 parts that had been manufactured in a secret factory in Cravant, smack bang in the middle of France. Sources disagree on the details, but my understanding is that from over 100 fuselages and wings that were discovered, around 70 were completed and put into service with GC 3/5 Normandie-Niémen squadron from around July 1945. By all accounts disliked by their pilots, they were not a successful addition to the French Air Force, and most flew only a handful of hours, largely because of reliability problems. By November 1946 the project had been abandoned and the French Focke-Wulf was replaced by the P-63 Kingcobra and/or Spitfire.
PT Decals produced a nice sheet in 1/48 for various French aircraft, including NC.900 no.23, which was an Fw190A-5. Eduard tooled a 1/48 Fw190A-8 kit in 2006 and released this Weekend boxing in 2008, which at £12.99 was cheap as chips. However, it is a kit with a reputation, which is why Eduard revisited the subject in 2017 with a completely new tool. I’m stubborn and stuck with what I had: the old kit.
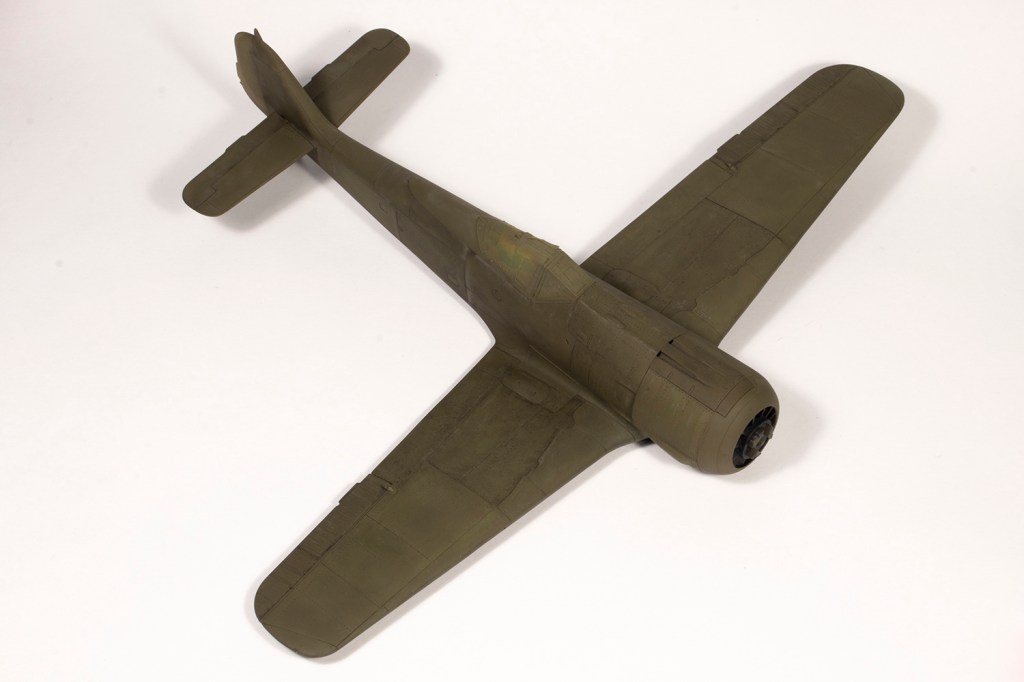
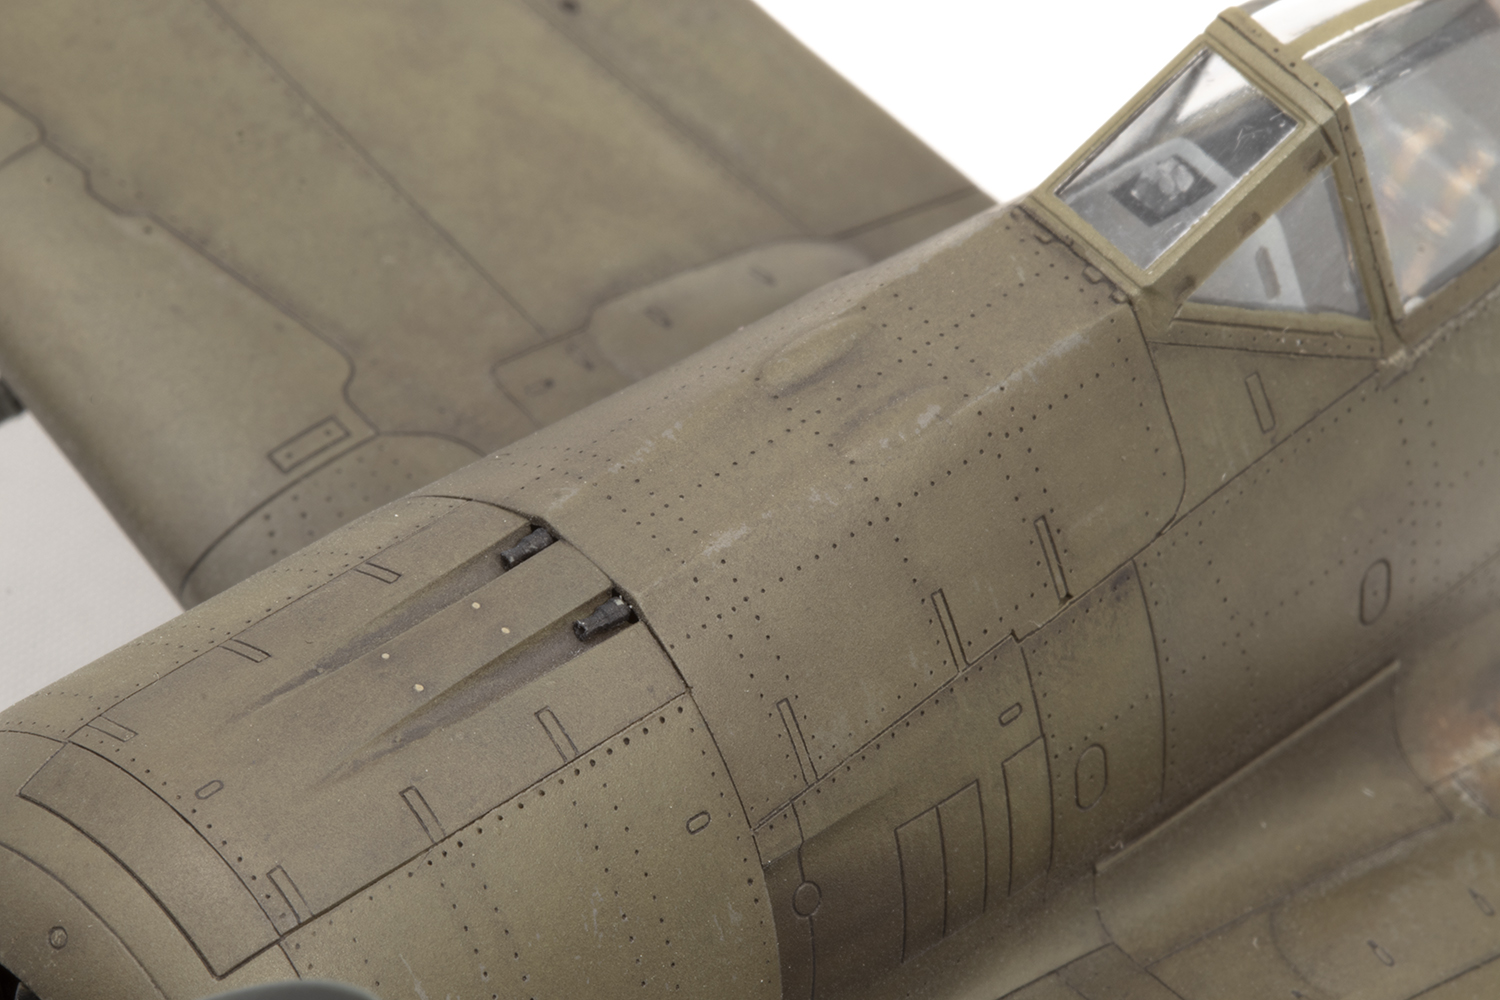
There are quite a few photos of NC.900s kicking around on the internet. Sadly they are universally of poor quality and in black and white, so there’s an awful lot of guesswork going into this model. What I was fairly sure of was that the wing guns should be omitted and that no aerial wire was fitted.
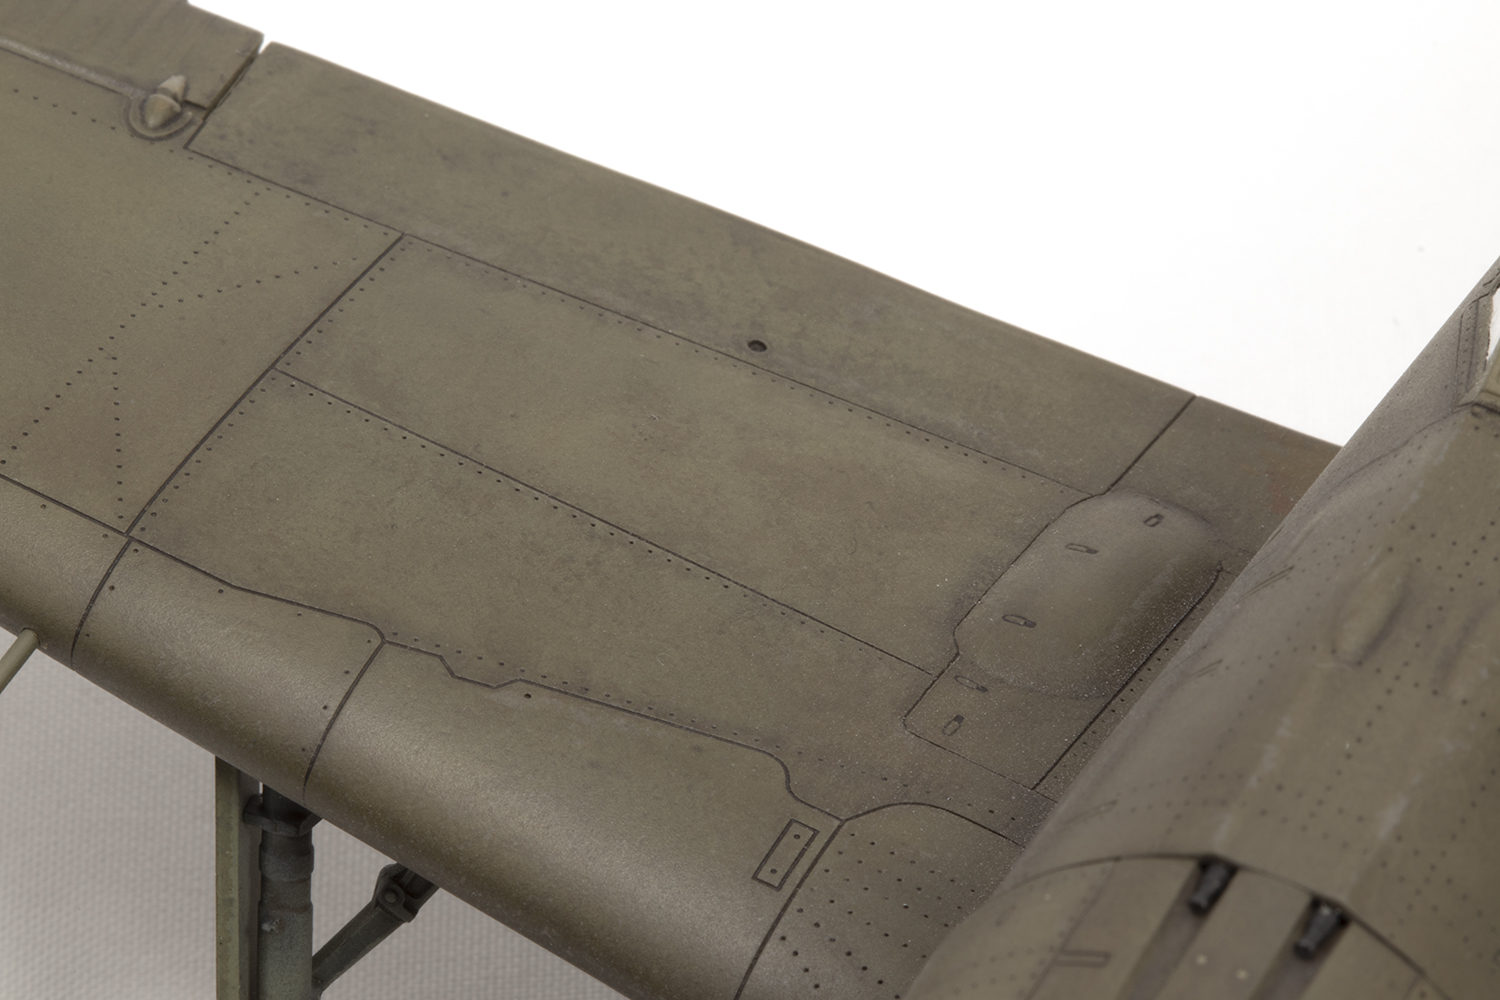
In 2006, Eduard were making pretty nice kits. Not as nice as they are today, but this is reasonable for a middle-aged moulding. The surface detail is petite and well moulded and the model is packed with options. These are, in fact, its downfall: Eduard love an open gun bay and really, really, really want you to make a model with them open. But I really, really, really didn’t want to do that, and that’s where the hard work comes in.
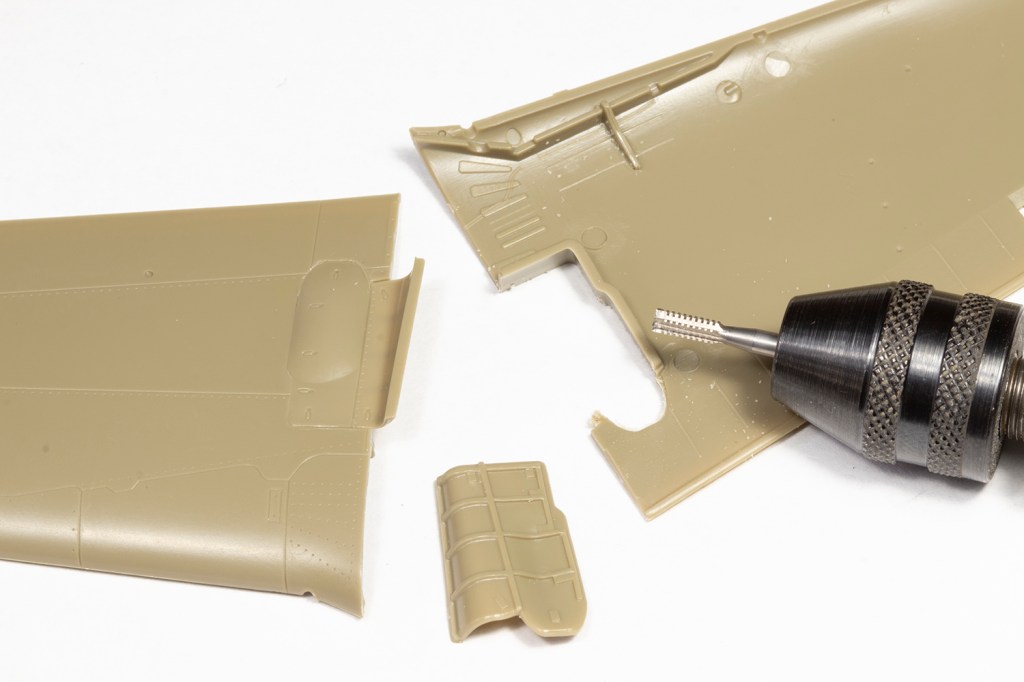
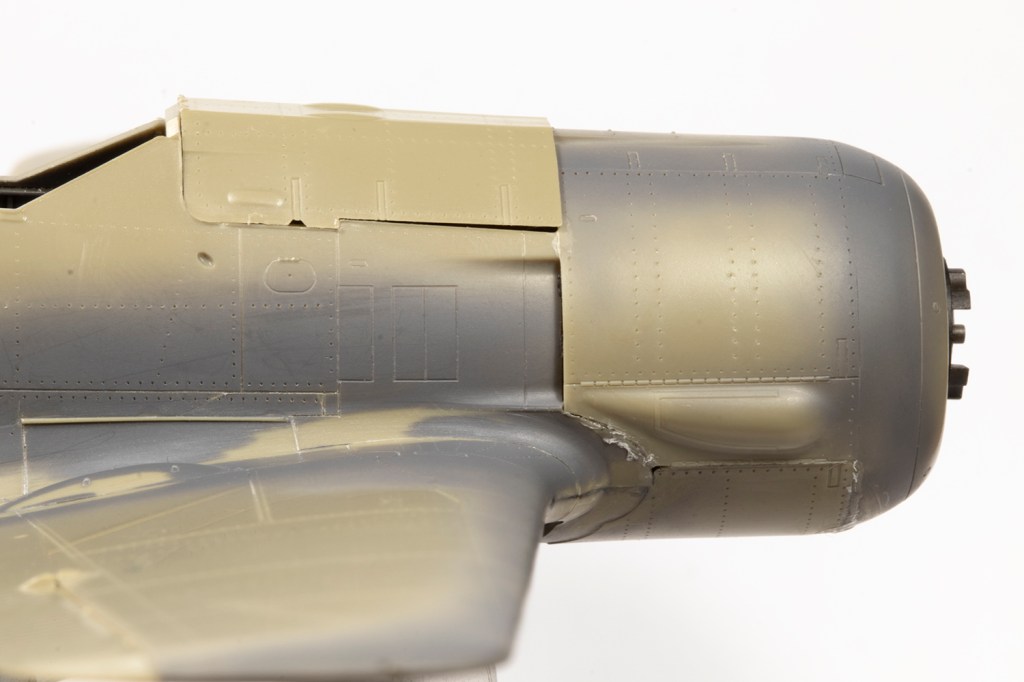
To fit the wing gun bay doors closed requires part of the wing to be ground away, and the shape is not trivial. This is never good news. I used a milling bit in a motortool to remove the necessary section, trimmed it with a knife and then fitted the doors. The fit is okay, but restoring the panel line around the edge is not fun as it’s a complex shape.


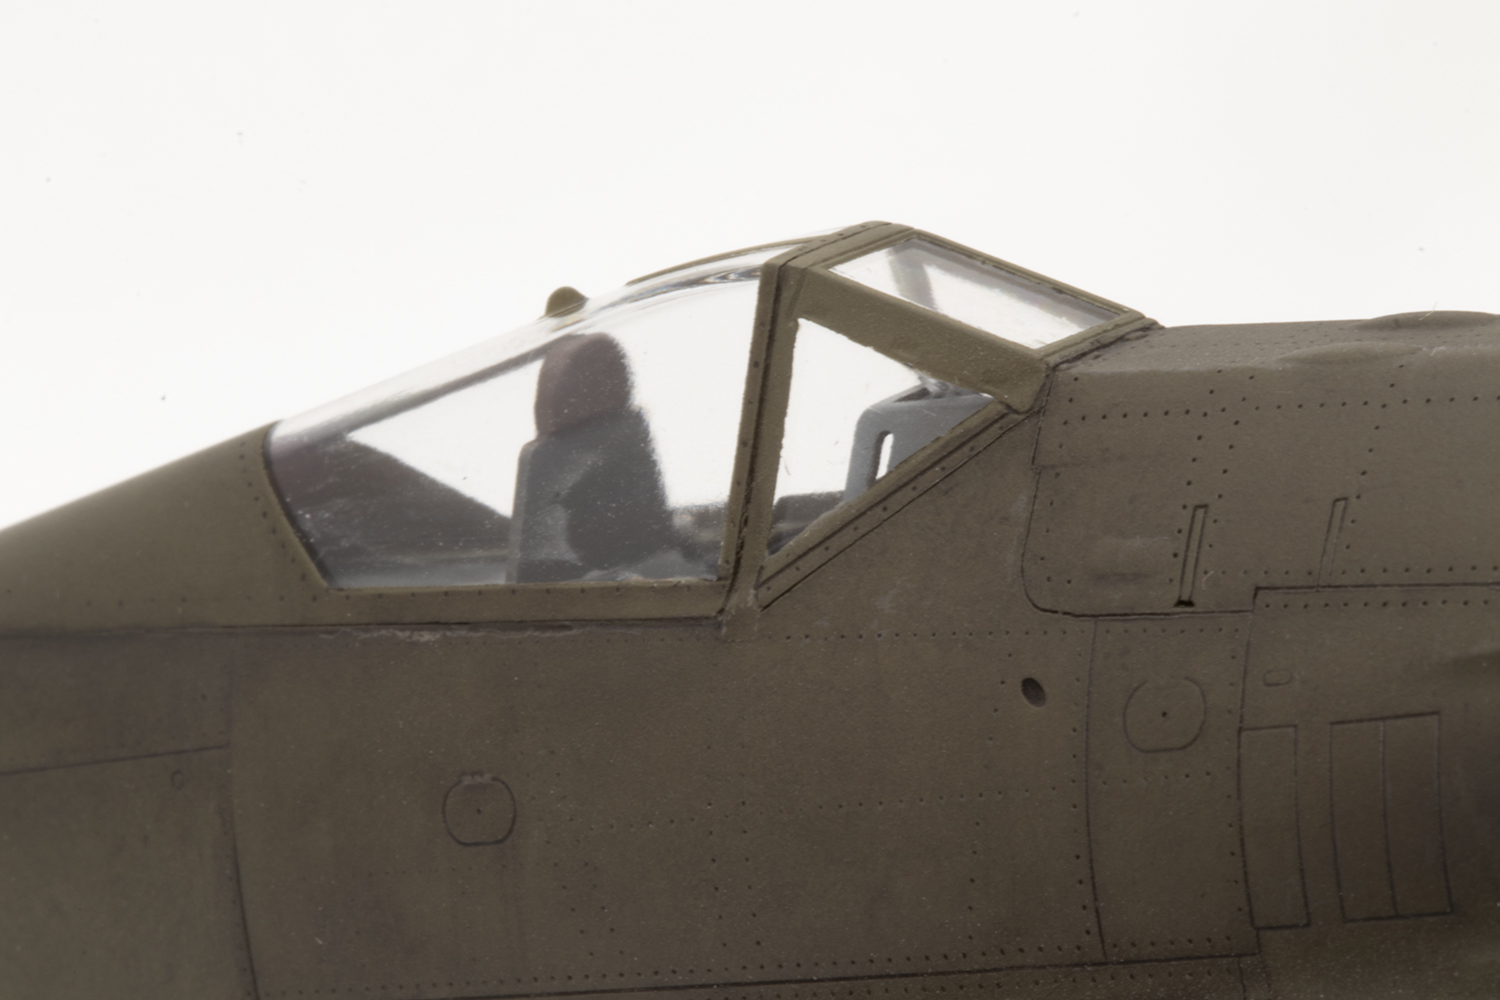
While the wing was drying I dealt with the cockpit. This is rather nice from the box, and being the Weekend boxing had no PE included. My only addition was some belts made from Tamiya tape and etched buckles from Reheat and ANYZ. I often feel my cockpits are quite lacklustre, which is not a problem as I invariably close the canopy, but this time I wanted more contrast. Lots more contrast. So over a base layer of Mr Color 116 RML66 I mixed in progressively more and more light grey, airbrushing smaller and smaller patches away from the nooks and crannies after each addition, until it was very light indeed. Completely unrealistic, but then who says we’re chasing realism anyway? I think it looks cool. A black oil wash defined the depths a bit more and I punched the instrument dials from the kit decal sheet and fitted them to the instrument panel. The dials are quite basic and I’m looking forward to acquiring some generic ones from Airscale at Telford this year.


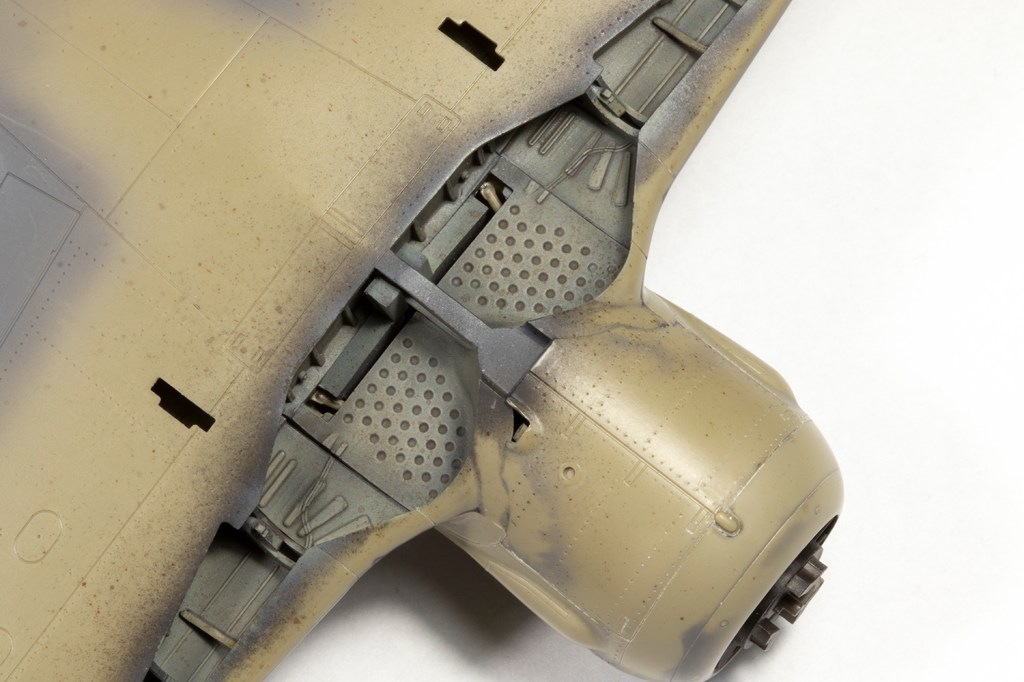
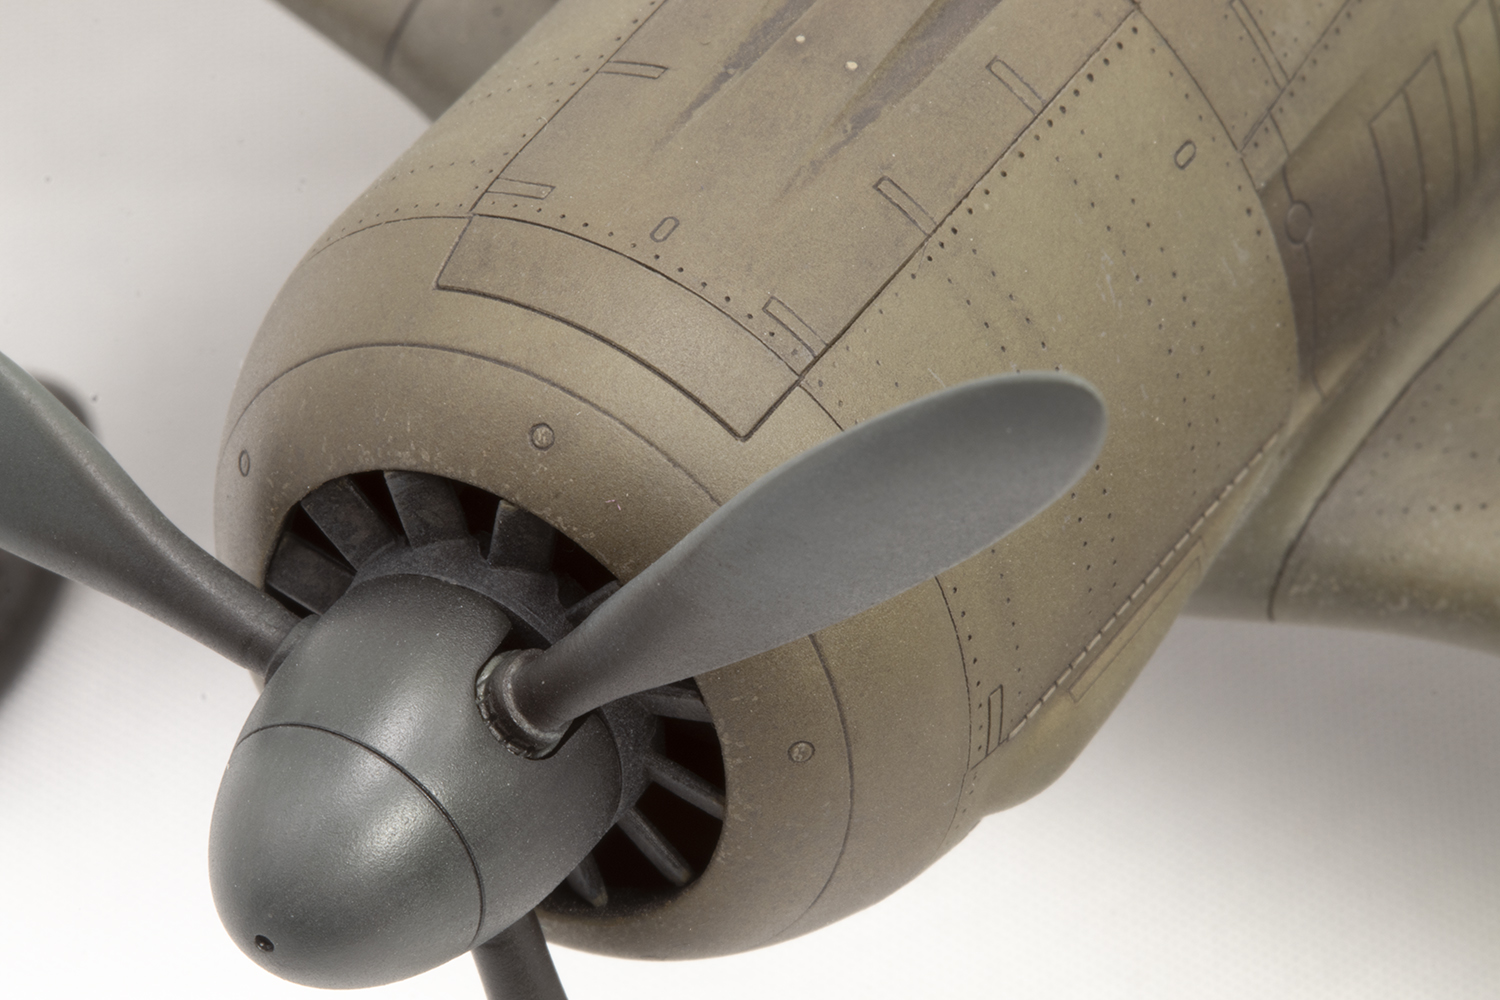
In addition to the guns, Eduard would also really like you to expose the engine. To be fair, it is quite a nice engine and about as good as one could expect for a kit of this vintage. I have no interest in open panels and would have preferred to miss the engine out altogether, but you are required to make it to give the exhausts and spinner something to hang off.
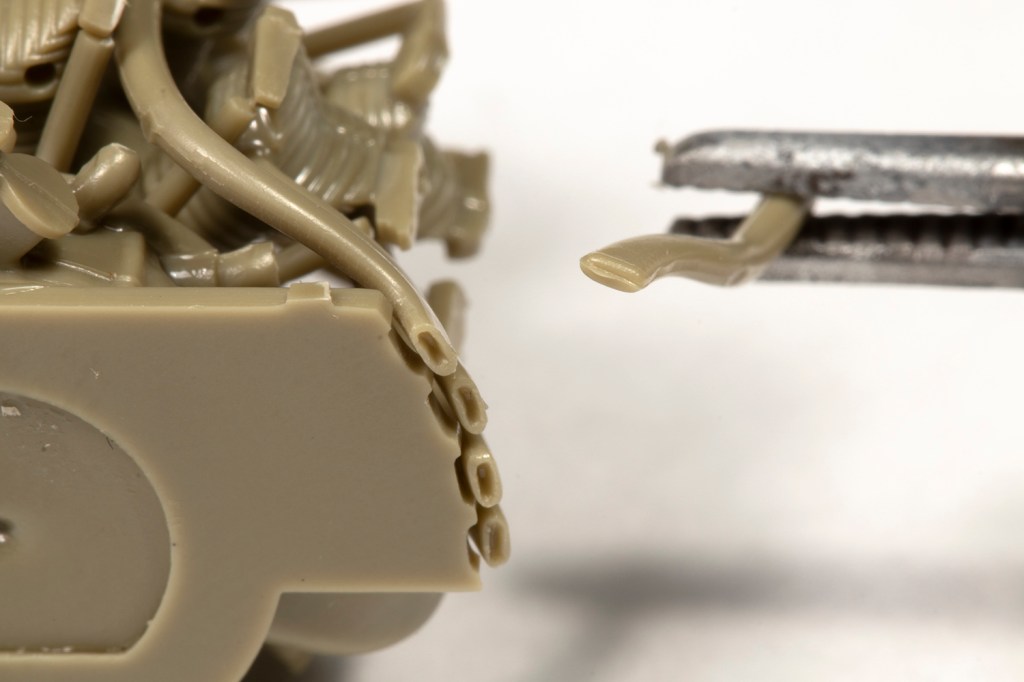
Said exhausts are a bit of a pain as they are individually moulded and need the ends hollowing out. Eduard supply a plastic template to get the exhaust geometry correct (be careful not to glue it to the back of the engine) but mine still didn’t line up quite right. The spinner baseplate attaches at the front and now is when you have to set the position of the prop as you won’t be able to later on. The vast majority of the engine will be invisible on the completed model and so painting it is pointless.

Reviews of this kit at the time tended to be bimodal, either reporting excellent fit or terrible fit. My experience has been that with two notable exceptions, the fit was excellent, but you need to do a lot of planning and dry-fitting to achieve this. This started with fitting the fuselage halves together as correct placement of the cockpit and the nose gun bay are critical. Eduard mould small locating devices for these, which are easy to miss, and my strategy was to fit the internal components one by one to one fuselage half and then tape the other half in place to ensure the placement was correct. Once I was happy I could close the fuselage halves with superglue.

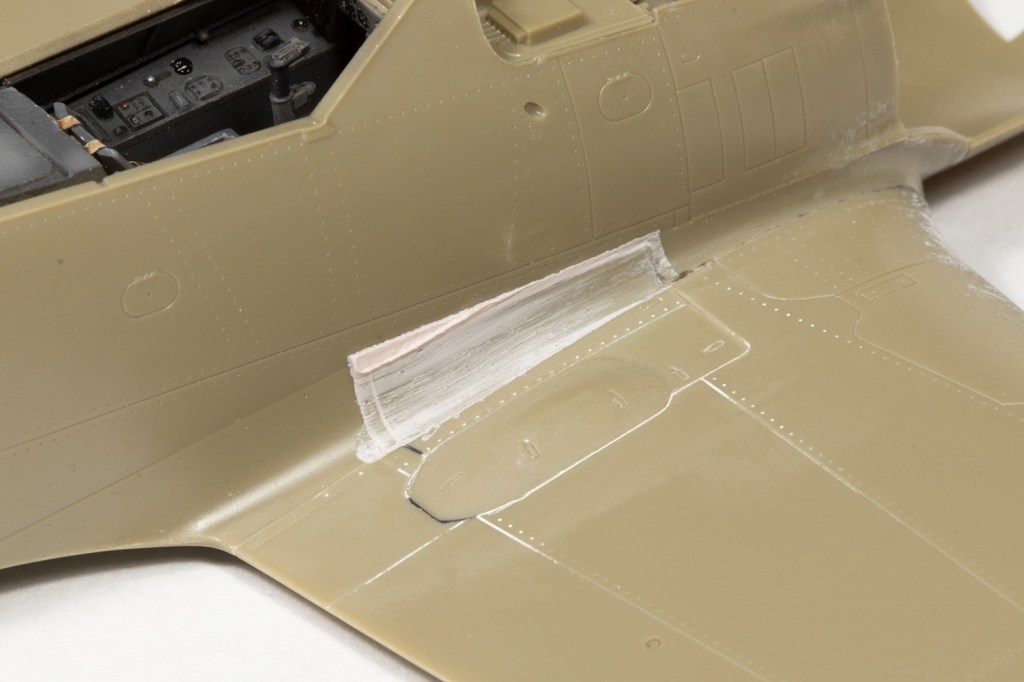
After the halves were together, I decided to attach the upper wings to the fuselage. The main undercarriage bay is complex and comprises a lot of parts, and this had been constructed in the same fashion as the fuselage, i.e. by gluing the parts in and then dry fitting the wings together with tape to guarantee it was all correct. The upper wings were attached first to the fuselage to maximise the fit at the wing root, which revealed the first notable fit problem: the top of the gun bay doors did not fit at all. Before fixing this problem, the lower wing was glued in place, although it took a fair amount of clamping to get the best fit.
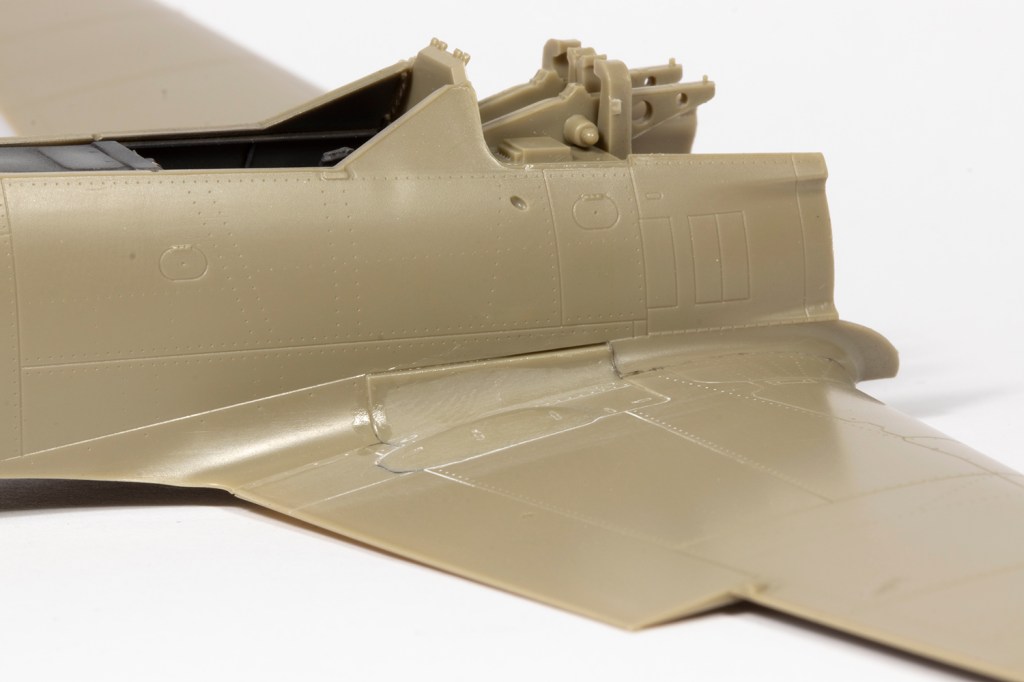

The significant gap at the top of the gun bay doors was closed with two-part polyester putty, but this didn’t adhere very well and good old CA was used in the end. Once sanded out, a strip of stretched sprue was glued along the top to hint at a hinge line.


The core of the model was now together, and the extremities needed to be added. First were the ailerons, which initially didn’t fit at all. Why these were moulded separate is a mystery to me, and eventually they did fit when the hinge slots had been widened with a file. They remained slightly too thick compared to the rest of the wing, but I hid this underneath. Just don’t look underneath.


I had been warned that the engine bearers are around 2mm too long and cause the nose cowling to not fit properly. It was therefore with some trepidation I approached this stage, but I decided to trust Eduard and see how it fitted from the box. The answer is: rather well. It is critically dependent on the position of the nose gun bay bulkhead, but in my case it went together as advertised.
The nose gun door, on the other hand, didn’t fit at all. The first issue is the gun mounts are way too high and big and prevent the door from closing with the fuselage. Not a problem for me as I was going to slide the guns in at the end anyway: chop the mounts away and fit the cover. Except the cover is about 1mm longer than the space it’s meant to fit into. This is a problem, and it took a while to gently sand down the front of the door until it dropped in place.

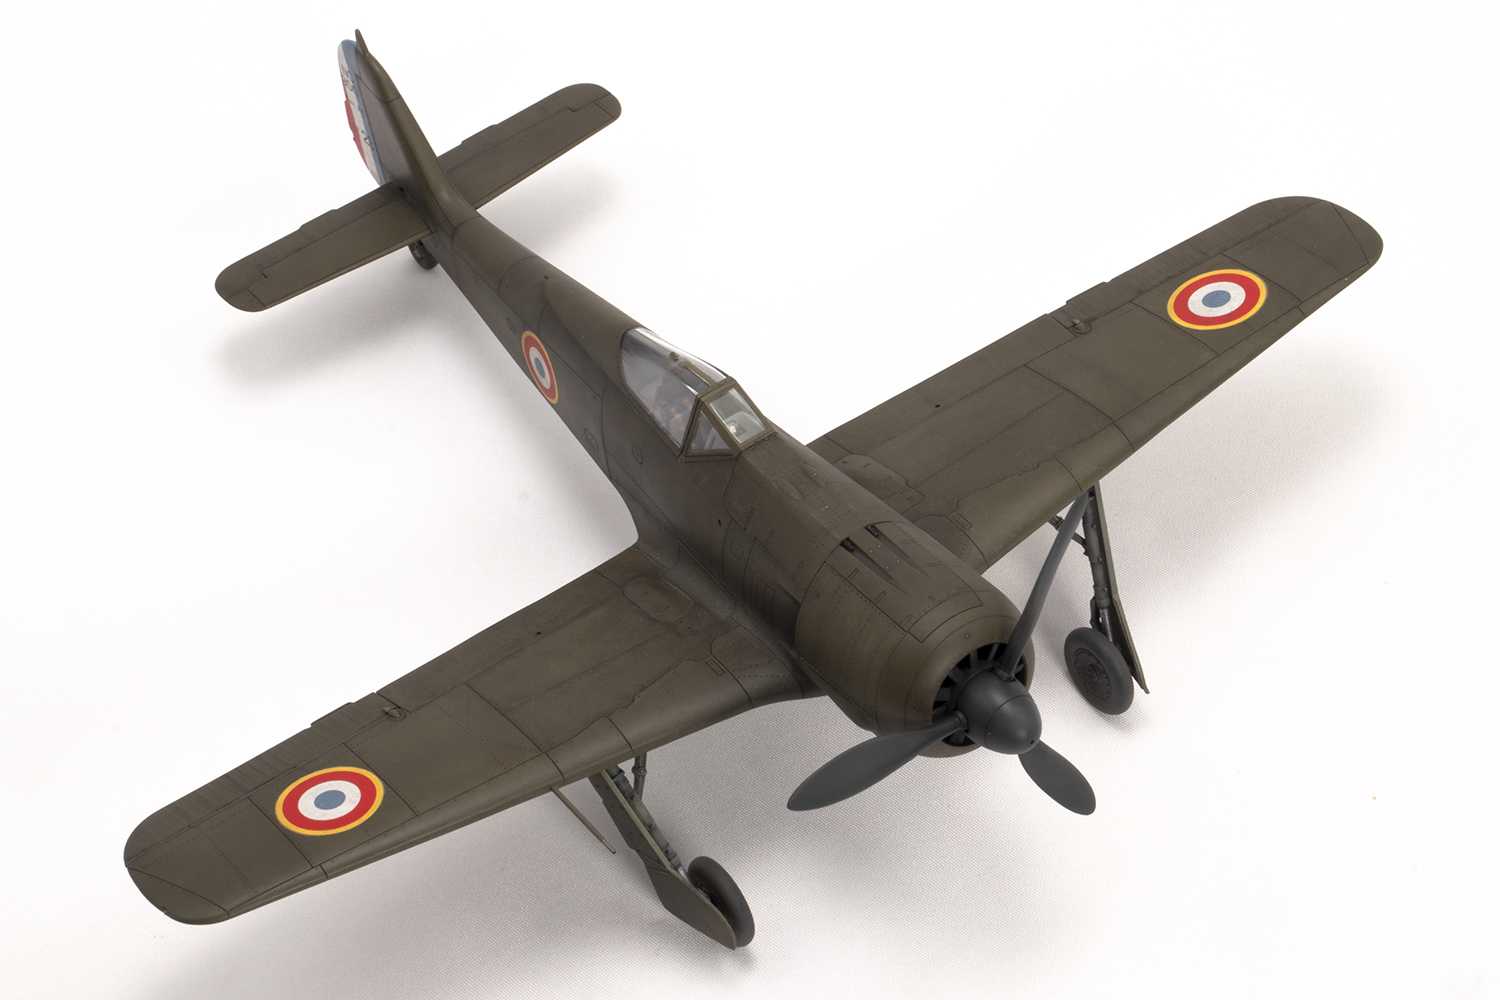
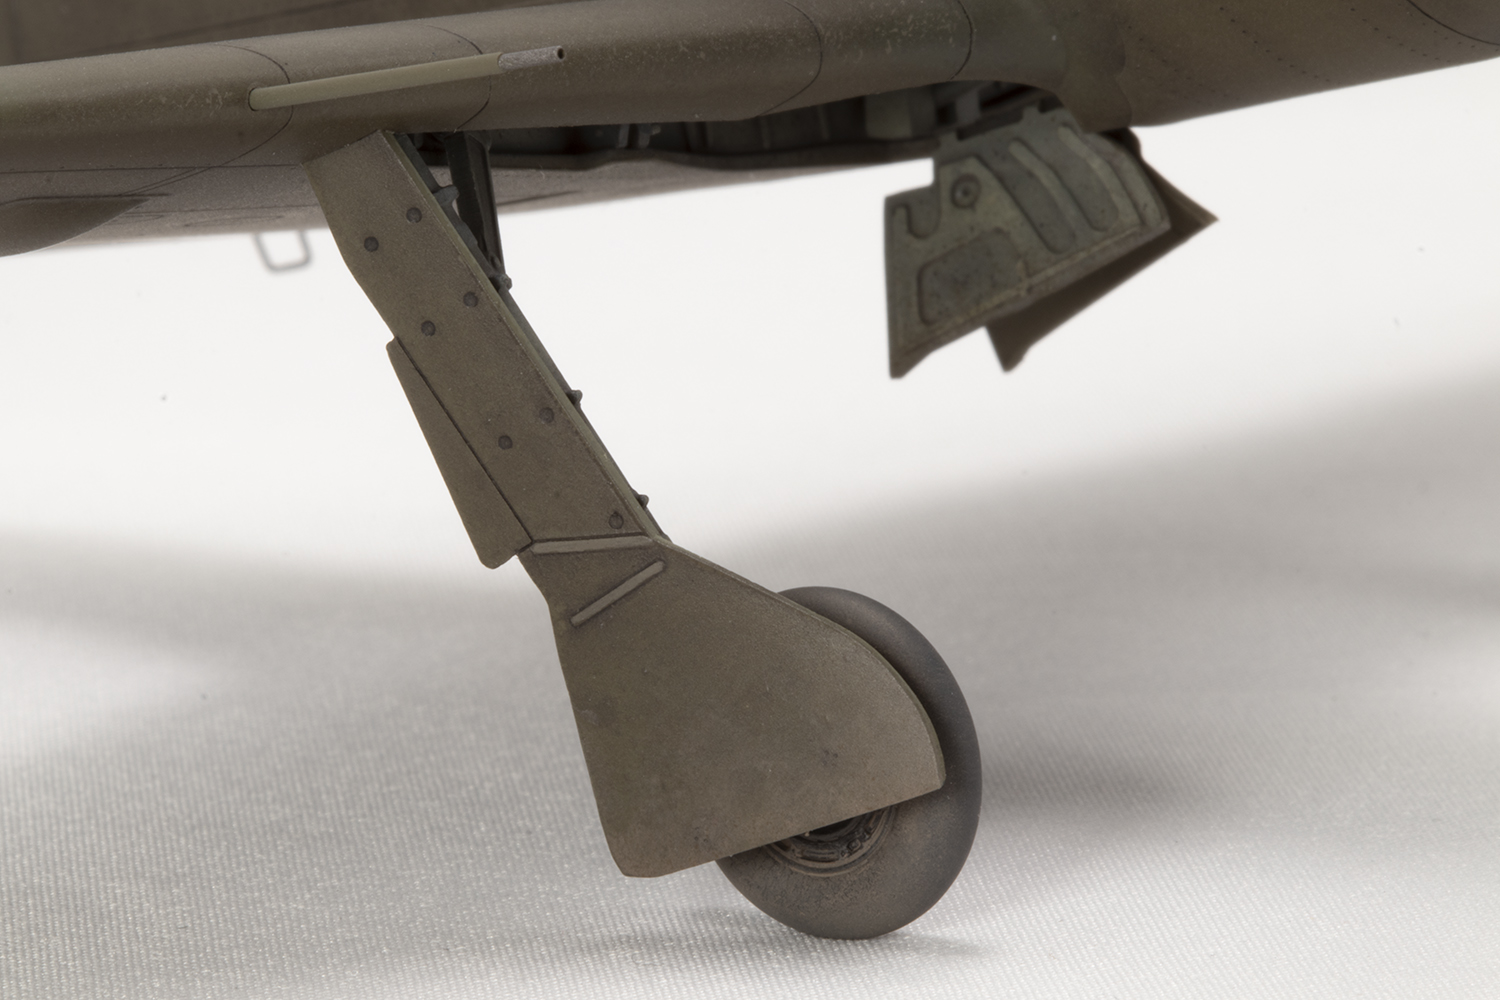
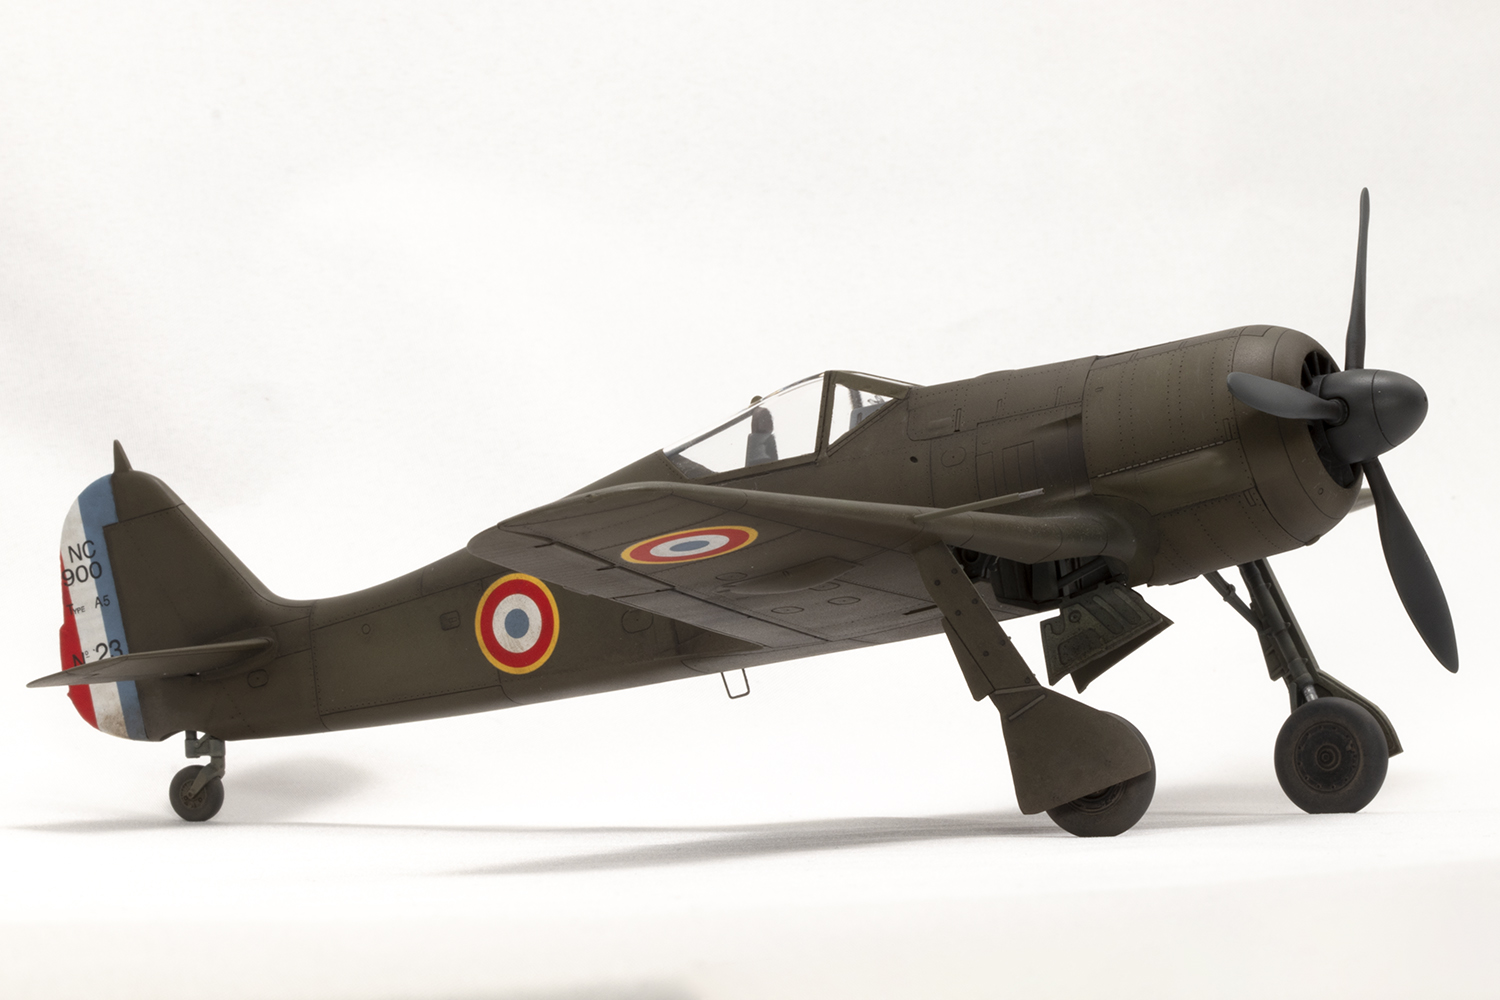
I now had a complete airframe (the tailplanes were no great drama) sans canopy. Whilst I’d been beavering away on all that, I also had been dealing with the undercarriage so I don’t get left with all the boring jobs at the end. I know nothing about German WWII aircraft, and don’t really want to know any more, so I put my faith in Eduard’s instructions and painted everything RLM02. Except I wasn’t paying attention and didn’t notice the wheels should be black. Someone on Facebook kindly corrected me, and even though I don’t know what colour the wheels really were (because the photos are all black and white), I did repaint them, which was a shame as I quite liked the effect I had got with the RLM02.


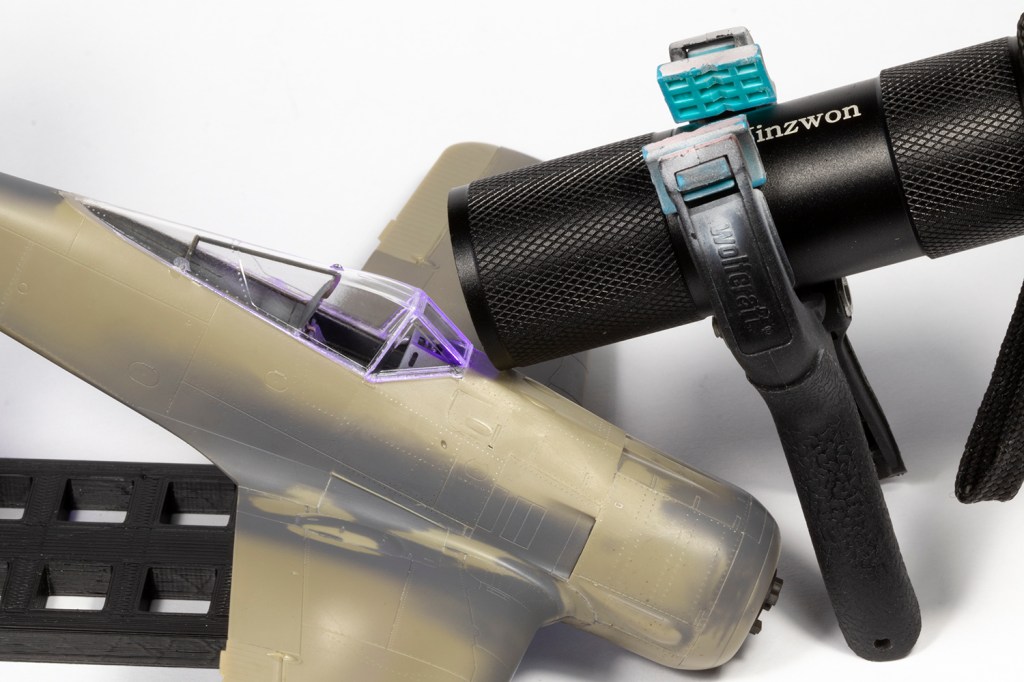
The clear parts were the last to go on, and fitted pretty well. A small gap between the canopy and the windscreen was filled with some UV clear resin and set with UV light (obviously). I prefer this to something like PVA because it sets hard and can be sanded and scribed. The lower lip of the windscreen was slightly proud of the fuselage sides and took multiple layers of Mr Surfacer 500 to smooth out before being carefully sanded with high grit Tamiya paper.
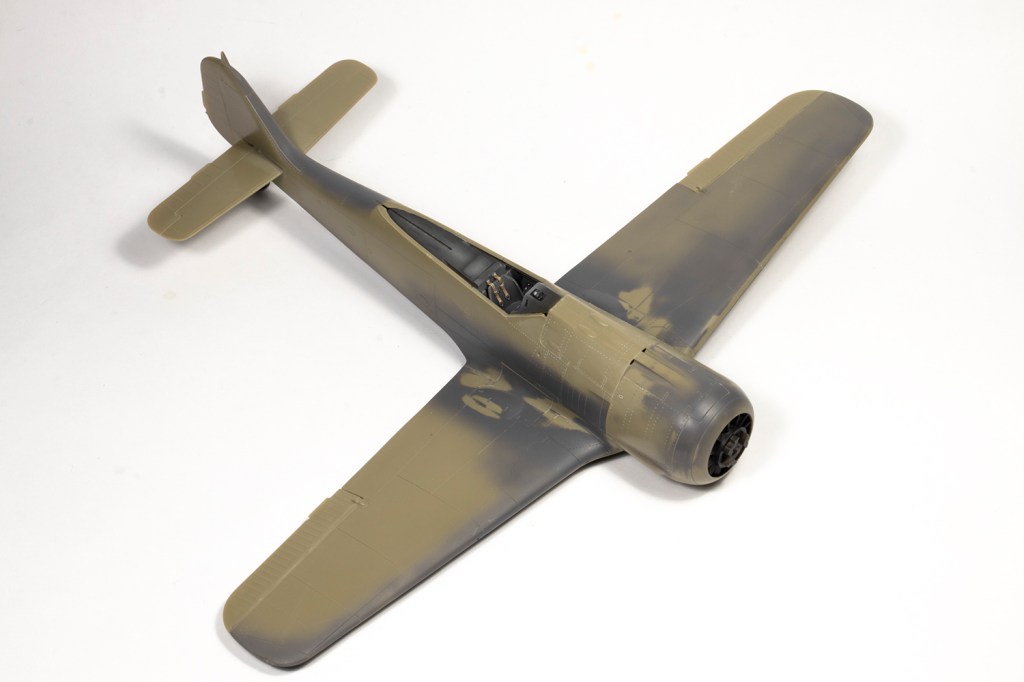
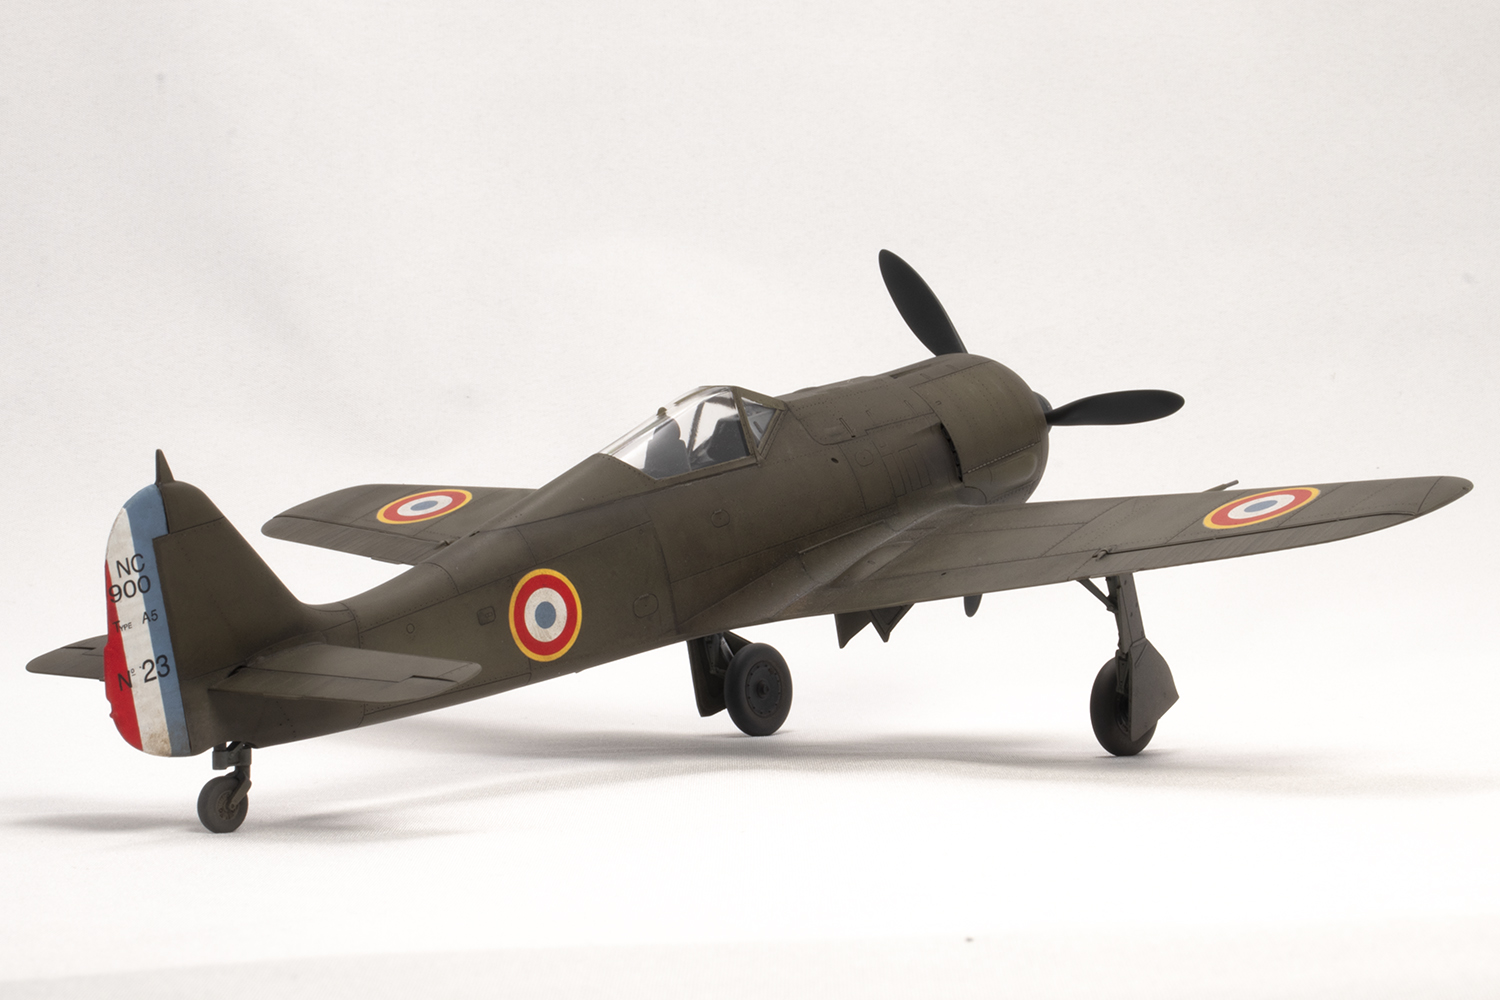
I was somewhat tortured about how to paint this aircraft. References are almost universal in stating NC.900s were ‘repainted’, but never offer an opinion on ‘repainted over what?’ Given all the photos I had access to were black and white I was more than happy to go along with ‘green’ as the final colour, oft-quoted as either RLM70, RLM71, a local mix intended to resemble US Olive Drab, or a French colour referred to as ‘goose poo’ (and which in my imagination would resemble an Austin Allegro my mum once owned…), but I had no idea what this green colour was ‘repainted’ over. It matters because despite very low flight hours, whatever paint the French used was of poor quality and degraded very quickly, presumably just in the elements where the aircraft were parked. I therefore wanted to know what colour was showing through the green.
I never did get an answer, and so with no particular insight, painted the whole airframe in RLM75. My plan was to emulate the work of Jay Blakemore, who has a lovely looking technique of airbrushing enamels and using white spirit to ‘wash’ them away to reveal the undercoat. By using a lacquer grey and a Humbrol enamel Olive Drab, I intended to do the same.


In short, it didn’t work. I haven’t sprayed enamels since 2006 and thus my stock is old. I found a tin of 155 Olive Drab and mixed it with some 116 (whatever that is – a darker green) and thinned with regular white spirit. I could not get it through the airbrush but eventually ended up with a thick layer of paint that dried to a texture I could only describe as ‘velvety’. This was an inauspicious start. I then set to with enamel washes, the plan being to erode the green from the recessed panel lines to give a natural wear pattern. Instead I got ugly lumps of green revealing the RLM75 which all of a sudden looked very out of place. In an attempt to rescue this, I sanded everything down with 2500 Infini film, which left the Olive Drab in place, and mottled over the top varying amounts of Mr Color 23 and 304 Olive Drab and 17 RLM71. This helped.


The next step was to liberally brush over the green a filter of ABT502 Sepia and Burnt Umber oil paints, varying the intensity and mix panel by panel. Slowly I ended up with something I really rather liked. A layer of VMS Satin was intended to provide a barrier for further oil washes in the panel lines, which it did, but had the unintended effect of darkening everything. Despite some repeated applications of Gunze GX113 Flat, the aircraft remained stubbornly satin and darker than I would have liked.


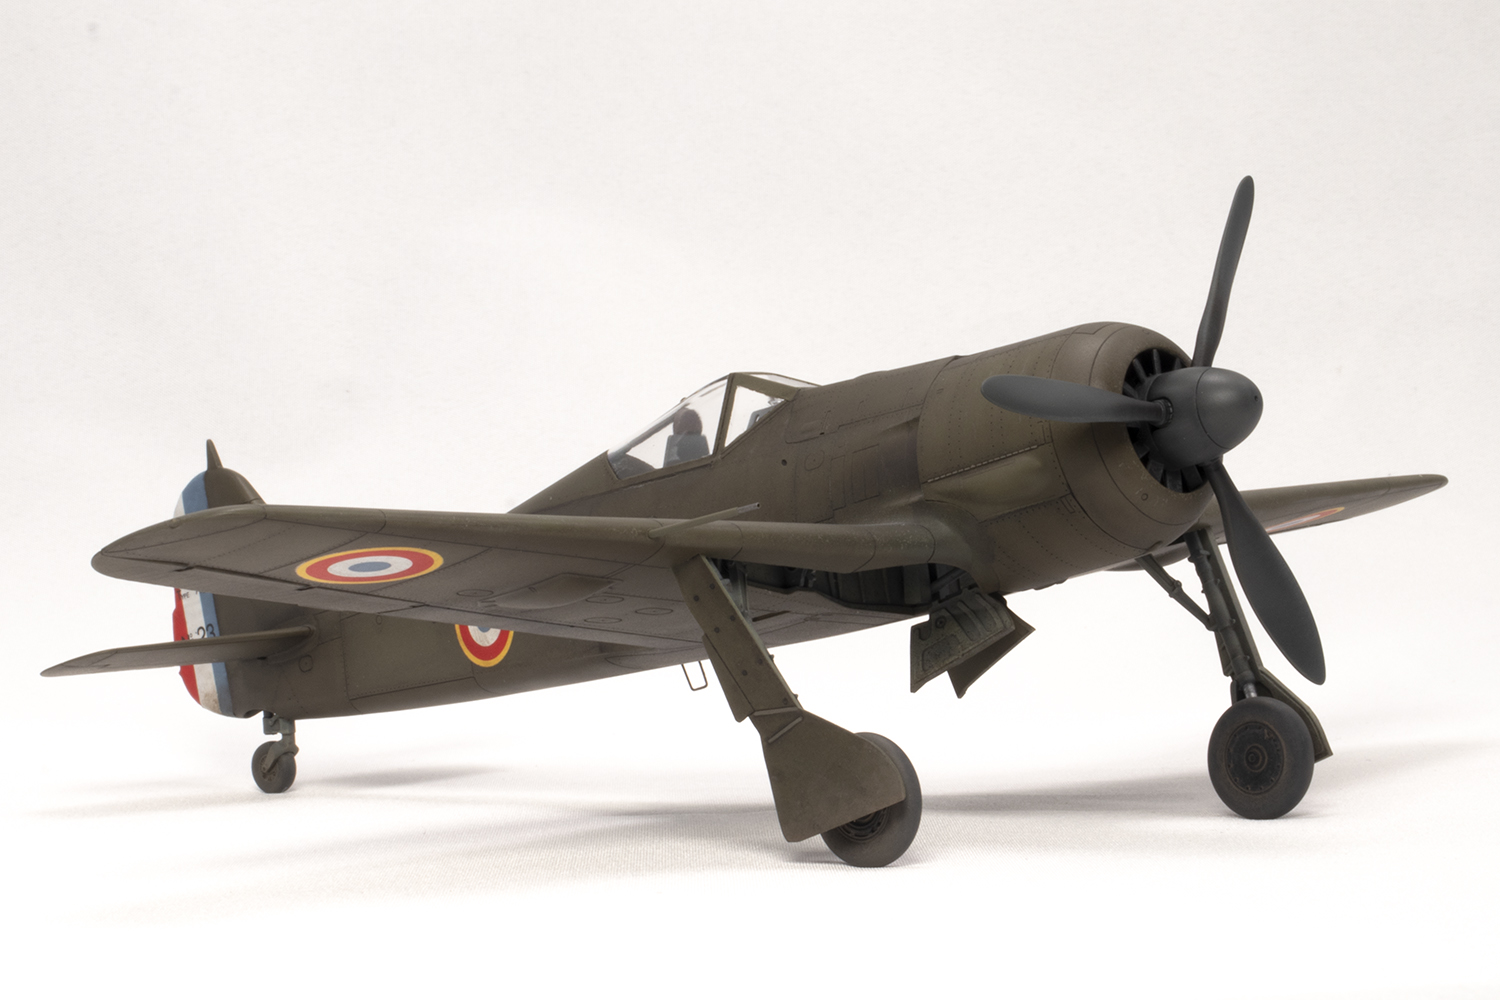
I wanted as grungy a finish as possible, and in truth the end result is still significantly less grungy than shown in photos of the real thing. More layers were added by means of some AK Weathering Pencils around the wing roots, exhaust stains in MRP Exhaust and Smoke, and a lot of splattering of Liquitex inks thinned with Tamiya X-20A and flicked on with a brush. This latter effect is subtle to the point of invisibility; I should have thinned the inks less. Some painted chips in Vallejo Khaki completed the look around the cowling.
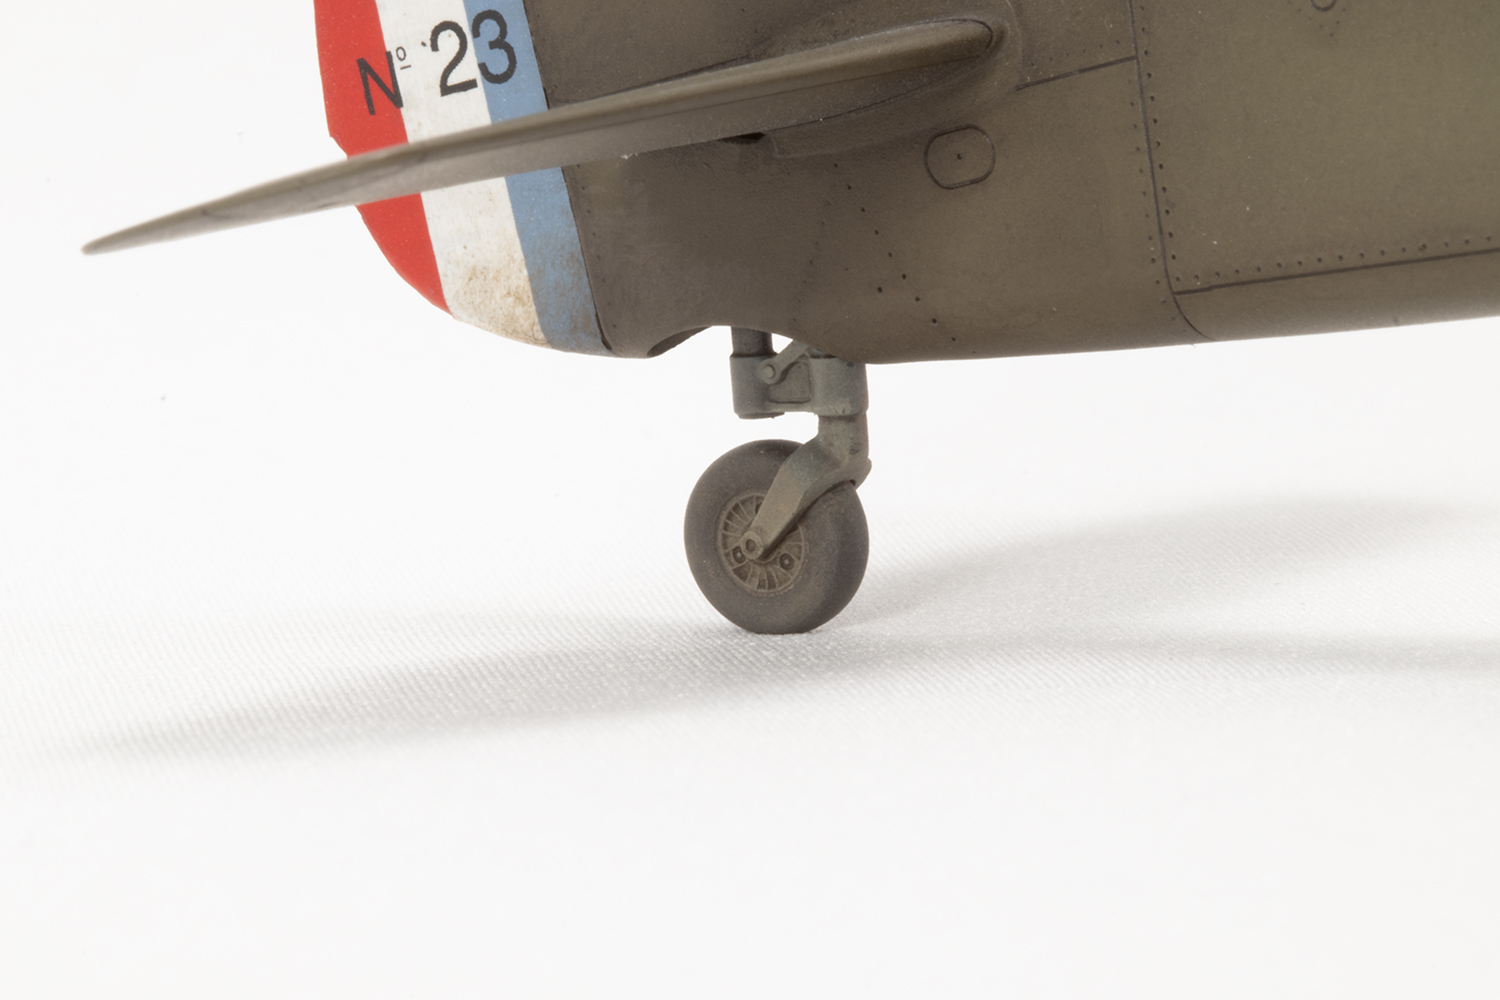
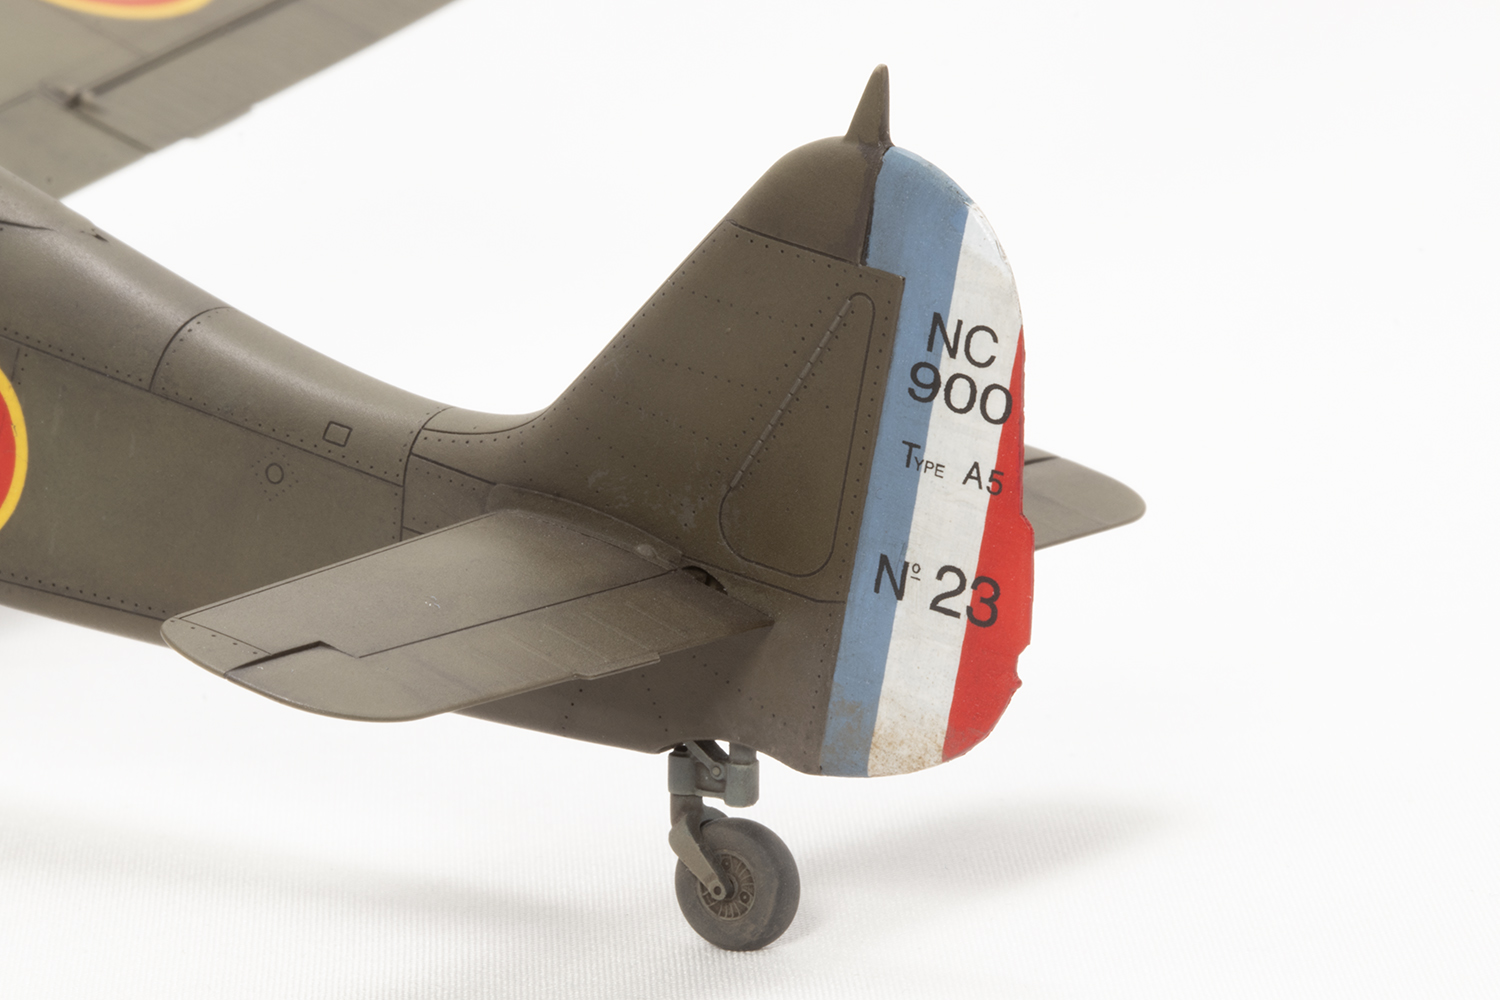
This project started to come apart with the decals, which is odd since there are only eight of them. They’re not that old but despite being thin were brittle, stiff, refused to react much to decal solvents, and in some places fragmented. The real flaw, however, is that the designer elected to incorporate the black text on the tail into the tricolore stripes and fit the whole thing to the Tamiya kit. The good news is that the Tamiya kit clearly has a much larger rudder, which is better than the other way round, but it would have been infinitely preferable to paint the stripes and have a separate decal for the text. As it is, the red stripe is too narrow because of the excess that needs removing, and dealing with stiff, brittle decals around the trailing edge of the rudder is nasty.
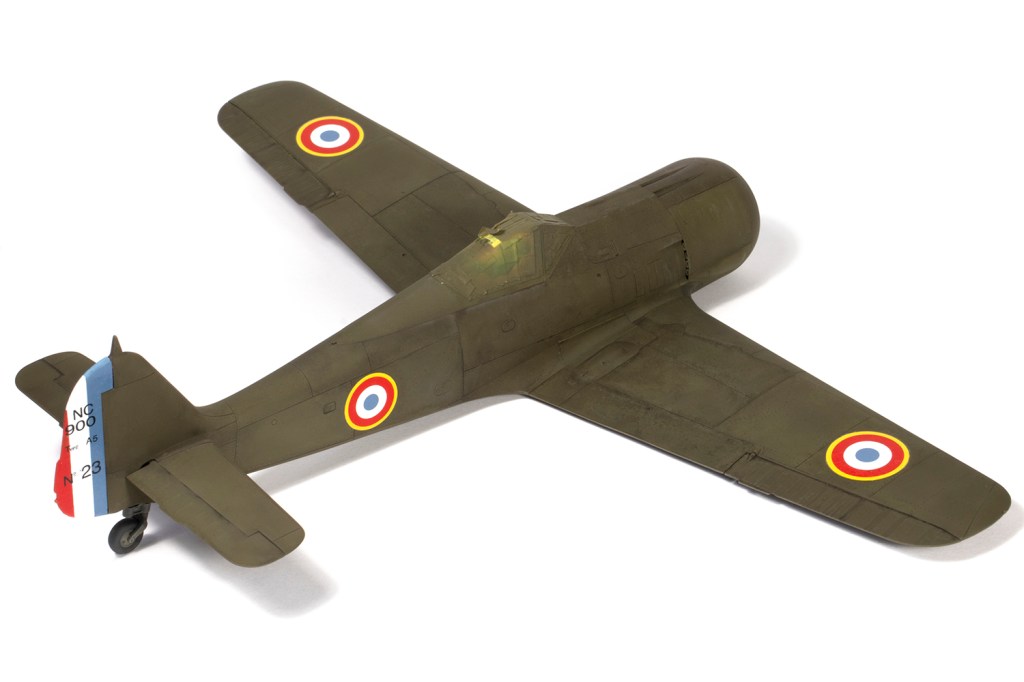
Examination of photographs after I applied the decals (isn’t it always the way? When will I ever learn?) revealed the wing roundels are too small and I positioned them too far inboard.

Despite the puny-looking locating devices for the main gear, they locked beautifully into place, but the wheels had to be adjusted so they only looked merely wonky rather than properly drunk. I replaced the poorly-moulded kit pitot tube and pilot’s step with items fabricated from Albion Alloys tubing.
Completion of the project was the removal of the masking, which was somewhat deflating as I clearly hadn’t sealed the canopy as well as I thought I had, and some paint mist made it through to mar the inner starboard side. My other regret was that I didn’t weather the prop and spinner much, and they look a little out of place.
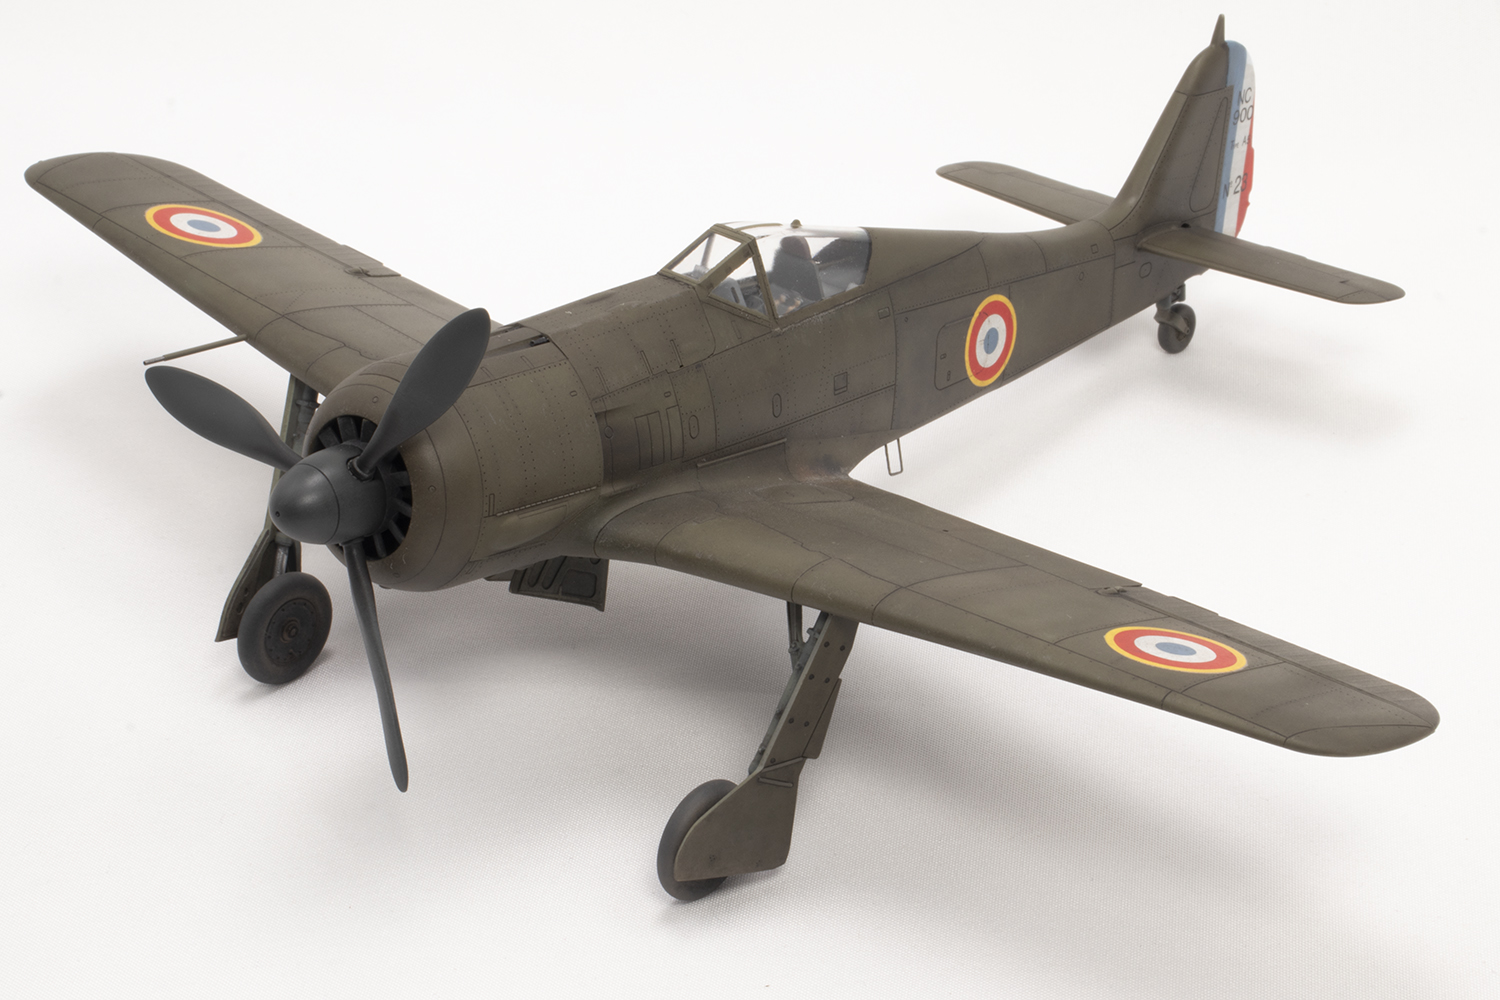
But no matter! This was a nice little six week project of a kit that I thought would give me far more trouble than it did. I am particularly proud of the weathering on the upper wings (undoubtedly invisible in the photos in this article) and I wish I knew how I’d done it so I could replicate it. No doubt the newer Eduard Fw190 is an easier build, but if you’ve got one of these knocking about in the stash, build it!


Year bought: 2010 (The Aviation Hobby Shop, London)
Year built: 2023 (New Addington, Croydon)
Back to home.
