with Wolfpack resin seats
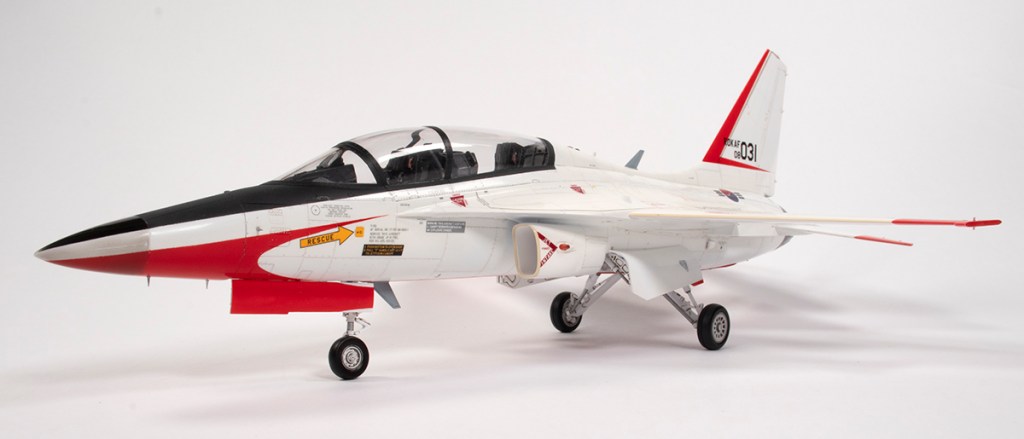
Republic of Korea Air Force, South Korea 2015
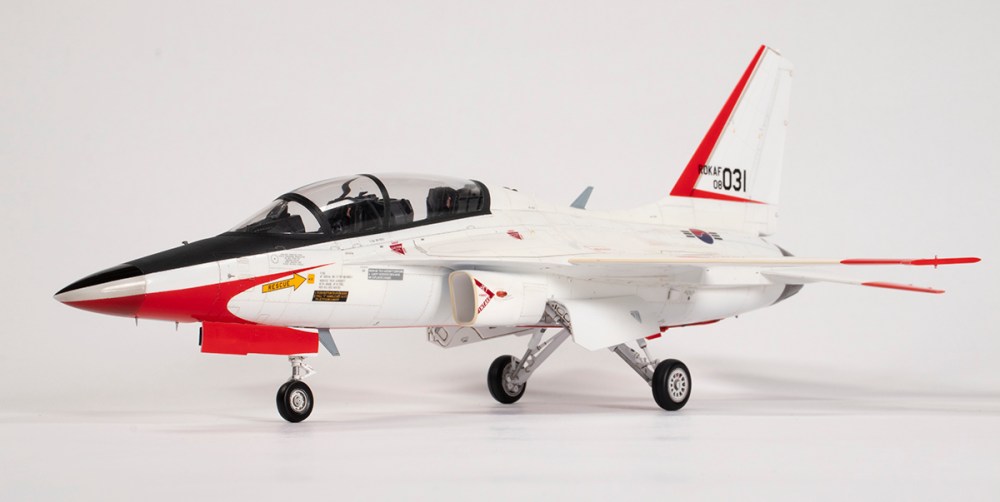
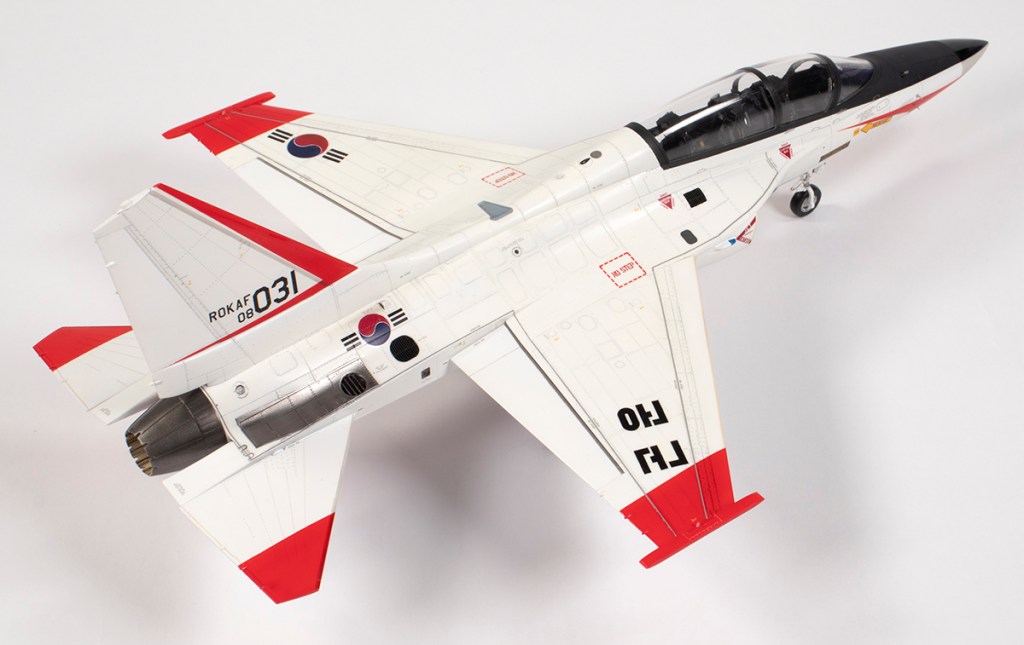
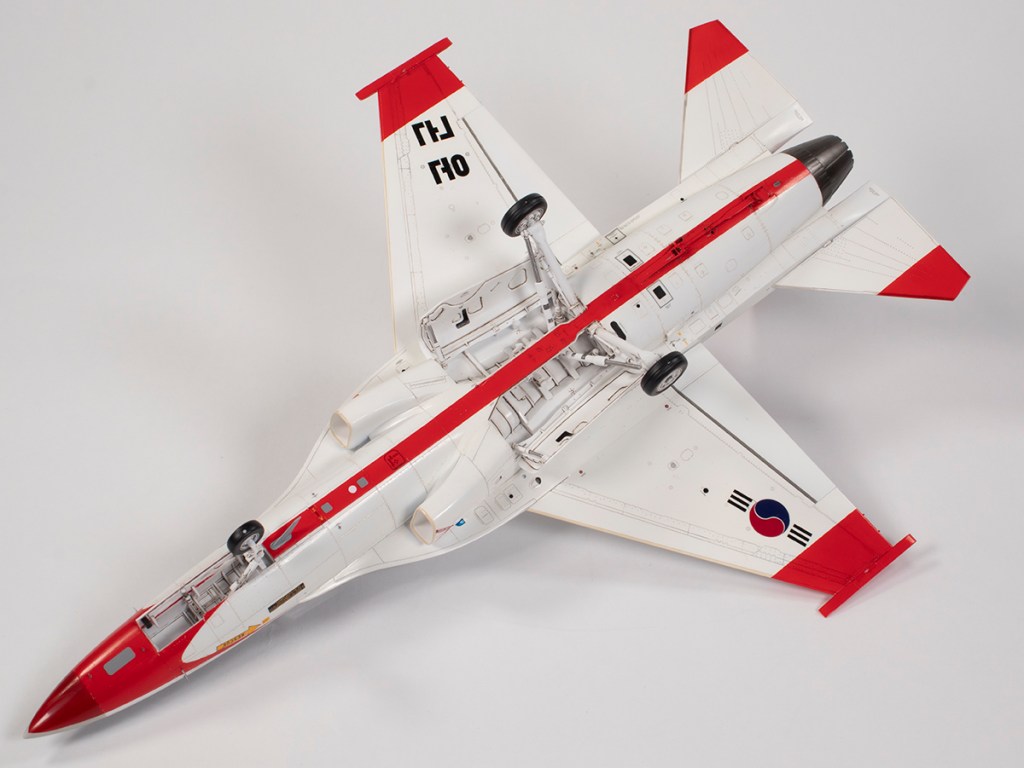
Number Four in my little ‘F-16 and children’ series is this kit from Academy of the Korean Aerospace Industries T-50 Golden Eagle supersonic trainer. Designed in cooperation with Lockheed Martin, its Fighting Falcon heritage is obvious from the wings, tail surfaces and undercarriage, but it departs in some interesting areas, such as the twin intakes.
This is a much better kit than it has any right to be. The subject is, after all, a relatively niche interest aircraft that in 2011, when it was released, had not seen widespread use. Clearly Academy wanted to do a good job for the home crowd, rather like Hasegawa did for the comparable and equally obscure Kawasaki T-4.
It’s moulded in white, which is a pain, in soft plastic and with fine and comprehensive recessed surface detail. There is a slight texture to the parts, sadly not uncommon these days in modern kits, which you would not find in a top quality kit from the 1990s. In my opinion, this is one of the few areas in modelling that has seen a regression over the last couple of decades, but it’s a small price to pay for advances elsewhere.
Such advances are evident here. The slide moulding is done very well and the surface detail nicely reproduced over the entire kit. The parts are numerous and finely moulded; the cockpit is particularly complete and the undercarriage is nice and busy, although still rather simplified compared to the real thing. A dry fit of the parts is very encouraging. Add decals printed by Cartograf, and the overall package is surprisingly alluring.

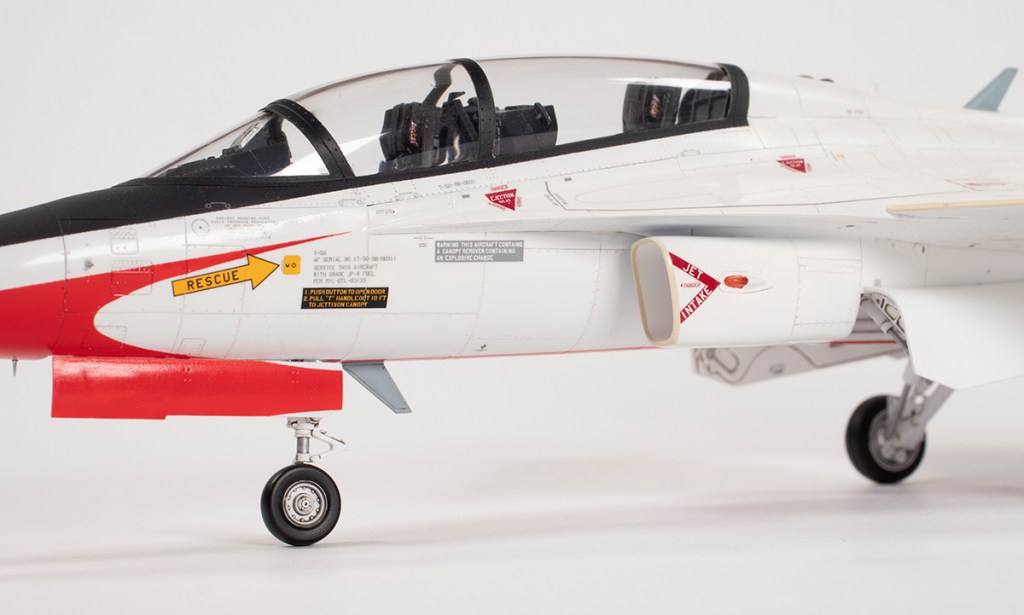
The only concession to aftermarket I made was to get some Wolfpack resin seats. This was less for the detail and more for the fact I hate making seat belts. They are adequate for this purpose, but far from a necessary addition. I found the cockpit to be one of the most complete out of the box I’ve ever seen, including proper separate throttle controls and extensive internal canopy details. The only improvements would have been for some better instrument panel decals and properly detailed upper instrument panels. (These are shown as such in the instructions but the plastic is blank.) As is my wont, I did a very cursory job of the cockpit so I could get it out of the way and onto the bit I like most: sticking the big parts together and sorting the seams out.


Yes, you read that correctly. My favourite part of modelling is the bodywork: removing the seams. I used to hate it. In fact, I believed it was impossible. I kept reading in magazines about how a modeller had eliminated the seams, yet I could still see them on the finished model. My sense of disillusionment only increased when I started going to model shows. Was it really possible to actually remove a seam?
Once I realised that the answer to this question was ‘yes’, and that for me I could do it easily with super glue, seam work rapidly became the core of my modelling process. I am a firm believer that however good the fit of a kit, the seams will always need some work. It’s taken me a couple of decades, but I’ve now reached a point where I am satisfied enough with my seam removal techniques.
In addition to super glue, my enjoyment also stems from finally getting the right tools. The secret, in my opinion, is not only in the filling material, but also in the abrasives. After trying most of the products on the market, I have settled on a large collection of Infini sanding products I’ve amassed: sanding sticks, sponge sticks, sponge sheets, elastic sanding films and adhesive-backed sanding sheets stuck to Ultra Flat Sanders. I cannot recommend these enough for their consistency in grit size and longevity.
My typical work flow for dealing with a joint starts with the glue. Since I find cements that use a chemical bond, such as Tamiya Extra Thin, often leave an unstable joint liable to shrink over time, I eliminate that problem by using a thick super glue. The downside is there’s no adjustment time; the upside is the joint sets quickly, can be worked on in minutes, and will not produce any of the dreaded ghost seams.
Once the seam is glued, I will most likely use more super glue along its length. For this model, I experimented with a new product to me: VMS’ CA Filler Powder. I’ve no idea what this is made from, nor what its long term stability will be, but you mix it with super glue to form a paste that can be applied with more accuracy than neat CA. I found it made the super glue a bit easier to sand and a lot easier to scribe – these are the two main disadvantages of using CA as a filler. I rarely use accelerator.
After an indeterminate period of time, stretching from a few minutes to several days (depending on when I can next get to the model), I’ll set to sanding out the super glue using a variety of abrasives. Each of the products mentioned earlier have their strengths and weaknesses. My latest acquisition – the elastic sanding films – are particularly nice as they wrap around my finger and give me a very intimate contact with the surface I’m sanding. The important thing is to start coarse (usually 400 or 600 grit) and work up through each grit (800, 1000, 1500…) to something like 2500. It’s worth noting that grits are rarely comparable between different manufacturers (or even between product ranges from the same brand), which is why I like to confine myself to just one for a given joint. After a polish with the 4000 buffer, you should have a very smooth and scratch-free surface.
Of course, you also need to monitor your progress as you go. I have two main tools for this: light, and a needle. The light needs to be bright and close. I hold the seam up to the light at a very acute angle. Any surface imperfections will become visible as shadows, and these become more obvious as you go to higher grits. The needle is used for checking these shadows. I run it, with no pressure at all, across the joint. If it catches or deviates it means more work needs to be done. It sounds a lot of work, and it is, but I’m happy with the results and it means I do not need to prime for the purpose of checking seams.


Back to the T-50. The engineering of the kit is relatively complex and the fuselage comes in three main sections. Within these, the heart of the model is the main undercarriage bay/rear intake section. Get this right and everything else should follow. I did not get it right and it caused me no end of trouble. I still do not know if this was my fault or the kit’s.
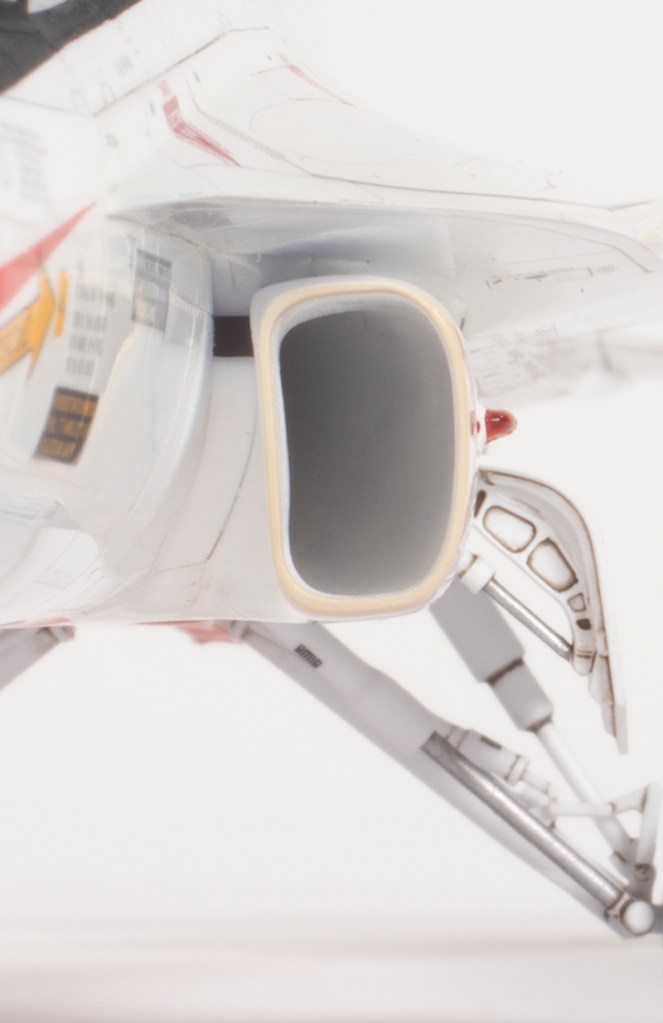
The problem for me was that I could not get the main bay to seat fully down into the lower fuselage half. I didn’t think much of it at the time, but as the build continued it became apparent that this was a critical mistake. The first sign of trouble was that the intake trunking protruded too far forward from the lower fuselage, meaning the intakes wouldn’t fit. Once I’d fixed this with some gentle sanding, it then transpired that the intake trunking did not line up with the intakes.


Now, I’m all for ignoring stuff that doesn’t matter that much, but I have become increasingly fussy when it comes to intake interiors. I had hoped that after making three F-16-style intakes, those on the T-50 would be easier, but I was mistaken. Academy supply full intake trunking all the way back to the engine turbine face (a part that is invisible on the finished model). I’d already eliminated the longitudinal seams along the front and rear sections of the intake trunks, but the problem was the front and rear sections did not match up. At all. My solution was to force the rear section (that part attached to the main undercarriage bay) to meet with the front intake sections. This worked, until I realised that the soft plastic had fractured in several places on the lower fuselage ahead of the main bay. Damn.

Eventually I worked it all out with more of the CA/powder mix on both the inside and the outside of the intakes. It took forever to get the insides even close to smooth (and they were not perfect when I was done), and my usual method of grabbing a small piece of sanding sponge in reverse action tweezers was hampered by the intakes being both small and curvy.

This was all made worse when during clean up, the panel across the length of the main landing gear bay (part A35) tore away from where it was mounted because the main bay had not seated properly. This necessitated some ‘negative modelling’ (a great phrase coined, I believe, by David Knights from the Plastic Model Mojo podcast), which is where things have gone backwards and you’re modelling just to get back to where you were. Again, CA and powder were the solution.
TL;DR (as they say on the internet): fit the main undercarriage bay properly (i.e. step 3 in the instructions) and save yourself a world of pain.


In general, I found the fit to be highly variable. Some parts, like the tail sections and nose, fitted amazingly well. Others, like the LERX panels under the front fuselage, had some horrible gaps that required filling. The latter were extremely difficult to access and were dealt with by using a lot of Milliput followed by more CA and powder. In order to prove the rule that I should only join parts with super glue in order to avoid ghost seams, I did use Tamiya Extra Thin to stick the upper and lower front fuselage halves together. This was because I thought the joint was a panel line. Turns out, it isn’t, and I proceeded to clean the seam up. A week later I had a ghost seam: should have used the CA! Some brushed on Mr Base White 1000 functioned as an excellent filler and was gently sanded out using a 2000 grit sanding stick.
KAI make this aircraft in trainer and armed versions, and Academy have catered for this by providing optional parts for the gun. I obviously needed the blank insert, and this fitted moderately well. Usually, I would have left this well alone, but with my new CA and powder combination, I felt emboldened to see if I could make the panel seamless. As is often the case with panel inserts, the part I had attached sat slightly lower than the surrounding fuselage. The hard bit would be rescribing the irregular shape of the panel edge.

Eventually I hit upon the idea of using the spare gun panel. I traced around this to make a template using thin plastic card. I then filled the panel completely with the super glue and powder mix, and sanded it flush. I stuck my template in place using a couple of tiny dots of super glue, and scribed round it with a pin. With the template popped off and the glue dots polished away, I had a nice flush panel with a neatly scribed edge. If you haven’t guessed it yet: I really like this super glue/powder combo.

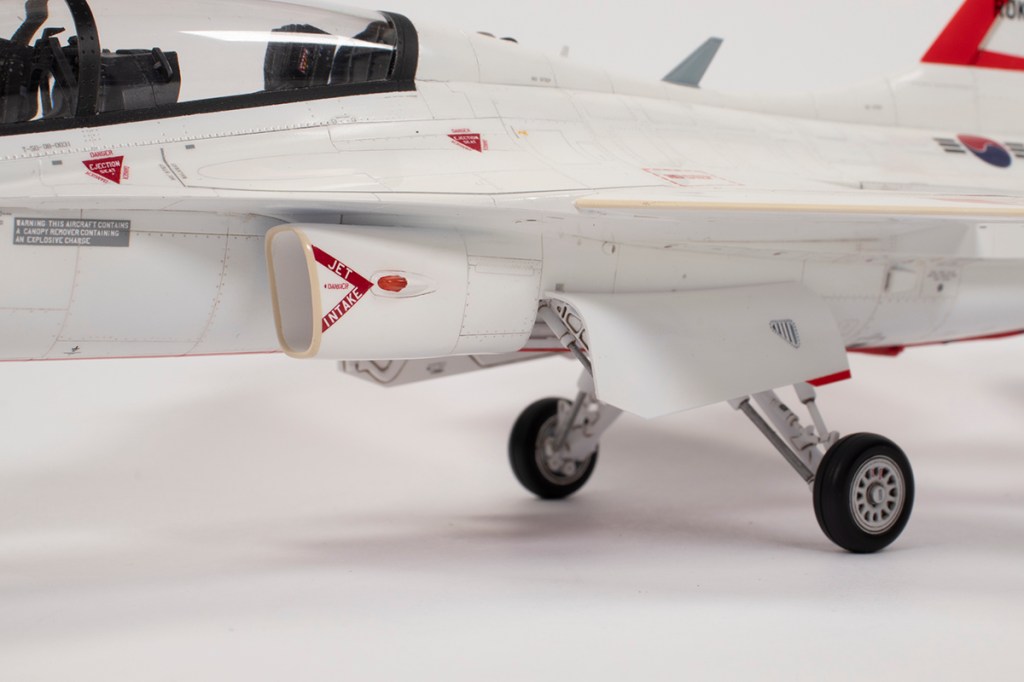
The area around the intakes has many deep recesses and ideally all of this would have been painted prior to assembly. The poor fit of the LERX panels precluded this and an awful lot of sanding work was necessary around all the joints where the front and rear fuselages come together. Infini PE sanders were invaluable for accessing the deep nooks and crannies where seams had to be removed.


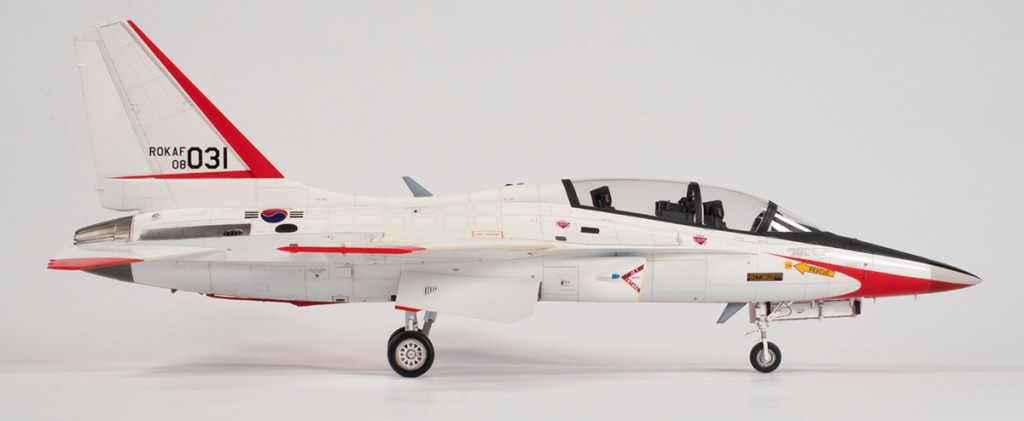
Academy mould the main canopy with its correct omega cross section and thus there is a mould seam to clean up along its length. This is straightforward to remove. I like to start with the finest grit I can get away with, which in this case was a 1000 grit Infini sanding stick. I used this to grind away the seam until it was gone, and then polished it using 2000, 3000, 5000 and 7000 grit sticks, all used wet and applying gentle pressure. Once this was done I moved to Tamiya polishing compounds. I’ve taken to applying these using cloth buffing wheels chucked in my Proxxon Micromot, which is highly effective but incredibly messy as polishing compound is flung from the wheel. By working my way up through the Coarse, Fine and Finish compounds I ended up with a sparking and defect-free canopy.


The main canopy fitted quite well once I had thinned down the rear bulkhead significantly. At the front, the windscreen was another matter and I had to spend quite some time hacking away at the inside of the front cockpit coaming to get it to fit properly and allow the windscreen to fit over the top. Since they would be largely invisible, I made life simpler for myself by not installing the interior canopy rails.

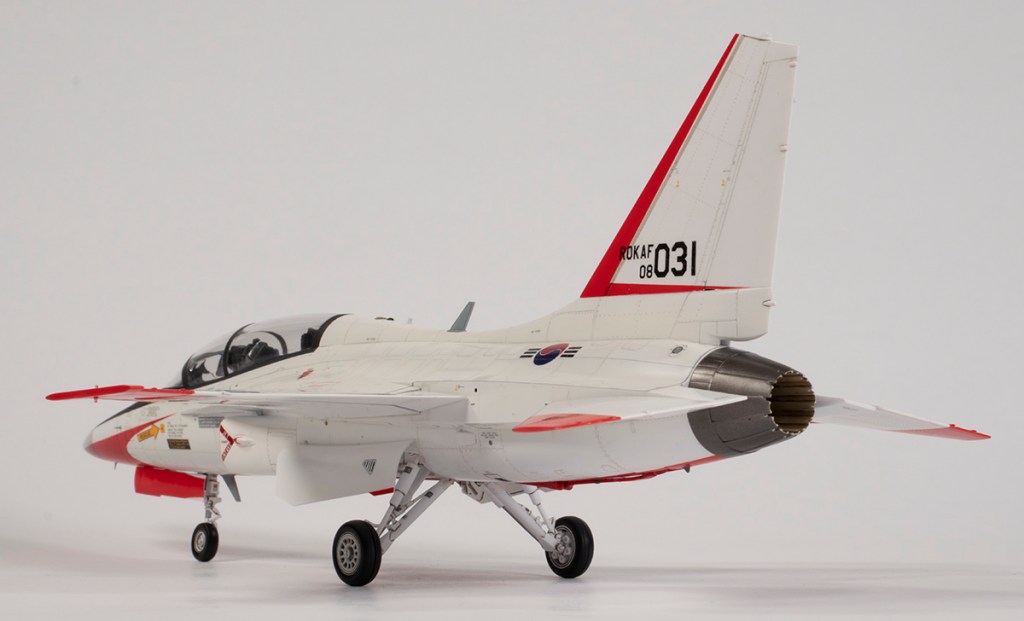
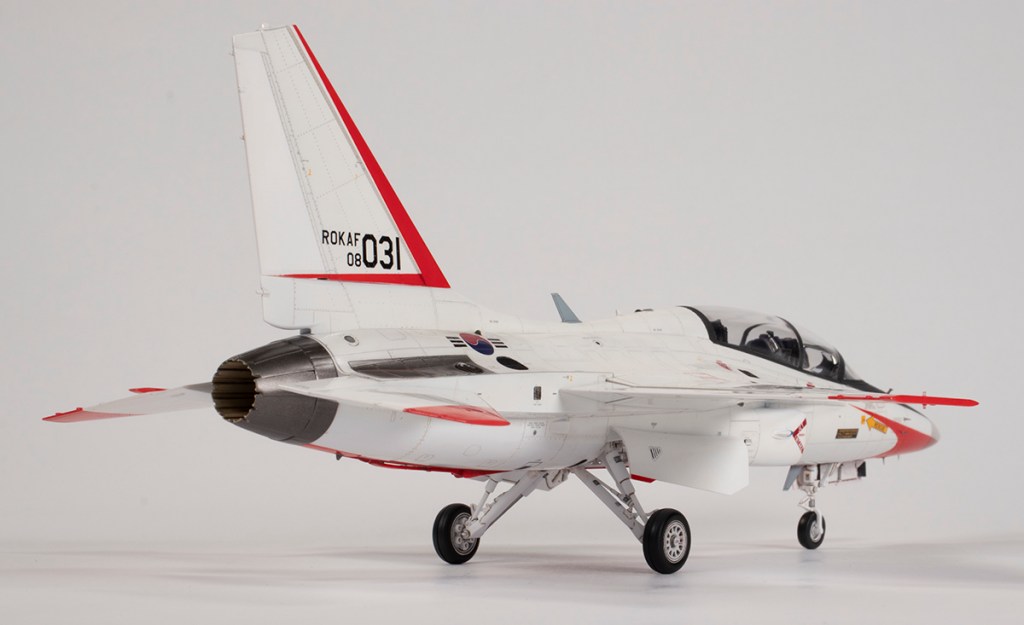
I left off the flaps for painting as I wished to pose them deflected, as is common in photos of the real thing. In the end, they fitted very poorly when deflected, and so I added them in the neutral position. I also left off the tail and exhaust as they fitted very well and could be added later. Having the tail surfaces separate would make the polishing I intended to do much easier. The navigation lights on the intake sides did not fit very well into their recesses and I thinned the bases down using the flat sander. This was difficult as the parts are small and there’s not much to hold on to. The lights themselves were masked using very fine strips of Tamiya tape filled in with Maskol. They look clunky on the finished model and this is one of the areas I am least happy with.
There is meant to be a small blade antenna on the spine, as shown in the painting instructions. This wasn’t on my kit; either it was sheared off at some point, or Academy failed to mould it correctly. I replaced it with a spare from a MiG-21 kit.


It then came time to think about the finish. This was going to be tough, because the aircraft is white and generally very clean. The main conundrum is what do with the recessed surface detail? A wash would most likely be overpowering, but doing nothing never looks good in my opinion, especially close up. I decided to do something new, and ‘pre-wash’ the surface detail. I’m sure people have done this before, but it was new to me.
First, several thin coats of Mr Finishing Surfacer 1500 were airbrushed over the entire airframe. On top of this I applied a wash made from mixing Tamiya black and grey panel line washes. These are dense, enamel washes that dry quickly and hard. My plan was to then lightly sand the entire airframe with 2500 grit sanding sponges and film, which would perform the dual functions of both removing the excess wash and smoothing the primer for the subsequent highly-thinned coats of white. This worked surprisingly well.


The final white finish is a mixture of layers of Mr Color 1 and 316, the latter being warmer in tone. I thinned this about 80% with Mr Rapid Thinner (so I could spray more coats more rapidly) and set about toning down the wash. Knowing when to stop was a challenge, and I’m not sure I got it right, but when the recessed detail was only just distinguishable from the surrounding panels, I stopped. Overall, I think this was a pretty effective way of subtly highlighting the detail, but you’ll have to be the final judge!

Having spent ages looking at photos of real T-50s online, the subtleties of the finish became obvious. It looks a lot simpler than it is. The anti-glare panel was masked with the aid of a template made from a Silhouette cutter and airbrushed with a mix of MRP Black, Traffic Grey and Insignia Blue in an 8:1:1 ratio. This allowed me to distinguish it from the nose cone, which was simply black. The red is a hard shade to pin down, as it changes so much from photo to photo, but in the end I settled on a 75/25 mix of Mr Color 3 Red and 59 Orange. This was also masked with assistance from a template scanned from the decal sheet and cut from Tamiya masking sheet using the Silhouette.


I had actually tried to paint the red on the nose cone in pure red, since it should be a lot darker than the rest of the red trim. This failed, and so I decided to just mask the nose off and spray it with Mr Hobby H95 Smoke Grey. I was much happier with the result.
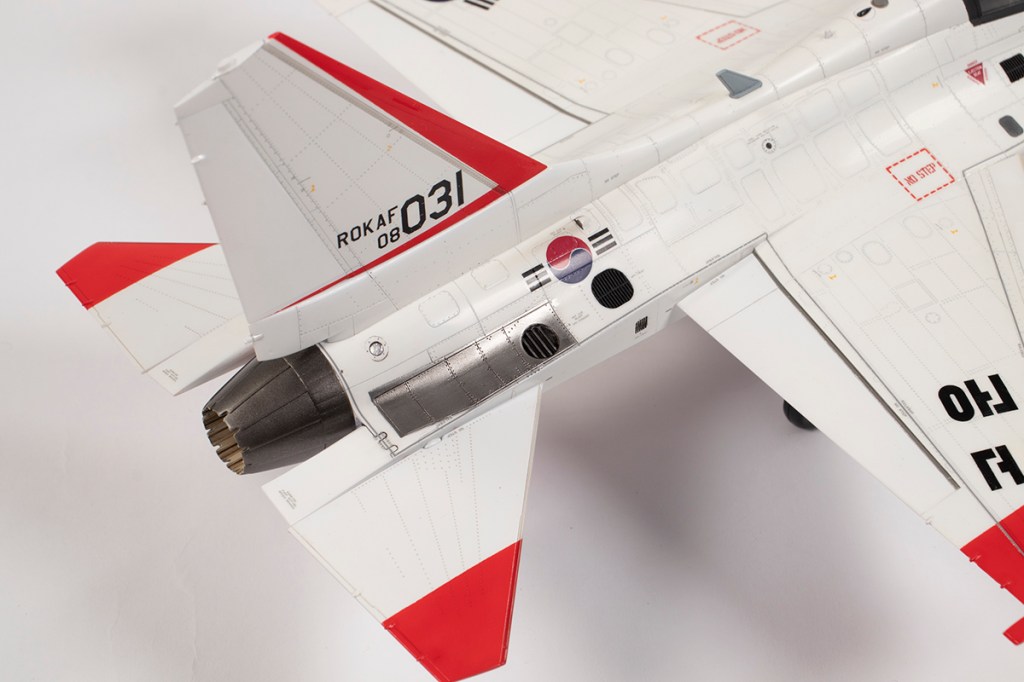
Other subtleties kept cropping up. The leading edge of the intakes and wings were not white, although exactly what colour they are never became truly apparent. Photos taken from further away made them look silver/grey; those close up much more cream. I used a mix of Mr Color Off White and Sail. The leading edge of the tailplanes also appeared to be darker, as did the leading edge of the flaps. I went with more Smoke Grey for the former, and Mr Color 317 for the latter (which is what the aerials were also all painted with). The various grilles all had to be painted black, and the metallic panel near the tail was my first go with Mr Color Super Metallic 2 paints, which worked pretty well.

Eventually, the paint was essentially done, and I embarked on the next stage of the plan: getting a subdued gloss finish. I did not want a high gloss, and from previous experience had discovered that a gloss varnish sanded down with 2500 grit sponge and then buffed with a 4000 grit buffer produced a very smooth, reflective but not overly glossy surface.
This process was started with some layers of Tamiya X-22, upon which I applied the decals. This went fine; what happened next didn’t. Since I had already highlighted the surface detail, I didn’t care if I filled it in with clear. In fact, it would be better if it was all filled in. So I loaded my Iwata RG-3 up with some quite thick Mr Color GX100 Clear Gloss and sprayed it on nice and heavy. 24 hours later I had a very glossy airframe and some very wrinkled decals, although fortunately only a few. In an effort to avoid the same on the underside, I went with KColors SW100, which is a water-based acrylic gloss.
Once everything was good and dry, I set to with wet 2500 grit sponge and film. The GX100 sanded beautifully; the SW100 less so, and some of the recessed detail got clogged with the residue. This proved remarkably difficult to remove. I’ve learned two important lessons: GX100 must be applied with care, and SW100 is not the best to polish.
However, once I’d used the buffer, I was generally happy with the overall effect. It’s always difficult to sand around some of the protruding detail, and I got a bit lazy in some areas, but the result is super-smooth for the most part, without being too shiny.
Final construction was a bit of an ordeal as the undercarriage is not engineered terribly well and the wheels flop around all over the place, and so I ended up with a wonky nose gear leg and some slightly misaligned wheels. The 6 pitots and AOA sensors around the nose are tiny and jolly difficult to install neatly.
The final result is pleasing enough to my eye from a normal viewing distance. Despite the various challenges, I actually had a lot of fun making the kit, aside from the interminable sanding of the intakes. I tried new things, and learnt new things, which hopefully will mean the next project will be even better.


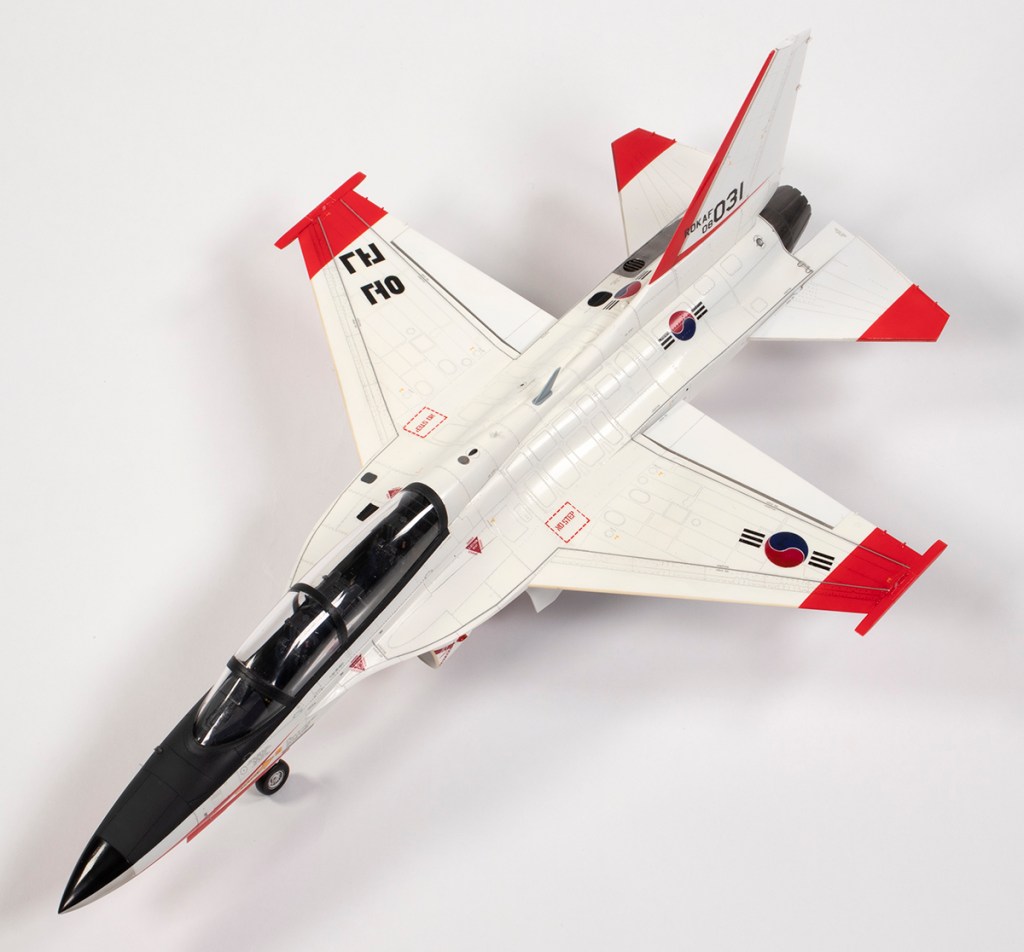
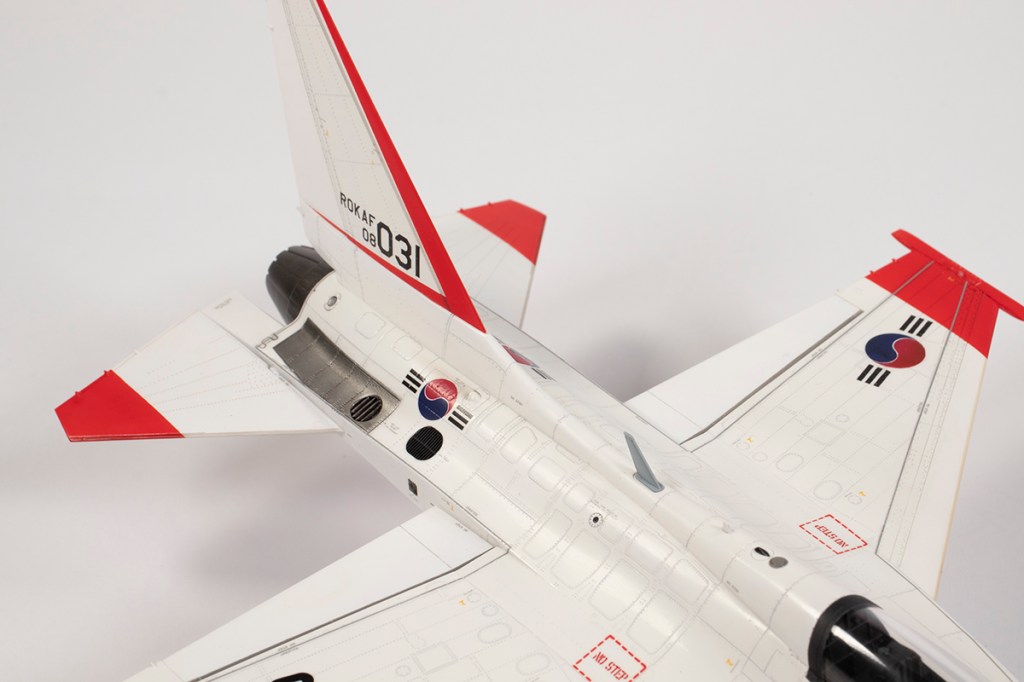
(With apologies to any Korean readers out there. I misapplied the text on the upper wing. I fixed some of it, but it’s still not quite right!)


Year bought: 2012 (老麦模型 Laomai Model Shop, Zhengzhou, China)
Year built: 2021 (New Addington, Croydon)
Back to home.
